In Entire Operations, a user ID can be used to enter the system. Several users can log on to Entire Operations with the same user ID and password at the same time. For reasons of data security and in order to trace data modifications, however, each user usually has a personal user ID and password.
This document covers the following topics
 To list all functions available for the User metanode
In the object workspace, select the User metanode and open the context menu.
The following functions are available:
| Function | Shortcut | Description |
|---|---|---|
| List | F8 | See Listing Users. |
| New | CTRL+N | See Viewing, Adding and Modifying a User. |
| Refresh | F5 | Refresh users: see Refreshing Object Lists in the User's Guide. |
| Filter | F3 | Selection criteria to list users: see Filtering Objects in the User's Guide. |
| Export | --- | Open the Export Objects window to export users: see Exporting Objects in the Import/Export Functions documentation. |
| Set Drag And Drop Function | --- | See Drag & Drop in the User's Guide. |
 To list all functions available for a User instance
Select a User instance and open the context menu.
The following functions are available:
| Function | Shortcut | Description |
|---|---|---|
| Open | CTRL+O | See Viewing, Adding and Modifying a User. |
| Display | CTRL+D | Display user information: see Viewing, Adding and Modifying a User. |
| Delete | DEL | See Deleting a User. |
| Browse Log | --- | See Displaying Logged Information in the User's Guide. |
| Export | --- | Open the Export Objects window to export a user: see Exporting Objects in the Import/Export Functions documentation. |
| Add to Workplan | --- | See Add to Workplan in the User's Guide. |
| Set Drag And Drop Function | --- | See Drag & Drop in the User's Guide. |
 To list all users
In the object workspace, select the metanode and choose List from the context menu, or press F8.
A User List window similar to the example below opens:
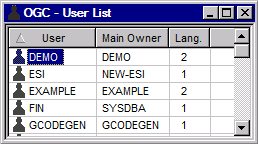
The window lists all user IDs available in your Entire
Operations environment and their associated owners. It also indicates the
language under which Entire Operations runs (2 for German,
1 for English).
 To view a user definition
In the object workspace, select a User instance and choose from the context menu, or press CTRL+D.
A Display User window similar to the Maintenance User window opens where you can view all definitions and profile settings of the user.
The tabbed pages available on the window are explained in the sections referenced below:
 To modify a user
In the object workspace, select a User instance and choose from the context menu, or press CTRL+O.
A Maintenance User window similar to the example below opens:
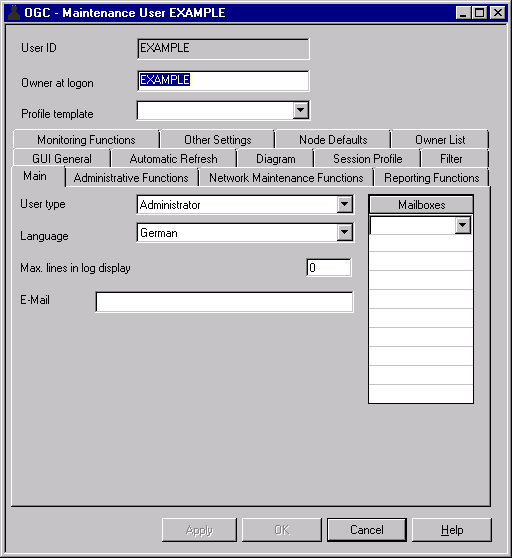
The definition of the selected user is shown.
Each tab represents an area of Entire Operations components that are defined for a user.
The tabbed pages available on the window are explained in the sections referenced below:
Change the user definition as required.
When you are finished, choose to save the changes.
In the object workspace, select the metanode and choose from the context menu, or press CTRL+N.
A Create new User window similar to the Maintenance User window opens.
The tabbed pages available on the window are explained in the sections referenced below:
Add the required information and profile settings in the same way as when modifying a user.
When you are finished, choose to save the user definition and profile settings.
You define a user profile to Entire Operations and set main user defaults by using the fields in the upper half of the Maintenance/Create new User window and on the Main page.
All other pages of the Maintenance/Create new User window are used to define user privileges for distinct maintenance functions and manage individual preferences for default system settings.
User profiles can be modified individually at any time.
Note:
We recommend that a user with a modified profile logs off from
Entire Operations after the changes are made and logs on again to refresh the
session. This guarantees that all profile changes are in effect.
| Field | Description | |
|---|---|---|
| User ID | Entire Operations user
ID.
This is the user ID with which the user should log on to Entire Operations. See also the sections Entire Operations User IDs and Operating System User IDs in the User's Guide. |
|
| Owner at Logon | A job network belongs to
an owner.
Users linked to that owner are allowed to perform any activity on that network. This includes the granting of some job network functions to other users. The owner at logon must always be defined. See also the section Owner at Logon in the User's Guide. You can link additional owners to a user as described in Adding and Removing User/Owner Links and Owners. Note: |
|
| Profile
Template
(optional) |
User ID of a predefined
template user.
The selection of an existing user sets all the attributes to the value of the corresponding attributes in the referenced profile. The predefined templates change permission values. The field Profile template is reset if an attribute of the user maintenance window is manually modified. Default templates: |
|
| General User | Use default general user profile. | |
| Operator | Use default operator profile. | |
| Administrator | Use default administrator profile. | |
If you
enter a value in the selection box, you can use the following abbreviations:
G (General User), O
(Operator) or A
(Administrator).
The user's settings can be modified individually later. |
||
| User Type | Determine the tasks the
user is allowed to do.
The value entered here sets certain authorization defaults in the user profile. Possible selection options: |
|
| General User | User with general rights.
The general user can only view and maintain the Entire Operations objects allowed by the administrator. In addition, the user can view and maintain the objects allowed to the owners and users associated with the user. |
|
| Operator | User with operator rights.
The operator can view and maintain all Entire Operations objects and perform all system maintenance functions allowed by the administrator. |
|
| Administrator | User with administrator rights.
The administrator can view and maintain any Entire Operations objects and perform any system maintenance functions. |
|
|
With these options, the profile settings of a user are predefined. |
||
| Language | Determine the user
language under which Entire Operations is to run.
Possible selection options: |
|
| English | English. | |
| German | German. | |
| Max. Lines in Log Display | Determine the maximum
number of lines shown in the log display.
The maximum number can be overridden in the Log Display Selection window (see Log Information in the User's Guide). A value of zero (0) or an empty field means that there is no line
limit.
|
|
| E-mail address used for
notifications sent to the user by Entire Operations.
The commercial at sign ( |
||
| Mailboxes | Mailbox(es) associated
with the user.
User is notified of any pending requests linked to these mailboxes. You can specify up to 10 mailboxes per user. |
|
Defining a user profile consists of authorizing the user for a certain level of activity in the various system facilities.
User authorizations fall into the following groups:
- Authorization Options
The user privileges that can be granted for a function depend on the user type defined for the user: general user (type
G), operator (typeO) and system administrator (typeA).You can select one of the following authorization options for each function listed in the window (choose OK to save modifications):
 To delete a user definition and profile
In the object workspace, select the user you want to delete from the User metanode.
Open the context menu and choose Delete or press DELETE.
A confirmation window opens.
Choose to confirm the deletion or to cancel the action.
Note:
Deleting a user does not necessarily also delete the owner
specified as Owner
at Logon for this user. You can use the OW-MB--P utility
(administrator rights required) to make sure that an owner is entirely removed
from the environment: see
Mass Change
of the Owner and Owner Deletion in the User's
Guide.
In addition to the Owner at Logon who must be defined in a user profile, you can link a user to other owners and remove existing links or delete owners.
If other owners are defined, the user can switch to one of them during the session.
Notes:
Related Topic:
Using Owners in the User's Guide.
 To link a user to an additional owner
Open the Owner List page of the Maintenance/Create new User window shown in the following example:
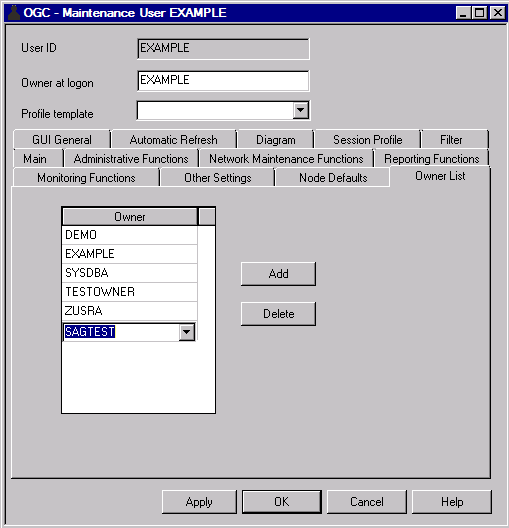
The list box shows all owners (if already specified) linked to the user.
Choose Add and enter the name of an
additional owner (here: SAGTEST) or select an owner from the
drop-down list box.
Choose OK to confirm your action.
 To delete an owner link or an owner
Replace the name in the Owner at logon field of the Maintenance/Create new User window.
Or:
Open the Owner List page of
the Maintenance/Create new User window.
The list box shows all owners linked to the user.
Select the owner you want to delete and choose Delete and then OK to confirm the deletion.
The link to the owner is removed for the selected user, or the owner is deleted if not associated with any other users.
The following applies when deleting an owner from a list or maintenance window:
The owner cannot be deleted if it is still linked to the following Entire Operations objects: calendar, network, symbol table and/or event.
Furthermore, an owner cannot be deleted if it is specified as the main owner (Owner at Logon) for any user. You have to replace the name before you can delete the owner.
If an owner is deleted, all links to the user are removed.
Deleting an owner from a list or window does not necessarily delete all references associated with this user. The owner can remain unused in your environment. Use the OW-MB--P utility (administrator rights required) to make sure that an owner is entirely removed: see Mass Change of the Owner and Owner Deletion in the section Entire Operations Utilities.
If you open the Administrative Functions page of the Maintenance/Create new User window, you can authorize a user (see Authorization Options) to perform the administration described in the following table.
The table indicates the default setting that applies to each user type: A is system administrator, O is operator and G is general user.
| Function | Description | Option | Default for User Type | ||
|---|---|---|---|---|---|
| A | O | G | |||
| User Definition | Specifies access rights in the user
maintenance facility.
If read or no access permission is selected here, the List function and the expand tree functions only return information for this user. The Open function is enabled only for the objects owned by the user. A user with read or no access permission can only view non-security settings of his profile. See also the option Modify non-security settings. |
delete | no rights | no rights | |
| Auto Logon Definition | Specifies default node user IDs for automatic node logon. See also Defining Node Default User IDs. | not enabled | not enabled | not enabled | |
| Resource Master Maintenance | Specifies access rights in the master resource definition facility. | delete | delete | no rights | |
| Node Definition | Specifies access rights in the node maintenance facility. | delete | delete | no rights | |
| Defaults Definition | Specifies access rights in the Entire Operations defaults facility. | delete | no rights | no rights | |
| Mailbox Definition | Specifies access rights in the mailbox definition facility. | delete | delete | no rights | |
| Monitor Start/Shutdown | Authorizes the user to start or
shutdown the Entire Operations
Monitor manually and display Monitor status information, or to use
the corresponding STATUS
direct command (see the Direct Commands documentation).
|
enabled | enabled | not enabled | |
| Special Functions | Authorizes the user to perform special global, control and recovery functions. See the section Special Functions. | enabled | not enabled | not enabled | |
| Other Functions | Authorizes the user to access the global message code table and perform special functions. | enabled | not enabled | not enabled | |
| Import/Export | Authorizes the user to perform import/export functions. See also the Import/Export Functions documentation. | enabled | not enabled | not enabled | |
| Modify non-security settings | Authorizes the user to modify
non-security settings for the user's own user profile.
This option setting only applies to a General User or an Operator with read or no access permission selected for User definition.
|
not enabled |
enabled |
enabled |
|
If you open the Network Maintenance Functions page of the Maintenance/Create new User window, you can authorize a user (see Authorization Options) to perform the job and network maintenance functions on the master database described in the following table.
The table indicates the default setting that applies to each user type: A is system administrator, O is operator and G is general user.
| Function | Description | Option | Default for User Type | |||||
|---|---|---|---|---|---|---|---|---|
| A | O | G | ||||||
| Network Definition | Specifies access rights
in the network
maintenance facility (see the User's Guide).
The user for which delete is checked here, is also allowed to deactivate networks or jobs. |
delete | no rights | no rights | ||||
| Job Definition | Specifies access rights in the job maintenance facility (see the User's Guide). | delete | no rights | no rights | ||||
| Prerequisite Definition | Specifies access rights in the condition maintenance and resource specification at job level (see the User's Guide). | delete | no rights | no rights | ||||
| EOJ Checking + Action | Specifies access rights in the End-of-Job checking and actions facility (see the User's Guide). | delete | no rights | no rights | ||||
| JCL Definition | Specifies access rights to JCL definitions including editing. | delete | no rights | no rights | ||||
| Description Display | Specifies access rights to the text editor of the object description facility. | delete | no rights | no rights | ||||
| Symbol Tables | Specifies access rights in the symbol table maintenance facility (see the User's Guide). | delete | no rights | no rights | ||||
| Schedules | Specifies access rights in the schedule maintenance facility (see the User's Guide). | delete | no rights | no rights | ||||
| Calendars | Specifies access rights in the calendar maintenance facility (see the User's Guide). | delete | no rights | no rights | ||||
| Editor Autosave | If enabled, the editor feature AUTOSAVE ON is
active at the start of the editing session.
|
enabled | no rights | enabled | ||||
| Last Run Display | List of active jobs: | submitted or prompted | submitted | submitted | submitted | |||
| submitted |
Use the last submitted run as the default for the run number preselection (default). |
|||||||
| prompted |
Use the last prompted run as the default for the run number preselection. |
|||||||
If you open the Reporting Functions page of the Maintenance/Create new User window, you can authorize a user (see Authorization Options) to perform the report functions described in the following table.
The table indicates the default setting that applies to each user type: A is system administrator, O is operator and G is general user.
For detailed information on the reports mentioned in the table, see the section Reporting and Report Types in the User's Guide.
| Function | Description | Option | Default for User Type | ||
|---|---|---|---|---|---|
| A | O | G | |||
| Wildcards in Online Selections | Authorizes the user to use wildcards in selections for online reports (see Generating or Regenerating Online Reports in the User's Guide). | enabled | enabled | not enabled | |
| Log of Abended Jobs | Authorizes the user to display the Log - Abended Jobs and the Log - Jobs not started reports. | enabled | not enabled | enabled | |
| Log of Completed Jobs | Authorizes the user to display the Log - Terminated Jobs report. | enabled | not enabled | enabled | |
| Network Activation & Schedule | Authorizes the user to activate job networks, and display the Network Start Summary and Network Schedule Overview reports. | enabled | not enabled | enabled | |
| Network Description (short) | Authorizes the user to display the Network Description (short) report. | enabled | not enabled | enabled | |
| Network Description (detailed) | Authorizes the user to display the Network Description (detailed) report. | enabled | not enabled | enabled | |
| Schedule of Jobs | Authorizes the user to display the Schedule of Jobs report. | enabled | not enabled | enabled | |
| Job Flow | Authorizes the user to display the Job Flow of Network report. | enabled | not enabled | enabled | |
| Accounting Information | Authorizes the user to display Accounting Information report. | enabled | not enabled | enabled | |
| Symbol Printing after Prompting | Determines whether all symbols are saved as a file after prompting (see also Symbol Prompting during Network Activation in the User's Guide). | enabled | enabled | enabled | |
| Second Symbol List Format | Symbol names with more than 20 characters are truncated (enable checked) or completely displayed (enable not checked) on the screen. | enable | not enabled | not enabled | not enabled |
| Cross-References | Authorizes use of the
Cross-References
report function (see the User's Guide) and the
corresponding XREF
direct command (see the Direct Commands
documentation).
|
enabled | not enabled | enabled | |
| Bar Charts | Authorizes the user to generate bar charts as Network Start Overview, Network and Job Start Overview and Network Schedule Overview. | enable | enabled | enabled | not enabled |
| Monitor Accounting | Authorizes the user to generate Monitor Tasks and Functions Overview and Monitor Tasks and Exits Overview reports. | enable | not enabled | not enabled | not enabled |
If you open the Monitoring Functions page of the Maintenance/Create new User window, you can authorize a user (see Authorization Options) to perform the operations on jobs in the active database described in the following table.
The table indicates the default setting that applies to each user type: A is system administrator, O is operator and G is general user.
| Function | Description | Option | Default for User Type | |||
|---|---|---|---|---|---|---|
| A | O | G | ||||
| Active Jobs | Specifies access rights
for modifications
to active jobs (see the User's Guide).
The user for which delete is checked here, is also allowed to deactivate networks or jobs. |
delete | delete | delete | ||
| Show Mailbox Requests | Authorizes the user to
display and react on mailbox
messages (see the User's Guide), and use the
corresponding MAIL direct command (see the
Direct Commands documentation).
|
enabled | enabled | enabled | ||
| Active Prerequisite Definitions | Specifies access rights for active prerequisite definitions (see the User's Guide). | delete | delete | delete | ||
| Active EOJ Checking + Actions | Specifies access rights for End-of-Job checking and actions (see the User's Guide) for an active job. | delete | delete | delete | ||
| Active JCL Editing | Specifies access rights for editing JCL of an active job (see the User's Guide). | delete | delete | delete | ||
| Active Conditions | Specifies access right for active job conditions (see the User's Guide). | delete | delete | delete | ||
| Active Prerequisite Resources | Specifies access rights for active prerequisite resource definitions (see the User's Guide). | delete | delete | read | ||
| Resource Usage | Specifies access rights to resource usage lists and definitions (see the User's Guide). | delete | delete | read | ||
| Activate Network | Authorizes the user to
activate
networks manually (see the User's Guide).
If the user is allowed to activate networks, the user may also deactivate networks or jobs. |
enabled | enabled | enabled | ||
| Resubmit Job | Authorizes the user to use the resubmit function for an active job (see the User's Guide). | enabled | enabled | enabled | ||
| Hold/Release Job | Authorizes the user to put an active job on hold or release an active job (see the User's Guide). | enabled | enabled | enabled | ||
| Display Job SYSOUT | Authorizes the user to view job SYSOUT of a job run (see the User's Guide). | enabled | enabled | enabled | ||
| Cancel Job | Authorizes the user to cancel a running job (see the User's Guide). | enabled | enabled | enabled | ||
| Log Display | Authorizes the user to
view Entire Operations
logs (see the User's Guide) for owners
associated with this user ID.
Possible settings are: |
enable |
enabled for owner list | enabled for owner list | enabled for owner list | |
| enable | If enable is checked, the function is allowed. | |||||
| Owner list | Allow function for all owners
associated with this user ID.
(Applies to User Type G only.) |
|||||
| Owner | Allow function for the
Owner at Logon
only (see the User's Guide).
(Applies to User Type G only.) |
|||||
There are three groups of user attributes:
| Type | Defined Interface |
|---|---|
| User attributes relevant for the Entire Operations character interface and Entire Operations GUI Client. | Can be defined in both the Entire Operations character interface and Entire Operations GUI Client. |
| User attributes relevant for the Entire Operations character interface only. | Can be defined in the Entire Operations character interface only. |
| User attributes relevant for Entire Operations GUI Client only. | Can be defined in Entire Operations GUI Client only. |
The following tabbed pages of the Maintenance/Create new User window can be used to define GUI-specific attributes for a user:
 To specify general attributes
Open the tabbed page GUI General:
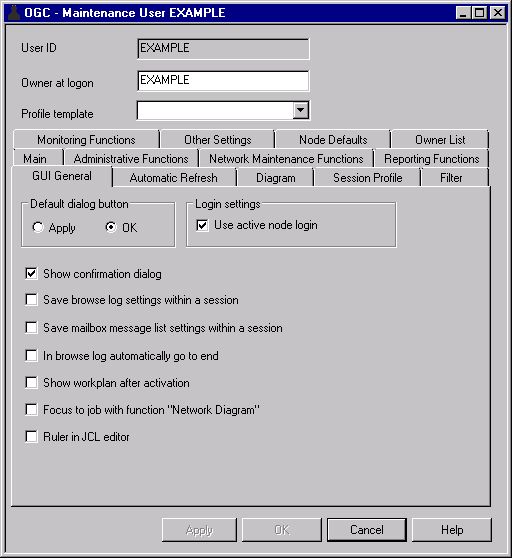
The option settings available are described in the following table:
| Option | Description |
|---|---|
| Specify whether
or (default) is
performed when you press ENTER.
Select either function. |
|
| Select this check box (default)
to use the active node logon each
time a logon is needed.
See also Logon Function in the User's Guide. |
|
| Select this check box (default)
if you want the confirmation dialog to appear when you modify but not save an
object.
Clear the check box to switch off the confirmation dialog. |
|
| Select this check box to save
the settings of the Browse Log function for later use
within the same session.
Default: Check box not selected. See also Displaying Logged Information - Browse Log Function in the User's Guide. |
|
| Select this check box to save
mailbox message list
settings for later use within the same session.
Default: Check box not selected. See also Show Messages in the User's Guide. |
|
| Select this check box if you
want to scroll automatically to the end of a log file displayed when the
Browse
Log window opens.
Default: Check box not selected. See also Displaying Logged Information - Browse Log Function in the User's Guide. |
|
| Select this check box to
display the workplan after
network activation.
Default: Check box not selected. See also Show Workplan in the User's Guide. |
|
| Select this check box to
position an opened network diagram to the job for which the Network
Diagram function is performed.
Default: Check box not selected. |
|
| Ruler in JCL editor | Select this check box to show
or hide the ruler displayed in the
editor
window (described in Using the Editor in the
User's Guide).
Default: Check box not selected. |
Choose to save your settings.
 To set refresh options for Entire Operations functions
Open the tabbed page Automatic Refresh:
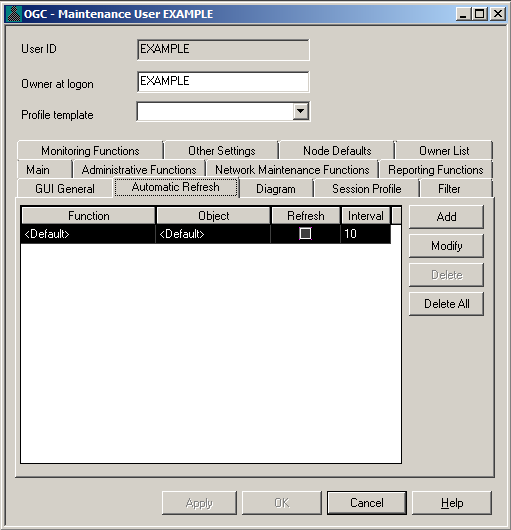
Choose Add.
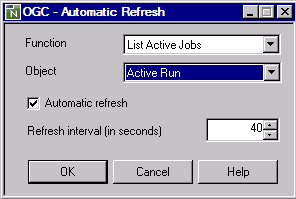
A window similar to the example below opens where you can select a function, an object and a refresh interval, and mark a check box to enable automatic refresh:
 To specify diagram attributes
Open the tabbed page Diagram:
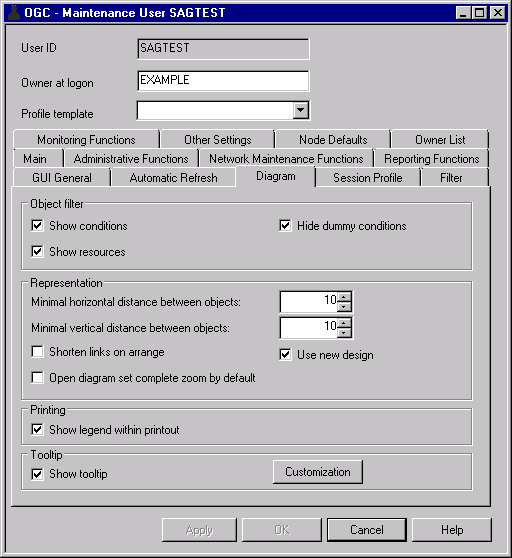
Here you can specify diagram attributes, use the Object filter for resources and conditions (hide/show these resources and conditions in the diagram), and modify diagram representation. If Show conditions is selected, you can, additionally, select Hide dummy conditions to specify whether to hide (default) dummy conditions in the diagram and show real conditions only.
If the option is selected, the diagram opens the diagram with complete zoom.
It is possible to define a tooltip for diagram objects. The tooltip can be switched on and off and the information displayed in the tooltip can be customized by choosing the button.
Choose to save your settings.
 To make a workplan persistent
Select the Session Profile tab to modify the Entire Operations GUI Client profile settings stored in the database.
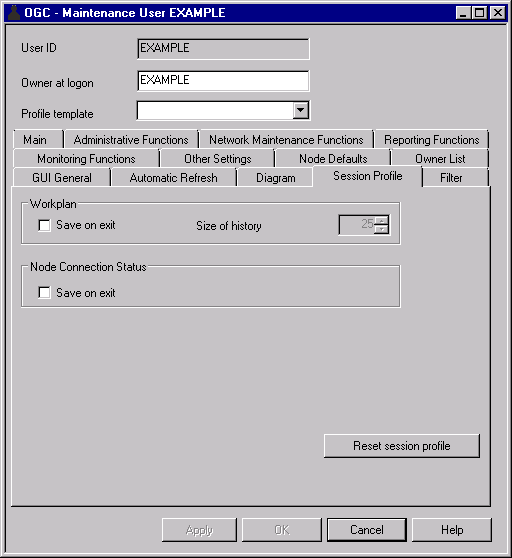
Select the save on exit check box next to Workplan to make the workplan persistent. If required, change the size of the workplan pool in the Size of history box.
Note:
For further information, see
Show
Workplan in the User's Guide.
 To make the node connection status persistent
Select the Session Profile tab to modify the Entire Operations GUI Client profile settings stored in the database.
Select the save on exit check box next to Node Connection Status to enable the status persistent connections.
Note:
For further information, see
Monitoring the
Node Connection Status in the User's
Guide.
You can set default filter criteria for active jobs, provide access rights for named filters, and specify objects to be filtered in a global filter.
For more information on filters, see Filtering Objects in the User's Guide.
 To specify default filter criteria
Open the tabbed page Filter:
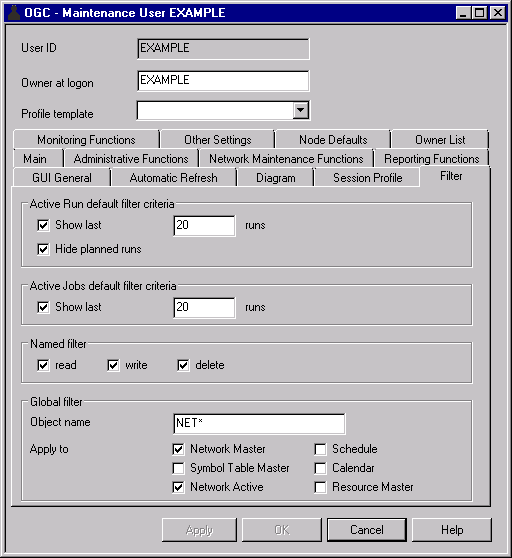
Set the required options explained in the following table:
| Field/Option | Description |
|---|---|
| Show last n runs | For Active
Run:
Show the last
For active jobs: Show the last
Note: |
| Hide planned runs | For Job Active/Active
Job:
Hide planned runs. |
| Named filter | Permissions for named filters.
Select the check box next to the access right (read, write and/or delete) to be granted to the user. |
| Object name | For a global filter only.
Specify the search criteria to be used for the objects selected in Apply to. For valid name ranges, see Specifying Filter Criteria in the User's Guide. The filter criteria applies to the objects of the user and its granted owners. |
| Apply to | For a global filter only.
Select the check box next to the type of objects to be filtered (for example, Network Master). |
When you are finished, choose OK to save your settings.
A global filter is in effect until removed from the user profile.
 To remove a global filter
Clear the Object name field on the Filter page and choose OK.
Or:
Remove all marks from the check boxes in the
Apply to section.
The global filter settings are removed for the user (and granted owners), and any named filters defined by the user are reactivated.
You can set default display options and sort orders for object lists on the Other Settings page of the Maintenance/Create new User window:
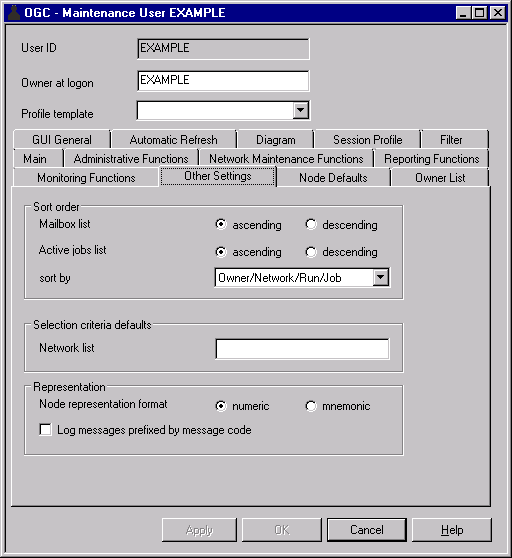
The fields contained on the page are explained in the following table:
| Field | Meaning | ||
|---|---|---|---|
| Mailbox List | Sort sequence for the mailbox list. | ||
| ascending | Sorted in ascending order. | ||
| descending | Sorted in descending order. | ||
| Active Jobs List | Sort sequence for listing active jobs (see Active Job Networks in the User's Guide). | ||
| ascending | Sorted in ascending order. | ||
| descending | Sorted in descending order. | ||
| sort by | Active jobs list sorted by: | ||
| Owner/Network/Run/Job | Sorted by owner/network/run/job. | ||
| Time | Sorted by timestamp. | ||
| Network List | Presets filter criteria for a network list displayed in the character user interface application: | ||
O |
Networks of owner. | ||
G |
Owner granted networks. | ||
A |
Active networks only. | ||
R |
With number of active runs. | ||
U |
User granted networks. | ||
| Node representation format | numeric | Nodes are displayed in numeric format (default). | |
| mnemonic | Nodes are displayed in mnemonic format. | ||
|
Note: |
|||
| Log messages prefixed by message code | Log display behavior. Possible button settings: | ||
| checked | Messages in the log
display are prefixed with their message code (if one exists), for example:
EOR2260 - Network activation
                                                  performed
. See also
See also the Message column in the example of a system log shown in the User's Guide. |
||
| unchecked | Messages in the log display are not prefixed with their message code (default). | ||
For each operating system server node a user is working with, you
can define a node default user ID per user. By default, the content of the
Natural system variable *USER (described in the
Natural System Variables documentation) is used for a node
logon.
You can define single or multiple node default user IDs for a user. Apart from these node/user definitions, a user can, of course, also use any other node user IDs that are not defined in the user profile.
This section describes how to define node default user IDs for a selected user. For a mass change to node/user definitions, you can use the NOPUNA-P utility described in Mass Update for User Access to Nodes in the User's Guide.
Operating System User IDs in the User's Guide
Mass Update for User Access to Nodes in the User's Guide
 To define a node default user ID for a user
In the Maintenance/Create new User window, open the tabbed page Node Defaults:
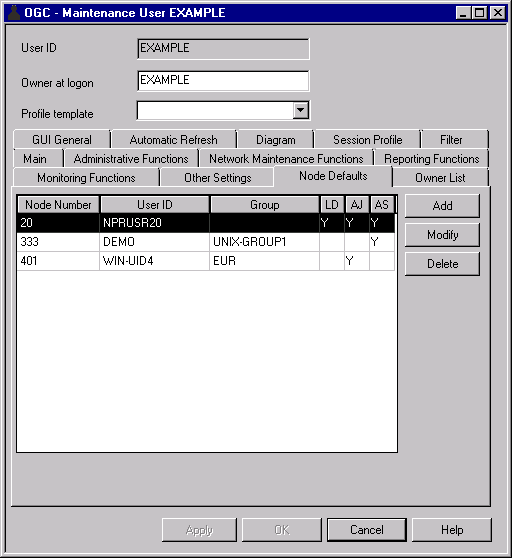
All node default user IDs defined for the selected user are displayed in the table.
(The table is empty if no node default user IDs have yet been defined for the selected user.)
The table columns are described in Fields and Columns: Node Default User IDs.
If you want to modify a user definition, select the required table row and choose Modify.
Or:
If you want to add a user definition, choose
Add.
A Node Defaults window similar to the example below opens:
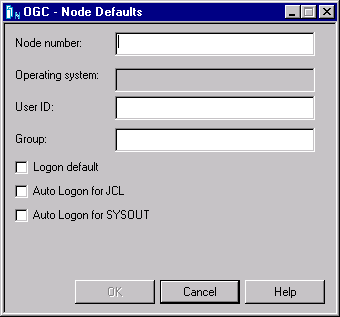
Add or replace the required values.
The input fields are described in Fields and Columns: Node Default User IDs.
Choose OK to save your entries.
The window closes and the node defaults definition is added to or updated on the Node Defaults page.
The columns on the Node Defaults page and the corresponding fields in the Node Defaults window are explained in the following table:
| Field/Column | Description | ||
|---|---|---|---|
| Node Number | Number defined for a node (see also Fields: Node Definition). | ||
| User ID | Operating system user ID to be used for the node. | ||
| Group | Name of a UNIX group or
Windows domain to be used for the node logon if defined for the respective UNIX
or Windows node (see also Default Group).
A group name is not evaluated for mainframe nodes. See also Operating System User ID, Group, Domain in the User's Guide. |
||
| Logon Default
(column LD) |
Only applies if several
node default user IDs are defined for a user and node.
Select this option for the node user ID to be used by default for a node logon. You can specify only one logon default per user and node. If no logon default is specified, the default user ID (if defined) of the node is used. See also Special Definitions for a Node (Mainframe) and Special Definitions for a Node (UNIX and Windows). If only one operating system user ID is defined for a user and node, the Logon Node dialog is preset to this user ID. Possible column entries: |
||
Y |
Use as the logon default. | ||
N
or blank |
Do not use as the logon default (default). | ||
| Auto Logon for JCL
(column AJ) |
(Administrator rights
required.)
Select this option to allow the specified user to automatically log on to the specified node for browsing JCL. Possible column entries: |
||
Y |
Enable automatic logon. | ||
N
or blank |
Do not enable automatic logon (default). | ||
| Auto Logon for SYSOUT
(column AS) |
(Administrator rights
required.)
Select this option to allow the specified user to automatically log on to the specified node for browsing SYSOUT. Possible column entries: |
||
Y |
Enable automatic logon. | ||
N
or blank |
Do not enable automatic logon (default). | ||
| Operating System | Information field/column containing the operating system returned for the specified node. | ||
 To delete a node default user IDs for a user
On the tabbed page Node Defaults, select the table row that contains the node definition you want to remove and choose
The node definition is removed from the table.