Activating a job network or job means preparing it for execution. On activation, the following is performed:
The definitions of jobs, networks, logical conditions, symbol tables etc. are copied to the Entire Operations active database and assigned a unique run number;
If necessary, symbol prompting is requested (see also Symbol Prompting during Network or Job Activation). However, symbol prompting is not performed for any subnetworks.
The global activation exit user exit is invoked, if defined in the Entire Operations defaults;
The JCL defined for jobs within the network is copied to the active JCL storage on the active database;
Variables (symbols) used in dynamically generated JCL are substituted by their current values. This does not apply to variables defined to be substituted at job submission time;
The JCL definitions of active job networks, respectively of active jobs, can differ from the JCL definitions in the master definition. To allow this, the corresponding symbol tables must contain certain reserved symbols on activation. See also Predefined Symbols in the section Symbol Table and Symbol Maintenance.
If you use pre-generated JCL, symbol replacement is performed at the time of JCL generation.
The Entire Operations Monitor recognizes the job network as active and checks time frames, input conditions and resources defined for the jobs. If all prerequisites for any jobs are fulfilled, these jobs are submitted.
This document covers the following topics:
Symbol Prompting during Network or Job Activation - Symbol Table and Symbol Maintenance
Master Database and Active Database - Concepts and Facilities documentation
In this documentation and on the user interface, the terms activation and network start/job start are used.
Activation
denotes the process of creating an active copy of a network or
job definition.
Network start/job start
denotes the actual execution start time of the activated/active
job network or job.
During a network activation or single job activation, the list of the required (active) symbol tables (see the section Symbol Table and Symbol Maintenance) will be determined by Entire Operations. The result of the determination will be written to the Entire Operations log.
It may look like this:
List of active Symbol Tables created Determined Symbol Table Versions for 17.01.14 ... Ob Job St SymTab defined determined ... NV 00 N1649T00 (current) -> v002 ... JM J001 00 N1649T00 (unnamed) -> (unnamed) ... JM J003 ED N1649T00 (current) -> v002 ... JM J004 ED N1649T00 (nv) -> (unnamed) ... JM J005 ED N1649T00 (svn) -> v002 |
The column St contains the status of the symbol table to be activated.
ED means "evaluation duplicate". It will
be set if a previous determination (evaluation) resulted in the same symbol
table with the same version. In this case, the symbol table (version) will be
activated only once.
The determined symbol table versions (see Versioning of Symbol Tables in the section Symbol Table and Symbol Maintenance) will be used for the following symbol table activation.
In case of any determination error, the network activation of job activation will be aborted.
It is also possible to activate a job network manually irrespective of any defined schedule. This may become necessary for a number of reasons, for example:
No schedule has been defined for the job network;
To override defined activation date and time;
The job network is not scheduled for the required date.
Job network or job activation can also be triggered by any event within Entire Operations, for example by the termination of another job network or by the Entire Operations Application Programming Interface (API); see also API Routines. Like manual activation, this can be performed at any time.
Symbol prompting for active symbols is also performed, when a job or network is activated manually, if at least one symbol of a symbol table used by the job or network is appropriately marked.

The Entire Operations Monitor will activate job networks automatically according to their defined schedules. However, it is also possible to activate a network manually from the Network Master node.
When a network is activated, all jobs within the network, except recovery jobs, are activated.
Note:
Only authorized users can activate job networks manually.
There are several situations in which you may wish to activate a job network manually:
When no schedule has been defined for the network;
To start the same network several times (with different run numbers);
When the network is not scheduled for the current date;
To reactivate a network.
 To activate a network manually
In the object workspace, select a Network Master instance.
Invoke the context menu and choose .
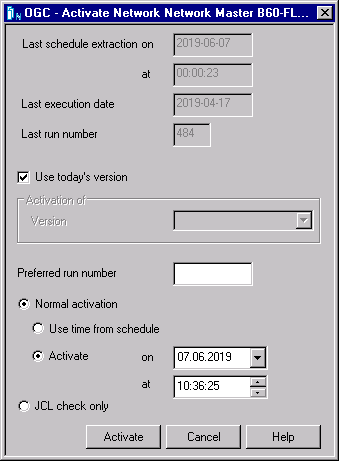
An Activate Network window similar to the example below opens:

Change the input fields as required. All fields contained in the window are explained in Fields: Network Activation.
Choose when you are finished.
If symbol prompting has been defined for the network, a Symbol Prompting window opens with a table of symbols used during dynamic JCL generation.
If required, change the symbols and symbol values. For further explanations, see Symbol Prompting during Network or Job Activation in the section Symbol Table and Symbol Maintenance.
Choose Continue when you are finished.
If the activation is successful, the activated network gets a new run number as returned in a message, and its execution can be tracked in the GUI Client.
If a workplan has been defined for the network, a Workplan window opens with a list of objects accessed during the current Entire Operations session.
In the Workplan window, change the entries as required. For further explanations, see Show Workplan in the section Using Entire Operations GUI Client.
Choose OK when you are finished.
This section covers the following topics:
The fields in the Activate Network window are described in the following table:
| Field/Option | Description | |
|---|---|---|
| Use today’s Version | Version of
the network to be activated.
If a current version exists for the current date, it will be preset as default value. If more than one version exists for a network, select Use today’s Version (default) or Activation of Version as needed. If a version is not defined, then Activation of Version must be used. If no version for a network exists, then Use today’s Version and Activation of Version have no function. |
|
| Activation of Version | ||
| Last Schedule Extraction on/at | Date and time of the last automatic schedule extraction for this network by the Entire Operations Monitor. | |
| Last Execution Date | Date of the last activation. | |
| Last Run Number | Run number of the last activation. | |
| Preferred Run Number | If input is allowed for
this field, you can enter the run number you want to be used for the activated
network. Run numbers for further network activations increment from this
number.
If the requested run number is in use, Entire Operations assigns the next free number to the run. If this field contains a zero ( Field input is allowed or not allowed (default) in the network default settings: see the option Allow setting of preferred run number during activation in the section Defaults for Network Options in the Administration documentation. |
|
| Normal activation: Use Time from Schedule | Select this option to activate the network within the defined time frames (Earliest Start, Latest Start, Deadline), even if the current date is not a scheduled date for this network. With this option, you can force the same time dependencies as if the network were scheduled and activated automatically. | |
| Normal activation: Activate on/at | Shows the current date and time. You can modify the date and time to force activation at any time on any date. There is no limitation for future date and time settings. | |
| JCL Check only | If this option is
selected:
Only a JCL check is performed for the job network or job. The required commands are automatically inserted:
z/OS, JES2: Notes:
|
|
| If this option is not
selected:
Normal activation (job submission) is initiated. This is the default. |
||
Just as you can perform an ad-hoc manual activation of a job network at any time to allow it to run outside of its scheduled times, you can also manually activate any job at any time, regardless of its position within a job network.
The activated job is assigned its own run number (in sequence with the network run number) and, if you do not change the date or time, is submitted immediately by the Entire Operations Monitor. If the job contains symbols as placeholders for variables, symbol prompting takes place as described in the section Symbol Prompting during Network or Job Activation. If other symbol tables are required, they are prompted too.
The differences between the manual activation of a single job and the manual activation of a job network are that when a single job is activated:
No check for defined input conditions for the job is performed;
No output conditions are set by the job.
All other End-of-Job actions defined for the job are executed.
 To activate a job manually
In the object workspace, select a Job Master instance and choose from the context menu.
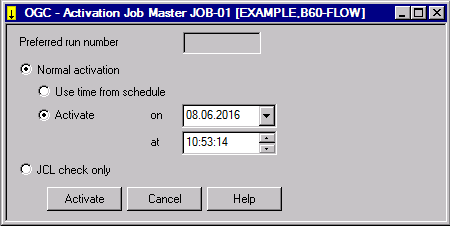
An Activation Job Master window similar to the example below opens:

The window title indicates the job (here: JOB-01)
to be activated and the owner and network (here: EXAMPLE,
B60-FLOW) of the job.
Make your definitions. The fields contained in the window are explained in Fields: Job Activation.
When you are finished, choose .
The job is activated and listed in the Active Run node.
This section covers the following topics:
The fields of the Activation Job Master window are described in the following table:
| Field | Description |
|---|---|
| Preferred Run Number | If input is allowed for this field, you
can enter the run number you want to be used for the activated job. Run numbers
for further job activations increment from this number.
If the requested run number is in use, Entire Operations assigns the next free number. If this field contains a zero ( Field input is allowed or not allowed (default) in the network default settings: see the option Allow setting of preferred run number during activation in the section Defaults for Network Options in the Administration documentation. |
| Normal activation: Use Time in Schedule | Select this option to activate the job
within the defined time
frames (earliest start, latest start, deadline), even if the current
date is not a scheduled date for this network. With this option, you can force
the same time dependencies as if the network was scheduled and activated
automatically.
For more information on network time frames, see Activating a Job Network Manually in the section Network Maintenance. |
| Normal activation: Activate at Date/Time | Shows the current date and time. You can modify date
and time to force activation at any time on any date. There is no limitation
for future date and time settings.
Note: |
| JCL Check only | If this option is selected:
Only a JCL check is performed for the job network or job. The required commands are automatically inserted:
z/OS, JES2: Notes:
|
| If this option is not
selected:
Normal activation is used. An actual JCL check is not performed. This is the default. |
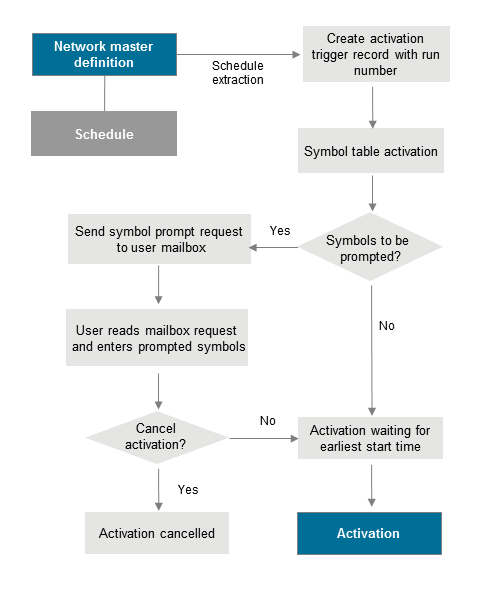
Job networks are activated automatically in two steps:
At the beginning of a new day or during Monitor startup, all schedules are checked for job networks to be executed during that day. This process is called schedule extraction and the data extracted are called the activation trigger records.
The activation trigger records force job network activation a short time before the earliest start of the network. This time span can be defined in the Entire Operations defaults: see the Extraction of schedules before activation option described in Defaults for Time Ranges in the Administration documentation.
Notes:
After the creation of an activation trigger record, active symbol tables are created for the specific network run. If there is at least one symbol marked as to be prompted within these active tables, a symbol prompting request is sent to the mailboxes of all users defined as message recipients for that network.
The network activation is kept in hold, until any user sees the request and enters or confirms the symbols to be prompted. For this reason, schedule extraction can be performed several days in advance. (See Global Schedule Extraction in the section Special Functions in the Administration documentation.)
If the calculated latest start is after the calculated deadline, the last start will be set 1 minute before the deadline.
If the (new) latest start is before the earliest start, the job activation will be aborted with an error message.
Entire Operations automatically assigns a run number to each active copy of a job network on the active database. This run number uniquely identifies the active copy of a job network and is automatically passed to its jobs, input conditions, etc.
The run number is assigned:
During the creation of an activation trigger record;
During a manual activation;
If a network is activated by an API routine.
Run numbers are in the range 1 to 99999 by default and are unique on network level. When the maximum run number has been reached, assignment again starts from 1.
The upper limit for run numbers can be modified in the Entire Operations defaults as described in Defaults for Network Options in the Administration documentation.
The assignment of a run number to each activation of a job network allows multiple activations of a job network on the same date, and allows you to distinguish between multiple active copies of the same job network.
Note:
There is no guarantee that subsequent activations will have
ascending run numbers. They are as unpredictable as operating system job
numbers. Entire Operations retains the last run number, even for deleted job
networks. If you define a new job network of the same name, the new run numbers
start from the deleted network's last run number incremented by 1.
When manually activating a job or a network, you can specify a preferred run number to be used for the next run (see also Activating a Job Network Manually and Activating a Single Job Manually.
Maintaining Active Runs - Active Job Networks
The operative data of Entire Operations must be removed again from the active database after a certain time. Part of this process is the removal of work files as well, which Entire Operations has created in the file system for job control purposes.
The retention periods for active objects can be defined (see Administration) documentation.
The cleanup may be defined to be carried out automatically every day. If no time is defined for the cleanup, then it will be started at 00:00. A time for the daily cleanup start can be defined. For a more detailed description, see Administration documentation.
The cleanup of the active database can also be started manually any time (see Cleanup of the Active Database in the Administration documentation).
Furthermore, it is possible to run the cleanup of the active database in a Natural batch job (see Cleanup of the Active Database in Batch Mode) exterior to the Entire Operations Monitor. The cleanup in batch mode can be executed with the Monitor running or shut down.
Note that the cleanup of the active database depending upon the data quantity to be processed affects the system. It is recommended to schedule the cleanup for silent times.
Cleanup runs can also be performed several times a day. This makes it possible to reduce the volumes to be processed per run.
Entire Operations creates files in the operating system under BS2000, UNIX and Windows. Among other things, they contain the job SYSOUT or the JCL to be executed.
During the deactivation of active jobs, which have run in one of these operating systems, the assigned work files are deleted as well.
All definitions are created in the Entire Operations Defaults. They are described in the Administration documentation.
In addition to an automatic cleanup, or alternatively, you can also do a cleanup of the active database in batch mode outside of the Entire Operations Monitor.
Use a Natural batch job with the following commands:
LOGON SYSEOR
CLEAN function log-target
FIN
| Parameter | Description | |
|---|---|---|
function |
Possible values: | |
ALL |
Cleanup, deactivation, deletion of work files. | |
CLEAN |
Cleanup only. | |
DEACT |
Deactivation, deletion of work files only. | |
log-target |
Possible values: | |
NOP |
The cleanup is logged in the Entire Operations log. | |
SO |
The cleanup is logged in the SYSOUT of the batch job.
In addition, the start and end messages of the cleanup are logged in the Entire Operations log. |
|
ALL |
The cleanup is both logged in the Entire Operations log and the SYSOUT of the batch job. | |
The batch cleanup can take place with the Monitor running or not. It is recommended to do the cleanup at times of low Monitor utilization.
Like the automatic cleanup the batch cleanup should be performed at least once a day. Several runs a day are possible. This may be useful to reduce the data amount of each cleanup run.
The Entire Operations retention periods also apply to batch cleanup.
CLEAN ALL SO
Complete cleanup and log into SYSOUT.
The cleanup of mailbox messages to SYSDBA can be executed in batch mode. To do this, use a Natural batch job including the following commands:
LOGON SYSEOR
MX-DEL1P yyyymmdd hhiiss
FIN
| Parameter | Description |
|---|---|
yyyymmdd |
Day up to which cleanup is to take place. |
hhiiss |
Time up to which cleanup is to take place. |
MX-DEL1P 20020201 100000