
This document covers the following topics:
 To list all functions available for a Job Active node
In the object workspace, select a Job Active node and open the context menu.
The following functions are available:
| Function | Shortcut | Description |
|---|---|---|
| List | F8 | See Listing Active Jobs. |
| New | CTRL+N | Creating a new Job Active: see Adding a New Job to the Active Network |
| Refresh | F5 | See Refreshing Object Lists. |
| Filter | F3 | Using selection criteria to list active jobs: see Filtering Objects. |
| Set Drag And Drop Function | --- | See Drag & Drop. |
To list all functions available for a single Job Active
instance
Select a Job Active instance and invoke the context menu.
The following functions are available:
| Function
(or shortcut) |
Description |
|---|---|
| Open
(or CTRL+O) |
Opens the Maintenance Job Active to modify all definitions of the specified job: see Displaying and Modifying an Active Job Definition. |
| Display
(or CTRL+D) |
Opens the Display Job
Active window to view all definitions of the specified job.
The read-only fields in the window correspond to the fields in the Maintenance Job Active window: see Displaying and Modifying an Active Job Definition. |
| Network Diagram | Opens the Diagram Active Run window displaying an overview of the active job runs within the network. See Viewing a Network Diagram. |
| Zoom Subnetwork | See Listing Jobs of an Active Subnetwork. |
| Subnetwork Diagram | This function is used for
navigation purposes. Using it for a job of type NET, the network
diagram for the network that is linked to this object is opened. See
Viewing a Network
Diagram.
|
| Usable Symbol Tables | Opens a list of symbol tables used by the active job. See also Listing Usable Symbol Tables in the section Symbol Table and Symbol Maintenance. |
| Deactivate | See Deactivating a Job in an Active Network |
| Hold | See Holding an Active Job. |
| Release | See Releasing an Active Job. |
| Cancel | See Cancelling an Active Job. |
| Resubmit | See Resubmitting an Active Job. |
| Reactivate | See Reactivating an Active Job. |
| Regenerate Active JCL | See Regenerating Active JCL. |
| Stop cyclic execution | Stops a currently executing cyclic job. |
| Modify Latest Start | See Modifying the Latest Start Time for an Active Job. |
| Browse Active JCL | See Browsing Active JCL. |
| Edit Active JCL | See Editing Active JCL. |
| Release edit lock | Removes a lock from active JCL held
on the source by a user who previously edited it. The unlock action is archived
in the Entire Operations log.
Important: See also Locking of Natural Sources in the section Job Maintenance. |
| Extended Log / Active JCL Changes | See Viewing the Extended Log with Active JCL
Changes.
See also Choosing the Job ID of a Job for Logging. |
| Browse SYSOUT | See Viewing Job SYSOUT. |
| Extended Log / JCL | Opens a window where you can
see the JCL which was submitted for this job.
For further information, see JCL Log in the section Job Maintenance. See also Choosing the Job ID of a Job for Logging. |
| Extended Log / SYSOUT | Opens a window where you can see the SYSOUT of the job. |
| SYSOUT Messages | Opens a window where you can see the SYSOUT messages of the job (z/OS only). |
| Waiting for | See Displaying Prerequisites for Active Jobs: Waiting for. |
| List Active Jobs | See Listing Active Jobs. |
| Browse Log | See Displaying Logged Information - Browse Log Function. |
| Add to Workplan | See Add to Workplan. |
| Set Drag And Drop Function | See Drag & Drop. |
You can access active runs of a network to list and maintain active jobs from different nodes in the object workspace. The result list of active jobs depends on the node and the node instance selected.
- User Restrictions for Active Jobs Lists
Users can be restricted to view jobs in the List Active Jobs window.
If the user is of type Administrator (
A) or if the user has access to the owner SYSDBA, then all active jobs are displayed. In all other cases, the following active jobs are displayed:
From networks of the current owner,
From networks of owners to which the user has access,
From networks to which the user has access.
See also Granting Definition: Authorizing Other Users or Owners to Access a Network in the section Network Maintenance.
To list active jobs
In the object workspace, select an instance from a Network Active or an Active Run node to list all active jobs of this particular network or active run, respectively.
Or:
In the object workspace, select an instance from an Owner or a Network Master node to list all active jobs of this particular owner or network, respectively.
Or:
In the object workspace, select the General node to list all active jobs running in your environment.
Open the context menu and choose the function.
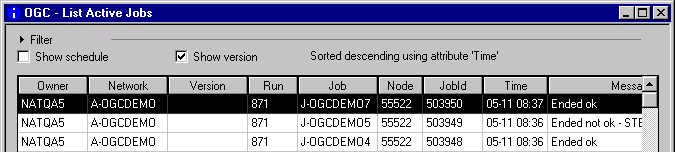
A List Active Jobs window similar to the example below opens with a list of active jobs:

This list displays all active jobs available showing the owner, network, run, job node, job ID, time and a message.
The columns and input fields are explained in Columns and Filter Criteria: List Active Jobs.
Notes:
To display the
Latest Start and Deadline
columns
Select the check box.
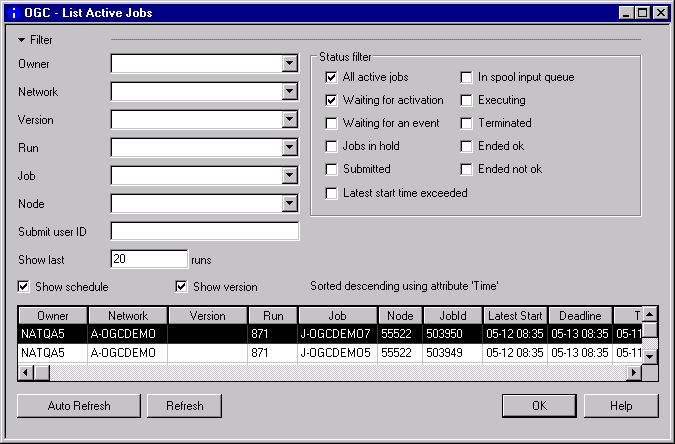
The columns with the latest start times and deadlines are displayed as shown in the following example:

Select the Show version check box.
The column with the job version is displayed as shown in the following example:
To change the sort order
Click on the column header area of any column in the table to sort by that column.
The list is then sorted by that column. The current sorting state is shown above the table.
The first time a user requests sorting, all data is retrieved from the server if it has not been done before. Therefore, some delay is possible, depending on the count of active jobs. Changing the preselection causes to re-read data again and initial sorting settings are applied.
Click on the column header again if you want to change the sort sequence from ascending (default) to descending.
The initial sort order can be changed on the tabbed page Other Settings of the Create new User or Maintenance User window (see User Maintenance in the Administration documentation).
To filter the job list
Click on Filter
![]() to expand (or collapse) the Filter
section.
to expand (or collapse) the Filter
section.
The Filter section is expanded as shown in the following example:
Specify or select the required filter criteria and choose OK when finished.
The columns and input fields are explained in Columns and Filter Criteria: List Active Jobs.
To refresh the list contents
Proceed as described Refreshing Object Lists.
This section covers the following topics:
The columns and input fields available in the List Active Jobs window are explained in the following section.
Depending on the node or node instance for which the
List Active Jobs function is used, the fields below
![]() are either read-only or can be used to specify filter criteria to
reduce the number of active jobs listed in the window.
are either read-only or can be used to specify filter criteria to
reduce the number of active jobs listed in the window.
| Column/Field | Description |
|---|---|
| Owner | The name of the owner whose active
jobs are shown.
If available as input field, you can select an owner out of the drop-down-box to show only its active jobs. |
| Network | The name of the network for which the
active jobs are shown.
If available as input field, you can select a network out of the drop-down-box to show only its active jobs. |
| Version | The network version for which the
active jobs are shown.
If available as input field, you can select a version out of the drop-down list box to show only its active jobs (see also Maintaining Job Network Versions in the section Network Maintenance). |
| Run | The run number for which the active
jobs are shown. The run number is automatically assigned at activation time.
The job run number uniquely identifies an active copy of a job together with
the job name.
If available as input field, you can select the run number of the network to show only its active jobs. |
| Job | The job name as defined to Entire
Operations.
If available as input field, you can select a job out of the drop-down-box to show only its active jobs. |
| Node | Execution node of the machine
designated for the job.
If available as input field, you can select a node out of the drop-down-box to show only its active jobs. |
| JobId | The job identifier as assigned by the operating system or by the job entry subsystem. |
| Time | Last action or check date/time for the job. |
| Message | Last message issued for the job by Entire Operations. For a list of possible messages and their meaning, see Messages in Active Jobs Lists in the Messages and Codes documentation. |
| Submit user ID | Select a user ID out of the drop-down-box to show only its active jobs. |
| Show last n runs | Enter a number to restrict the list of
active jobs to the last n runs where
n is a number in the range from 1 to 999999999.
|
| Show schedule | See To display the Latest Start and Deadline columns. |
| Show version | See To display the Version column. |
| Status filter | Select job status filters to additionally reduce the list of active jobs: see Listing Active Jobs by Process Status. |
You can list active jobs according to their processing status by opening the Filter section of the List Active Jobs Network Active window and selecting one or more Status filter options:
| Selection Option | Description |
|---|---|
| All active jobs | All active jobs (default). |
| Waiting for an event | All active jobs waiting for at least one event. |
| Jobs in hold | All jobs in hold. |
| In spool input queue | All jobs in the scheduling system input queue. |
| Ended not ok | All jobs with job not ok terminating
status.
|
| Ended ok | All jobs with job ok terminating
status.
|
| Submitted | All submitted jobs. |
| Terminated | All terminated jobs. |
| Waiting for activation | Planned network runs waiting for activation. |
| Executing | All jobs in execution. |
| Latest start time exceeded | All jobs that exceed the Latest Start Time: see Modifying the Latest Start Time for an Active Job. |
To list jobs of an active subnetwork
From a Job Active node, select a job of
the type Subnetwork (NET), and choose
Zoom Subnetwork from the context menu.
Or:
From the table in an Active Job List
window, select a job of the Type NET, and
choose Zoom Subnetwork from the context menu.
The jobs of the subnetwork defined for the selected
NET-type job are listed in a (separate) Active Job
List window, as shown in the following example:

To add a job to the active database for the current run of an
active job network
Select a Job Active node and choose New from the context menu.
A Create new Job Active window (similar to the Maintenance Job Active) opens where you can enter the required definitions as described for a job master in the section Adding a Job Definition.
Adding a job to an active job network involves temporarily changing the network structure and job flow. This is achieved with the minimum of effort, as the following example shows.
This section covers the following topics:
You may wish to add a job to a network for one specific run.
This example illustrates the addition of a job to a network consisting of 3 sequential jobs. The new job (Job 4) is to be inserted between Job 1 and Job 2:
To achieve a sequential job flow
Add the new active job using the Create new Job Active window;
Define Cond-1 as input condition for Job 4;
Define Cond-4 as output condition in End-of-Job handling for Job 4;
Change the input condition defined for Job 2 (Cond-1) to Cond-4.
Job 4 is executed for the current run of the job network only.
If you wish this change to be permanent, use this procedure on the master database.
You can change the latest start time or an active job instance where the active job status permits it. The latest start time may be changed for an active job that is not started or is already terminated.
To modify the latest start time for an active job
In the object workspace, select an instance of Job Active.
Invoke the context menu and choose Modify Latest Start.
A window similar to the following opens:
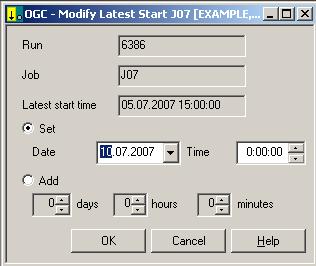
The options available correspond to the methods described for an active job run.
If you have several instances of one job running, for example, after resubmitting a job, you receive a selection window for selecting the job ID of the job whose log you want to view.
To choose the log
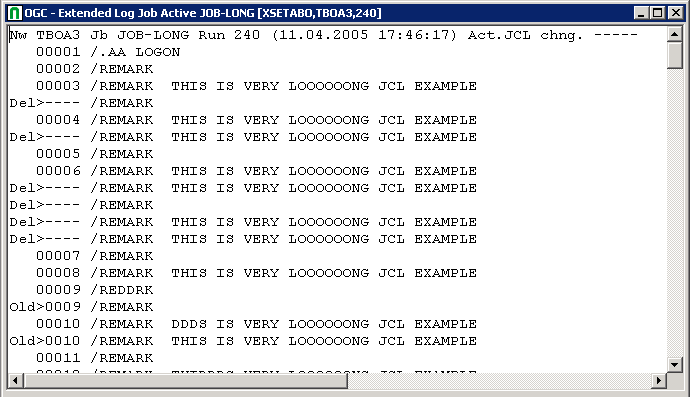
Select a job from the Job Active node and choose Extended Log / Active JCL changes or Extended Log / JCL from the context menu.
The following window opens:
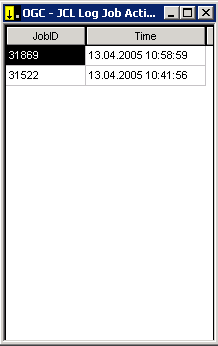
Select a job by double-clicking on a job ID in the JobID column.
The selected log is displayed:
Operating system jobs in the Entire Operations active database can be handled directly from a Job Active instance.
When Entire Operations submits jobs to the operating system, they are assigned a job number which appears, for example, in the Maintenance Job Active window. In z/OS systems, JES operator commands are issued.
Note:
In BS2000, console commands are issued.
You can cancel the planned activation of a job in a planned network run that is waiting for activation. The job is then not executed within the active network.
To cancel an active job from the operating system
In the object workspace, select a Job Active instance and choose Cancel from the context menu.
A confirmation dialog prompts you to choose Yes to cancel the job.
The job is cancelled from the operating system.
Notes:
A cancelled job cannot be released for further processing.
For BS2000 jobs, you can only use the Cancel function if the following conditions are fulfilled:
The BS2000 user ID in effect is allowed to issue a cancel command for the Entire System Server node(s) in use. If required, specify the following in the Entire System Server parameter file and restart Entire System Server:
SYSTEM-COMMAND-USER=TSOS,user-id[,...]
For example:
SYSTEM-COMMAND-USER=TSOS,SAG1,SAG2,SAG3
The active and passive Entire System Server console servers are available (see the Entire System Server User's Guide).
UNIX jobs are cancelled by the SIGTERM signal.
You can stop an active job and place it in hold status.
To stop a job and place it in hold status
In the object workspace, select a Job Active instance and choose Hold from the context menu.
The message Job set to Hold appears
in the Message column for the job
Notes:
You can release a job from hold status.
To release a job from hold status and allow it to
continue
In the object workspace, select a Job Active instance and choose Release from the context menu.
The message Job released from Hold
appears in the Message column for the job.
Notes:
NET (subnetwork): during a
release, no new activation of the subnetwork will be performed.
to be activated too.
After a job has terminated, you can modify and resubmit it while it is still in the active database. This function is useful after a job has failed.
For example, if a JCL error has occurred, you can modify the active JCL (see Editing Active JCL) and resubmit the job. The resubmitted job uses the old input conditions for submission, but can set different output conditions, depending on the End-of-Job analysis.
Any output conditions set by the job's first run can be reset by the second run if this feature is defined in the job's original End-of-Job handling.
To resubmit an active job
In the object workspace, select a Job Active instance.
Invoke the context menu and choose the function.
The following window opens:
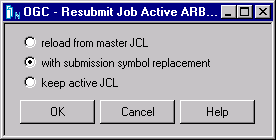
Select a resubmission option and choose .
The options are explained in Options for Resubmission.
This section covers the following topics:
You have one of the following options to resubmit a job:
| reload from master JCL | Reload the JCL from the master JCL definition and resubmit the job. |
| with submission symbol replacement | Reload the active JCL with symbol
replacement (default) and resubmit the job.
Symbols and symbol function values are updated depending on the setting of the Entire Operations default Submit symbol/function recalculation at resubmit in the Defaults for Other Settings window described in the Administration |
| keep active JCL | Reload the active JCL from the previous job submission and resubmit the job exactly as before. Symbol replacement is not repeated. |
Note:
Jobs of the types NAT (Natural Program) or
STC (Started Task) are always
resubmitted with keep active JCL; a different option
selected for resubmission is ignored.
If the Repeat function is used for jobs with
NET type (subnetwork), the
subnetwork will be repeated with the same subnetwork run number. However, this
is only allowed if the subnetwork has not started yet.
In case of a resubmission of the active job, the pregenerated JCL is not reloaded if the active JCL of the job has been edited in the meantime.
The SYSOUT file copy attempts are limited if the SYSOUT file is locked. The limit is 10 times the task (Monitor) wait time. If the task wait time is smaller than 30 seconds, the limit is 10 * 30 = 300 seconds.
If the SYSOUT file is still locked when the limit is reached, the
active job will be set to a permanent error status, with the message text
10 SYSOUT Renaming Attempts failed.
For each unsuccessful attempt, the message text will be set to
SYSOUT File Renaming - File in use. In addition, the
event will be logged with the SYSOUT file name.
To prevent the execution of a certain job in an active network
for the current run
From a Job Active node in the object workspace, select an active job and choose Deactivate from the context menu.
A confirmation dialog similar to the example below opens for the selected job:
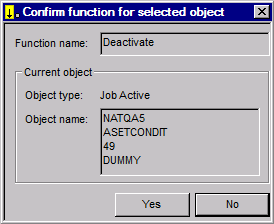
The window indicates the name of the owner (here:
NATQA5), the name of the active network (here:
ASETCONDIT), the run number (here: 49) and name of
the active job (here: DUMMY).
Choose Yes to deactivate the job or to cancel the action.
Deactivation is performed by the Entire Operations Monitor in the background. Deactivating a job from the active network involves deleting it from the active job network and restructuring the active network in order to ensure uninterrupted job flow. The following example illustrates job deactivation by bypassing a job in an active network consisting of three sequential jobs.
This section covers the following topics:
The network in the following figure is to run without Job 2:
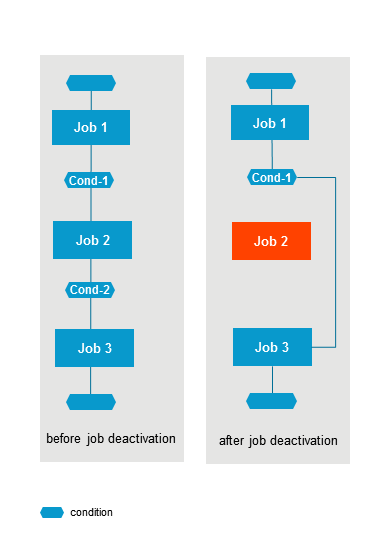
To ensure uninterrupted job flow
To prevent Job 2 from running, it is sufficient to delete its input condition Cond-1. If you deactivate Job 2 with the Deactivate function, the input condition is automatically deleted.;
Replace the input condition for Job 3 (Cond-2) by the input condition Cond-1.
The current run of the job network skips Job 2.
If you wish to deactivate a job that is currently running (interrupt its execution), you must cancel it from the operating system before deactivation (see Cancelling an Active Job).
This function is used to deactivate an active job and then reactivate it completely.
This function can be used to restore an inconsistent active job (for example, if a symbol was missing during the original activation).
To reactivate an active job
In the object workspace, select a Job Active instance and choose Reactivate from the context menu.
A confirmation dialog prompts you to choose Yes to reactivate the job.
Reactivation is performed in the background by the Entire Operations Monitor, whereby:
The active job is deactivated and activated again.
After deactivation, the job may temporarily disappear from the active jobs list or active diagram.
All input and output definitions are recreated.
The active JCL is newly generated.
A prerequisite check is performed after reactivation.
To view and modify an active job
In the object workspace, select a Job Active instance.
Invoke the context menu and choose or Display.
Open opens a Maintenance Job Active window similar to the example below:
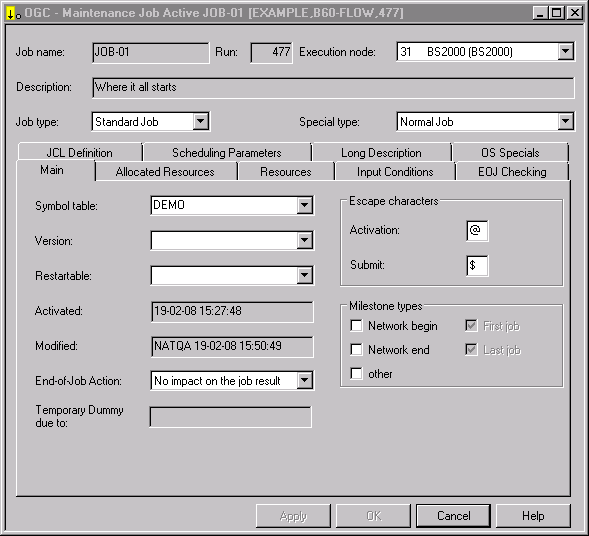
Display opens a Display Job Active window which corresponds to the Maintenance Job Active window above but is write-protected.
The following applies when you modify a job definition in an active job network definition:
The current user ID is stored as the last modifying user of the job for all definition and JCL modifications. This user ID is taken as the submit security user ID. If the Monitor does not use its own user ID, see Monitor Defaults - Submit Security User Type in the Administration documentation.
It may be necessary to release the active job after the modification with the Resubmit function. This causes a new check of all prerequisites.
This section covers the following topics:
The input fields in the Maintenance Job Active window mostly have the same meaning as in the maintenance window of a job master definition; see Fields: Job Definition (Master) in the section Job Maintenance. However, the Maintenance Job Active window contains the following additional fields which are protected:
In the Maintenance Job Active window, it is possible to modify the field Special Type to Execute as dummy.
If Execute as dummy is not
set, an automatic reloading of the JCL is performed. In case of active
jobs of the type NET, the
subnetwork is activated.
If Execute as dummy is set, the job is executed as a dummy job. In this case, it does not play any role, whether already active JCL or an active subnetwork were loaded.
See also: Job Execution as a Dummy Job.
To modify the End-of-Job checking and actions for the current
run of a specific job
In the Maintenance Job Active window, open the EOJ Checking page.
The current definitions are displayed on the page similar to the example shown in the section Defining and Managing End-of-Job (EOJ) Checking and Actions. You can modify event and action definitions in the same way as described in this section.
Note:
Any modifications made to End-of-Job handling parameters of an
active job are valid for the current job run only.
To view the long text description of an active job
In the Maintenance Job Active window, open the Long Description page.
The Long Description page contains either descriptive text for the job (see the example in the section Job Maintenance) or an URL address as shown in the example below:
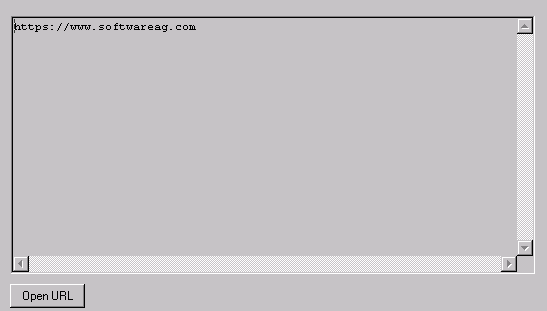
If an URL address is displayed, you can choose Open URL to open the page associated with the URL.
The page contains text, provided a long description exists for the job master. The text is displayed in Editor format. No modification is possible. The text can only be modified on the master database by using the appropriate job maintenance function as described in Writing and Viewing Online Documentation for a Job.
The Waiting for function is used to display all events pending for an active job.
To display all waiting prerequisites for an active Job
In the object workspace, select a .
Invoke the context menu and choose the function.
A Waiting for Job Active window similar to the example below opens:
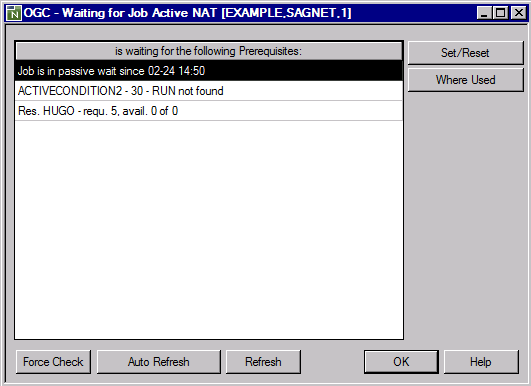
The window lists the events an active job is waiting to complete.
The listed messages indicate that the current run of the job
(run number 1) is waiting for the input condition
ACTIVECONDITION2 from the run number 30, and the
availability of the resource HUGO. A resource is indicated by a
Res. prefix.
The text Job is in passive wait since 02-24
14:50 shows since when the job has been in passive wait for the
input condition and the resources.
In this case, the job is automatically returned to the active wait by setting the correct input condition and making sure that the resource can be allocated; that is, the Monitor will execute a prerequisite check.
For a complete list of possible messages and their meaning, see Messages in Active Jobs Lists in the Messages and Codes documentation.
All functions available in the Waiting for window are explained in Functions: Prerequisites for an Active Job.
The following functions are available in the Waiting for Job Active window:
| Function | Description |
|---|---|
| Force Check | Force an active
prerequisite check.
Only before the message |
| Auto Refresh | See Refreshing Object Lists. |
| Refresh | |
| Set/Reset | Set:
|
| Where Used | Where used:
|
You can display the resources used by active jobs.
You can also modify resources for the current run of an active job without changing the original resource specification on the master database for future job runs. This can be useful if different job runs require different amounts of a specific resource, for example paper or tape drives.
To view resources used by an active job
In the Waiting for Job Active window, select the required resource and choose Where Used.
An Active Usage Resource window similar to the example below opens:
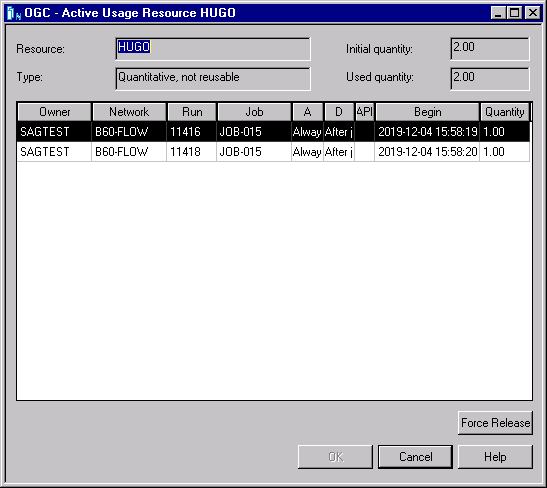
The window lists other active jobs in your active network environment which are currently using partial quantities of the resource for which your active job is waiting.
The fields and columns in the window are described in Fields and Columns: Active Resource Usage in the Administration documentation.
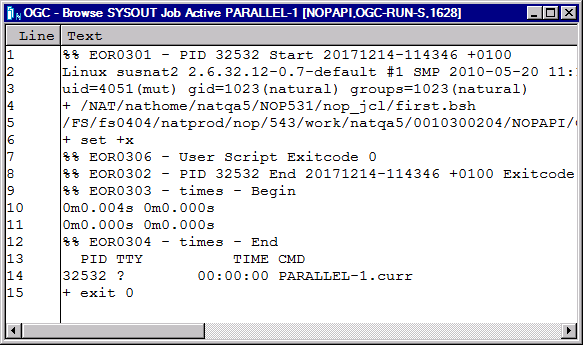
You can view SYSOUT of an active job depending on the operating system installed at your site:
| Operating System | SYSOUT Availability |
|---|---|
| z/OS | SYSOUT can be browsed immediately after job submission. It is readable until the current last line readable from the spooling system (for example, JES2). |
| BS2000 | The SYSOUT file can be browsed only after job termination. This is because the SYSOUT file is open during execution and cannot be read. |
| UNIX/Windows | The SYSOUT file can be browsed immediately after job submission. It is readable up to its current last line. |
This section covers the following topics:
To view job SYSOUT
In the object workspace, select a Job Active instance and choose from the context menu.
Depending on your access rights, a Logon Node window opens.
Enter your user ID and password and choose OK.
A Browse window similar to the example below opens:
On UNIX:
On BS2000:
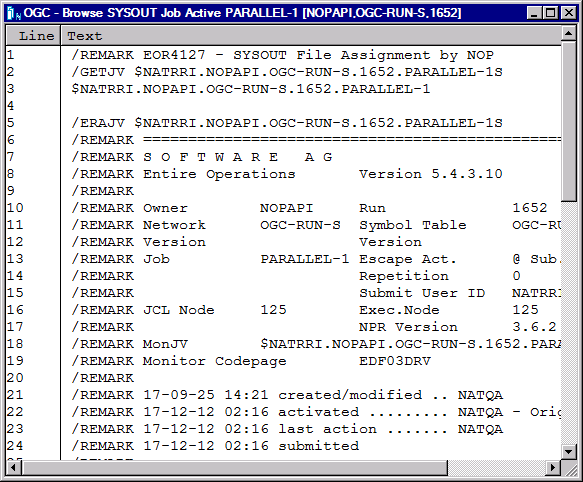
The window displays active SYSOUT produced for the DD
statements processed by the selected job (here: PARALLEL-1, owner
NOPAPI, network OGC-RUN-S, run number
1628 (UNIX) or 1652 (BS2000). SYSOUT output data is
contained in numbered text lines sorted in ascending order.
On z/OS and z/VSE:
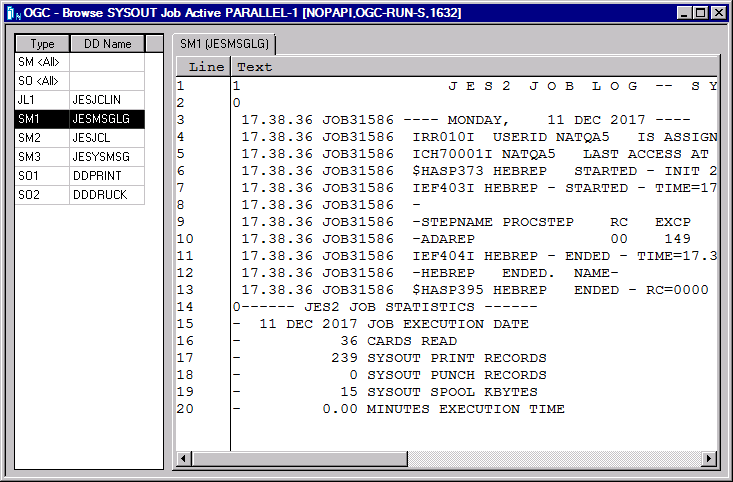
If more than one SYSOUT file exists, a table in the left
window section lists all DD statements produced by the job and the
type of the SYSOUT file. For
each file you select in this table, a tabbed page opens in the right window
section showing the SYSOUT of the corresponding DD statement. Several files of
the same file type are numbered sequentially from one (SM1,
SM2, and so on). Files of the same type are combined in an
<All> collection file, for example, SM
<All>.
The browse functions available are explained in Available Functions: Browse SYSOUT.
- Notes about SYSOUT File Display
The following applies when viewing SYSOUT:
Name of the SYSOUT file
In BS2000, UNIX and Windows, the SYSOUT file name is indicated in the first line of the SYSOUT text.Automatic Logon to the Operating System Server
Before a SYSOUT file is displayed, Entire Operations checks whether the user is allowed to access the SYSOUT file. If necessary, an automatic logon is carried out with the user ID, which is entered for the user as a standard user ID for the operating system server (see Defining Node Default User IDs in the Administration documentation). If this automatic logon does not function, for BS2000 files, a further attempt will be made with the BS2000 user ID from the fully qualified file name. If this was successful, the current user ID is set accordingly for the operating system node. If the user does not (implicitly or explicitly) log on to the operating system server with the credentials required to access SYSOUT, the SYSOUT file cannot be displayed.Line Length under UNIX and Windows
Lines longer than 250 characters will be abbreviated in the SYSOUT display. They will be marked with>>>in the columns 247 to 250 of the display.File Truncation
If the SYSOUT file or spool data set exceeds a given line limit, the display will be truncated: see SYSOUT line limit in Defaults for Network Options in the Administration documentation.Number of Previous Executions
Entire Operations can display SYSOUT of up to 180 previous executions of the job (e.g., repetitions, cyclic executions).
On z/OS and z/VSE, SYSOUT files are identified by the following output types to distinguish their contents:
| File Type | Purpose | Applies on |
|---|---|---|
CC |
Summary of job steps and condition codes. | |
JL |
JCL of selected job. | |
SI |
SYSIN data. | |
SM |
System messages. | |
SO |
SYSOUT data. | |
LST |
List queue. | z/VSE only. |
PUN |
Punch queue. | z/VSE only. |
RDR |
Reader queue. | z/VSE only. |
XMT |
Transmit queue. | z/VSE only. |
<All> |
Identifies a
collection file that combines all files that belong to a certain file type, for
example, SM <All>.
|
The following functions are available from the context menu of the Browse SYSOUT window:
| Function | Shortcut | Description | |
|---|---|---|---|
| Copy | CTRL+C | Copy the text lines selected in the SYSOUT file to the clipboard to be pasted into another file. | |
| Reverse Order | CTRL+R | Display SYSOUT text in descending order
of line numbers (last line first).
The text is sorted in ascending order by default. |
|
| Refresh | F5 | See Refreshing Object Lists. | |
| Find | CTRL+F | Open the Find dialog to enter a search string and specify search options (case sensitive and/or whole word only) and the search direction backward (scrolls up in the source) or forward (scrolls down in the source). | |
| Find Next | F3 | Find the next occurrence of the search string specified in the Find dialog. | |
| Go To | CTRL+G | Scan the SYSOUT file for a specified line number and highlight this line. | |
| CTRL+P | Output the SYSOUT file on a printer. | ||