Defining End-of-Job checking and actions means instructing Entire Operations what actions to trigger after a job has terminated. The triggered action is referred to as an End-of-Job action.
End-of-Job checking and actions consists of two steps:
Analysis of job results (determination of End-of-Job status);
Triggering of appropriate system actions.
The End-of-Job action depends on the status of the whole job or any other event which can be checked by Entire Operations on termination. The status of the job on termination is determined by the occurrence of certain events during job execution which Entire Operations can check.
Before Entire Operations can check for an event, it must be defined to the system, together with instructions as to the action to be triggered. If no events are specified, Entire Operations performs End-of-Job checking automatically using system defaults.
This document describes the End-of-Job (EOJ) checking functions used to check the job status on job completion and take appropriate action, if required.
For conceptual information, see Events and Actions: End-of-Job Checking in the Concepts and Facilities documentation.
In the terminology of Entire Operations, an event is the occurrence of a defined situation which is recognized during the End-of-Job analysis. Entire Operations automatically triggers system action, depending on the occurrence of events during job processing.
If you do not specify any event, Entire Operations provides a
default event expressed as job OK or job not OK,
depending on whether a received condition code is greater or less than a
default condition code, or, for BS2000, whether certain system messages are
received.
Some examples of possible defined events are:
Exit code of a UNIX job equals 2;
STEP2 of JOB1 ends with a condition code greater than 8;
No job step ends with a condition code greater than 0;
A defined message appears in the job SYSOUT;
A database or file contains or does not contain certain expected data;
The result of a user exit (expressed by its return code).
A job variable contains certain expected data (BS2000).
Events are checked on a check OK/not OK
basis. End-of-Job actions can be triggered by:
the result of a single event check (for example, a job step checking in z/OS);
the result of all End-of-Job checks (including the default
checks), which always causes either the event job OK
(All Checks ok) or job not OK (Any
Check not ok) to occur.
Both of these event definitions are always predefined for every job.
In the latter case, you can define two sets of actions:
one set is performed if all checks finished OK
(All Checks ok, i.e., job OK);
the other is performed if at least one check finished not
OK (Any Check not ok, i.e., job not
OK).
All Checks ok and Any Check not ok are mutually exclusive parameters to be checked.
All events can be combined as required. You can specify up to 30 different event checks for a job.
This section covers the following topics:
The following table provides an overview of the availability of End-of-Job checks for the supported operating systems and job types:
| End-of-Job Check | z/OS | z/VSE | BS2000 | UNIX | Windows | SAP |
|---|---|---|---|---|---|---|
| Termination Codes | * | * | ||||
| Job Variables | * | |||||
| User Exit | * | * | * | * | * | |
| String Search | * | * | * | * | * | * |
| User Switch | * | |||||
| Exit Code | * | * |
An asterisk (*) indicates that the End-of-Job check
is available for the operating system or job type. These checks are described
later in this section.
On z/OS: The job result check will be retried by the Monitor
up to 10 times, when the message Job disappeared from Spool
Queue appears.
The wait interval between SYSOUT read attempts is constantly at least 30 seconds (not to be confused with the Monitor wait time, because it may be very short).
On BS2000: Entire Operations can only check job SYSOUT if it
is assigned to a file. JCL of jobs that are to run under Entire Operations
control must therefore not contain SYSOUT assignments to
*dummy,
primary or to a temporary file,
otherwise no End-of-Job checking is possible.
See also Defining SYSOUT Actions.
For the operating system z/OS the following applies:
In case of incomplete SYSOUT, the SYSOUT reading will be retried 10 times, with intervals not shorter than 30 seconds. Interval can be longer if the monitor task wait time is longer.
End-of-Job actions refer to all actions performed after termination of a job. These actions can be performed automatically by Entire Operations or manually by the user.
All End-of-Job actions can be defined for an event (job step) or at the job level.
For each of the user-specified or default events, you can define how Entire Operations is to act.
Possible End-of-Job actions are:
Set/reset output conditions to continue the job flow.
Set/modify symbol values.
Release resources held by a job.
Set/reset/modify job variables (BS2000 only).
Execute End-of-Job action user exits.
Deactivate job.
Activate other job networks or single jobs.
Start job recovery.
Handle job SYSOUT data.
Pass output files to Entire Output Management.
Send message to user or console with information about any abnormal event or pending condition.
Only one action of the same type can be defined for an event (except
in the case of output conditions). If you need several actions of the same type
for the event job OK or job not OK, you can define
these by adding an Add. Job-ok,
Job-not-ok event.
 To view End-of-Job events and actions defined for a job
In the Job Master window, open the tabbed page EOJ Checking as shown in the following example:
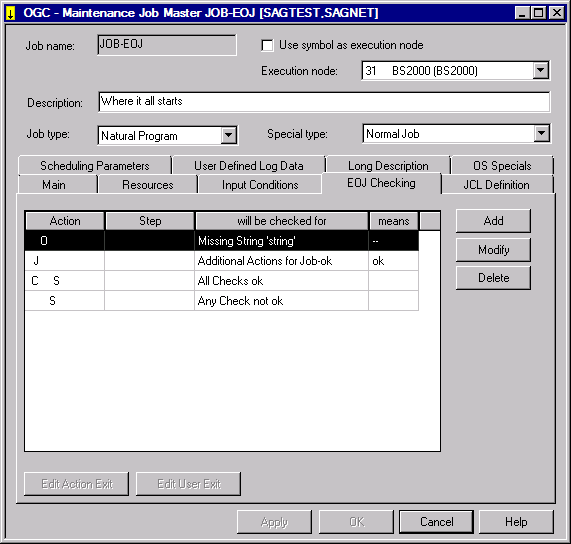
The page lists all End-of-Job actions and events defined for the selected job.
The columns and functions available on the page are described in the relevant sections.
This section covers the following topics:
The tabbed page EOJ Checking provides the following columns:
| Column/Row | Description | ||
|---|---|---|---|
| Action | Summary
of defined actions for the event.
Each character listed in this column represents an action defined for the event. All characters possibly shown here are listed in Action Indicators: EOJ Checking Page. |
||
| Step | Applies
to z/OS only.
Step name in JCL ( |
||
| will be checked for | Event to be checked (condition code, system code, user abend code, system message, etc.). | ||
| means | Event status after the check: | ||
ok |
All checks ended OK. | ||
n.ok |
At least one check ended not OK. | ||
-- |
Event has no influence on the job result.
(Corresponds to No influence.) |
||
|
See also Handling End-of-Job Actions. |
|||
| OA | This
column only appears on the EOJ Checking page in the
Maintenance Job Active window of an active job.
This column only contains entries if an event occurred during job execution. The entries under O indicate the status of the event check, the entries under A indicate whether the action defined for the event was performed: |
||
| Entry | O | A | |
| blank | Event was not checked. | No action performed. | |
- |
Event did not occur. | n/a | |
+ |
Event occurred. | Action performed. | |
E |
Error occurred during event check. | One or more actions performed erroneously. | |
M |
Event definition was modified. | Action definition was modified. | |
E |
Error occurred during the event check. | One or more actions failed. | |
The character(s) shown in the
Action
column of the EOJ
Checking page indicate the action(s) that have been
defined for the event. For example: PSU indicates that a
description (P), a SYSOUT action (S) and a
notification message (U) have been defined for the event.
| Action Indicator | Action Indicated |
|---|---|
A
|
Job or job network activated. |
C
|
Output condition defined. |
J
|
Job variable defined. |
L
|
Kept resource released. |
O
|
Other actions defined. |
P
|
Description of event exists. See also Creating and Viewing Online Documentation for Events. |
R
|
Recovery action defined. |
S
|
SYSOUT action defined. |
T
|
SYSOUT or other files passed to Entire Output Management. |
U
|
User message defined. |
X
|
Action user exit defined. |
Y
|
Symbol or symbol settings modified. |
The following functions are available for a table item selected on the EOJ Checking page:
| Function | Description | |
|---|---|---|
| Add | Define a new End-of-Job event and action(s). | |
| Modify | Edit the selected End-of-Job event and action(s). | |
| Delete | Delete the selected End-of-Job event and action(s). | |
| Edit Action Exit | Edit the action user exit
to be executed if the selected event occurs. This command is only available if
you are authorized to modify the selected user exit.
See also User Exits for End-of-Job Checking and Actions in the section User Exits. |
|
| Edit User Exit | Edit the user exit
specified for the selected checking user exit. This command is only available
if you are authorized to modify the selected user exit.
See also User Exits for End-of-Job Checking and Actions in the section User Exits. |
|
To add or modify an End-of-Job (EOJ) check and action
definition
In the Job Master window, open the tabbed page .
Choose or Modify depending on whether a definition already exists.
An EOJ checking window similar to the example below opens:
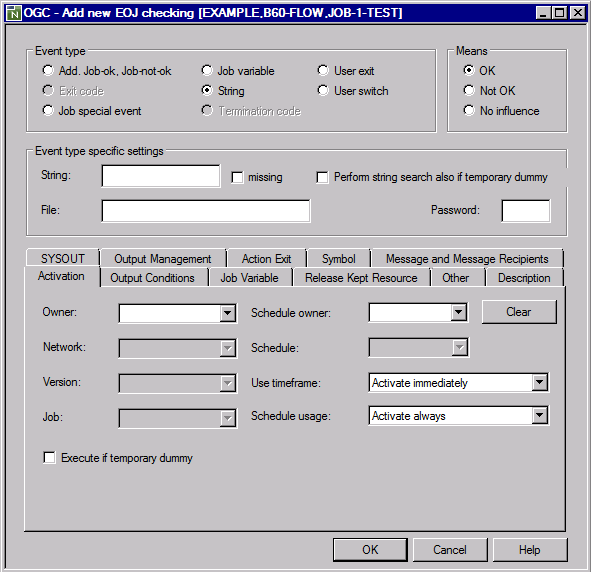
The input fields and tabs provided in the EOJ checking window depend on the operating system (here: BS2000) of the execution node and the Event type (here: String) specified for the job. All fields and tabs that can be available in the window are explained in Fields: EOJ Checking Window.
Make your definitions and choose to save your entries.
This section covers the following topics:
This section describes the fields and tabs contained in the EOJ checking window.
The fields in the Event type, Means and Event type specific settings group boxes are used to define the job event.
The fields on the tabbed pages in the lower window section are used to define the action to be taken if the event occurs. The following table indicates when a field in a group box has a corresponding field on a tabbed page.
Note:
The fields and tabbed pages available
to define an event or action depend on the operating
system of the execution node and the Event type selected for the job.
This is also indicated in the table below.
| Field | Page | Description | ||
|---|---|---|---|
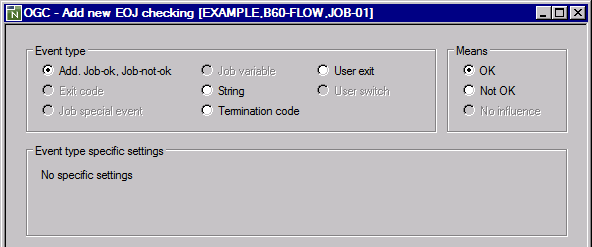
| Event type | A -
Add. Job-ok,
Job-not-ok:
Additional definition for All Checks ok or Any Check not ok to execute multiple End-of-Job actions of the same type. This event is required to define several actions of the
same type for the event Note: See also Handling End-of-Job Actions and Example of an Additional Job OK/not OK Event (Event Type A). |
||
|
(z/OS and z/VSE only) C - Termination Code:Termination code received during job execution (job step). For possible values, see the field Event field. See also Example of a Termination Code Event (Event Type C). |
|||
|
(BS2000, UNIX and Windows only) J - Job Special Event:Special event during job execution. When such an event
occurs this always means This event occurs if an operating system abend or hardware failure occurs during job execution. This is always used when a job did not run on LOGOFF (job ended normally) or ABEND (job interrupted with error). The defined actions are taken after the start of the Monitor. |
|||
| R -
User Exit:
Job SYSOUT is to be checked by a user exit. |
|||
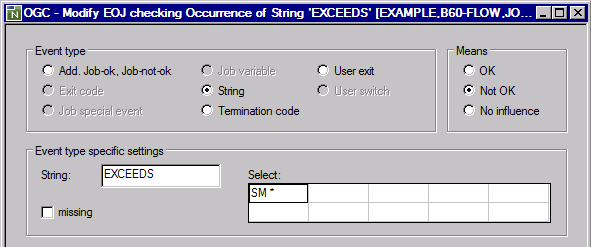
| S -
String:
Occurrence of a specific string in the job SYSOUT or a specified file. See also the field String and Example of a String Event (Event Type S). |
|||
|
(BS2000 only) U - User Switch:Event depends on a user switch. |
|||
|
(BS2000 only) V - Job Variable:Event depends on the contents of a job variable. The input fields available to define a job variable are explained in Fields: Job Variable Definitions (BS2000 only). |
|||
|
(UNIX and Windows only) X - Exit Code:Exit code check. The result of the event comes from the exit code of a script under UNIX or Windows or from the exit code of a program executable under Windows. Specify a logical operator and an exit code to compare the received exit code with the specified values. Note: If a SYSOUT file read error occurs while the Monitor is
trying to read the exit code from the job SYSOUT, this error is treated as a
temporary error. The Monitor attempts to read the exit code up to 10 times. The
time between the attempts is equal to the Monitor wait time. If there is still
no success after 10 attempts, the job is set to the |
|||
| Means | Specifies the event check
status if the defined event occurs.
Possible check-box settings: |
||
| OK | Check OK.
|
||
| Not OK | Check not OK.
|
||
| No influence | No effect on the job result. | ||
|
See also Handling End-of-Job Actions. |
|||
| Event type specific settings: | |||
| Stepname
(z/OS and z/VSE only) |
(z/OS and z/VSE only) JCL step to be checked for the return code specified in the Operator and fields. Special step names: |
||
|
|
Event occurs if the definition is true for any step of the jobs. | ||
|
|
Event occurs if it is true for the maximum termination code (condition code) of the job. | ||
|
Note: See also Example of a Termination Code Event (Event Type C). |
|||
| Operator
(z/OS and z/VSE only) |
(z/OS and z/VSE only) Specifies the logical operator used to compare the received return code with the value entered in the Event field. See also Example of a Termination Code Event (Event Type C). |
||
| Event
(z/OS and z/VSE only) |
(z/OS and z/VSE only) Select a termination condition and enter a value, if required: |
||
| Condition | 4-character condition/return code | ||
| User Abend | 4-character user abend code (z/OS only). | ||
| System Abend | 4-character system abend code (z/OS only). | ||
| Job deleted by operator | Job deleted by operator. | ||
| Job failed JCL error | Job failed, JCL error.
Note: |
||
| Job execution interrupted | Job execution interrupted, for example, system crash (z/OS only). | ||
| 'Not cataloged' error | Not cataloged (compiled) error (z/OS only). | ||
| Job not run JCL error |
Note: |
||
|
See also z/OS and z/VSE Defaults for Event Checking and Example of a Termination Code Event (Event Type C). |
|||
| User exit | Name of the End-of-Job checking user exit which is to run on job
termination.
Note: To display a selection list of user exits, first enter the name of a Natural library in the Natural library field. You can then select a user exit from the drop-down list box of the User exit field. Depending on your permissions, you can Edit or Delete a checking user exit on the tabbed page EOJ Checking. See also:
|
||
| Natural library | Name of the Natural
library which contains the required user exit.
This library should be different from the Entire Operations system library. |
||
| Execute user exit asynchronously |
Possible check-box settings: |
||
| unchecked | User exit is executed synchronously (default). | ||
| checked | User exit is executed asynchronously (in a Natural task). | ||
| String | Specify the string to be searched for in SYSOUT or any defined file.
If the string is found, the event occurs. The following applies:
If the search string contains at least one blank at the beginning, in the middle or at the end, it must be enclosed in quotes. For example: ' leading blanks' |
||
|
See also Example of a String Event (Event Type S). |
|||
| missing
(string) |
String missing. Possible check-box settings: |
||
| unchecked | The event occurs if the string is found (default). | ||
| checked | The event occurs if the string is not found. | ||
| Select
(string) (z/OS and z/VSE only) |
(z/OS and z/VSE only) z/OS:You can limit the search for
strings by specifying file numbers
in this field according to the file type ( Enter the file type followed by a number, a range of
numbers or an asterisk ( |
||
SM 1 |
Search system messages 1. | ||
SM 1:5 |
Search system messages 1 to 5. | ||
SO *
|
Search in all SYSOUT files. | ||
CC 1 |
Search condition codes 1. | ||
|
z/VSE: You can use these file types: |
|||
|
See also Example of a String Event (Event Type S). |
|||
| in File
(string) (BS2000, UNIX and Windows only) |
(BS2000, UNIX and Windows only) Name of the file to be scanned for the specified search string. You may have to supply a user ID and a password with the file name. Symbol replacement is possible for the file name or any part of it:
If the file name contains the activation escape character, a symbol replacement is performed (from the active symbol table). The updated file name is stored in the active database. If you leave this field blank, Entire Operations searches for the string in the SYSOUT collection file created by the Entire Operations Monitor. Symbol replacement is possible. The submission escape character is to be used. |
||
| Perform string
search also if temporary dummy
(string) (BS2000, UNIX and Windows only) |
(BS2000, UNIX and Windows only)
Specifies whether to perform the string search for temporary dummies. check box settings: |
||
| checked | The string search is always performed (default). | ||
| unchecked | The string search is only performed if the job is not executed as a temporary dummy. | ||
| Password
(string, job variable) (BS2000 only) |
(BS2000 only) Alphanumeric password for a defined job variable or a password-protected file (optional). |
||
| User Switch ... of BS2000 User ID
...
(BS2000 only) |
(BS2000 only) Enter a valid BS2000 user switch in the range from
|
||
| Tabbed Pages: | |||
| Activation | The tabbed page Activation is explained in Defining Network and Job Activation Actions. | ||
| Output Conditions | The tabbed page Output Conditions is explained in Output Conditions for an Event. | ||
| Job
Variable
(BS2000 only) |
(BS2000 only) The tabbed page Job Variable is explained in Fields: Job Variable Definitions (BS2000 only). |
||
| Release Kept Resource | The tabbed page Release Kept Resource is described in Release Kept Resource Action. | ||
| Other | The tabbed page Other is explained in Defining Other Actions: Deactivate Job Automatically. | ||
| Description | The tabbed page Description is used to add, view or modify text that describes an event. See Creating and Viewing Online Documentation for Events | ||
| SYSOUT Action | The tabbed page SYSOUT Action is explained in SYSOUT Action. | ||
| Output Management | The tabbed page
Output Management is used to pass single or multiple files
to Entire Output Management for further processing after job completion.
For detailed information, see Passing Files to Entire Output Management. |
||
| Action Exit | The fields on the tabbed page Action Exit are used to define an action user exit. See Defining Action User Exits. | ||
| Symbol | The tabbed page Symbol is explained in Defining Actions for Symbol Value Modification. | ||
| Message and Message Recipients | The tabbed page Message and Message Recipients is explained in Defining Notification Messages. | ||
- Fields: Job Variable Definitions (BS2000 only)
The fields available to define a job variable event in the header section of the EOJ checking window and a job variable action on the tabbed page Job Variable are explained in the following table:
Field Description Job variable Name of a valid BS2000 job variable. If the job variable is specified without an explicit user ID, the job default BS2000 user ID is used as a prefix. Symbol replacement is performed in the name if the name contains the activation escape character at least once. Symbol replacement is possible. The submission escape character is to be used.
Position Position of the substring of the job variable value to be checked. Possible values: 1 to 253.
Length Length of the substring of the job variable value to be checked. Possible values:
1to253.Format Format in which the substring of the job variable value is to be checked against the comparison-string.Possible selection options:
Aalphanumeric Nnumeric is Logical operator to be used for comparison of the defined BS2000 substring of the job variable value against the comparison-string.compared to Enter the string or field to be compared with the substring of the job variable value. The strings are compared in the defined format. The content of this field is compared with the substring of the job variable value, or it is inserted into the substring of the job variable value. The comparison is made in the defined format.
Symbol replacement is possible. The submission escape character is to be used.
Password (Optional field) If the job variable is read password-protected, specify the password here.
Execute if temporary dummy See End-of-Job Actions after Execution as a Temporary Dummy Job. - Valid Comparison Operators
You can use one of the following comparison (relational) operators to compare two character strings and return either the value true or false:
Operator Explanation =Equal to the specified value. EQ>=Greater than or equal to the specified value. GE>Greater than the specified value. GT<=Less than or equal to the specified value. LE<Less than the specified value. LT<>Not equal to the specified value. NE
To delete an event definition
On the tabbed page EOJ Checking, select the required event and choose .
A window prompts you to confirm the deletion.
Choose to confirm the deletion.
(No cancels the action.)
The page closes and the event definition is removed.
This section covers the following topics:
Symbol replacement error during job submission:
If a symbol replacement error occurs at submission time, the
event Job not run JCL error is
set to occurred.
If the event Job not run JCL error is not defined, it is added to the active job.
If a string defined in the
Global Message Code
Table (see the Administration documentation) is
found anywhere in the SYSOUT, its severity equivalent is compared with the
highest condition code value accepted as OK. The job is not
OK if the severity equivalent is higher than this default.
If no events are defined for a job, Entire Operations provides a default check of the return code type (for termination codes):
If a system code that is not equal to 0 (zero)
has occurred at any job step, the job is evaluated as not OK if
this event is not explicitly defined. This also applies if an event has
occurred which has been defined using ANYSTEP. The occurrence of
such an event has the priority over definitions, which apply for any steps.
For z/VSE only:
No system codes are available in the z/VSE operating system.
For z/VSE only:
The following messages lead to a not OK status of
the z/VSE job:
PROGRAM ABEND
ENDED ABNORMALLY
OPERATOR CANCEL
You can set the default for how to treat the message
IEF201I job terminated if it occurs. The appropriate
option in the Operating
System Specials (see the
Administration documentation) determines whether to treat
this message as not OK. If treated as not OK, a log
is written and the job is set to the status Job
interrupted. If treated as OK, the occurrence of
IEF201I in SYSOUT has no consequences and the job continues.
If the message IEF287I data set not
cataloged is received, it is written to the log and the job is
treated as not OK.
If a condition code or user code, which is not explicitly
defined, is received at any job step, it is compared with the highest value
accepted as OK. The job is not OK if the code is
higher than this default. The job is also not OK if no explicit
check has returned an OK. For more information, see the
Operating
System Specials option.
Events like JCL error, Job not run and Job interrupted cause
the status not OK by default. Dedicated event definitions can
override this.
In all other cases, the job is accepted as
OK.
Precedence of event checks:
If a MAXCC or ANYSTEP check has
been defined and this event occurs, no check is done on the highest value
accepted as still OK.
MAXCC precedes ANYSTEP.
For z/VSE only:
Date formats in z/VSE SYSOUT:
In z/VSE SYSOUT, the following date formats are recognized and handled:
| American Format | MM/DD/YY, MM/DD/YYYY |
|---|---|
| European Format | DD/MM/YY, DD/MM/YYYY |
If a date contains a 2-digit year specification in the SYSOUT, Entire Operations adds the century for further processing. In this case, a sliding window of + / - 50 years is applied (see also Date Display and Input Options).
Entire Operations either uses a defined Monitor job variable for a job or creates its own job variable if job variables are available.
If the Monitor job variable displays an abnormal end, the job
is not OK.
By default, if defined message keys appear, the job is
regarded as faulty and is set to not OK. These
message
codes (see BS2000 Default Message Codes in den
Administration documentation) are default settings which
are in effect after the installation of Entire Operations. However, they can be
freely adapted. It is possible to completely delete this table.
Note:
Each time this table is modified, possibly faulty jobs may
no longer be set to not OK.
If messages like program dump appear in
the SYSOUT, the job is not OK.
In all other cases, the job is accepted as OK.
Entire Operations inserts start and end messages (EOR0301, EOR0302) in the SYSOUT.
If the end message EOR0302 is missing, the job is treated like an interrupted job. Because it is possible that the SYSOUT of an asynchronous child process is written behind the end message, the message EOR0302 is searched in the whole SYSOUT file. If the End-of-Job checking detects that there is unexpected SYSOUT behind the end message, you cannot obtain the process times for accounting. A note is written to the log:
Process times for accounting not found ... SYSOUT
of background processes may exist.
If no special event checking was defined for a job (UNIX and
Windows), then the event is compared to a system-wide default value for UNIX or
Windows. Depending on this check, the job result can be set to not
OK.
In all other cases, the job is accepted as OK.
You can browse text description of active event and write or modify the text description of a master event.
To add, view or change an event description
On the EOJ Checking page select the event for which you want to add a description or whose description you want to view or change and choose .
The letter P in the Action column indicates whether a description already exists for the event.
The EOJ Checking window opens.
Open the tabbed page Description.
The page contains either descriptive text for the event or an URL address as shown in the example below:
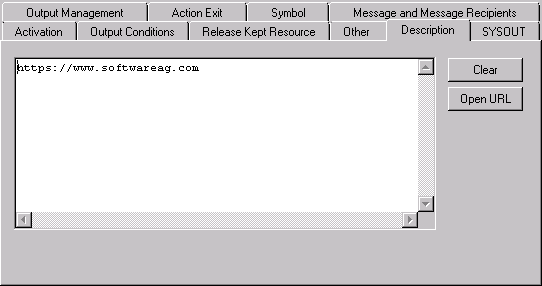
If an URL address is displayed, you can choose Open URL to open the page associated with the URL.
Write new or replace existing text as required.
Choose Clear if you want to remove the whole text contained in the editor area.
Choose OK when you are finished.
Note:
After you add or modify an output condition definition, a loop
check is performed on the affected network. The same conditions apply as
described in Checking for a
Loop in a Job Network in the section Network
Maintenance with one exception: if a loop is detected in the job
flow, no corresponding message appears.
This section contains examples of event definitions:
This example defines an additional Job OK event to
execute another End-of-Job action of the same type.
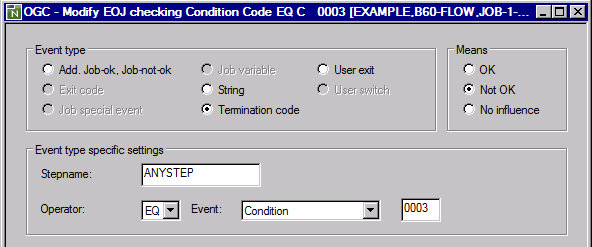
If Condition Code 3 is received at any step (ANYSTEP)
during job execution, the event result is not OK.

This event occurs if an operating system abend or hardware failure occurs during job execution.
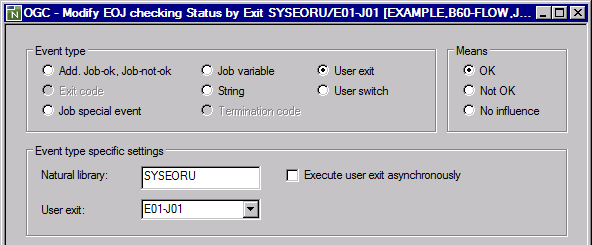
User exit E01-J01
checks the job SYSOUT at job completion. This user exit resides in the Natural
library SYSEORU.
Example for z/OS:
Example for BS2000:
Example for z/OS: If the string EXCEEDS is found
in any system message (SM *), the event result is not
OK.
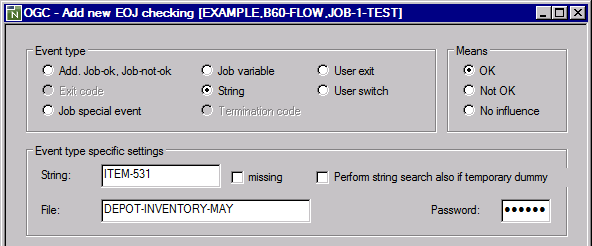
Example for BS2000: If the string ITEM531 is
found in the BS2000 file DEPOT-INVENTORY-MAY, the event result is
OK.
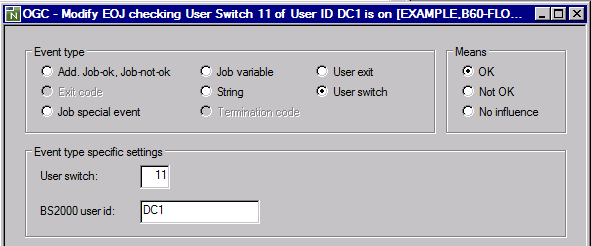
The event is OK if user switch 11 of the
BS2000 user ID DC1 is on at job termination time.
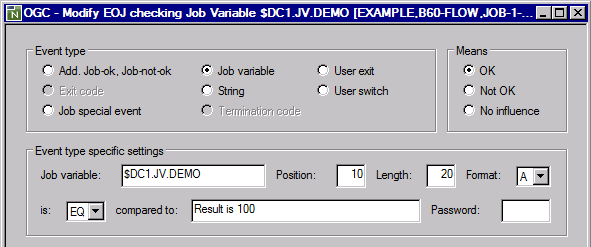
The event is OK if the job variable
$DC1.JV.DEMO contains Result is 100 at the position
10, in the length 20, in alphanumeric
(A) format.
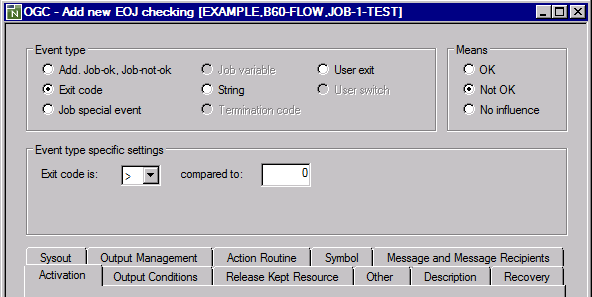
The event is OK if an exit code greater than
0 (zero) occurs.
An End-of-Job action can be performed for a check event defined at the job step level and/or the default check event All Checks ok or Any Check not ok defined at the job level.
The default check events are always provided in the last two table rows of the EOJ Checking page.
All checks ok can be used to define actions to perform if no error occurred during job execution.
Any Check not ok can be used to define actions to perform if at least one error occurred during job execution.
This section covers the following topics:
To define an action
On the EOJ Checking page, select an event at the job step level for which you want to define an action, or select the default event check All Checks ok or Any Check not ok
Choose Add or Modify depending on whether you want to add or change an action, and proceed as described in the action-specific instructions in the remainder of this chapter.
The example below demonstrates how the same action can be defined for several purposes:
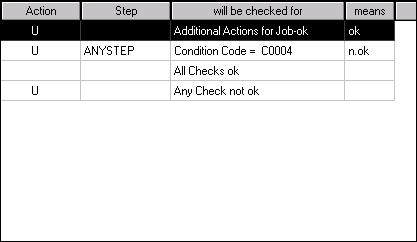
In the example above, a notification message (U) is sent after job termination if
No error occurred during job execution (Additional
Actions for Job-ok),
Condition Code 4 occurred during job execution, and
Any error occurred during job execution (Any Check
not ok).
You can modify the setting of Execute if temporary dummy for all relevant End-of-Job actions defined for a selected set of job masters.
Prerequisite: Read and write permissions must be checked in the EOJ Checking + Action option of your user profile (see Network Maintenance Functions described in the Administration documentation).
To update "Execute if temporary
dummy" for multiple jobs
From the table in the Job Master List window, select the jobs whose Execute if temporary dummy settings you want to change and choose Mass update from the context menu.
Or:
Open the diagram of the network master containing the jobs
to be updated, select the job masters whose Execute if temporary
dummy settings you want to change and choose Mass
update from the context menu (see also
Maintenance
Functions for Diagrams).
A Mass update Job Master (or Diagram Job Master, respectively) dialog similar to the following opens:
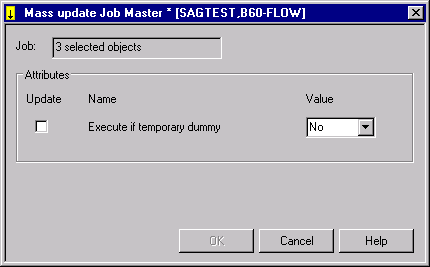
The Job field indicates the number of job masters selected for the update operation.
If you want to perform the execute operation, select the Update check box (not selected by default) and choose Yes from the drop-down list box to check the Execute if temporary dummy option for all End-of-Job actions of the selected jobs.
Or:
If you do not want to perform the execute operation, select
the Update check box and choose No
(default) from the drop-down list box to uncheck the Execute if
temporary dummy option for all End-of-Job actions of the selected
jobs.
Choose OK.
The setting of the Execute if temporary dummy option is changed for the following End-of-Job actions:
Related Topic:
To remove an action
On the EOJ Checking page select the event for which you want to remove an action and choose .
The EOJ checking window opens.
Open the page that contains the action you want to remove.
On the appropriate action page, choose Clear.
The entries in the window are removed.
Choose OK.
Or:
On the appropriate action page, choose
Delete (if available).
A confirmation window opens.
Choose Yes.
(No cancels the action.)
The page closes and the action is removed.
To remove an event with a single action
If a single action is defined for an event, you may want to remove the entire event by selecting the required event on the EOJ Checking page and choosing Delete.
For temporary dummy jobs, End-of-Job actions are partially carried out as if the jobs were running in normal mode.
Several End-of-Job action definitions contain a field Execute if temporary dummy which can be used to execute the End-of-Job action according to this definition if the job was executed as a temporary dummy job.
Possible check-box settings:
| checked | Perform the End-of-Job action if the job executed as a temporary dummy job. |
| unchecked | Do not perform the End-of-Job action if the job executed as a temporary dummy job (default). |
Note:
You can check or uncheck the Execute if
temporary dummy option for multiple jobs at the same time: see
Changing Execute if Temporary
Dummy Settings for Multiple Jobs.
This section covers the following topics:
If the Execute if temporary dummy option is not selected in an event action definition, the following defaults apply:
| Output conditions | Output conditions are always set or deleted even if the job is a temporary dummy job. |
|---|---|
| Dummy due to schedule changes | Additional End-of-Job actions are not executed. |
| Dummy for other reasons | Additional End-of-Job actions are executed. |
Actions that refer to the SYSOUT file cannot be executed if no SYSOUT file exists. This case applies if the job is executed as a temporary dummy job.
End-of-Job action user exits are not performed for temporary dummy jobs.
You can set or reset output conditions as End-of-Job actions for any job events.
You can define up to 50 output conditions for any event at the job step level or at the job level according to All checks ok and Any check not ok.
To add, view or change an output condition
On the EOJ Checking page, select the event for which you want to create a condition and choose Add.
Or:
On the EOJ
Checking page, select the event whose output condition
you want to view or change and choose .
The letter C in the Action column indicates whether an output condition exists for the defined event.
The EOJ checking window opens.
Open the tabbed page Output Conditions show in the following example:
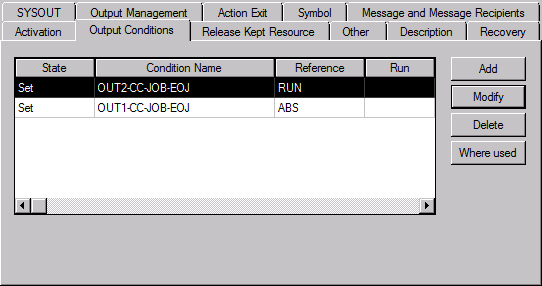
If output conditions already exist, they are listed in the table. In the example above two conditions are set for a selected Termination code event.
The column headings are explained in Columns and Fields: Output Conditions. The commands are explained in Commands: Output Conditions.
Choose Add to define a new condition.
Or:
Select an existing output condition (here:
OUT1-CC-JOB-EOJ) and choose Modify.
An Output Condition window similar to the example below opens:
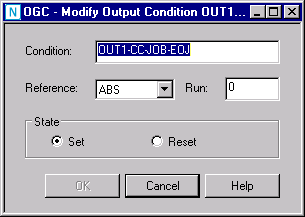
Enter the required values.
The fields and valid input values are explained in Columns and Fields: Output Conditions.
Choose OK when you are finished.
The Output Condition window closes.
On the Output Conditions page, choose OK.
On the EOJ Checking page, choose OK.
The definition of the new or modified output condition is saved.
- Columns and Fields: Output Conditions
The columns available on the Output Conditions page and the corresponding fields in the Output Condition window are explained in the following table.
Column/Field Description State | Set/Reset
Determines whether the defined output condition must be true (Set) or false (Reset) if the associated event occurs. Possible values:
Set Condition is true (default). Reset Condition is false (ignored). Condition Name | Condition User-defined name for the condition. Use this name if you wish to define this output condition as an input condition for another job. Symbol replacement is possible. The submission escape character is to be used.
If you want to add or modify a global condition that can be used across networks, consider the rules and restrictions for global conditions described in the section Global Conditions.
Reference
An output condition can be set with different references (usually the current network run number).
The reference is evaluated and set when the active condition is created by the Monitor according to the End-of-Job definition.
Possible values:
ABSAbsolute condition. Exists only once, because it is independent of run numbers.
RCMSets an active condition with owner, network, run number of the calling network and appends multiple suffixes.
RCMcan be used to determine that the conditions defined for a predecessor job apply to all jobs that reference this predecessor in multiple activated subnetworks. In this case, the input condition of the corresponding successor job must be referenced withRCA: seeRCAin the section Possible References for Input Conditions.RUNor
blank
Current run number of the job network is assigned (default). Run Run number of the job to which this condition applies when modifying the condition for an active job. If left blank, the current run number is assumed by default.
- Commands: Output Conditions
The commands available on the Output Conditions page are explained in the following table.
Function Description Create a new output condition. See Adding, Displaying and Modifying an Output Condition. Delete the condition as an output condition for the job. See Deleting an Output Condition. Modify the output condition definition. See Adding, Displaying and Modifying Output Condition. Open a Where used Condition window with a list of jobs for which this condition is defined as an input or output condition. For more information, see the corresponding function for input conditions described in Listing Jobs Linked to an Input Condition.
To delete an output condition
On the Output Conditions page, select the output condition you want to delete and choose Delete.
A confirmation window opens.
Choose Yes.
(No cancels the action.)
The confirmation window closes and the selected output condition is removed.
You can define a value to be assigned to a symbol or the substring of a symbol value (analogous to a BS2000 job variable) as End-of-Job action depending on the occurrence of an event. The value assignment can be performed in the master or active symbol table, or in both tables. It is possible to modify symbol tables different from the ones specified for the job or the network.
To add, view or change a symbol value setting
On the EOJ Checking page, select the event for which you want to set a symbol value and choose Add.
Or:
On the EOJ
Checking page, select the event whose symbol setting you
want to view or change and choose .
The letter Y in the Action column indicates whether a symbol value has already been set for the event.
The EOJ checking window opens.
Open the tabbed page Symbol similar to the example below:
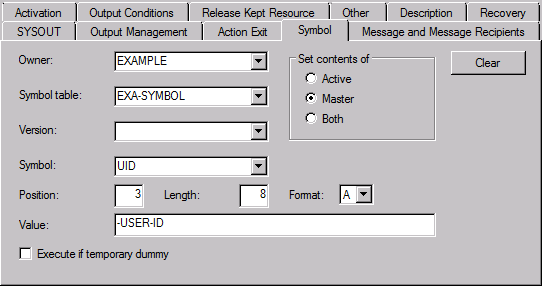
In the example above, the string -USER-ID
replaces or sets the value for the symbol UID in the
EXA-SYMBOL master table of the owner EXAMPLE:
Assuming the old value is NOP, the new value
in the master table will be NOP-USER-ID.
Assuming the old value is
VVVVVVVVVVVVVVVVVVVV, the new value in the master table will be
VVV-USER-IDVVVVVVVVV.
Assuming an old value does not exist (empty
value), the value in the master table will be set to
-USER-ID
(with three leading blanks).
In the input fields, enter the required values. They are described in Fields: Symbol Modification
You can remove all current entries from the window by choosing Clear.
Choose OK when you are finished.
The symbol value setting is saved and the Symbol page closes.
To remove a symbol value setting
Proceed as described in Removing Actions.
This section covers the following topics:
The fields available on the Symbol page are explained in the following table.
| Field | Description | ||||||||||
|---|---|---|---|---|---|---|---|---|---|---|---|
| Owner | Owner of the symbol
table.
When a symbol is set to Active or
Both, the owner of the symbol table and the owner of the
job must be the same. This is indicated by |
||||||||||
| Symbol table | Name of the symbol table
that contains the symbol whose value you want to set or change. The symbol
table must be defined for the network master of the job master.
|
||||||||||
| Version | Version of the specified
symbol table.
The current version (empty field) is the default. |
||||||||||
| Set contents of |
|
||||||||||
| Symbol | Name of the symbol.
Symbol replacement is possible. Example:
If |
||||||||||
| Value | Value to be set into the
complete symbol value or a substring of the symbol value.
Symbol replacement is possible. If the effective value length (after symbol replacement) is longer than the value specified in Length, the value will be shortened to the length specified there. |
||||||||||
| Position | Position at which the
specified symbol value or a substring of the symbol value is set.
Possible values: 1 (default) to 120 characters. |
||||||||||
| Length | Length of the substring
of the symbol value to be set.
Possible values: 1 to 120 characters. Note: If you want to make sure that an old value is entirely replaced, enter a new value of 120 characters. |
||||||||||
| Format |
|
||||||||||
| Execute if temporary dummy | See End-of-Job Actions after Execution as a Temporary Dummy Job. | ||||||||||
(Applies to BS2000 only)
You can define a value to be assigned to a job variable (analogous to a symbol) as End-of-Job action depending on the occurrence of an event.
To add, view or change a job variable setting
On the EOJ Checking page, select the event for which you want to define a job variable setting and choose Add.
Or:
On the EOJ
Checking page, select the event whose job variable
setting you want to view or change and choose
.
The letter J in the Action column indicates whether a variable setting has already been defined for the event.
The EOJ checking window opens.
Open the tabbed page Job Variable similar to the example below:
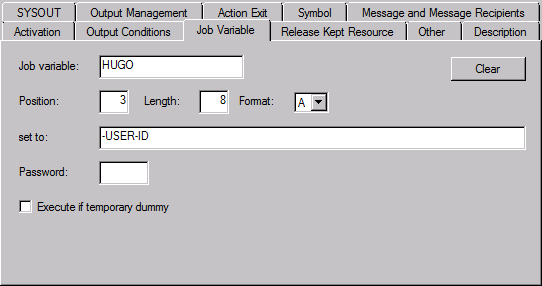
In the example above, the string -USER-ID
replaces or sets the value for the job variable HUGO:
Assuming the old value is NOP, the new value
will be NOP-USER-ID.
Assuming the old value is
VVVVVVVVVVVVVVVVVVVV, the new value will be
VVV-USER-IDVVVVVVVVV.
Assuming an old value does not exist (empty
value), the value will be
-USER-ID
(with three leading blanks).
If no job variable has been defined, the fields in this window are empty; you can set a job variable, by entering the values here.
In the input fields, enter the required values. They are described in Fields: Job Variable Modification.
You can remove all current entries from the window by choosing Clear.
Choose OK when you are finished.
The job variable setting is saved and the Symbol page closes.
To remove a job variable setting
Proceed as described in Removing Actions.
| Field | Description | |
|---|---|---|
| Job variable | Name of a valid BS2000
job variable.
If the job variable is specified without an explicit user ID, the job default BS2000 user ID is used as a prefix. Symbol replacement is performed in the name if the name contains the activation escape character at least once. |
|
| Position | Position of the substring
of the job variable value to be checked.
Possible values: 1 to 253. |
|
| Length | Length of the substring
of the job variable value to be checked.
Possible values: 1 to 253. |
|
| Format | Format in which the
substring of the job variable value is to be checked against the comparison
string.
Possible selection options: |
|
A
|
alphanumeric | |
N
|
numeric | |
| set to | Enter the string or field to be set as the job variable value or as
a substring of the job variable value.
Symbol replacement is performed if the field contains the activation escape character at least once. |
|
| Password | (Optional field)
Password to be entered if the job variable is password-protected. |
|
| defined | Information field that indicates whether a Write Password is defined. | |
| Execute if temporary dummy | See End-of-Job Actions after Execution as a Temporary Dummy Job. | |
You can define user exits for End-of-Job checking and End-of-Job actions.
For information on defining user exits, see User Exits for End-of-Job Checking and Actions in the section User Exits
This section describes how to specify an action user exit for a particular event. Depending on your permissions, you can also add or edit an action user exit.
User Exits for End-of-Job Checking and Actions in the section User Exits
To add, view or change an action user exit definition
On the EOJ Checking page, select the event for which you want to define an action user exit and choose Add.
Or:
On the EOJ
Checking page, select the event whose user exit
definition you want to view or change and choose
.
The letter X in the Action column indicates whether an action user exit.
The EOJ checking window opens.
Open the tabbed page Action Exit similar to the example below:
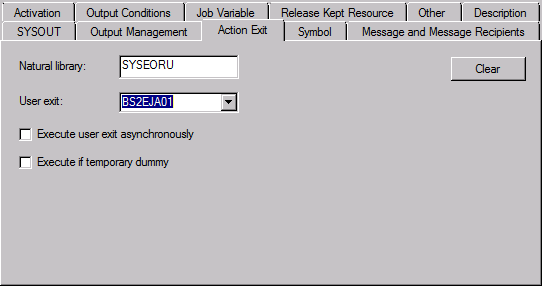
In the input fields, enter the required values. They are described in Fields: Action User Exit.
If required, choose Clear to remove all current entries from the window.
You can also specify the name of a user exit that does not yet exist. Entire Operations saves the definition assuming that you will create the user exit at a later time.
For information on coding user exits, see User Exits for End-of-Job Checking and Actions (section User Exits) and Editing Master JCL and Natural Sources.
When you are finished, choose OK to save your entries.
To remove an action user exit definition
Proceed as described in Removing Actions.
This section covers the following topics:
The fields available on the Action Exit page correspond to the fields available for a checking user exit (event type User exit in the Event type specific settings section of the EOJ checking window.
| Field | Description | |
|---|---|---|
| Natural library | Name of the Natural
library that contains the user exit.
See also Natural library in Fields: EOJ Checking Window. |
|
| User exit | Name of the user exit.
See also User exit in Fields: EOJ Checking Window. |
|
| Execute user exit asynchronously | See Execute user exit asynchronously in Fields: EOJ Checking Window. | |
| Execute if temporary dummy | See End-of-Job Actions after Execution as a Temporary Dummy Job. | |
The tabbed page
Other is used to deactivate a job
automatically, even if it ended not OK.
Select Accept from the
drop-down list box if you want to
deactivate the active job after termination even when it terminates with
not OK. If you select Do not
accept, the job remains active until you have corrected or
manually deactivated it.
Choose Clear if you want to reset the selection box to its default (blank) value Do not accept. See also Removing Actions.
The occurrence of a defined event during job execution can trigger the activation of a specified single job or a whole job network. You can define activation of a job or network for specific events or at the job level for All checks ok and Any check not ok.
Activation is only possible if the network belongs to the defining user or if the defining user is authorized to activate the network of another user. The user defining the network to be activated must at least have authorization to activate this network (see Authorizing Other Users or Owners to Access a Network (Granting Access) in the section Network Maintenance).
To add, view or change an activation definition
On the EOJ Checking page, select the event for which you want to define an activation action and choose Add.
Or:
On the EOJ
Checking page, select the event whose activation
definition you want to view or change and choose
.
The letter A in the Action column indicates whether an activation action has already been defined for the event.
The EOJ checking window opens.
Open the tabbed page Activation similar to the example below:
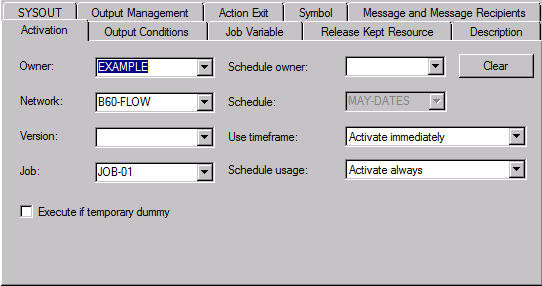
Enter the required values. The input fields and options are explained in Fields: Network and Job Activation.
If required, choose Clear to remove all current entries.
Choose OK when you are finished.
Your action definition is saved and the window closes.
This section covers the following topics:
| Field | Description | |
|---|---|---|
| Owner | Name of the owner of the
network to be activated.
For possible input values to list a specified name range from the drop-down list box (if available), see Specifying Filter Criteria. |
|
| Network | Name of the network to be
activated.
For possible input values to list a specified name range from the drop-down list box (if available), see Specifying Filter Criteria. |
|
| Version | Version of the network to be activated.
The current version (empty field) is the default. For possible input values to list a specified name range from the drop-down list box (if available), see Specifying Filter Criteria. |
|
| Job | Job to be activated.
If the field is empty (default), the whole network is activated. For possible input values to list a specified name range from the drop-down list box (if available), see Specifying Filter Criteria. |
|
| Use timeframe | Valid selection options: | |
| Use time frame of called network | Activate the End-of-Job action according to the time frame/schedule defined for the called network. | |
| Activate immediately | Activate the job immediately (default). | |
| Schedule usage | Valid selection options: | |
| Explicitly defined schedule | Activate the End-of-Job action only if the current day is defined in the network's resp. explicitly defined schedule. | |
| Activate always | Always activate the End-of-Job action (default). | |
| Schedule owner | Name of the owner of the
schedule to be used for activation.
If this field is empty (default), the owner of the network to be activated is used. |
|
| Schedule | Name of the schedule to
be used for activation.
If this field is empty (default), the schedule of the network to be activated is used. |
|
| Execute if temporary dummy | See End-of-Job Actions after Execution as a Temporary Dummy Job. | |
You can define a recovery process to be started as the result of a defined event during job execution. You can also define recovery action at the job level according to Any check not ok.
Usually, recovery is used in case of job failure. For example, a
recovery job can be a compression job started after the message
Library full is received. The string Library
full should be defined as a string event (event type
S). Entire Operations starts the recovery job
automatically when the event occurs.
The recovery process comprises the following tasks:
Activation of a recovery network or a recovery job.
Creation of an internal condition to provide a correct return to the calling network.
Rescheduling of the job to be recovered.
One recovery network can be used in multiple recovery definitions.
It always returns to the calling network.
It is possible to stop the calling network after the recovery.
The conventional way to trigger a recovery network would be to
define an event which activates the recovery network. Recovery is then started
only if the event occurs or if any check is not OK. The recovery
network must be defined as a network master.
To add, view or change a recovery definition
On the EOJ Checking page, select the event for which you want to define a recovery definition and choose Add.
Or:
On the EOJ
Checking page, select the event whose activation
definition you want to view or change and choose
.
The letter R in the Action column indicates whether an activation action has already been defined for the event.
The EOJ checking window opens.
Open the tabbed page Recovery similar to the example below:

Specify the recovery network to be started. The input fields and valid values are explained in Fields: Network and Job Activation.
If required, choose Clear to remove current entries.
Choose OK when you are finished.
Your recovery definition is saved and the window closes.
To remove a recovery definition
Proceed as described in Removing Actions.
This section covers the following topics:
The fields on the Recovery page are described in the following table:
| Field | Description | |
|---|---|---|
| Owner | Owner of the network
that contains the recovery job(s).
selection options: |
|
owner-name |
Owner name other than the current
owner.
For possible input values to list a specified name range from the drop-down list box (if available), see Specifying Filter Criteria. |
|
(SAME) |
Owner of the current network is used (default). The default value is replaced at execution time. | |
| Network | Network that contains the
recovery job(s). The recovery network must be defined in the Network
Maintenance facility.
selection options: |
|
network-name |
Name of the network to be recovered.
For possible input values to list a specified name range from the drop-down list box (if available), see Specifying Filter Criteria. |
|
(SAME) |
(Only applies to single recovery
jobs.)
Same name (default) as the current network that contains the job to be recovered. The default value is replaced at execution time. When you copy a recovery job to another network, the
default values |
|
| Version | Version of the network
that contains the recovery job(s).
selection options: |
|
network-version |
Version of the network that contains
the job(s) to be recovered.
For possible input values to list a specified name range from the drop-down list box (if available), see Specifying Filter Criteria. |
|
(SAME)
or empty field |
Same version (default) as the version of the network that contains the job(s) to be recovered. The default value is replaced at execution time. When you copy a recovery job to another network, the
default values |
|
(CURRENT) |
Current version of the network that contains the job(s) to be recovered. | |
| Job | Name
of the last job in the recovery network to be executed upon job failure. This
job must terminate successfully to start rescheduling.
For possible input values to list a specified name range from the drop-down list box (if available), see Specifying Filter Criteria. |
|
| Same run | Single recovery jobs can be defined in the same network and can be
executed under the same run number as the network to be recovered. All active
objects of the network are then accessible for the recovery job with this run
number.
Possible check-box settings: |
|
| checked | Use same run number (default for single jobs). | |
| unchecked | Use a separate run number for the recovery (default for whole network). | |
| Reschedule | Specifies whether the job
is to be rescheduled for submission after recovery.
Possible selection options: |
|
| Reschedule original job | Resubmit the job. | |
| Do not reschedule original job | Do not resubmit the job (default). | |
| Stop active network after recovery | Stop the original network after recovery. | |
| Repeat | Maximum number of times the original job is to be rescheduled after
a recovery.
Possible values: 1 (default) to 99. The Entire Operations Monitor sets the reserved
condition Repeat is meaningful only if Reschedule is set to Reschedule original job. |
|
| Wait time | Time to wait in minutes until the recovery is started, and between the recovery attempts. | |
When defining a recovery action, the following Entire Operations system symbols can be prefixed with the escape symbol for symbol prompting and used, for example, in a comment line in the JCL of the recovery job:
| Field | Description |
|---|---|
P-C-OWNER
|
Owner of the job making the call. |
P-C-NETWORK
|
Network of the job making the call. |
P-C-NETWORK-VERSION
|
Version of the network of the job making the call. |
P-C-JOB
|
Name of job making the call. |
P-C-RUN
|
Run number of the job making the call. |
P-C-SUFFIX |
Value of the suffix symbol of the job making the call. |
They are substituted at JCL load with their current values. In the SYSOUT of the recovery job, you can then find the substitution of the parameters:
*** Symbol  : P-C-OWNER
  ***   Value : GFR
  *** Symbol  : P-C-NETWORK
  ***   Value : NET-1
  *** Symbol  : P-C-JOB
  ***   Value : JOB-6
  *** Symbol  : P-C-RUN
  ***   Value : 208
  *** =====================================================
2 //STEP1    EXEC PGM=NOPCONTI
3 //STEPLIB  DD   DISP=SHR,DSN=NOP.DEV.LOAD
  *** CALLER OWNER   GFR
  *** CALLER NETWORK NET-1
  *** CALLER JOB     JOB-6
  *** CALLER RUN     208
  ***
In this way, you can find out the job making the call, that is, the job to be recovered by the recovery job.
You can define SYSOUT actions to be performed at job completion if the associated event occurs.
You can define the job SYSOUT to be cancelled or printed as the result of a defined event or the End-of-Job status (All checks ok and Any check not ok).
End-of-Job user exits are available for more complex actions, for example for obtaining selected information from the job SYSOUT. See also User Exits for End-of-Job Checking and Actions in the section User Exits.
To add, view or change a SYSOUT action
On the EOJ Checking page, select the event for which you want to define a SYSOUT action and choose Add.
Or:
On the EOJ
Checking page, select the event whose SYSOUT action you
want to view or change and choose .
The letter S in the Action column indicates whether an activation action has already been defined for the event.
The EOJ checking window opens.
Open the tabbed page SYSOUT.
The fields and options available in the window are explained in Fields: Network and Job Activation.
Select the SYSOUT action that corresponds to the function you want to perform.
If required, choose Clear to remove current entries.
Choose OK when you are finished.
The specified SYSOUT action is saved and the window closes.
To remove a SYSOUT action
Proceed as described in Removing Actions.
This section covers the following topics:
| Field | Description | |
|---|---|---|
| SYSOUT action | Select one of the following options to perform the required function: | |
| Delete | Delete SYSOUT on job completion. | |
| Release SYSOUT for printing. | ||
| Log | Log SYSOUT in the Entire Operations log file. | |
| Log, then delete | Log SYSOUT and then delete it. | |
| Log, then print | Log SYSOUT and then print it. | |
| Pass to Entire Output Management | Pass SYSOUT to Entire Output Management (NOM). | |
| Pass to OPO | Pass SYSOUT to the Open Print Option (OPO). | |
| Spool class | You can specify that the
spool class of a job is to be modified after
completion. The definition created here overrides the default setting.
Notes:
|
|
You can define a notification message to be sent as the result of a
defined event, or if the job terminated OK or not OK.
This is especially useful to inform appropriate user of job failures.
A user-defined message comes along with job execution information generated by Entire Operations. This information is more comprehensive if e-mails are used for sending; mailboxes have less information because they are limited to a single line. For example:
Mailbox message:
This line is the user-defined text.
==> EXAMPLE / EXA-NET3 / 10 / EXA-JOB1
Corresponding e-mail message:
Owner EXAMPLE - Network EXA-NET3 - Run 10 - Job EXA-JOB1
... Execution Node 123 (DAEF-123)
Event: Additional Actions for Job-ok

Ended ok
This line is the user-defined text.
A message can be defined for any event or at the job level according to All checks ok and Any check not ok.
The Entire Operations Monitor continues to send a message until it has been successfully transmitted.
This section covers the following topics:
Global Messages for Events in the Administration documentation
To view or change a
notification message
On the EOJ Checking page, select the event whose message you want to view or change and choose .
The letter U in the Action column indicates whether a message has already been defined for the event.
The EOJ checking window opens.
Open the tabbed page Message and Message Recipients:
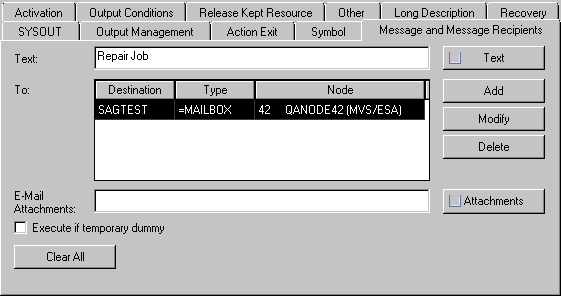
The page shows the short message text and the recipient(s) defined for the message.
All fields contained on the page are described in Fields and Columns: Message and Message Recipients.
All functions provided on the page are described in Available Functions: Message and Message Recipients
- Message texts
If required, write new message text or replace the current text in the Text field.
Or:
Choose to open a Text dialog to write or display text that exceeds the length of the Text field.
In the Text dialog, you can choose Clear to remove all current text entries.
See also Rules for Message Text.
- Recipients
If you want to add a recipient definition, choose .
Or:
If you want to change a recipient definition, in the To: section, select the table row that contains the required definition and choose Modify.
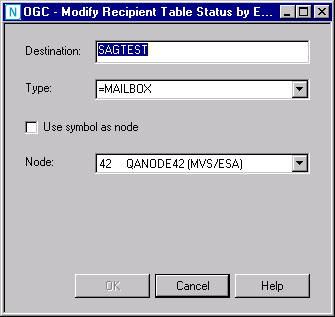
A Recipient Table window similar to the following opens:
Add or change the definition as required and choose OK.
The input fields are described in Fields and Columns: Message and Message Recipients.
Or:
If you want to delete a recipient definition, in the To: section, select the table row that contains the required recipient and choose Delete.
Caution: Use this function with care.
- E-mail attachments
If you want to attach a file to the message, choose Attachments.
An E-Mail Attachments dialog opens where you can enter one or more addresses of files to be attached to the message.
See also Rules for E-Mail Attachments.
You can choose Delete to remove all current entries.
Choose OK when you are finished.
The specified notification message is saved and the window closes.
Or:
Choose Clear All if you want to remove
all current text entries (message text and all recipient definitions).
On the EOJ Checking page, select the event for which you want to define a message and choose Add.
The EOJ checking window opens.
Open the tabbed page Message and Message Recipients, enter message text in the Text field and choose Add to define message recipients.
All fields contained on the page are described in Fields and Columns: Message and Message Recipients.
All functions provided on the page are described in Available Functions: Message and Message Recipients
Proceed as described in Steps 3 to 4 of To view or change a notification message.
To remove a notification message
Proceed as described in Removing Actions.
The fields and columns on the Message and Message Recipients page and in the Recipient Table window are described in the following table.
Note:
The fields are mandatory unless indicated otherwise in the
table. All fields are cleared if you leave a mandatory field empty and you
cannot save the message definition.
| Field/Column | Description | |
|---|---|---|
| Text | One-line text of the
message to be sent if the associated event occurs.
The text in the Text field is dimmed if additional text exists. See also Rules for Message Text. |
|
| E-Mail Attachments | Shows the address of the
file attached to an e-mail.
The address in the E-Mail Attachments field is dimmed if more than one address exists. See also Rules for E-Mail Attachments. |
|
| Destination | Message
destination or recipient, respectively.
In z/OS and z/VSE: enter the user ID of a TP system user. In BS2000: enter a terminal name and the related processor name in the Type field. In UNIX: enter a UNIX user ID valid in the UNIX environment of the addressed server. The message is sent with the UNIX mail function. Since the Destination field is usually too short for an e-mail address, it is recommended to put a symbol into this field, preceded by the submission escape character (in the previous example,$EMAIL-ID).
The effective e-mail address must be defined as symbol value in the symbol
table used by the job.
If e-mail addresses are to be defined (in an EBCDIC
character set) on the mainframe, the string |
|
| Type | Message recipient
(destination) type.
Possible selection options: |
|
=EMAIL |
Sends the message by e-mail to any
recipient in the intranet or internet.
The e-mail is sent in plain text mode. As Windows does not have a built-in
See also E-Mails on UNIX and Windows. |
|
=EMH |
Sends the message by e-mail to any
recipient in the intranet or internet.
The e-mail is sent in HTML format. See |
|
=EXIT |
Use the global message sending exit.
See Global Message Sending Exit in section Global User Exits of the Administration documentation. |
|
=MAILBOX |
Sends the message to the internal Entire Operations mailbox specified in Destination. | |
=COMPLET |
Sends the message explicitly to a Com-plete user (z/OS only). | |
=TSO |
Sends the message explicitly to a TSO user (z/OS only). | |
=CONSOLE |
Sends the message to the operator
console (mainframes only).
An entry in the Destination field is not required. |
|
processor-name |
BS2000: The processor name related to the BS2000 terminal name specified in Destination. | |
| Node | Message sending node.
Enter the Entire System Server node through which the message is routed. You can define the message sending node as a symbol if the Use symbol as node option is selected. For details, see Symbols in Node Definitions in the section Symbol Table and Symbol Maintenance. Default is the execution node of the job. |
|
| Use symbol as node | Select this option to define the message sending node as a symbol. | |
| Execute if temporary dummy | See End-of-Job Actions after Execution as a Temporary Dummy Job. | |
The following rules apply when writing message text on the Message and Message Recipients page:
- Message Text Field
The Text field can contain up to 120 characters on a GUI client and 45 characters on a CUI client. Characters that exceed the CUI limit are truncated on the CUI screen.
If the text contains an activation escape character, text replacement is performed from the active symbol table.
- Message Text Window
If the Text field contains text, the first input line of the Text window is filled with this text by default.
If no text is entered in the Text field, the first input line of the Text window is copied into the Text field by default. Text that exceeds the 45-character limit of the Text field is truncated.
Text can be entered on 10 input lines with a maximum of 120 characters per line on a GUI client and 76 characters on a CUI client. Characters that exceed the CUI limit are truncated on the CUI screen. Empty lines are removed from the text.
If the text contains an activation escape character, text replacement is performed from the active symbol table.
The text in the Text field is removed when the text in the Text dialog is deleted.
Note:
If the text on the
Message and Message
Recipients page is not modifiable, the effective
message text is automatically generated for the event by Entire Operations.
The following rules apply when attaching a file to an e-mail from the Message and Message Recipients page:
- Send Limits
You can attach up to 5 files to a message for e-mails sent through UNIX or Windows execution nodes.
You can attach only one file to e-mails sent through mainframe nodes.
There is no limitation for the size of an attachment. However, consider that large attachments, for example, consume large database space and may need more time to send the message. This can have an impact on the Entire Operations Monitor task used for message sending.
- Node Usage
Attachments are always taken from the execution node of the job, for which the message is sent.
For e-mails sent through UNIX nodes: Attachments from any execution node can be sent.
For e-mails sent through mainframe and Windows nodes: Attachments can be sent only if they are located on the e-mail sending node (recipient node).
If an attachment cannot be found, a notification is appended to the e-mail body, and a message is written to the Entire Operations log.
- File Format
Attachments from z/OS can be sequential text files and PDS members only. They are sent with
Content-Transfer-Encoding: 8bit.Attachments from BS2000 can be sequential text files only. They are sent with
Content-Transfer-Encoding: 8bit.Attachments from UNIX and Windows can be files of any type. They are sent with
Content-Transfer-Encoding: base64.- File Name
The file name can contain symbols.
Symbols preceded by the activation escape character are replaced at job activation time.
Symbols preceded by the submission escape character are replaced during message sending.
The SYSOUT file of a job can be attached by using the activation escape character defined for the job or containing network. Example:
^P-SYSOUT(assuming
^is the escape character)- File Address
The maximum file address is 120 characters on a GUI client and 76 characters on a CUI client. Characters that exceed the CUI limit are truncated on the CUI screen.
Each file name must begin on a new line.
Files must be specified with their full path name. Example:
/home/sag/work/NOP 551 Adabas Files.docxA Windows path name can be specified with a slash (
/) or a back slash (\).For mainframes, the file address can be specified using the syntax file-name(member-name), where member-name is the name of a source file. Example:
PDS.SOURCE1(IEFBR12)A mainframe file address is converted to upper case during job activation.
The following functions are provided on the Message and Message Recipients page:
| Function | Shortcut | Description |
|---|---|---|
| Add | --- | Add a recipient definition to the To: section of the page. |
| Modify | --- | Modify the recipient definition selected in the To: section of the page. |
| Delete | --- | Delete the recipient definition
selected in the To: section of the page.
Caution: |
| Clear All | --- | Clear all fields on the page. |
| Text | --- | Add additional message text. |
| Attachments | --- | Attach one or more files to an e-mail message. |
The sender name contains Entire Operations for
all sending platforms.
An additional line with the Entire Operations event text is added to the mail.
- Usage Notes:
Before using a z/OS Entire System Server node for sending e-mails, you must invoke the node definition in Entire Operations and enter the line command
O(Other) for that node.For further information, see Special Definitions for a Node (Mainframe) in the section Definition of Nodes in the Administration documentation.
You must define at least the mail destination and the SYSOUT class for the node through which the e-mail is to be routed.
The e-mail send routine for z/OS performs an Entire System Server logon, if necessary. The user ID for the logon is the submit user ID for the active job. If no submit user ID is defined for the job, the default user ID for the node is used.
To use a z/OS Entire System Server for sending e-mails, make sure that all users who send e-mail are correctly defined in the security systems (if applicable). It might be necessary to define user IDs as USS users.
For more information, see the appropriate Entire System Server documentation for your operating and security system.
E-mails can be sent via BS2000 nodes if Entire System Server nodes are used.
Before using a BS2000 Entire System Server node for sending
e-mails, you must invoke the node definition in Entire Operations and enter the
line command O (Other) for that node.
For further information, see Special Definitions for a Node (Mainframe) in the section Definition of Nodes in the Administration documentation.
The e-mail send routine for BS2000 performs an Entire System Server logon, if necessary. The user ID for the logon is the submit user ID for the active job. If no submit user ID is defined for the job, the default user ID for the node is used.
UNIX: To be able to send e-mails on UNIX machines from Entire System Server, the following mail programs must be available there:
| AIX, HP-UX, Linux, Sun Solaris: | sendmail |
| Others: | rmail |
Windows: To be able to send e-mails on Windows machines from Entire System Server, you must define a message command. This is a (third-party) command line tool to be used for sending e-mails via Entire System Server/Windows.
Before using a UNIX or Windows node for sending e-mails, you
must invoke the node definition in Entire Operations and enter the line command
O (Other) for that node.
The return address of the e-mail is set to the same value as E-Mail Reply-To.
For further information, see Special Definitions for a Node (UNIX and Windows) in the section Definition of Nodes in the Administration documentation.
You can define an End-of-job action to explicitly release the resource held by another job of this network. The quantity released for the resource is equal to the quantity defined in the prerequisite resource definition of the respective job (that is, the quantity that was allocated).
It is possible to release a resource held by any other job of this network with the Release Kept Resource option.
To add, view or change a resource release definition
On the EOJ Checking page, select the event for which you want to define a resource release action and choose Add.
Or:
On the EOJ
Checking page, select the event whose resource release
definition you want to view or change and choose
.
The letter L in the Action column indicates whether a resource release definition already exists for a defined event.
The EOJ checking window opens.
Open the tabbed page Release Kept Resource shown in the following example:
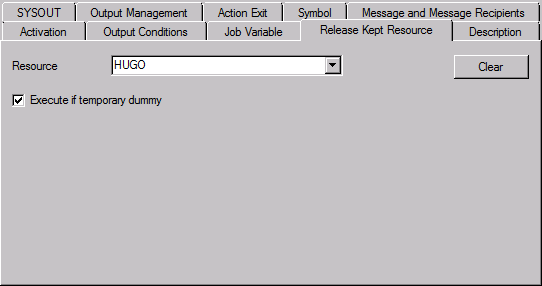
Enter the required values. The fields are explained in Fields: Release Kept Resource.
If required, choose Clear to remove the current entries.
Choose OK when you are finished.
The resource release definition is saved.
To remove a release kept resource definition
Proceed as described in Removing Actions.
This section covers the following topics:
The fields in the Release Kept Resource page are explained in the following table.
| Field | Description |
|---|---|
| Resource | Name of the resource to be released.
You can select a name from the drop-down list box. |
| Execute if temporary dummy | See End-of-Job Actions after Execution as a Temporary Dummy Job. |