
This section describes common functions of Entire Operations GUI Client that perform the same operations for different objects.
In addition, it describes the functions of the General metanode that perform global operations on all objects in your Entire Operations environment.
In Entire Operations GUI Client, a long reading process can be cancelled by pressing ESC.
 To cancel reading
Press ESC.
All maintenance dialogs within the Entire Operations GUI Client provide an additional button to save previously entered information without closing the maintenance dialog. The changes take effect just by selecting .
If you create a new objet and select , this dialog changes from a New to a Maintenance behavior.
To view a list of objects
In the object workspace, select a metanode.
Open the context menu and choose , or press F8.
Or:
Use the LIST
direct command as described in the Direct Commands
documentation.
A List window similar to the example below opens:
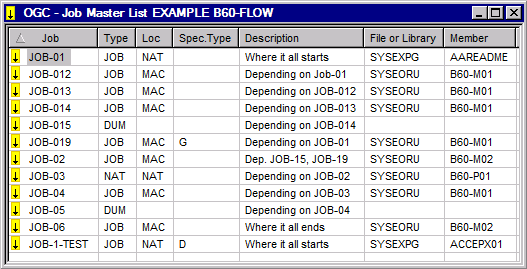
All objects of the selected metanode are listed.
In the example above, all jobs of the Job
Master metanode are listed for the B60-FLOW network of
the owner EXAMPLE.
This section covers the following topics:
The context menu in a List window provides the Grid Lines function with the options Show and Hide to show grid lines in the List window or hide them, respectively. Changes affect the view in the active List window only.
You can set initial values for all List views:
From the Options menu, choose Grid Lines and select Show or Hide. This setting is stored between sessions in user XML profile and is used as the default value for all List views.
To refresh objects listed in the object workspace
In the object workspace, select a metanode and choose from the context menu, or press F5.
The list of objects of the selected metanode is updated immediately.
To refresh objects from an open list window
Open a window that contains a list of objects and press F5 or choose the button, if available.
The list is updated immediately.
Or:
Open a window that contains a list of objects and choose
, if available.
In the Automatic Refresh window that opens, select the check box. If required, change the time interval (the default is 30 seconds) in which you want to update the list.
Choose OK.
The list is updated automatically in the time interval specified.
You can define a named or unnamed filter for a set of objects to be shown by default in the tree view nodes of the object workspace and listed in an object List window.
The following rules apply when using a named filter:
The default values set for Filter in your user profile (see the Administration documentation) are used.
You must have appropriate access rights to read, modify and delete a named filter.
A global filter specified in your user profile overrides any named filters set in your environment.
You cannot use a named filter if a global filter is set in your user profile.
A named filter is in effect during the current session, or across sessions if the Restore My Desktop is set.
A global filter is in effect across sessions, the setting of the Restore My Desktop option is ignored.
Once set, a filter becomes effective immediately. The tree view in the object workspace is rebuilt and only shows the type of objects and name ranges specified for the filter.
A named filter that uses the selection criterion
(current) may need a refresh of the list data if the determination
date changes: see Changes to the Determination
Date.
If a filter is set in your environment, the icon of the folder
that contains the filtered objects changes from
![]() to
to
![]() in the object workspace.
in the object workspace.
To filter objects
In the object workspace, select a metanode.
Open the context menu and choose .
Or:
Press F3.
A Filter window similar to the example below opens:
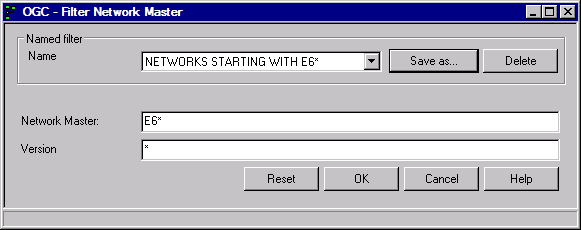
The input fields provided in the window depend on the type of objects contained in the selected node. For example, the field Version is only available for objects of the type network master and symbol table master.
The input fields are dimmed if a global filter is set. The Name field then contains (Global Filter) and the object specification fields indicate the selection criteria used by the filter. In this case, you cannot create or set a named filter.
You can create a new filter by entering a name in the Name field or choose a filter from the drop-down list box. Choose an option:
Leave the Name field blank and enter the required filter criteria in the remaining input fields.
Or:
From the Name, select the name of a filter with predefined filter criteria.
From the Name, select the name of a filter you want to use as a template for a new filter. Change the filter criteria as required and save the filter with a new name by using the Save as function.
A filter name can have a maximum of 50 alphanumeric characters.
Choose when you are finished.
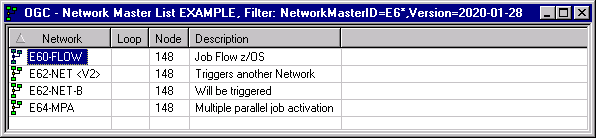
Now, only objects which satisfy the selection criteria are listed in the tree view and List window as shown in the following example:
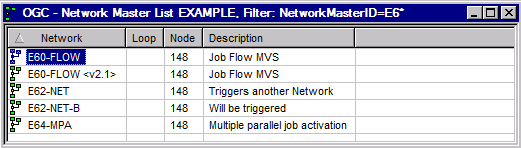
The filter criteria used for the list is indicated in the window title (here: Filter: NetworkMasterID=E6*).
In the example above, all networks with names starting with
E6 are to be selected for all network versions.
A common named filter remains active until you explicitly Reset it or until a global filter overrides it.
The Filter window provides the following functions:
Choose Reset to reset all filter criteria and deactivate a filter.
Choose Save as… to save the current filter criteria as a named filter.
A window opens where you can enter the filter name.
Choose OK to save the new filter.
Choose to remove a selected named filter.
A window prompts you to confirm the deletion.
This section describes the options provided to specify name ranges to be used as selection criteria for Entire Operations functions or drop-down list boxes.
In the following table,
value is any combination of one or more
characters.
| Input | Names Selected |
|---|---|
* |
All names. |
value* |
All names that start with
value.
Example: |
value> |
All names greater than or equal to
value.
Example: |
value< |
All names less than or equal to
value.
Example: |
value?
|
All names that start with
value and end with any single character
for each question mark (?) entered.
Example: |
value?value |
All names that match and
value combined with a question mark (?)
in any order.
Example: |
??? |
All names with an exact length of three characters.
Example: |
This option only applies to the Filter function.
As an alternative to specifying a name range for a network version, you can also list only the current version for each network.
The filter selects a single network version as the current version if either of the following applies:
The date range specified in the usage definition of a network version (see Handling Network Version Usage Definitions) matches the evaluation date. The evaluation date is either the determination date specified for a filtered List window or the current date of a filtered tree view. See also Changes to the Determination Date.
The network has one version only (a named or an unnamed version, see Versioning of Job Networks) and a usage definition does not exist for this version.
- Changes to the Determination Date
The result list returned in the List window for a named filter that uses
(current)depends on the determination date set. If the date changes, you need to refresh the data in an open List windowYou need not refresh the data returned for an unnamed filter that uses
(current)because it always considers the determination date.The list of networks in the tree view returned for a filter that uses
(current)always considers the current date; the determination date is ignored.Possible differences in the results between the List window and the tree view are indicated in the following instruction.
To list current network versions only
In the Filter Network Master window,
enter (current) in the Version field as shown
in the following example:
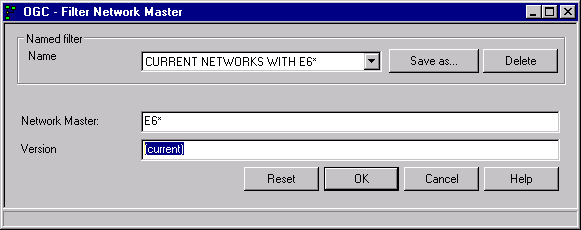
Choose OK.
Now, only the network version which satisfies the selection
criterion (current) is listed for each network in the
List window as shown in the following example:
Version=determination
date (here: Version=2020-01-28)
in the window title indicates that the filter uses (current) for
network version selection.
The list in the tree view returned for the same filter criteria is different if the current date (for example, January, 27, 2020) does not match the determination date:
E62-NET <V2> is not listed in the network
tree because the usage definition for this network is not valid on the current
date.
The context menu in a List window provides the Save View as File function to save the content of a List window as a report file containing columns and column headings and filter information. For detailed information, see Report Output Options in the section Reporting.
The drag and drop function is used to specify and perform a preferred menu function on all objects in a node or a node instance contained in the object workspace.
This can help perform frequently used functions more easily and avoids having to search through context menus.
To execute a function with drag and drop
From the tree view in the object workspace, drag a node or a node instance and drop it onto the empty content pane.
Or:
Select the required node and choose Set Drag and
Drop Function from the context menu.
If the selected node is not yet preset with a drag and drop function, a Maintenance Drag&Drop dialog similar to the example below opens:
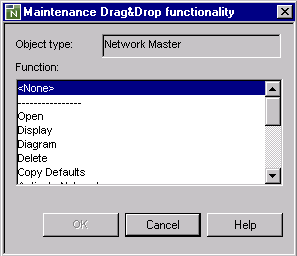
The functions available for selection depend on the object
type (here: Network Master) of the node selected. There are
different functions available for node instances and metanodes.
Select the required function and choose .
The dialog closes.
If the selected node is already preset with a drag and drop function, the selected function is executed immediately.
If a drag and drop function cannot be performed, the function terminates with an appropriate message.
To change or reset a drag and drop function
Open the Maintenance Drag&Drop dialog as described in the previous instructions.
Select the required function or select <None> to remove a drag and drop function and reset the function.
Choose .
The function opens a window that displays information for the currently selected item. You can only view the information, not edit it. If you want to edit the item, you have to use the function.
To display an object
In the object workspace, select the object.
Open the context menu and choose .
Or:
Press CTRL+D.
A dialog appears that displays all available information for the selected object.
Note:
For a detailed description of the displayed fields, see the
description of the function for the respective
object.
Important:
Copying an object always means that the complete underlying
structure is also copied into the target destination.
To copy single or multiple objects
In the object workspace, select a node instance or an entire node.
Open the context menu and choose , or press CTRL+C.
Or:
In the object
workspace, select a node for which you can choose
List from the context menu. A
Master
List window opens.
From the list table in the Master List window, select single or multiple objects and choose from the context menu within the table, or press CTRL+C.
The object data is copied to the clipboard and ready to paste at the required location within the object workspace.
Proceed as described in Pasting Objects.
To paste objects
In the object workspace, select the node where you want to place the object data previously copied to the clipboard.
Choose Paste data from the context menu, or press CTRL+V.
A Paste data window similar to the example below opens:
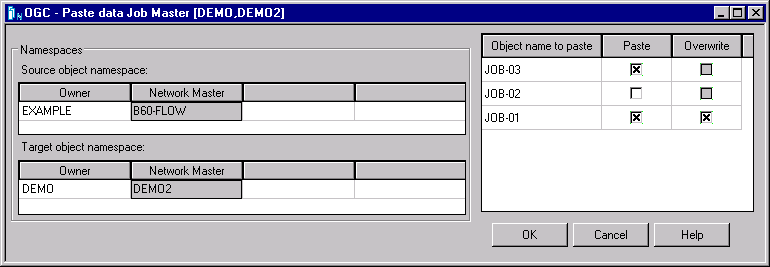
The Source object namespace table
indicates the source location (here: owner EXAMPLE, network
B60-FLOW) that contains the objects to be copied.
The Target object namespace table
indicates the target location (here: owner DEMO, network
DEMO2) where to copy the selected objects.
The Object name to paste column in the
right table lists the source objects selected for the copy operation (here:
jobs JOB-03, JOB-02, JOB-01).
In the Object name to paste field, replace the object name, if required.
Select the Paste check box next to the
object you want to copy. The check boxes are selected by default. Remove the
check mark for an object you want to skip. In the example above,
JOB-02 is not copied.
Select the Overwrite check box to replace an existing target object with the same name.
When you are finished, choose .
The objects are added to the specified target location and listed in the previously selected node in the object workspace.
The function opens a dialog to confirm the selection for this operation.
To delete an object
In the object workspace, select the object.
Open the context menu and choose .
Or:
Press DELETE.
A dialog appears where you have to confirm the deletion.
You can import and export objects using the Import/Export function of the General metanode or the Export function of a selected node or node instance.
For detailed information on using the functions, see Importing Objects and Exporting Objects in the Import/Export Functions documentation.
The General metanode provides menu functions that are performed on all objects available in your current Entire Operations environment:
| Function | Described in Section |
|---|---|
| Next Activations | Viewing next network activations.
See Viewing and Modifying Next Network Activations in the section Schedule Maintenance. |
| List Active Jobs | See Listing Active Jobs in the section Maintaining Active Jobs. |
| Activity Log | See Monitoring Entire Operations Activities in the section Log Information. |
| Browse Log | See Displaying Logged Information - Browse Log Function in the section Log Information. |
| Monitor Status | See Monitor Status. |
| Determination Date | See Determination Date for Report Data in the section Reporting. |
| Reporting | See Report Types in the section Reporting. |
| Cross-References | See Types of Cross-References in the section Cross-References. |
| Import/Export | Importing Objects and Exporting Objects in the Import/Export Functions documentation. |
| Show Messages | See Show Messages. |
| Show Workplan | See Show Workplan. |
| Show all Owners | See Show all Owners |
| Show linked Owners | See Show linked Owners. |
| Set Drag And Drop Function | See Drag & Drop. |
The Monitor is the heart of Entire Operations. The Monitor is a complex program that wakes up periodically and checks the definitions stored in the master database for any work to do. It activates and processes networks and jobs according to their prerequisites and controls running job networks, even if they reside on the nodes of different computers.
The Monitor Status function of the General metanode is used, for example, to start and stop the Monitor.
Before you can monitor Entire Operations activities, you may have to log on a node.
To monitor Entire Operations
In the object workspace, select the metanode.
Open the context menu and choose .
For an inactive node, a Logon Node dialog opens first.
The fields contained in this dialog are explained in Fields: Logon Node.
Enter your user ID and password and choose to log on to the specified node.
A Monitor Status window opens displaying all Monitor tasks.
Here you can:
Start and stop the Monitor.
Hold or release a certain Monitor task.
If you want to display the Monitor tasks before the dialog is automatically refreshed, you can refresh it manually by selecting the button.
Select .
For detailed information, see Status of the Entire Operations Monitor in the Administration documentation.
The function of the General metanode is used to list mailbox messages and requests as shown in the following example:
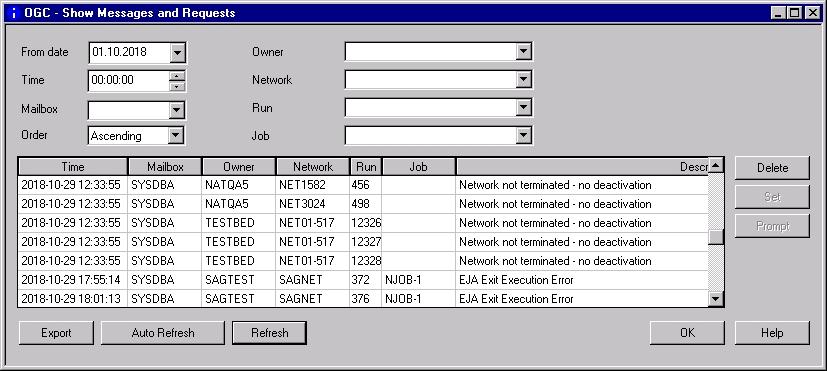
For explanations of this window, see Handling Messages and Requests in the section Working with Mailboxes.
The function stores a reference to the currently selected object in a list of activities to be done.
To add an object to the workplan
In the object workspace, select an object.
Open the context menu and choose .
The object is listed within the workplan for further processing.
You can view all entries of your workplan by using the menu function of the General metanode.
The function of the General metanode is used to open the workplan.
The workplan contains a list of Entire Operations objects that are accessed during the current Entire Operations GUI Client user session. This list facilitates repeated access to these objects.
Invoking the workplan, a Workplan window with an open Objects page is displayed first.
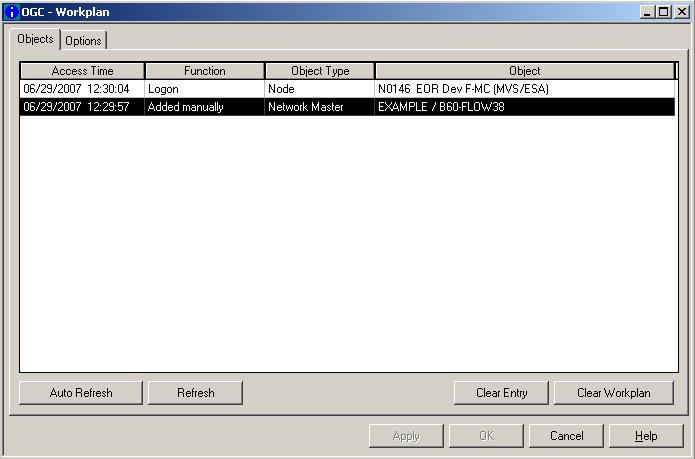
The list of objects contains the following columns:
| Column | Description |
|---|---|
| Access Time | Date and time of the last user access
to this object.
See also Date and Time Formats. |
| Function | Name of the last function executed for this object. |
| Object Type | Type of the object. |
| Object | Name of the object including the
superordinate objects that identify it unambiguously within a namespace. The
single constituents of the name are separated by slash (/)
characters.
|
To refresh the workplan
The workplan is automatically refreshed for local operating actions of users. Otherwise:
Choose the button.
The workplan is now manually refreshed.
To add objects to the workplan
Certain objects are inserted into the workplan during an Entire Operations session automatically if you display or change them. Otherwise:
Choose Add to Workplan from the context menu for the required object to add it to the workplan manually.
The workplan is automatically refreshed by inserting new objects. Adding a new object to the workplan has no impact on the object itself.
To clear entries in the workplan
Choose the button to delete the selected entry from the workplan.
Or:
Choose the button to
delete all workplan entries.
Deleting object entries from the workplan does not delete or deactivate any objects.
To work with objects via the workplan
On the Objects page of the Workplan window, select the object you want to process and right-click in the window to open the context menu and select the required function.
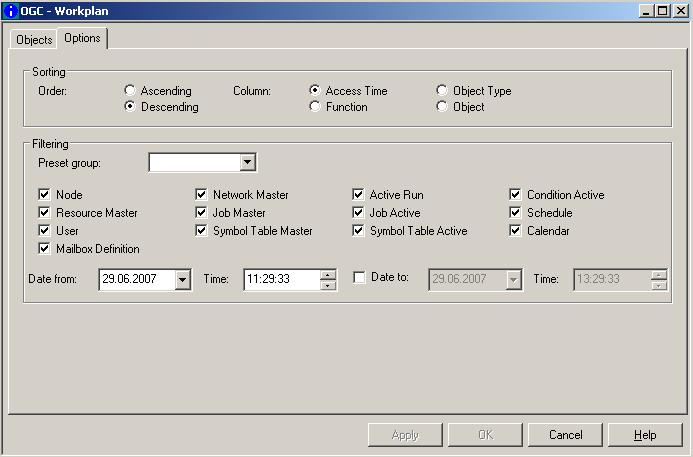
The Options tab displays all possible workplan options.
The workplan is transient by default. However, you can make the workplan persistent between sessions by setting the Show workplan after activation option in your user profile as described in GUI General in the Administration documentation.
The number of recent entries saved can be configured in the user profile (see the Session Profile in the Administration documentation). If the workplan lists more than the configured maximum number of saved entries, only the last recent records will be saved for the next session.
This selection box allows a preselection for the following individual filters.
- All
Display all entries.
- Master
Display only master objects
- Active
Display only active objects
- Custom
The object types become determined via marking them in this dialog. It is automatically activated if you diverge from the standard preselection.
- None
Deletes all subsequent individual filters.
This function of the General metanode is allowed for users with administrator rights only. It allows you to switch to the SYSDBA mode:
All existing owners are listed in the Owner metanode.
The Owner metanode changes its name to Owner (SYSDBA access).
No owners are listed below Owner via Granting.
This function is allowed for users with administrator rights only.
This function corresponds to the direct command
SET OWNERLIST
                                  ALL
described in the Direct Commands
documentation.
See also the section Using Owners.
This function of the General metanode is allowed for users with administrator rights only.
In opposite to the Show all Owners function, this function allows you to switch back from SYSDBA access mode to normal mode:
Only linked owners are listed in the Owner metanode.
Granted owners are listed in the Owner via Granting metanode.
This function corresponds to the direct command
SET OWNERLIST
                                  LINKED
described in the Direct Commands
documentation.
See also the section Owner Maintenance.
In case of problems, you can enable tracing and thus write trace information to a trace file. Since tracing has a negative impact on performance, we recommend that you use the trace function only if requested by Software AG support.
To activate tracing and write information to a trace file
From the menu, choose and select a level from to and the file destination Overwrite or as shown below:
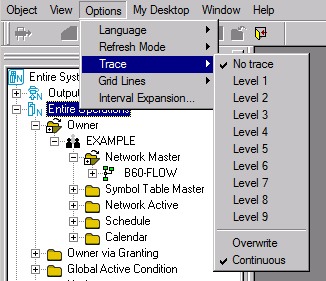
The higher the trace level (Level 1 is low, Level 9 is high), the more complex information is written to the trace file.
The trace file is created in the directory defined by the
environment variable %TEMP%.
The name of the trace file depends on the trace option set:
The content of the trace file is overwritten each time the
trace is newly started. The name of the trace file is
estrace.log.
The content of a previous trace file is not overwritten, a
new trace file is created instead. The name of the new trace file is
estrace_date_time.log,
where date has the format YYMMDD, and
time has the format HHMMSS. Example:
estrace_190123_120746.log.
The trace is written to the trace file when:
The Trace option setting changes from No trace to Level 1 to Level 9.
During startup, if the last session was closed with an active trace level of Level 1 to Level 9.
To deactivate tracing
From the menu, choose .