
Entire Operations provides the system administrator with several special global, control and recovery functions.
Note:
Some of these functions should be used only as recovery for
uncommon situations.
This document covers the following topics:
 To access special functions
In the object workspace, select and choose from the context menu.
A Special Functions window similar to the example below opens.
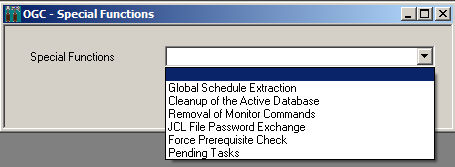
Open the drop-dop list box and select the required function.
Choose .
The activation of networks is handled by the Entire Operations Monitor in the following steps:
Extraction of the schedules, by default at the beginning of a new day.
The activation of the extracted job networks at or shortly before the earliest start time of the network.
The examination of the schedules can be forced at any time by using the Global Schedule Extraction feature. Several schedule extractions on the same day have no influence on already extracted activations.
Note:
Any modification to a schedule automatically implies an
activation extraction for the networks linked to this schedule.
This section covers the following topics:
To add an extraction date and time for schedule
extraction
In the object workspace, select .
Invoke the context menu and select .
From the Special Functions drop-down list box, select .
A Global Schedule Extraction window similar to the example below opens:
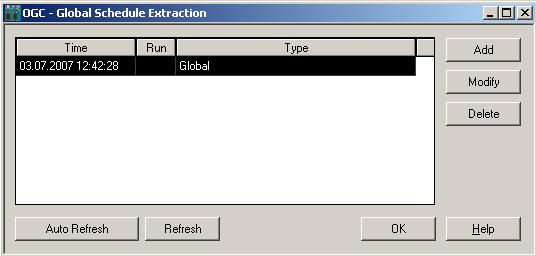
The columns are explained in Columns/Fields: Global Schedule Extraction.
Choose Add.
An Add new Start time window opens. The fields are explained in Columns/Fields: Global Schedule Extraction.
Select or enter the required date and time and choose OK when finished.
The window closes and the new start date and time are listed in the Global Schedule Extraction window.
To modify a date and time set for schedule extraction
In the Global Schedule Extraction window, select the row that contains the date and time you want to modify.
Choose Modify.
A Modify Start time window opens. The fields are explained in Columns/Fields: Global Schedule Extraction.
To delete a date and time set for schedule extraction
In the Global Schedule Extraction window, select the row that contains the date and time you want to delete.
Choose Delete and then Yes to confirm the deletion.
The window closes and the selected date and time are removed from the Global Schedule Extraction window.
The following table describes the columns and fields contained in the Global Schedule Extraction and related subordinate windows:
| Column/Fields | Meaning | |
|---|---|---|
| Global Schedule Extraction window: | ||
| Time | Date and time of
activation extraction.
See also Date and Time Formats in the User's Guide. |
|
| Status | Status of network
activation processing.
Possible status values:
Global schedule, active on demand |
|
| Add new Start time window: | ||
| Date/Time | Date and time to be
used for activation extraction.
See also Date and Time Formats in the User's Guide. |
|
| Modify Start time window: | ||
| New start time/Old start time | The planned (old) start
time previously set and the new start time to be used instead.
For valid input values, see Date and Time Formats in the User's Guide. |
|
| Keep predefined Job Time Frames | Adapt the job time
frames.
Possible check box settings: |
|
| unchecked | All job time frames are adapted (default). | |
| checked | Jobs with master time frame definitions are not adapted. | |
Normally, the active database is cleaned automatically every time the Entire Operations Monitor starts up or at the beginning of a new day.
An immediate cleanup of the active database can be triggered at any time. It is executed by the Entire Operations Monitor (in the background). This cleanup removes expired active job entries, pending tasks, log records, and related material from the Entire Operations database file. The retention periods of the Entire Operations default settings (see Defaults for Time Ranges) are used.
Alternatively, the cleanup of the active database can be performed in batch mode. See Cleanup of the Active Database in Batch Mode described in the User's Guide.
All operations performed during the cleanup are recorded in the Entire Operations log.
To clean up the active database
In the object workspace, select .
Invoke the context menu and select .
From the Special Functions drop-down list, select .
Choose and then Yes to confirm the cleanup.
This function removes all internal commands from the internal Entire Operations Monitor command queue.
| Warning: Use this function only in case of emergency and with extreme care. |
To remove all Monitor commands
In the object workspace, select and choose from the context menu.
From the Special Functions drop-down list, select .
Choose and then Yes to confirm the removal.
The Monitor functions are removed.
The JCL File Password Exchange function allows the system administrator to exchange the file password for all definitions of a given file. This function should be used after the modification of a file password on the operating system level.
To exchange the JCL file password
In the object workspace, select and choose from the context menu.
From the Special Functions drop-down list, select and choose OK.
A JCL File Password Exchange window similar to the example below opens:
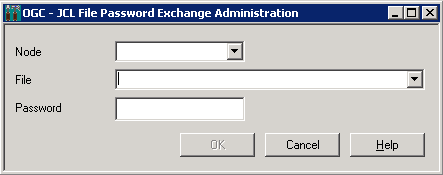
Select the required node and file and enter a password. The input fields are explained in Fields: JCL File Password Exchange Administration.
Choose when you are finished.
The password is now changed.
This section covers the following topics:
| Field | Meaning |
|---|---|
| Node | Number of the Entire System Server node on which the file can be accessed. |
| File | The password for the file specified here will be exchanged in all job definitions. |
| Password | The new replacement
password (invisible when entered).
This password must then be used when editing or selecting members, as well as for JCL loading of the Monitor. |
This function forces an active prerequisite check for all jobs which have been set to the status passive wait.
To force a prerequisite check
In the object workspace, select and choose from the context menu.
From the Special Functions drop-down list, select .
Choose and then Yes to confirm the action.
The prerequisite check is performed.
This function shows unfinished file deletion requests from deactivation.
The main reason is a file in use error
during a delete attempt.
Pending tasks are deleted during the next database cleanup (see the relevant section).
To view all pending tasks
In the object workspace, select and choose from the context menu.
From the Special Functions drop-down list, select Pending Tasks.
A Pending Tasks window opens.
All pending tasks are listed in the window. (The list is empty if no tasks are pending.)
The columns in the window are explained in Columns: Pending Tasks.
You can refresh the list by using the button.
Choose .
The columns of the Pending Tasks window are described in the following table:
| Column | Meaning | |
|---|---|---|
| Owner | Owner of the affected network. | |
| Network | Network that contains the affected job. | |
| Run | Run number of the affected job. | |
| Job | Job that references the affected file. | |
| Type | Type of delete request. Possible values: | |
O |
Online or Monitor request. | |
B |
Batch cleanup. | |
| Wait | Hours since the delete request is pending. | |
| File | File affected by the delete request. | |