This document provides information on the Natural-specific preferences. It covers the following topics:
The Natural-specific preferences are set in the Preferences dialog box of Eclipse.
 To show the Natural-specific preferences
From the menu, choose .
In the tree of the resulting dialog box, expand the Software AG node and then the Natural node.
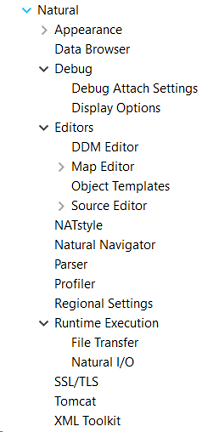
Different pages are provided for setting different types of preferences.
Note:
When optional components of NaturalONE have been
installed, additional nodes may be shown when you expand the
Software AG node, in parallel to the
Natural node. For example, when Service
Development has been selected in the installer, a Business
Services node and a Code Generation node are
shown. For detailed information on the preferences which are available from
such a node, see the documentation for the corresponding optional
component.
Select one of the pages in the tree and set the required options as described in the topics below.
Note:
When you choose the button on a page which contains several tabs, the defaults
are restored for all tabs which belong to this page (not only for the currently
visible tab).
Choose the button to save your changes and to close the dialog box.
Several tabs are provided on the Natural page:
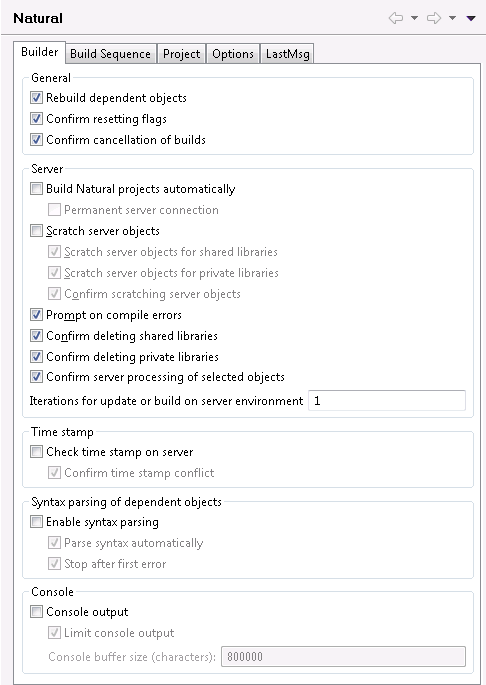
- Rebuild dependent objects
When selected (default), only referencing Natural sources that require the modified copycode, data area or DDM at catalog time are cataloged in the Natural environment after the copycode, data area or DDM has been changed and uploaded to the Natural environment. Furthermore, if the
PCHECKprofile parameter is set in the parser options of the project properties, all referencing Natural sources are cataloged.- Confirm resetting flags
When selected (default), a dialog box appears when you reset the flags, which are part of the label decorations, in the Eclipse workspace. This dialog box asks whether you really want to reset the flags.
The dialog box contains the Always reset without prompt check box. When you select this check box in the dialog box, Confirm resetting flags is automatically deselected in the preferences.
- Confirm cancelation of builds
When selected (default), a dialog box appears when you are about to cancel a build. This dialog box asks whether you really want to cancel the current build of the project.
The dialog box contains the Always cancel the build without prompt check box. When you select this check box in the dialog box, Confirm cancelation of builds is automatically deselected in the preferences.
For further information, see Canceling a Build.
- Build Natural projects automatically
When selected, the appropriate Natural environment is automatically updated each time you save a source or add a new source. The source is uploaded to the Natural environment and is stowed there. The library into which a source is written and stowed is determined by the mode you have defined for the project (either shared mode or private mode). See Steplibs in Changing the Project Properties for further information.
When deselected (default), you have to update the Natural environment manually. See Updating the Objects in the Natural Environment for further information.
- Permanent server connection
Only available when Build Natural projects automatically is selected.
When selected, a permanent connection to the Natural environment is established.
When deselected (default), a connection to the Natural environment is only established when information needs to be uploaded or downloaded.
- Scratch server objects
Depending on which of the following options is selected (Scratch server objects for shared libraries or Scratch server objects for private libraries or both), this description applies to either private mode libraries or to shared mode libraries of a Natural environment or to both.
When selected, each object that is renamed or deleted in the Eclipse workspace is also renamed or deleted in the Natural environment when this environment is updated. The source and (if available) the generated object are then deleted in the Natural environment. This applies when the Build Natural projects automatically option is set (see above) or when the command is used (see Updating the Objects in the Natural Environment).
When you delete objects, this option has only effect when you select single objects in the Eclipse workspace. When you select one of the container nodes (the node for a project, library or subfolder), the objects are only deleted in the Eclipse workspace, but not in the Natural environment. This is important if you want to remove projects or libraries from the Eclipse workspace, but do not want to remove the corresponding libraries in the Natural environment. If required, you have to delete the objects in the Natural Server view manually.
When deselected (default), the objects in the Natural environment are not affected when the environment is updated. The objects that have been renamed in the Eclipse workspace are then available in the Natural environment, in addition to the original objects. The objects that have been deleted in the Eclipse workspace are still available in the Natural environment. Be aware of the fact that the objects which are still available in the Natural environment may still be referenced by other programs; this may cause problems.
- Scratch server objects for shared libraries
Only available when Scratch server objects is selected.
The Natural objects will be deleted or renamed according to the description above in the shared libraries (when working in shared mode). When working in private mode, the shared library objects are not deleted or renamed.
- Scratch server objects for private libraries
Only available when Scratch server objects is selected.
The Natural objects will be deleted or renamed according to the description above in the private libraries (when working in private mode).
- Confirm scratching server objects
Only available when Scratch server objects is selected.
When selected, a dialog box appears when you use the command from the menu, or when the Natural environment is updated after you have renamed or deleted objects in the Eclipse workspace (that is, when the Build Natural projects automatically option is set or when the command is used). In this dialog box, you are asked whether you really want to scratch (that is, delete) the corresponding object(s) from the Natural environment. Up to 10 affected objects are listed in this dialog box.
The dialog box contains the Always scratch without prompt check box. When you select this check box in the dialog box, Confirm scratching server objects is automatically deselected in the preferences.
- Prompt on compile errors
When selected, a message box appears when a compile error occurs during a manual update of the Natural environment (that is, during the execution of an , or command). This message box shows the corresponding Natural error message. You can choose one of the following command buttons:
When you choose this button, you confirm the current error. When further objects have been selected for update, the processing will continue.
When you choose this button, the processing of further objects will be canceled.The message box contains the Do not show this message again check box. When you select this check box in the message box, Prompt on compile errors is automatically deselected in the preferences.
This option only applies to manual updates. The message box does not appear for compile errors which occur during an automatic update (that is, when the Build Natural projects automatically option is enabled in the Natural preferences).
- Confirm deleting server libraries
When selected, an additional dialog box appears when you rebuild a project in the Eclipse workspace and you select the Delete the contents of the affected libraries on the server first check box in the Rebuild Natural Project dialog box (see Rebuilding all Objects in the Natural Environment). In the additional dialog box, you are then asked whether you really want to delete the entire contents of the affected libraries from the Natural environment. Up to 10 affected libraries are listed in this dialog box.
The additional dialog box contains the Always delete without prompt check box. When you select this check box in the dialog box, Confirm deleting server libraries is automatically deselected in the preferences.
- Confirm deleting private libraries
When selected, an additional dialog appears when you change the development mode in the Steplibs property page of a project from private to shared mode or when you set a different runtime environment in the Runtime property page of the project. Please refer to Private Mode and Private-mode Libraries for more information.
The additional dialog box contains the Always delete private libraries without prompt check box. When you select this check box in the dialog box, the private libraries will automatically be deleted from the runtime environment and Confirm deleting private libraries is deselected in the preferences.
- Confirm server processing of selected objects
When selected (default), a dialog box appears when you are about to update the objects in the Natural server environment using the or command. This dialog box asks whether you really want to update/upload the selected objects and replace the corresponding objects on the server.
The dialog box only appears if a Natural project, library, folder or multiple Natural objects are selected. If only a single Natural object is selected, the dialog box does not appear and the object is processed immediately.
The dialog box contains the Always process selected objects without prompt check box. When you select this check box in the dialog box, Confirm server processing of selected objects is automatically deselected in the preferences.
- Iterations for update or build on server environment
When the Update or Build Natural Project command is selected, you can specify the number of iterations (1 to 9). This can help you to catalog all sources on the server in the proper order in one pass (see also Build Sequence).
When you specify a number greater than 1, the sources containing errors are re-cataloged until either no more errors occur or the specified number of retries has been reached. The default is 1.
See Updating the Objects in the Natural Environment for further information.
- Check time stamp on server
When selected, it is checked whether the source that is to be uploaded has been changed between download and upload. This check is done by comparing the time stamp of the source that is to be uploaded with the time stamp of the source that is to be overwritten on the server. For further information, see Checking the Time Stamps in the Natural Environment in Modifying Objects in the Natural Environment or in the Repository.
The following applies for debugging: when selected, the time stamp of the source in the local workspace is compared with the time stamp of the corresponding source on the server. When a time stamp conflict is found, a dialog box appears, asking whether you want to update the source in the workspace with the source from the server. See also Starting the Debugger. When Check time stamp on server is selected, the above mentioned dialog box is always shown, regardless of the setting of the Confirm time stamp conflict option.
The Check time stamp on server option applies only for shared mode. When working in private mode or when using a private-mode library, the setting of this option is ignored. For more information on the different development modes, see Steplibs in Changing the Project Properties.
Note:
This option is not used for the deployment of Natural applications. If you want to enable time stamp checking for the deployment, you have to do this in the deployment wizard for Natural applications. For further information, see Checking the Time Stamps in the Natural Environment in Deploying Natural Applications.- Confirm time stamp conflict
Only available when Check time stamp on server is selected. Applies only when transferring objects from the workspace to the server.
When selected, a dialog box appears when the time stamp of the source that is to be uploaded differs from the time stamp of the source that is to be overwritten on the server. You can then decide whether to proceed with the upload or not.
The dialog box contains the Always skip objects without prompt (No To All) check box. When you select this check box in the dialog box, is automatically deselected in the preferences.
For further information, see Checking the Time Stamps in the Natural Environment.
- Enable syntax parsing
When selected, the local NaturalONE parser also considers dependent objects when Natural sources are modified and saved. A dependent object is, for example, a program which uses the fields from a data area. If the data area is changed, this change must also be considered in the dependent program.
- Parse syntax automatically
Only available when Enable syntax parsing is selected.
When selected (default), all dependent objects are automatically parsed after a Natural source has been saved. If the modification of a source leads to errors in dependent objects, error markers will be shown in the Project Explorer view or in the Natural Navigator view. In addition, a corresponding error message is shown in the Problems view. For example, when you rename a field in a local data area and then save the local data area, all programs which use the renamed field from the local data area are automatically shown with an error marker.
When deselected, it is possible to parse the dependent objects manually, using the command. For further information, see the information on manual parsing in Parsing Dependent Objects.
When you change the setting of this option, the setting of the Parse Syntax Automatically command is adapted accordingly. For further information, see the information on automatic parsing in Parsing Dependent Objects.
- Stop after first error
Only available when Enable syntax parsing is selected.
When selected (default), parsing of dependent objects is stopped when the first error occurs in the current source. This reduces the number of error markers and thus improves the performance of syntax parsing and reduces memory consumption. In this case, only the first error marker is shown. If the source contains more than one syntax error, an additional information marker is shown which has the description "I_0004: Source has more than one error".
When you double-click the information marker in the Problems view (or when you select the marker and then choose from the context menu), the source containing the first error is opened. The vertical ruler on the left side of the source editor then shows the information marker in the first line, and all error markers in the lines which cause that error.
The information marker will disappear when the source has less than two errors, or when you deselect the option Stop after first error and start syntax parsing once more.
- Console output
When selected, Natural builder information is shown in the Console view each time you unload a project from the Natural environment or you save a source to the Eclipse workspace.
For example, when Build Natural projects automatically is disabled, a corresponding message is shown informing you that the changed source is waiting to be uploaded and stowed. On the other hand, when Build Natural projects automatically is enabled, you are informed that the changed source is uploaded and stowed.
- Limit console output
Only available when Console output is selected.
When selected, the value defined in the Console buffer size (characters) text box is used to define the limit for the console output of the Natural builder. When the console output surpasses the specified maximum size, the output is truncated from the beginning of the buffer.
When deselected, the console output of the Natural builder is not limited.
- Console buffer size (characters)
Only available when Limit console output is selected.
The value in this text box defines the maximum number of characters for the console output of the Natural builder. The default value is 800000.

If required, you can use the up-arrow and down-arrow buttons to change the build sequence for new Natural projects. This sequence is used by the command to upload and stow objects in the Natural environment. See also Build Sequence.
You can also define an individual build sequence for each Natural project in the project properties. See Builder in Changing the Project Properties.
- Root folder support
When selected (default), the additional option Create the library root folder is shown in the New Natural Project dialog box and in the Add to New Natural Project dialog box. When you select this additional option in the above mentioned dialog boxes, an additional folder with the name "Natural-Libraries" is created in the project. Any new libraries and objects that you create in this project are from now on always placed in the "Natural-Libraries" folder. Any libraries and objects that are not contained in this root folder are ignored when the project is built. See also Libraries in a Natural Project.
Other (optional) components of NaturalONE may also make use of root folders. For information on how such a component uses this option, see the documentation for this component.
- Group new objects by object type
When selected, the Group new objects by object type option is automatically selected when you create a Natural project (either by using the wizard or by downloading a library or object from a Natural server into a new project).
When not selected (default), this option is not automatically selected when you create a Natural project.
For further information, see Group Folders.
- Handling of missing objects
Pertains to the source editor, map editor, the Dependencies view and for debugging.
When your source code references, for example, a data area, copycode or DDM which the parser cannot find in your workspace, an error marker is shown in the source editor, and the corresponding message is shown in the Problems view. Missing objects are listed as "<Unknown>" in the Dependencies view.
Note:
This option relates only to objects that are required by the parser (copycodes, data areas and DDMs). Other objects that are called by the program (such as subprograms, subroutines or maps) are not affected. In addition, the map editor uses this option to determine whether layout maps that are only available on the server should be automatically read from the server or downloaded into the workspace.When you select an option other than Ignore from this drop-down list box, NaturalONE tries to establish a connection to the Natural server whenever the parser detects a missing object (using the connection properties stored in the associated Natural project). When the connection can be established, any missing object that can be found on the Natural server is either loaded into memory or downloaded into the workspace, depending on the option you have selected (see below). The steplib information defined for the current project or library is used for locating the missing objects.
This drop-down list box provides the following options:
Ignore
Default. No action is taken. In this case, you can manually download a missing object using the command in the Dependencies view (see Dependencies View in Using the Source Editor).Read from server
The object is loaded into memory and can thus be found by the parser and in the Dependencies view. The object remains in memory as long as you do not close the source which references this object. When you close the source, the object is removed from memory.Note:
By selecting this option, the parser error markers are removed, however, you will not be able to use the loaded object in the same way as a downloaded object. For example, the object cannot be used if you want to import data fields.Download from server
The object is physically downloaded into the workspace. It is placed into the current project, into a library which has the same name as the library on the Natural server.Exceptions:
If Natural Security does not allow downloading the object physically, the Download from server option is handled as Read from server.
When you are editing objects directly on a Natural server, missing objects are never downloaded into the temporary project which is automatically created in your workspace. They can only be loaded into memory. Therefore, the Download from server option is handled as Read from server.
- Properties
The Update project properties automatically on .natural file modification option controls whether or not an automatic update of the Natural project properties is made on a .natural file modification.
When selected, an automatic update of the Natural project properties is made when the content of the .natural file was changed externally, typically when a repository update has been made on this file. A manual update of the project properties is no longer necessary.
When not selected, no automatic update of the Natural project properties is made. A manual update of the project properties must be performed using the function Restore from Defaults in the Project > Properties > Natural dialog.
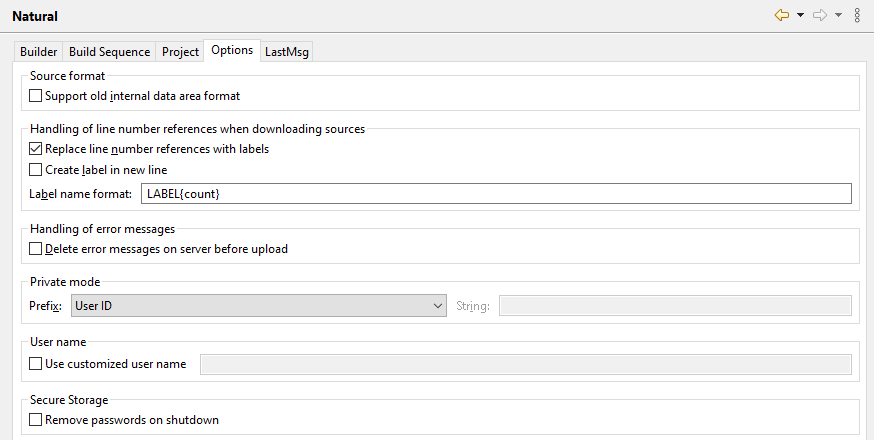
- Support old internal data area format
The setting of this option is used as the default value in the project properties when you create a new Natural project (either by using the wizard or by downloading from a Natural server).
This option applies to the internal format of data areas in a Natural for Windows or Linux environment.
With Natural Version 6.1 for Windows and Linux, a new internal format was introduced for data areas which supports, for example, dynamic and large variables.
When data areas are uploaded to the Natural environment, the new internal data area format is used by default. It is strongly recommended that you keep this default (that is, do not select this check box).
Data areas with the new format are not downward-compatible. Therefore, it is not possible to use them with Version 5.1 and below. Select this check box only, if you require data areas in the old format that are to be used with Natural Version 5.1 or below.
- Replace line number references with labels
When selected, the line number references in the source code are permanently replaced with labels when sources are downloaded to the Eclipse workspace. When the sources are later uploaded to the Natural environment, the labels remain in the source code. See also Line Numbers.
- Create label in new line
Only available when Replace line number references with labels is selected.
When not selected (default), each label is inserted at the beginning of the line which is referred to by the line number reference.
When selected, each label is created in a new line, directly above the line which is referred to by the line number reference.
- Label name format
Only available when Replace line number references with labels is selected.
By default, the label name format "LABEL{count}" is used, which results in the label names "LABEL1", "LABEL2", etc. You can specify any other valid label name containing the parameter "{count}". If you do not specify "{count}", the label count is nevertheless appended at the end of the label name.
- Delete error messages on server before upload
The setting of this option is used as the default value in the project properties when you create a new Natural project (either by using the wizard or by downloading from a Natural server).
When selected, all error messages are deleted in the appropriate library on the server before the error messages from a project are uploaded.
When not selected (default), all error messages are uploaded to the server. Any error messages which are no longer available in the project are not deleted on the server. This may cause inconsistencies.
See also Creating Application-Specific Messages.
- Private mode
The setting of the Prefix drop-down list box determines the names of the private-mode user libraries and private-mode steplibs that are automatically created when private mode is active for a project (when Natural Security is not active) or library (when Natural Security is active). For further information on private mode, see Steplibs in Changing the Project Properties.
Each name consists of a prefix which is up to six characters long and two digits which are automatically incremented (from 01 to ZZ). By default, the first 6 characters of the user ID are used as the prefix. For example, when the user ID is "CHARLES" (7 characters), the name for the first library is "CHARLE01", the name for the second library is "CHARLE02", and so on. When a user ID has less than 6 characters, the library name is filled with additional zeros (for example, "JIM00001").
The Prefix drop-down list box provides the following options:
<customize>
You define your own prefix, which can be up to 6 characters long, in the String text box. Due to the Natural naming conventions for libraries, the prefix must start with an alphabetical character.User ID
The first 6 characters of the user ID are used as the prefix. This is the default.Project name
The first 6 characters of the project name, as defined in the Project Explorer view or Natural Navigator view, are used as the prefix. Embedded blanks are removed and lowercase characters are converted to uppercase.Library name
The first 6 characters of the original library name are used as the prefix.- User name
The setting of User name determines the name which is to be used as user ID in new NaturalONE projects and new Natural objects.
When Use customized user name is selected, the user name must not be blank and must be valid according to the rules for valid Natural library names. When Use customized user name is not selected, the user name is identical to the login user name of the operating system.
The user name is taken:
as user ID in new Natural projects created using the New Project Wizard.
as user ID in projects checked out from the repository.
as user ID in imported projects.
as author in objects created using the New Object Wizard.
Setting or modifying the user name has no effect for already existing Natural projects and Natural objects.
- Remove passwords on shutdown
If selected, all Natural passwords are removed from the secure storage when NaturalONE is shut down.
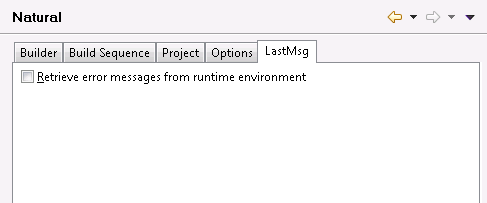
NaturalONE uses the LastMsg view to display additional information about the error situation which has occurred last. This functionality can be activated or deactivated by setting the preference Retrieve error messages from runtime environment.
Any time a Natural command is issued, the potentially created error messages in the runtime environment are transferred to NaturalONE and displayed inside this view; for further information, see Using the LastMsg View.
This page does not contain any options. When you expand the corresponding node in the tree, you can see the Label Decorations subnode (see the description below).
This page is available when you expand the Appearance node in the tree.
You can specify label decorations for the project nodes, library nodes, library subnodes and objects that are shown in the Project Explorer view or in the Natural Navigator view. By default, specific variables are set for each of these elements.
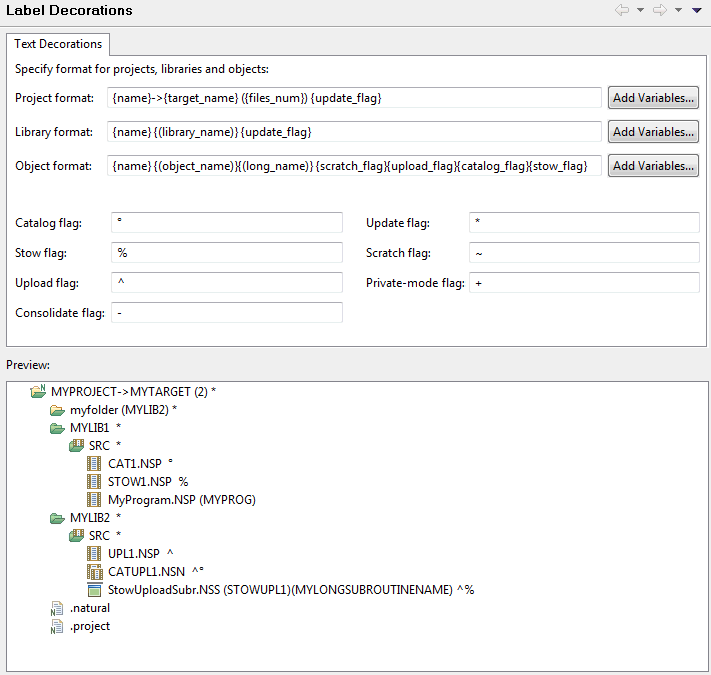
If you want to use different variables, for example, for the object format, you can choose the corresponding button. Before you choose this command button, make sure to place the cursor at the position where you want to insert the variables (do not place the cursor within an existing variable). In the resulting dialog box, you can then select the required variables (a brief description of each variable is provided in this dialog box).
The following table describes the variables which can be defined for the different formats (in alphabetical order):
| Variable | Description | Format | ||
|---|---|---|---|---|
| Project | Library | Object | ||
catalog_flag |
Only shown in the label decoration when the object needs to be cataloged in the Natural environment. See also Flags in a Label Decoration. | X | ||
code_page |
The code page that is defined for the Natural object. | X | ||
consolidate_flag |
Only shown in the label decoration when objects in a private-mode library are obsolete and need to be consolidated. See also Flags in a Label Decoration and Consolidating Objects in Private-Mode Libraries. | X | X | X |
ddm_dbid_fnr |
The database ID (DBID) and file number (FNR) of a DDM. Only shown in the label decoration when the object is a DDM. | X | ||
files_num |
Number of Natural libraries in the project (project format) or number of Natural objects in the library (library format). | X | X | |
library_name |
Name of the associated Natural library. Only shown in the label decoration when the name is considered as a library folder name. | X | ||
long_name |
Long name of the Natural object. Only
shown in the label decoration when the object has a long name.
Important: |
X | ||
name |
Name of the current project, library or
object.
With the object format, this can be either the Natural object name or a file name. See also File Names. |
X | X | X |
object_name |
Natural object name. Only shown in the label decoration when a file name has been defined. See also File Names. | X | ||
private_mode_flag |
Only shown in the label decoration when the object is available in a private-mode library. See also Flags in a Label Decoration. | X | X | X |
private_name |
Name of the associated private-mode library on the Natural server. Only shown in the label decoration when a private-mode name exists. See also Steplibs in Changing the Project Properties. | X | ||
size |
Size of the Natural object in bytes as
it will be stored on the Natural server (that is, without the source header).
This is different from the object properties where the source header is included in the number of bytes. |
X | ||
SM_mode |
Programming mode of the Natural object. This can either be "S" for structured mode or "R" for reporting mode. | X | ||
scratch_flag |
Only shown in the label decoration when the objects needs to be scratched in the Natural environment. See also Flags in a Label Decoration. | X | ||
src_lines |
Number of source code lines that will
be stored on the Natural server (that is, without the source header).
This is different from the source editor. When line numbers are shown, the source header lines are also counted. |
X | ||
stow_flag |
Only shown in the label decoration when the object needs to be stowed in the Natural environment. See also Flags in a Label Decoration. | X | ||
target_name |
Name of the assigned Natural environment. For a Natural server, host name and port number are shown. For a local Natural runtime, the string "natural-runtime" is shown. | X | ||
type |
Type of the Natural object (such as "PROGRAM" or "DDM"). | X | ||
update_flag |
Only shown in the label decoration when objects need to be updated in the Natural environment. See also Flags in a Label Decoration. | X | X | |
upload_flag |
Only shown in the label decoration when the object needs to be uploaded to the Natural environment. See also Flags in a Label Decoration. | X | ||
In the text boxes for the different formats, you can enter any characters (for example, parentheses, minus signs or blanks) or even words between the variables in order to improve the readability in the Project Explorer view or Natural Navigator view. The preview area always shows how the current definition would be rendered in the Project Explorer view.
When a specific value is to be shown in parentheses, you simply define it as shown in the following example:
({files_num})
However, if a value is not always available (for example, the long name of a Natural object), you can also use the following syntax in order to avoid empty parentheses in the Project Explorer view or Natural Navigator view (you can use this syntax with all variables and all types of brackets):
{(long_name)}
The representation of the different flags (catalog, stow, upload, update, scratch, consolidate, private mode) depends on the characters that are defined on this page. These flags are shown in the Project Explorer view or in the Natural Navigator view. See the flag descriptions in Flags in a Label Decoration. If you want, you can define different flags to be shown in the Project Explorer view.
Note:
The Natural-specific label decorations that are shown in the
Project Explorer view or in the Natural Navigator view are controlled by the
preferences under General > Appearance > Label
Decorations. By default, all Natural-specific label decorations
are shown. If you do not want to have label decorations, just go to the above
mentioned preference page and deselect Natural
Objects.
The following settings can be made for the data browser in the Natural preferences:
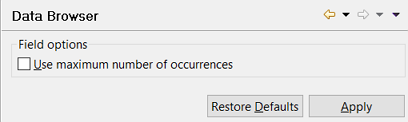
- Use maximum number of occurrences
The number of occurrences for multiple fields and periodic groups given in the Predict file for the Adabas DDM are used. If no Predict file is accessible, always the maximum number of occurrences is used. The maximum number of occurrences is 191 for a multiple field and 91 for a periodic group.
See also Displaying the Properties for a Field in Using the Data Browser.
This page does not contain any options. When you expand the corresponding node in the tree, you can see the Debug Attach Settings and Display Options subnodes (see the descriptions below).
The debug attach settings that are defined in the Natural preferences are used when you debug Natural RPC applications, Natural for Ajax workplace applications or external Natural applications. See also Using a Debug Attach Server.
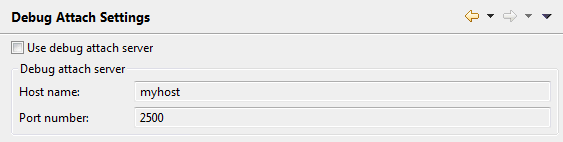
- Use debug attach server
When selected, the debug attach server is used.
- Host name
Only available when the Use debug attach server check box is selected.
The name of the host (or IP address) on which the debug attach server is running. The name of your local server is automatically provided. Do not use "localhost" as the host name.
- Port number
Only available when the Use debug attach server check box is selected.
The number of the port to which the debug attach server is listening. The port number used on your local server is automatically provided. The default port is 2500.
The display settings for variables. See also the description of the Variables view.
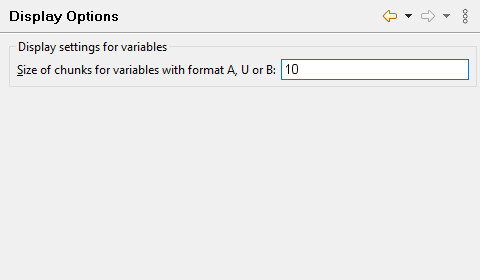
- Size of chunks for variables with format A, U or B
Defines the size of the chunks which are displayed in the Debug perspective's Variables view for variables of format A, U or B format. The default chunk size is 10. The value has to be in the range from 1 - 253.
If the chunk size preference is changed during debugging, the new chunk size will be used after the next debugger Step or Resume action.
This page does not contain any options. When you expand the corresponding node in the tree, you can see subnodes for the different types of editors (see the descriptions below).
This page is available when you expand the Editors node in the tree.
You can set preferences for various DDM editor options. These settings are taken as default values each time you start the DDM editor. See Using the DDM Editor for further information.
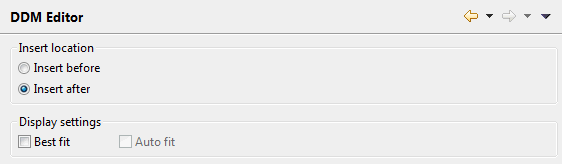
You can set the following options:
- Insert location
You can specify where fields are to be inserted. Select one of the following option buttons:
Insert before
When selected, a field is always inserted before the currently selected field.Insert after
When selected, a field is always inserted after the currently selected field.- Best fit
When selected, the width of each visible column is adjusted so that the column header and the content of a column are always completely visible.
- Auto fit
Only available when Best fit is selected.
When selected, each edited column is automatically readjusted to the optimum width (as described above) when you leave the column.
When deselected, the width of the edited column is not readjusted when you leave the column.
This page is available when you expand the Editors node in the tree.
You can set the preferences for various map editor options. These settings are taken as default values each time you start the map editor. See Using the Map Editor for further information.
General preference settings and a subnode are provided for the map editor:
You can set the following options:
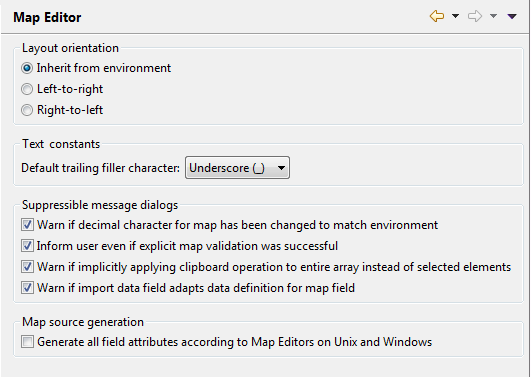
- Layout orientation
Here you can specify the default display direction. For further information refer to Editor in section Changing the Project Properties.
- Text constants
Here you can set the default trailing filler character for text constant labels in new maps. The value entered here is used to initialize the Label Filler property for the map. See Changing the Properties for the Map in the section Using the Map Editor.
- Suppressible message dialogs
You can suppress some message dialogs in the map editor. The following options determine whether or not the corresponding message dialogs will be shown. These message dialogs can also be directly suppressed via the Do not show this message in the future check box within the message dialog itself. When you select this check box in the message dialog, the corresponding option is automatically deselected in the preferences.
Warn if decimal character for map has been changed to match environment
When selected, a message dialog appears after the decimal character used by the map has been changed to match the value used by the corresponding project or (secured) library.Inform user even if explicit map validation was successful
When selected, a message dialog appears after performing an explicit validation of the map. See Validating Maps in the section Using the Map Editor for more information.Warn if implicitly applying clipboard operation to entire array instead of selected elements
When selected, a message dialog appears if a clipboard operation (, , ) is attempted on individual array elements. Because these operations are not supported for array elements, the operation is instead implicitly applied to the entire array in such cases. See also Selecting Controls in the Map in the section Using the Map Editor.Warn if import data field adapts data definition for map field
When selected, a message dialog appears if the selected field from Importing Data Fields exists on the map and the data definition can be adapted. See also Adding Controls to the Map for more information.- Map source generation
You can influence the generation of a map source when you save the map in the Map Editor. This may be useful to achieve full run time compatibility when a map object is executed within an application on a specific operating system.
Generate all field attributes according to Map Editors on Linux and Windows
When selected, all field attributes which are defined for the map fields are generated. When deselected, only the field attributes which do not match the default setting are generated. This is compatible to the Map Editor on mainframe systems.
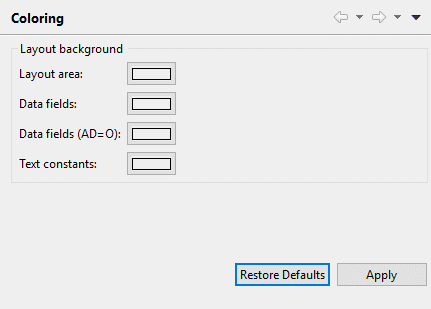
You can change the background colors for the different elements in the map editor layout page. The coloring for each element can be adapted individually.
To change the color for a specific syntax element
Click on the button of the map layout element you want to change and then choose the new color in the resulting dialog box.
Color buttons are available for the following elements:
Layout area
Data fields
Data fields (AD = 0)
Text constants
Click the button in order to make your color selection permanent.
As a result, the background of the corresponding map editor layout element is visualized with the set background color.
This page is available when you expand the Editors node in the tree.
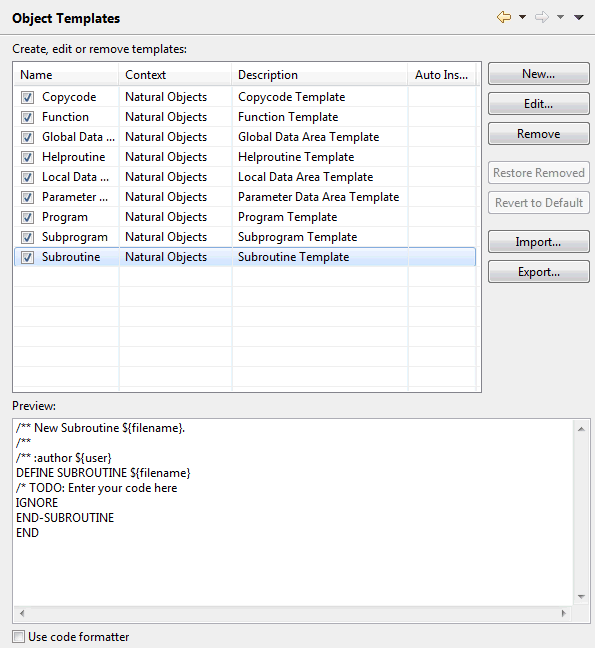
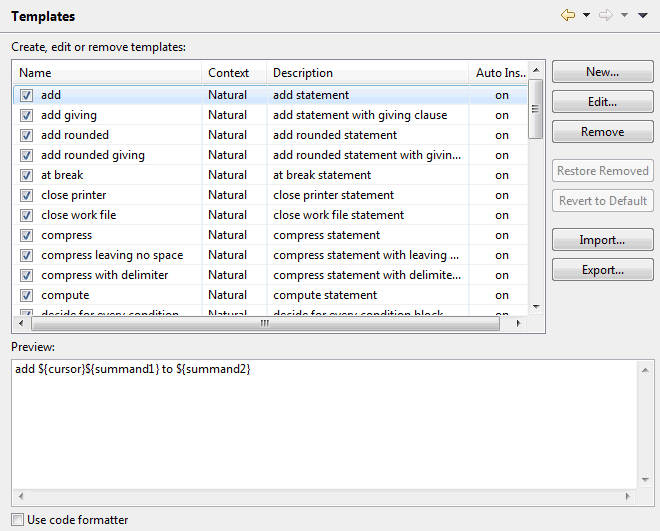
When you create a new Natural object which uses the source editor, a skeleton which is typical for this type of object is automatically provided in the source editor. The skeletons for the different types of objects are defined using the templates on this preference page. You can edit the existing templates so that they meet your specific requirements, and you can also create new templates.
Note:
The layout of this preference page is the same as that, for
example, of the Java editor templates. For information on how to use this page,
see the Eclipse online help.
For example, when you create a new subroutine with the name "MYSUB1", the following skeleton is automatically provided in the source editor:
/** New Subroutine MYSUB1.
/**
/** :author natural
DEFINE SUBROUTINE MYSUB1
/* TODO: Enter your code here
IGNORE
END-SUBROUTINE
END
The file name that is shown in the above example is controlled by
the variable ${filename} which is defined in the
template. When you edit a template, you can define the following variables:
| Variable Name | Description |
|---|---|
${date} |
Current date. |
${filename} |
Name of the current file. |
${time} |
Current time. |
${user} |
Name of the current user. |
${year} |
Current year. |
This page is available when you expand the Editors node in the tree.
You can set preferences for various source editor options. These settings are taken as default values each time you start the source editor. See Using the Source Editor for further information.
Several preference pages (subnodes) are provided for the source editor:
NaturalONE uses the general text editor preferences of Eclipse for its source editor, but it also provides special options for the source editor.
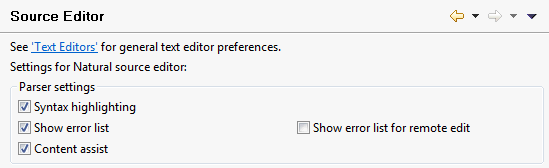
The following options are available:
- Syntax highlighting
When selected, syntax highlighting is used in the source editor. See also Syntax Coloring.
- Show error list
When selected, the errors in the source code are shown persistently in the Problems view after a program containing errors has been saved.
- Show error list for remote edit
The Natural Server view provides direct access to the Natural objects stored on a server. When you edit a source directly on the server, a temporary project is created in your workspace and the source is downloaded into this project. After the download, the Natural parser performs a syntax check.
When this option is selected and external objects (such as data areas or copycodes) are defined in the downloaded source, many errors are displayed in the editor. The reason for this is that no data definitions are available to the parser.
When this option is not selected, the misleading errors are not shown in the editor.
To benefit from the capabilities of the Natural parser, however, it is recommended that you create a Natural project in the local Eclipse workspace and then download the entire application into this project. Additional functionality such as versioning of the sources and deployment to the production environment is then available.
- Content assist
When selected, content assist is available in the source editor.
In the source editor, you can translate source code from upper case to lower case or from lower case to upper case.
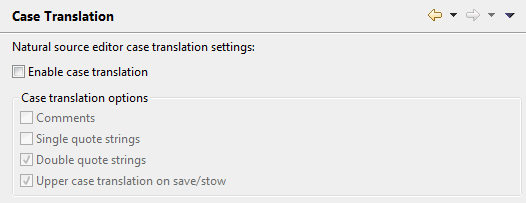
- Enable case translation
When selected, the commands and are enabled in the source editor. See Translating to Upper Case or Lower Case.
When selected, the remaining check boxes on this preference page are also enabled and you can specify the case translation options. When you then use one of the above mentioned commands in the source editor, the following applies:
Comments
When selected, the case for strings within a comment is changed.
Single quote strings
When selected, the case for strings within single quotes is changed.
Double quote strings
When selected, the case for strings within double quotes is changed.Upper case translation on save/stow
When selected, the entire source code is automatically translated to upper case whenever you save or stow the source code, depending on the settings of the above options.This is useful with Natural servers on mainframes where the
LOWSRCE(allow lower-case source) compilation option is set toOFF. For details, see the description of the system commandCOMPOPTin the Natural for Mainframes documentation.
Folding means that different elements in the source editor can be collapsed and expanded. This improves the readability and maintainability of objects with complex code structures.

- Enable folding
When selected, folding is enabled in the source editor. By selecting the remaining check boxes on this preference page, you can then specify the elements that are to be folded.
Elements that can be folded are, for example,
DEFINE DATAblocks,REPEATblocks,IF THEN ELSEblocks,READblocks, and blocks of two or more consecutive comment lines.
In the source editor, it is possible to mark all occurrences of a selected variable.
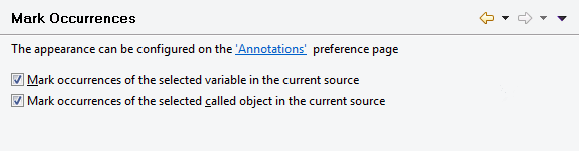
- Mark occurrences of the selected variable in the current source
When selected, all references to the selected variable are marked in the current source.
The marker may be, for example, text which is highlighted with a specific color. This depends on the settings on the Annotations page in the general text editor preferences of Eclipse. The corresponding annotation type is Occurrences.
Note:
The annotation type Write Occurrences is currently not supported.- Mark occurrences of the selected called object in the in the current source
When selected, all references to a selected called object are marked in the current source.
Called objects are subprograms, subroutines, functions, adapters, maps, helproutines and programs.
If you open an object from the passive cross-references of the Dependencies view, the cursor is positioned to the first occurrence of the corresponding called object and all references are marked.
In the source editor, you can enable or disable the protection of source code lines.

- Protect lines in sources generated by Construct or Code Generation
When selected (default), the protected lines in sources generated by Construct or by the Code Generation component of NaturalONE cannot be edited. These are the sources where the first line of the code starts with
**SAG GENERATOR.When deselected, all lines in the generated sources can be edited. You should disable the protection only if you no longer intend to regenerate the sources, but intend to maintain and further develop the code using the source editor of NaturalONE instead.
See also Protected Lines in Sources Generated by Construct or Code Generation.
When you use the Struct command in the source editor, the source code lines are indented according to the settings that are defined on this page. See Indenting the Source Code Lines.
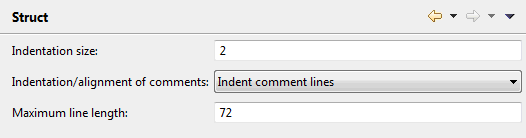
- Indentation size
You can enter the number of positions (from 1 to 9) by which source code lines are to be indented. By default, indentation is by 2 positions.
- Indentation/alignment of comments
This drop-down list box provides the following options:
Indent comment lines
Each comment line will be indented as far as the statement line above it; except comment lines which begin at the beginning of a line, these will be not be indented.Do not indent comment lines
Comment lines will not be indented.Align comment lines left-justified
Comment lines will be aligned left-justified.- Maximum line length
You can enter a number which defines the maximum line length. A line can be up to 245 characters long. Default: 72.
You can change the colors for the different syntax elements in the source editor. The current colors are shown in the preview area at the bottom of the page. The coloring for each syntax element can be enabled/disabled individually.
Note:
To see the colors in the source editor, syntax highlighting
must be enabled on the Source
Editor page.
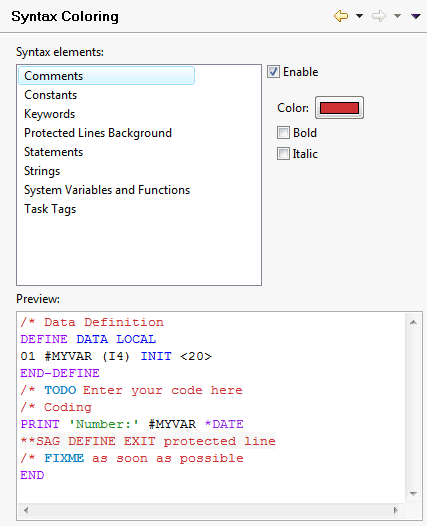
To change the color for a specific syntax element
Select the syntax element in the list box at the top.
Make sure that the Enable check box is selected for this syntax element.
The color that is currently used for this syntax element is shown on the Color button.
Choose the Color button, and then choose the new color in the resulting dialog box.
If you want to define bold and/or italic text for the selected syntax element, select the corresponding check box(es).
Each change is shown in the preview area at the bottom of the page.
Templates are used to insert recurring coding patterns into your source code. They are inserted using content assist, which is a standard feature in Eclipse. See also Using Content Assist.
A number of templates is automatically provided with NaturalONE. You can edit them so that they meet your specific requirements, and you can also create new templates. The name of a template must always start with the name of a Natural statement; otherwise the template is not offered for selection by the content assist feature.
Note:
The layout for this preference page is the same as that, for
example, of the Java editor templates. For information on how to use this page,
see the Eclipse online help.
The NATstyle settings that are defined in the Natural preferences are used when you check your Natural code with NATstyle. See also Checking Natural Code with NATstyle.
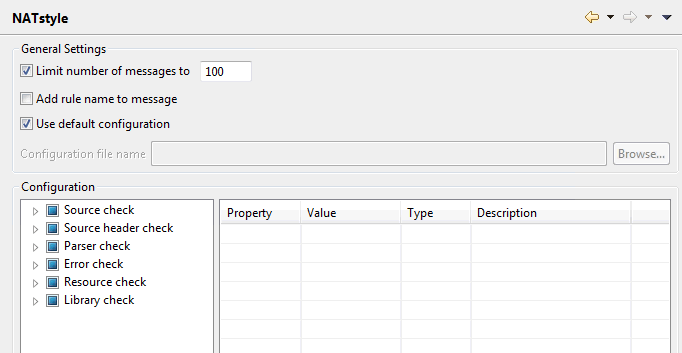
- Limit number of messages to
When selected, the number of entries in the Problems view and the number of NATstyle markers in the Natural editors is limited to the number you specify in the text box.
- Add rule name to message
When selected, the name of the rule is added to the end of the message. It is shown in brackets. For example:
TODO: Enter your code here [TODO comment]- Use default configuration
When selected, the default configuration is used for checking the Natural code. The default configuration cannot be modified.
When not selected, you can specify your own configuration file (see below). In this case, the Value column in the Configuration group box can be edited.
- Configuration file name
Only available when the Use default configuration check box is not selected. When you use the button to select an existing configuration file, this file is loaded and the settings defined in this file are shown in the Configuration group box.
To create a new configuration file, proceed as follows:
In the Configuration group box, expand the tree on the left.
In the tree, select the rule that you want to modify (for example, select Line length which is visible when you expand Source check).
Specify the appropriate information in the Value column. Different properties can be set for a rule. Depending on the property, you can specify the value using a drop-down list box, a dialog box or you simply type the value in a text box. See also the description of the property types below.
In the tree, make sure to select the check boxes for all rules that are to be used.
Choose the button.
When a configuration file has not yet been defined, a dialog box appears, asking whether you want to save your changes to a new configuration file.
Choose the button.
A dialog box appears, providing the file name NATstyle.xml as a proposal.
Specify a file name and choose the button.
The path and name of this file is now shown in the Configuration file name text box.
It is possible to export the NATstyle preferences from the currently used configuration file using the standard Eclipse functionality (File > Export > General > Preferences). This is helpful, for example, if you want to import these settings later into a different Eclipse workspace. A NaturalONE NATstyle Preferences entry is then available on the Export Preferences page. This entry is not available if the default configuration is currently used.
If you want to return to the default configuration, either choose the button or select the Use default configuration check box. In both cases, a dialog box appears, asking whether you want to reload the default configuration. Any changes to your own configuration file which have not yet been applied will be lost.
- Configuration
For detailed information on each rule that is shown in this group box, see Overview of NATstyle Rules, Error Messages and Solutions in the section Checking Natural Code with NATstyle.
Each property in a rule can belong to one of the following types:
Property Type Value Modification via String A standard Java string. Text box. String[] An array of standard Java strings. Dialog box in which you can add, modify, delete or clear string values. int A standard Java integer value. Text box. long A standard Java long value. Text box. enum One of a number of values. Drop-down list box. boolean Either "true" or "false". Drop-down list box. regex A regular expression. Dialog box in which you enter a regular expression and a test string. NATtype An unsorted list of identifier characters for the Natural object types. Dialog box in which you select the Natural object types that are to be checked.
The Natural Navigator settings that are defined in the Natural preferences are used when you work in the Natural Navigator view. See also Using the Natural Navigator View.
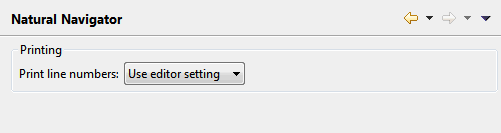
- Print line numbers
Determines whether the printout of an object source contains line numbers when it is printed from the Natural Navigator view. See also Printing Objects.
This drop-down list box provides the following options:
Use editor setting
Default. The current setting of the Show line numbers option of the general Eclipse preferences is used (Preferences > General > Editors > Text Editors).Yes
If selected, line numbers are always printed. The setting of the Show line numbers option of the general Eclipse preferences is ignored in this case.No
If selected, line numbers are never printed. The setting of the Show line numbers option of the general Eclipse preferences is ignored in this case.
The parser settings (Natural profile parameters) that are defined in the Natural preferences are used as the default values when you create a new Natural project from scratch. See also Creating a New Project Using a Wizard.
The following tabs are provided:
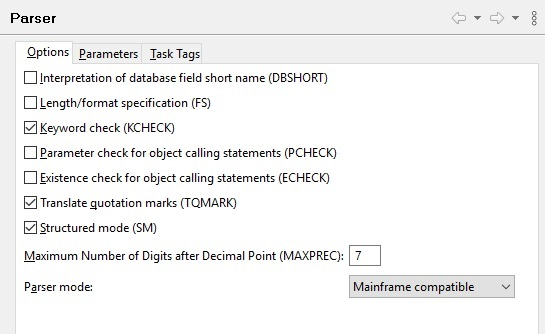
On this tab, you can specify the default values for the following Natural profile parameters:
| Option | Corresponding Natural Profile Parameter |
|---|---|
| Interpretation of database field short names | DBSHORT |
| Length/format specification | FS |
| Keyword check | KCHECK |
| Parameter check for object calling statements | PCHECK |
| Existence check for object calling statements | ECHECK |
| Translate quotation marks | TQMARK |
| Structured mode | SM |
| Maximum Number of Digits after Decimal Point | MAXPREC |
For detailed information on these profile parameters, see the Natural documentation for the appropriate platform.
The Parser mode drop-down list box, which is also provided on this tab, allows you to define the platform for which the Natural language syntax is to be checked. You can select one of the following options:
Mainframe compatible
Natural sources are checked according to the Natural syntax
for mainframe platforms.
Open systems compatible
Natural sources are checked according to the Natural syntax
for Windows and Linux platforms.
Error tolerant
When the Natural sources are checked, all valid Natural
syntax is accepted, no matter for which platform you are currently developing.
An error will occur only if invalid Natural syntax is found which does not
apply to any of the supported platforms.
For example, if you are developing for Linux platforms and your code contains special syntax which is only valid for mainframe platforms (such as the SQL extended set for DB2 databases), the parser will not consider this as an error.
Platform compatible
When the Natural sources are checked, not all Natural syntax
is accepted. The parser only accepts syntax which can be used on all
supported platforms. An error will occur if platform-specific syntax is found
(even if this is the correct syntax for a specific platform).
For example, if your code contains special syntax which is only valid for mainframe platforms (such as the SQL extended set for DB2 databases), the parser will consider this as an error.
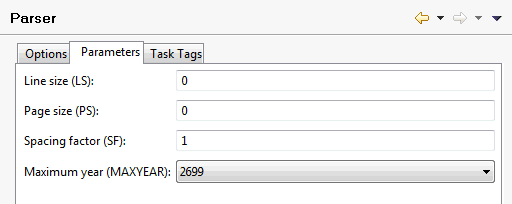
On this tab, you can specify the default values for the following Natural profile parameters:
| Option | Corresponding Natural Profile Parameter |
|---|---|
| Line size | LS |
| Page size | PS |
| Spacing factor | SF |
| Maximum year | MAXYEAR |
For detailed information on these profile parameters, see the Natural documentation for the appropriate platform.
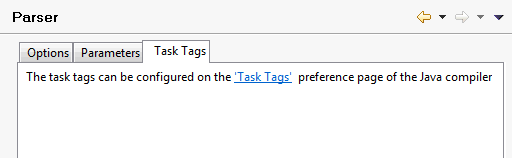
A task tag can be used to mark a section in a Natural source
that needs further refining. See also Working with
Tasks. NaturalONE uses the task tags that are defined for
the Java compiler. By default, these are TODO and
FIXME. To go to the corresponding Java preference page, you can
simply click the link on this tab. For more information, see the Eclipse online
help.
Note:
Other than the Java compiler, NaturalONE does not support
project-specific configurations.
The profiler settings that are defined in the Natural preferences are used as the defaults when you start a profiler session. See also Using the Natural Profiler.
The following tabs are provided:
On this tab, you specify the defaults for the output that is to be shown on the Hot Spots page of the profiler.
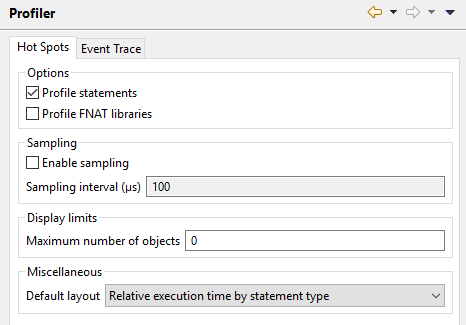
- Profile statements
When selected (default), the Hot Spots page of the profiler provides information on the used Natural statements. In this case, expandable nodes are shown for all involved Natural objects.
When not selected, only the information on the involved Natural objects is shown. Expandable nodes are not available.
- Profile FNAT libraries
When selected, both system library (FNAT) and user library (FUSER) objects are profiled. For released versions of the system libraries, statement information is not available.
When not selected (default), only user library objects are profiled.
- Enable sampling
When selected, a sampling technique is used which reduces the number of events sent by the trace session.
When sampling is enabled, the hit count corresponds to the number of recorded events (that is, the number of events that survive the sampling filter) and is not proportional to the number of times the event occurred (for example, the number of times a particular statement was executed). Instead, the hit count is weighted towards the events that take longer to execute, because they have a correspondingly greater chance of crossing a sampling interval. However, the displayed execution times (in particular the CPU times) are more-or-less independent of the sampling interval (except for statistical averaging effects, which increase with increasing sampling intervals and which may become significant). The higher the sampling interval, the less precise the results, but the lower the amount of generated and transferred event data (and thus the better the performance).
- Sampling interval
Only enabled when the Enable sampling check box is selected.
Specify the CPU time interval in microseconds to be used for sampling. Only the events that cross this sampling boundary are recorded.
Natural servers on Windows and Linux platforms only support a limited set of discrete values, and may therefore implicitly round the entered value up or down to the next supported value. The set of supported sampling intervals is: 1, 2, 4, 5, 8, 10, 16, 20, 25, 40, 50, 80, 100, 125, 200, 250, 400, 500, 625, 1000, 1250, 2000, 2500, 5000, 10000 . This is not relevant for the mainframe.
- Maximum number of objects
The maximum number of objects to be shown on the Hot Spots page of the profiler. The value 0 means that all objects are to be shown (default).
- Default layout
The layout initially used for displaying the data on the Hot Spots page of the profiler. For further information, see Viewing the Profiler Output > Hot Spots in Using the Natural Profiler.
On this tab, you specify the defaults for the output that is to be shown on the Event Trace page of the profiler.
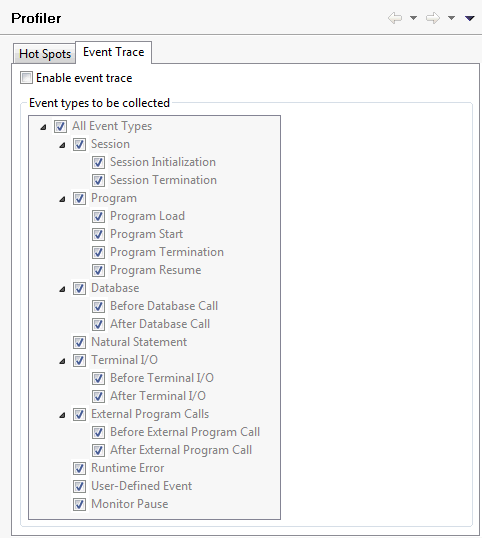
- Enable event trace
If selected, trace records for the events are collected on the server, and the Event Trace page is shown in the profiler.
Note:
Selecting this option can result in a big increase in the amount of data transferred to and stored on the client.- Event types to be collected
Only enabled when the Enable event trace check box is selected.
Deselect the event types for which you do not want to collect trace data. Or select the event types for which you want to collect trace data. See Overview of Event Types for a description of each event type.
Notes:
- When the event type Natural Statement is selected, each executed Natural statement is traced, which may lead to a large amount of trace records.
- If you intend to collect data for the event type Natural Statement and you are using a Natural server in a Linux or Windows environment, the programs to be traced must have been cataloged with
GPGEN=(PROFILER=ON).
The regional settings (Natural profile parameters) that are defined in the Natural preferences are used as the default values when you create a new Natural project from scratch. See also Creating a New Project Using a Wizard.
The following tabs are provided:
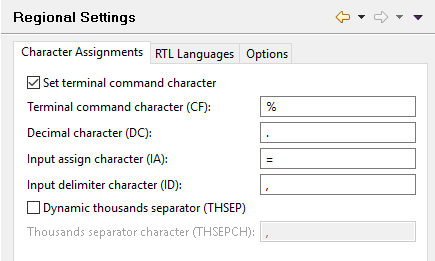
On this tab, you can specify the default values for the following Natural profile parameters:
| Option | Corresponding Natural Profile Parameter |
|---|---|
| Set terminal command character | CF |
| Terminal command character | |
| Decimal character | DC |
| Input assign character | IA |
| Input delimiter character | ID |
| Dynamic thousands separator | THSEP |
| Thousands separator character | THSEPCH |
For detailed information on these profile parameters, see the Natural documentation for the appropriate platform.
On this tab, you can specify the default settings for languages that are written from right-to-left (RTL).
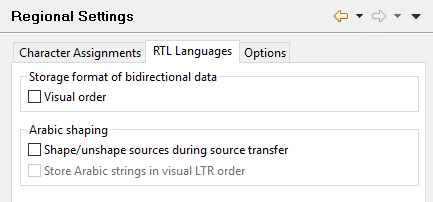
For further information see Changing the Project Properties.
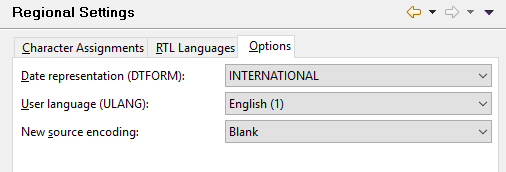
On this tab, you can specify the default values for the following Natural profile parameters:
| Option | Corresponding Natural Profile Parameter |
|---|---|
| Date representation | DTFORM |
| User language | ULANG |
For detailed information on these profile parameters, see the Natural documentation for the appropriate platform.
In addition, the New source encoding drop-down list box determines the initial setting used for the corresponding project property for newly-created projects. See Changing the Project Properties for further information.
You can specify particular settings for the Natural server. Several tabs are provided on the Runtime Execution page:
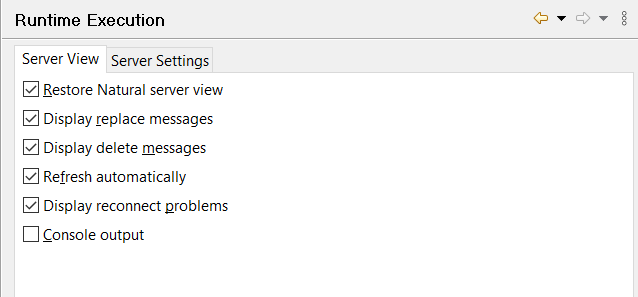
- Restore Natural server view
When selected, the same libraries that were expanded in the Natural Server view before you have closed NaturalONE are expanded when you start NaturalONE the next time. When not selected, server connections are not performed either with the implication that potential server problems will not be visualized via an error decorator.
- Display replace messages
When selected, a message box appears each time an object in the Natural Server view is about to be overwritten with another object which has the same name. You are then asked whether you really want to overwrite the object.
- Display delete messages
When selected, a dialog box appears each time an object in the Natural Server view is about to be deleted. You are then asked whether you really want to delete the object.
- Refresh automatically
When selected, the display is refreshed automatically for every delete, copy-and-paste, move and rename operation in the Natural Server view and for every change of the filter settings in this view. It is recommended to use this setting as long as it does not cause any performance problems. See also Refreshing the Display.
The automatic refresh is performance-optimized and refreshes only the parent nodes of changed nodes. For this reason, redundant nodes are not always removed. For example, when you remove all programs of a library by selecting every single program and then choosing the command from the context menu, the Program group node is not removed. However, when you remove all programs of a library by selecting the Program group node and then choosing the command, the Program group node is also removed.
Note:
This setting does not apply to upload operations (that is, when objects are copied to the Natural server).- Display reconnect problems
When selected, a message box appears each time you start NaturalONE and the connection to a mapped Natural server cannot be established. This is helpful, if the Natural Server view contains many nodes and a reconnect problem is therefore not immediately visible.
The message box contains the Do not show this message any more check box. When you select this check box in the message box, Display reconnect problems is automatically deselected in the preferences.
- Console output
When selected, status information about success or failure is shown in the Console view each time you check, stow or catalog an object in the Natural Server view. In addition, information about the download process is shown each time you download objects from the Natural Server view into a new or existing project.
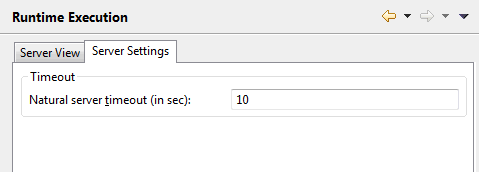
- Natural server timeout (in sec)
The number of seconds that NaturalONE waits for an answer from the Natural server. The default is 10 seconds. Normally, you need not change this default value.
This information is required when an application using file
transfer (UPLOAD/DOWNLOAD PC) is being executed or debugged.
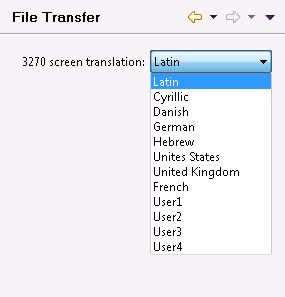
- 3270 screen translation
Using the drop down box, you can select a character set to be used for Natural file transfer. The default character set is "Latin".
Choosing a different character set can be required if the application that is to be executed on the mainframe uses a different character set. For example, if an application with codepage 1140 is being executed on the mainframe, the 3270 screen translation should be set to "United States". Otherwise some characters might not get converted correctly. For example, if the screen translation is still set to "Latin" (using codepage 1141) the backslash character
\will be converted toÖwhich is especially fatal when using file paths.
This page is available when you expand the Runtime Execution node in the tree. It provides the following tabs:
This information is required for executing and debugging Natural applications.

- Use default configuration
When selected, the local Tomcat server is used to execute and debug applications. In this case, the group Application/Web server is disabled.
- Server type
Only available when Use default configuration is not selected.
Select the server type that you want to use from the drop-down list box. The server type determines how your applications are displayed in the browser. Natural for Ajax (NJX) is used for displaying rich internet applications. The Natural Web I/O Interface client (NWO) is used for displaying character-based applications.
- Host name
Only available when Use default configuration is not selected.
The name of the host on which the application server, servlet container or web server is running.
The application server, servlet container or web server is responsible for rendering the Natural output in the web browser and for passing the input to NaturalONE.
Unless the application server, servlet container or web server runs on the same PC as your Eclipse installation, see the Natural I/O preferences for limiting the number of open ports.
- Port number
Only available when Use default configuration is not selected.
The number of the port on which the application server, servlet container or web server has been started.
- Application name
Only available when Use default configuration is not selected and the server type Natural for Ajax (NJX) has been selected. Not available for other server types.
The name of the application on the application server, servlet container or web server that is running. The application server, servlet container or web server is capable of running multiple applications at once with the same host name and port number, but different application names.
- Web Browser
NaturalONE displays the output of your program using the web browser specified ín the Eclipse Web Browser settings.
- Auto skip to next input field in web I/O pages
Only available when the default configuration is used or when the server type Natural for Ajax (NJX) has been selected. Not available when a server type other than Natural for Ajax is selected.
When selected, the cursor is automatically placed in the next input field when the last possible character has been entered in the current input field.
When not selected (default), the cursor remains in the current input field.
This information is required when executing and debugging Natural applications.
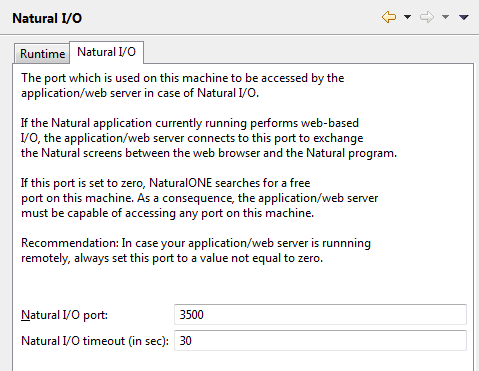
Specify the following information:
- Natural I/O port
The default port is 3500. If this port is already used on your PC, specify another port.
- Natural I/O timeout (in sec)
The number of seconds that NaturalONE waits for an answer from the application/web server. The default is 30 seconds. Normally, you need not change this value.
With this preference page you can setup SSL/TLS authentication. SSL/TLS authentication means checking the identity of the other party. In the case of NaturalONE, it will be checked whether the Natural Development (NDV) server to be connected to can be considered trustworthy. This is achieved via the usage of a so-called truststore containing the certificate(s) of the addressed NDV server(s).
To create your own truststore you can use, for example, Sun's keytool utility which can be found in the bin directory of the Java Runtime Environment (JRE):
keytool -import -alias mycert1 -file ndv.server.cert.crt -keystore truststore.p12 -storetype PKCS12
With the above command, the NDV server certificate named
ndv.server.cert.crt was added to the key store
truststore.p12 with alias name mycert1 in the
certificate storage format PKCS12.
SSL/TLS authentication can be optional (see below) and is enabled per default.
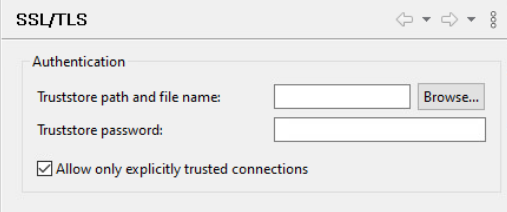
- Truststore path and file name
The path where the truststore can be found and it's name. You can browse to a truststore file by using the button.
- Truststore password
The password of the specified truststore. This can be empty if the truststore is not secured with a password.
- Allow only explicitly trusted connections
If enabled (default), connections to SSL/TLS-secured NDV servers are only possible if the authentication process with the provided truststore succeeds. In this case, the server’s certificate must have been explicitly added to the specified truststore. The following shows a successful mapping where authentication succeeded:
If disabled, unauthenticated connections to SSL/TLS-secured NDV servers on hosts with private IP addresses (see below) or on the same machine (localhost) will be allowed. The following shows a successful mapping where authentication failed (notice the warning decorator in the upper left corner of the server icon):
Private IP addresses are IP addresses reserved for hosts within a home or business network ("Intranet") that are not directly reachable externally. Furthermore, such hosts are invariably protected by a firewall. For these reasons, hosts with private IP addresses are much less vulnerable to external attack than those with public IP addresses.
By disabling this option, you are effectively implicitly trusting any SSL/TLS-secured NDV servers on such hosts.
NaturalONE includes an internal Apache Tomcat server. You can specify the following setting.
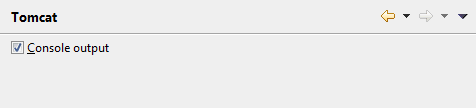
- Console output
When selected (default), the console output of the internal Tomcat server is shown in the Console view. Such an output is shown, for example, when the Tomcat server is started after the startup of NaturalONE, or when the web context (cisnatural) in which Natural for Ajax is running has to be restarted.
When not selected, the console output is not shown in the Console view.
Several tabs are provided for the XML toolkit:
For further information, see Using the XML Toolkit.
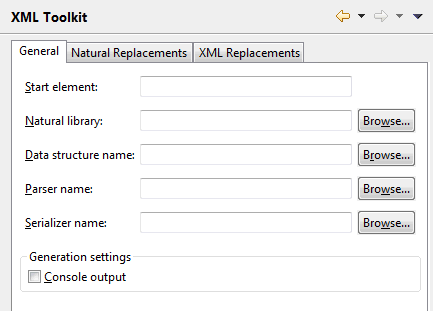
You can specify that certain items are automatically preselected in the XML toolkit wizard.
- Start element
The element that is to be used as the basis for the generated output file.
- Natural library
This can be a specific library.
- Data structure name
This can be a Natural data area, an XML schema or a DTD from a specific library.
- Parser name
This can be a subprogram or copycode from a specific library.
- Serializer name
This can be a subprogram or copycode from a specific library.
- Console output
When selected, trace information is shown in the Console view during the generation of the output files.
Special characters that are not valid in XML have to be converted into valid names. You can change the default conversion settings, if required.
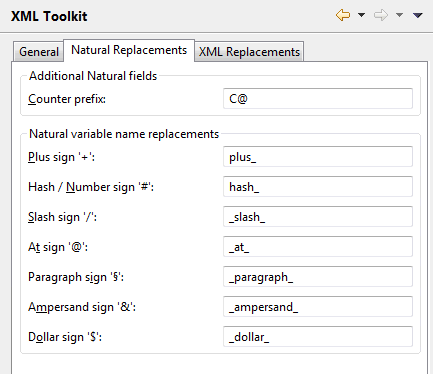
You can change the following settings:
- Additional Natural fields
Character Default Value Counter prefix C@ - Natural variable name replacements
Character Default Value Plus sign '+' plus_ Hash/Number sign '#' hash_ Slash sign '/' _slash_ At sign '@' _at_ Paragraph sign '§' _paragraph_ Ampersand sign '&' _ampersand_ Dollar sign '$' _dollar_
Special characters that are not valid in XML have to be converted into valid names. You can change the default conversion settings, if required.
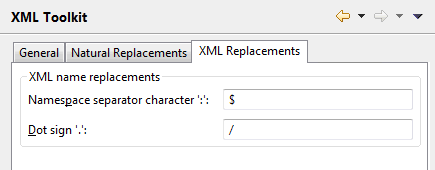
You can change the following settings:
- XML name replacements
Character Default Value Namespace separator character ':' $ Dot sign '.' /