
This document covers the following topics:
Each Natural project can contain one or more Natural libraries. A
Natural library is indicated by a green-colored folder icon:
![]() .
.
Other than on the Natural server, a Natural library in the Eclipse workspace contains only the sources. Generated programs (which are also called "GPs" or "cataloged Natural objects") are not stored in the Eclipse workspace. These are executed or debugged directly in the appropriate Natural environment.
In the Eclipse workspace, it is possible to store your Natural objects in arbitrary folder structures. This enables you to organize your objects in a more logical way than with the standard library structure that is mandatory on the Natural server. For example, you can group your objects according to the different tasks that are covered by your application.
Notes:
On the Natural server, the Natural library name and the objects in a library must meet the Natural naming conventions (see the Natural documentation for the appropriate platform for further information). However, in the Eclipse workspace, it is possible to use alternative folder and file names for the libraries and objects.
More detailed information is provided in the topics below:
A Natural project may contain a library root folder which has the fixed name "Natural-Libraries".
Library root folders can be created when the Root folder support option is activated in the Natural preferences (see Natural > Project in Setting the Preferences). When you create a new Natural project (either by using the wizard or by downloading objects into a new project), you can then define whether the library root folder is to be created, or not. To do so, you simply have to make sure that the Create the library root folder option is activated. The state of this option is stored and reused the next time you create a new project.
When an existing project does not yet contain a library root folder, you can also create the library root folder by adding a "normal" folder () in a Natural project and naming this folder "Natural-Libraries". With this name, the folder is considered to belong to Natural and its icon is shown with a green color. Next, you have to move all existing libraries which are still located outside this new library root folder into this new library root folder.
When a project contains the library root folder "Natural-Libraries", any libraries that are located outside this root folder are ignored when the project is built. When a library is located outside the library root folder, its icon is shown with the standard color for folders, which is yellow.
When a project does not contain a "Natural-Libraries" folder, all libraries are stored directly below the project node, and they are considered when the project is built.
A Natural library may contain the special folders SRC, ERR and RES.
SRC - Source Folder
The source folder has the reserved name
"SRC". It contains Natural sources (programs, maps,
DDMs, etc.).
Note:
DDMs in mainframe environments have only long names. When
downloading DDMs, the long names are automatically mapped to short names, if
necessary.
ERR - Error Message Folder
The error message folder has the reserved name
"ERR". It contains application-specific messages.
See also Creating
Application-Specific Messages.
RES - Resource Folder
The resource folder has the reserved name
"RES". It contains resources in the Natural sense of
the term, that is, non-Natural files (such as images or HTML files) that are
used in a Natural application.
Resources which belong to a Natural project can be altered using standard Windows or Linux tools, if available.
As long as these folders are stored within a Natural library, they cannot be renamed. However, when you move such a folder outside the library, it can be renamed as desired and can be used as a library of its own.
It is not mandatory to use the above mentioned folders. You can omit them altogether. By default, objects with the file extension .NS* are handled as Natural sources, and objects which adhere to the naming convention for Natural error messages are handled as error messages. All other items are considered to be resources, in the Natural sense of the term.
Exception: If Natural sources or error messages are to be handled as resources, you have to create a subfolder in the library with the reserved name "RES" and move the objects into this subfolder.
A library folder is a folder that is assigned to a specific Natural library. For example, you can have multiple library folders for one and the same Natural library, where each library folder just contains the objects which pertain to a specific part of the application. When the "Natural-Libraries" root folder exists, this works only when the library folders are contained in this root folder.
A library folder is indicated by a green- and yellow-colored
folder icon:
![]() .
.
Other than the library name which must adhere to the Natural naming conventions (for example, it may only be up to 8 characters long and must not contain lowercase characters), the name of a library folder may be up to 255 characters long. This can be any combination of uppercase and lowercase, but has to follow the rules of the underlying file system (Windows or Linux).
If you want to create a library and a library folder at the same time, you can do this as described in the section Creating Libraries.
You can also create a library folder by simply renaming a Natural library so that its name is no longer considered to be a valid Natural library name. When this is the case, the library name is modifiable in the properties of the library folder. This allows you to assign the library folder to a different library. If you rename a library folder in such a way that its name adheres again to the Natural naming conventions, the folder is no longer considered as a library folder; it is then considered as a regular Natural library (in this case, the library name is no longer modifiable in the library properties).
You can also create a "normal" folder () in a Natural project and then assign it to a Natural library by specifying the library name in the folder properties. As long as a "normal" folder has not been assigned to a Natural library, the folder icon still has the standard color, which is yellow. When the folder has been assigned to a library, the color of the folder icon changes to green and yellow, indicating that it is now considered as a library folder.
When you create a subfolder within a Natural library or library folder, this subfolder automatically inherits the library from the parent folder. However, it is also possible to assign a different library to a subfolder.
Important:
Even if the objects of one and the same library are
stored in different library folders, all object names must be unique within a
library. Keep this in mind, for example, when copying objects to a different
library folder.
The library that you assign to a library folder need not necessarily be contained in the workspace. When it does not yet exist on the Natural server, it will be created the next time you upload your changes.
The library folders are only used in the Eclipse workspace. They are not uploaded to the server (for example, when you deploy your application). On the server, only the conventional Natural libraries are used. When the objects in a library folder are uploaded to the server, they are always placed into the libraries that have been assigned to the library folder.
Caution:
As soon as a library folder is assigned to a library, a
.paths file is created in the project. This file contains
the mappings of the folder names to the Natural library names. You must not
change the .paths file manually since this may result in
damaging your project.
The Natural objects in a library can be grouped physically into separate folders, according to their object types. For example, all programs can be grouped into a folder named "Programs" and all adapters can be grouped into a folder named "Adapters".
This is similar to the Natural Server view where the objects in a library are automatically grouped into different nodes, according to their object types. However, other than in the Natural Server view where the objects are just grouped in a logical way, the objects in the workspace are grouped physically. This means, when an object in the Project Explorer view is shown within a folder named "Programs", this folder also exists in the file system (for example, \MyFirstProject\Natural-Libraries\TUTORIAL\Programs).
Note:
If you do not want to group the objects physically, the
Natural Navigator view offers the possibility to group
them in a logical way. See Using the Natural Navigator
View.
If you want to make use of physical group folders, you have to select the Group new objects by object type option when you create a new project (either by using the wizard or by downloading an existing library or object from a Natural server into a new project). You can also select this option in the project properties of an existing project. When you create a Natural object or error message, the group folders are then automatically created.
Note:
The default setting of the Group new objects by
object type option when creating new projects can be determined in
the Natural
preferences.
The group folders are only created for existing objects. For example, when a downloaded library does not contain any subprograms, a folder with the name "Subprograms" is not created.
In addition to the group folders for the different Natural object types, it is also possible to have a group folder with the name "Resources". This folder is automatically created when you download resources (that is, non-Natural files such as images or HTML files) from a Natural server.
When you have chosen to use group folders, the special folders with the reserved names "SRC", "ERR" and "RES" are not created.
A group folder is the same as a library folder and is also
indicated by a green- and yellow-colored folder icon:
![]() .
.
In the workspace, different types of names can be used for the Natural objects. In addition to the Natural object names which must adhere to the Natural naming conventions, you can define alternative (long) file names which may be up to 255 characters long (without the file extension). This can be any combination of uppercase and lowercase, but has to follow the rules of the underlying file system (Windows or Linux).
The file name must always be followed by the Natural file extension for the corresponding object type (such as .NSP or .NSS). All alphabetical characters in this file extension must be in uppercase.
Take care: It is also possible to create "long" file names which have less than 8 characters. This is the case, for example, when the name contains lowercase characters which are not allowed for Natural object names.
Important:
Do not confuse the "long" file names with
the long names of Natural objects (for example, of subroutines or DDMs). These
are two different things.
The file name can either be specified when creating a Natural object or by renaming an existing Natural object. If an object has a file name, the original Natural object name can be modified in the object properties.
The file names are only used in the Eclipse workspace. They are not uploaded to the server (for example, when you deploy your application). On the server, only the conventional Natural object names are used.
Note:
File names are not supported for error messages.
You can define your individual label decorations for the different nodes in the Project Explorer view and Natural Navigator view. For example, you can define to show the object size, the long name and the code page with the name of an object. For information on the label decorations that can be used with a Natural project, see Label Decorations in Setting the Preferences.
By default, several defined names are shown in the label decoration of a library folder or object:
For a library folder, the folder name is shown first, followed by the name of the Natural library, in parentheses, to which this folder has been assigned.
For an object, the file name is shown first, followed by the Natural object name in parentheses. When a long name is available (for example, of a subroutine), it is additionally shown, also in parentheses.
Example:
Notes:
In the Eclipse workspace, you can create a Natural library in different ways:
by downloading a library or object from a Natural server, see Downloading an Existing Library or Object from a Natural Server,
by creating a new library using a wizard, see below,
by checking out a library from the repository of your version control system.
 To create a new library using a wizard
In the Project Explorer view or in the Natural Navigator view, select the Natural project in which you want to create the library.
From the menu, choose .
Or:
Invoke the context menu and choose .
The following dialog box appears.
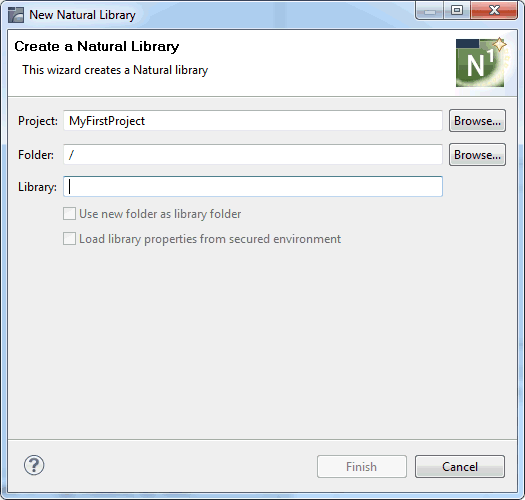
Specify the following information:
| Option | Description |
|---|---|
| Project | The project in which the library is to be created. If you have selected a project before invoking this dialog box, the project name is automatically shown in this text box. However, if you have not selected a project (or if you have invoked the dialog box, for example, in a new empty workspace), you have to enter the name of a project to be created. |
| Folder | If you want to store your new library at a different location within the selected project, choose the button. You can then select a library, library folder or even a subfolder such as SRC. See also Library Folders. |
| Library | A unique name for the new library. This name must adhere to the Natural naming conventions. |
| Use new folder as library folder | Only enabled when you have
specified a folder name. If you want to create a library and a library folder
at the same time, enable this check box. In this case, the new library is
created as a library folder. The folder name you have specified is used as the
name for the library folder.
It is important that you specify the new folder name as shown in the following example: /mylibfolder Do not omit the slash. |
| Load library properties from secured environment | Only enabled when Natural
Security is active in the associated Natural environment. When enabled, this
check box is activated by default. In this case, the library properties for the
newly created library are loaded from the server. If a corresponding library
does not exist on the server, the properties from the logon library of that
server are used. If the associated Natural environment is not accessible, a
dialog box appears. In this case, you can either cancel or continue the
operation. If you continue, the properties are set to the defaults of the
selected project.
When Natural Security is active and this check box is deactivated, the properties for the newly created library are set to the defaults of the selected project. |
Choose the button.
The new library or library folder is created in the specified project. When you have just created a library (and no library folder), the library contains empty folders for Natural sources, resources (that is, non-Natural objects) and application-specific messages (see also Special Folders in a Library).
You can now add Natural objects to the new library as described in Creating Natural Objects.
Notes:
The information below applies to both libraries and library folders.
To change the library properties
Select the library or library folder in the Project Explorer view or in the Natural Navigator view.
Invoke the context menu and choose .
The Properties dialog box appears.
In the tree on the left side of the dialog box, expand the Natural node.
When Natural Security is active in the associated Natural environment, a Security subnode is shown. Information on the pages that are available for this subnode is provided in the topics below.
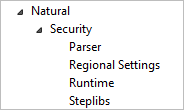
When Natural Security is not active, only the Natural node is shown, without any further subnodes.
Notes:
When you select Natural in the tree, the information that is shown depends on whether you have selected a library or a library folder in the Project Explorer view or in the Natural Navigator view.
The following information is shown for a library:
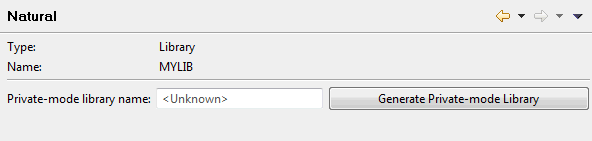
The information on the private-mode library is only shown when private mode has been enabled. For each library in a project, you can create a private-mode library in the associated server environment. You can do this in one of the following ways:
Leave the Private-mode library name text box empty and choose the button. The generated name for this library includes the prefix which is defined in the Natural preferences; see Natural > Options in Setting the Preferences.
Enter the name for the library in the Private-mode library name text box. The name of the button then changes to . Choose this button to create the private-mode library with the name you have just specified.
Once the private-mode library exists in the server environment, its name is shown in the Private-mode library name text box (which is read-only in this case) and the name of the command button changes to . When you choose this button, a dialog box appears, asking whether you want to delete the private-mode library in the server environment. When you delete the private-mode library and the server environment is protected by Natural Security, the corresponding entries in Natural Security's system file are also deleted.
The following information is shown for a library folder. In this case, you have the possibility to assign the library folder to a different library.

See also Renaming Objects and Libraries.
Make all required changes.
Choose the button to save your changes and to close the dialog box.
Note:
When a library is downloaded from Natural environment
which is protected by Natural Security, the steplib information and a number of
profile parameters are downloaded from the security profile which is located in
the Natural environment and are saved in the Eclipse workspace. Any changes to
the library properties are written to the .natural file.
They are not written back to the security profile.
When you expand the Security node (which is only shown when Natural Security is active in the associated Natural environment), the following property pages are available:
When you select Security in the tree,
the following property page is shown. It shows the settings for the
FNAT, FUSER and FSEC system files. If
information on a system file cannot be found,
"unknown" is shown.

When you select Parser in the tree, the following property page is shown.
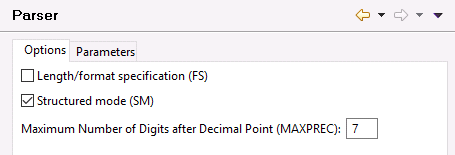
This property page provides different tabs. On these tabs, you can define the related profile parameters that are relevant for a library when Natural Security is active. More information on the individual options contained on these tabs is provided under Parser in the section Changing the Project Properties.
When you select Regional Settings in the tree, the following property page is shown.
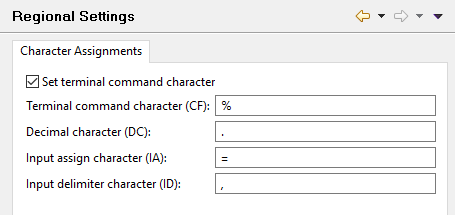
This property page provides a Character Assignments tab. On this tab, you can define the related profile parameters that are relevant for a library when Natural Security is active. More information on the individual options contained on this tab is provided under Regional Settings in the section Changing the Project Properties.
When you select Runtime in the tree, the following property page is shown.

On this property page, you can define the
LT profile parameter which is relevant for a library
when Natural Security is active. See also
Runtime
in the section Changing the Project Properties.
When you select Steplibs in the tree, the following property page is shown.
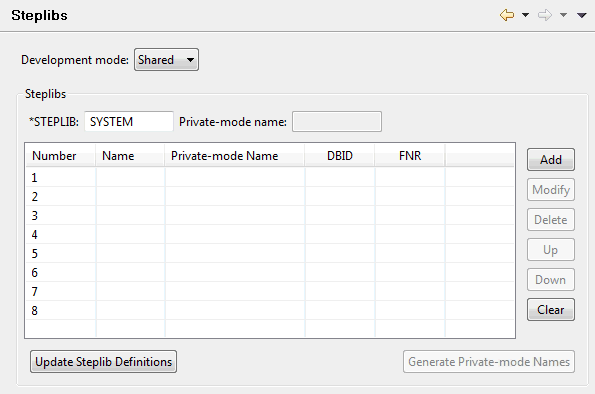
When Natural Security is active, steplibs can only be defined in the library properties. In this case, it is not possible to define them in the project properties.
It is possible to define different development modes for the individual libraries that are contained in a project.
When private mode is defined for the library, it is possible to define private-mode names for the steplibs which exist in the project.
For detailed information on the information that you can specify on this property page, see Steplibs in Changing the Project Properties.
The property page in the library properties provides the following command button which is not available in the project properties:
- Update Steplib Definitions
When you choose this button, the steplib definitions in your local workspace are updated with the steplib definitions from the associated Natural environment.
When Natural Security is active, it is important that your local steplib definitions match those in the Natural environment. For example, when you update a project in a Natural environment which is protected by Natural Security, the local steplibs are first compared with those in the Natural environment. When they match, the project is updated. When they do not match (for example, when different names are used or additional steplibs are defined in the local workspace), a dialog box appears listing the local steplib names and the steplib names in the Natural environment. Using the buttons in this dialog box, you can either update the local steplib definitions automatically and continue with the update, or you can cancel the update.
When the project containing a library pertains to a Natural environment which is protected by Natural Security, you can update the Natural profile parameters settings of a library in your workspace (such as the programming mode or the input delimiter character) with those which are currently active on the server. This is helpful, for example, when the Natural builder finds an error due to conflicting settings in the Eclipse and Natural server environments.
To update the library properties with the settings from the
server
In the Project Explorer view or in the Natural Navigator view, select the library that you want to update
Invoke the context menu and choose .
Note:
This command is only visible when the library belongs to
a project where the associated server environment is protected by Natural
Security.
The settings from the server are now available in your library properties.
You copy, paste, move, rename and delete Natural libraries in the same way as any Natural object. For detailed information, see the following topics: