
This document covers the following topics:
The XML toolkit is the tool of choice when you want to generate aids for the processing of XML documents within Natural. It is a wizard which makes use of the objects in the Eclipse workspace. Different input files are possible:
XML schema.
Document type definition (DTD).
Natural data area (local data area, global data area or parameter data area).
Depending on the input file, the XML toolkit generates the appropriate output files:
A parser implementation for the PARSE
statement.
A serializer implementation which uses the
COMPRESS statement.
A corresponding Natural data area.
A corresponding XML schema.
A corresponding DTD.
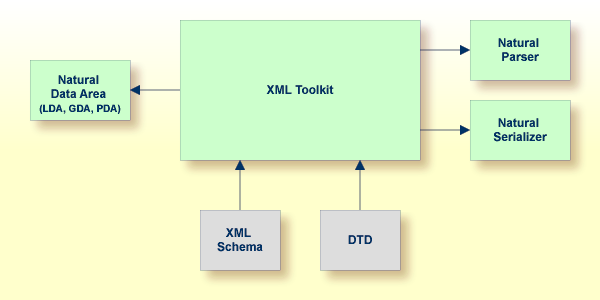
This is illustrated in the following graphics.
Input: XML Schema or DTD
When the input file is an XML schema or DTD, the XML toolkit
can produce a Natural data area, a parser implementation and/or a serializer
implementation.
Caution:
Byte order marks (BOMs) in XML schema and DTD input
files are currently not supported. If the input file contains a BOM, a parsing
error will occur. As a workaround, you have to remove the BOM
manually.
Input: Natural Data Area
When the input file is a Natural data area, the XML toolkit
can produce a parser implementation, a serializer implementation, an XML schema
and/or a DTD.

For more information on the XML toolkit, see Web Technology in the Natural documentation for the appropriate platform.
In order to generate the above mentioned output files, you use the XML toolkit as described below.
 To generate output files
In the Project Explorer view or in the Natural Navigator view, select the object that you want to use as the input file.
From the menu, choose . In the resulting New dialog box, expand the Natural node, select XML Toolkit and then choose the button.
The following dialog box appears (in this example, a DTD has been selected).
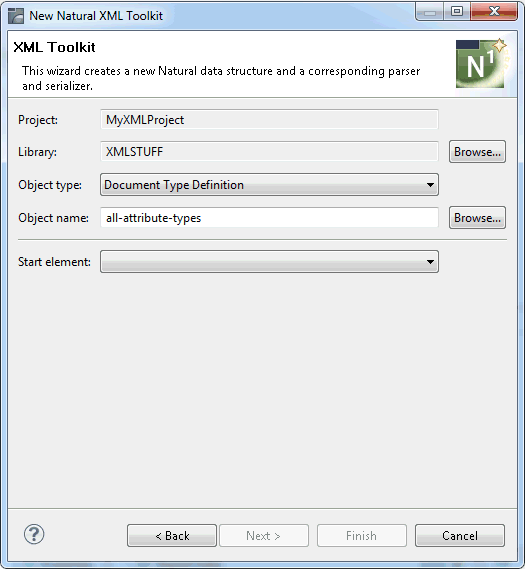
From the Start element drop-down list box, select the element that is to be used as the basis for the generated output file (for example, select the DTD element that is to be the basis for a new parameter data area).
Choose the button.
The following is now shown. You can create up to 3 different output files at the same time.
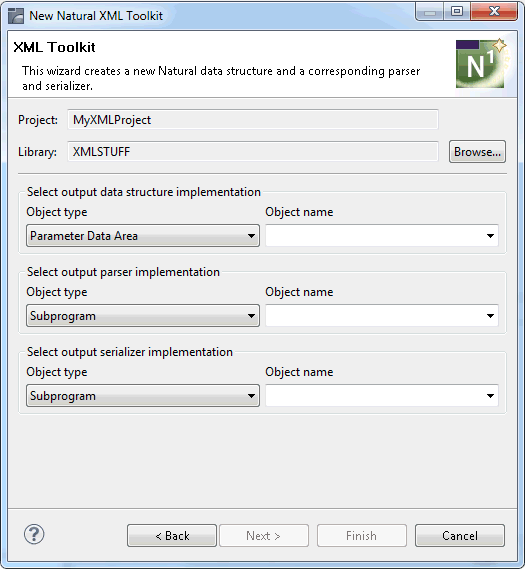
Enter a name for at least one output file and select the type of file (for example, copycode) that is to be generated.
Optional. If you want to change the default values for the generation, choose the button.
On the next two pages, you can change the Natural defaults and the XML defaults. These values are taken from the Natural preferences. See XML Toolkit in Setting the Preferences for further information on these defaults.
To start the generation, choose the button.
As a result of the generation, an editor window is opened for each generated output file. Each new object is shown in the Project Explorer view or in the Natural Navigator view, in the same library as the corresponding input file.
When you display the Properties dialog box for the file that was used as the input object for the generation, you can see the settings (for example, the replacements for the Natural variable names) that have been used for the last generation.