
This document covers the following topics:
When you edit a source directly on a Natural server, a lock is applied in order to prevent concurrent updating of objects, the source is automatically downloaded into a temporary project in the Eclipse workspace and the editor is opened. You can then apply changes to the source code and save them; the source is then changed on the server. When you close the editor, the object is automatically unlocked and removed from the temporary project. When the temporary project no longer contains any objects, it is removed from the Eclipse workspace.
The following information applies to Natural for Windows and
Linux. It also applies to Natural for Mainframes when the profile parameter
SLOCK has been set to
"SPOD".
On a Natural server, locking information is kept in the
development server file (FDIC). Therefore, locking is only
possible when such a file exists on the server.
Note:
Natural for Mainframes only: SLOCK=PRE is the
recommended setting when working in mixed environments. In this case, locking
information is kept in FUSER or FNAT (depending on
where the source member to be edited is located).
All Natural servers must have a development server file. An exception is a Windows server which can be run with or without development server file.
If a Windows server runs without development server file, NaturalONE never locks any objects. When an object is edited on a Windows server using Natural Studio, the object is locked and can therefore not be edited or deleted with NaturalONE. However, when you edit an object on a Windows server using NaturalONE, the object will not be locked and can thus be edited or deleted by any other user. It is also possible to delete a file on a Windows server which is currently edited in the same NaturalONE session; however, when the object is saved in the editor, the object is stored again on the Windows server.
If a server runs with a development server file, the above described situation cannot occur.
 To edit objects
In the Natural Server view, select the object(s) that you want to edit.
Invoke the context menu and choose .
Or:
Double-click each object that you want to edit.
An editor window appears for each selected object and you can now edit the sources. See Using the Natural Editors for further information.
When an object is currently locked, an editor is not invoked. Instead, the following information is shown: the date and time when the object was locked, and by whom it was locked.
Note:
For information on how to edit resources, see
Working with
Resources.
When you "list" an object, you display its contents but you cannot modify it. However, you can copy its contents. The object is automatically downloaded into a temporary project in the Eclipse workspace and the editor is opened in read-only mode. This is helpful, for example, if you want to view the contents of an object that you are not allowed to modify, or if you want to view the contents of an object and do not want to lock the object (as done with the command).
To list objects
In the Natural Server view, select the object(s) that you want to list.
Invoke the context menu and choose .
An editor window appears for each selected object.
Object sources are saved using the standard Eclipse functionality. The object source is saved directly on the Natural server.
To save an object
Activate the editor window for the source that you want to save.
From the menu, choose .
Or:
Press CTRL+S.
You can check the source code of an object (except classes) for syntax errors.
Note:
When the option Console output is enabled
on the Runtime
Execution page of the Natural preferences, information
about success or failure of the command is
shown in the Console view.
To check objects
In the Natural Server view, select the object(s) that you want to check.
Invoke the context menu and choose .
If an error was found, a dialog box appears, providing information on the error.
When you stow an object, it is compiled and saved. If no errors are found, the source form of the object is saved and the resulting generated program is stored (in addition to the source).
Note:
When the option Console output is enabled
on the Runtime
Execution page of the Natural preferences, information
about success or failure of the command is
shown in the Console view.
To stow the current object in the editor
Activate the editor window for the source that you want to stow.
Invoke the context menu and choose .
Or:
Press CTRL+T.
If an error is found, information on the error is shown in the Problems view. In this case, you first have to correct the error before it is possible to stow the object.
To stow several objects
In the Natural Server view, select the object(s) that you want to stow.
Invoke the context menu and choose .
If an error is found, a dialog box appears, providing information on the error. In this case, you first have to correct the error before it is possible to stow the object.
When you catalog an object, it is compiled. If no errors are found, the resulting generated program is stored.
In contrast to the command, the source code is not saved when you catalog an object. When the editor is open and the latest changes have not yet been saved, they are not considered by the command.
Note:
When the option Console output is enabled
on the Runtime
Execution page of the Natural preferences, information
about success or failure of the command is
shown in the Console view.
To catalog objects
In the Natural Server view, select the object(s) that you want to catalog.
Invoke the context menu and choose .
If an error was found, a dialog box appears, providing information on the error. In this case, you first have to correct the error before it is possible to catalog the object.
When you execute an object, the default configuration settings in the Natural preferences are used (see Natural I/O > Runtime in Setting the Preferences).
To execute objects
In the Natural Server view, select the object that you want to execute.
Note:
It is only possible to execute one object at a
time.
Invoke the context menu and choose .
The output is either shown in the internal browser or in an external browser, depending on your launch configuration.
Usually when something changes in Natural, the Natural Server view is automatically refreshed. This happens, for example, when objects are created, renamed or deleted. The automatic refresh requires that the corresponding option has been set in the Natural preferences; see Runtime Execution in Setting the Preferences.
There are, however, situations where an automatic refresh does not take place, since Natural is not aware of a modification. For example, two Natural processes are currently active and both are working on the same system file. When one Natural is applying a change to the system file (such as creating a new object), the second Natural is not aware of this modification. In this case, you have to refresh the display manually.
To refresh the display manually
In the Natural Server view, select the node to be refreshed (for example, a library).
Invoke the context menu and choose .
Or:
Press F5.
The most recent information is fetched from the Natural server. The tree remains expanded at the same place.
You can copy and move nearly all of the nodes in the Natural Server view. This can be either a group node or a node for a single object. For example, you can copy all programs of a library by copying the Program node. The following restrictions apply:
It is not possible to copy or move an object as long as the object is locked on the server.
It is not possible to copy or move a system file node.
The target node of a copy or move operation will only accept the objects of the selected source node when all objects can be copied or moved to the target node.
When you copy an object (for a example, a program), it is not possible to paste it in the same library. Likewise, when you move an object, it is not possible to move it within the same library.
Libraries are copied and moved in the same way as any other node in the Natural Server view. The target node for a copied or moved library can be any system file node. It can even be any other library node; in this case, all objects of the source library are copied. The following applies for libraries:
When a library is copied or moved to a system file node for
user libraries (FUSER), the new library must conform to the
library naming conventions. Thus, when you copy or move a system library which
starts with "SYS" to the user libraries, a dialog
box appears and you have to specify another name. The default library name
"USR-LIB" that is offered in this dialog box can be
overwritten.
The same applies when copying or moving a user library to the
system libraries (FNAT) where the library names must start with
"SYS". In this case, the dialog box mentioned above
offers the default name "SYS-LIB".
In all other cases, the name of the source library is taken as the name of the target library.
You can also copy and move nodes from one Natural server environment to another Natural server environment, for example, from a mainframe environment to a Linux environment.
Note:
Using drag-and-drop, it is possible to download libraries and
objects to an existing project in the Eclipse workspace. For further
information, see Downloading an Existing
Library or Object from a Natural Server.
To copy objects or libraries using menu commands
In the Natural Server view, select one or more nodes.
Invoke the context menu and choose .
Select the target node in the Natural Server view.
Invoke the context menu and choose .
To copy objects or libraries using drag-and-drop
In the Natural Server view, select one or more nodes.
Click and hold down the left mouse button.
Drag the mouse to the node in the Natural Server view to which you want to copy the objects.
Hold down CTRL.
Release the mouse button and then CTRL.
Caution:
If you do not hold down CTRL before
releasing the mouse button, the objects are moved.
To move objects or libraries using a menu command
In the Natural Server view, select one or more nodes.
Invoke the context menu and choose .
The following dialog box appears.
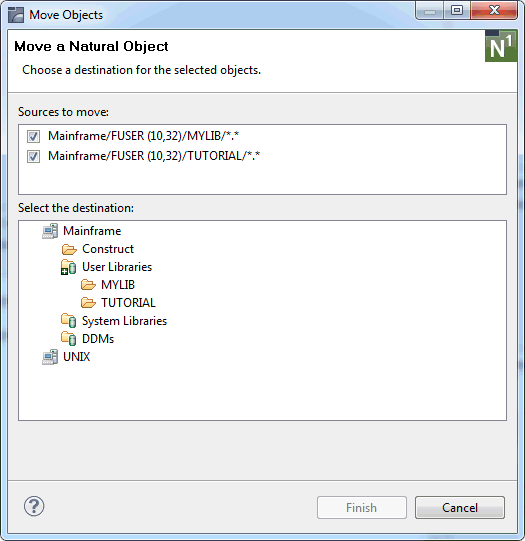
The upper part of the dialog lists the path(s) to the selected node(s). If you decide that you do no longer want to move one of the listed nodes, simply deselect the corresponding check box.
In the lower part of the dialog, select the target node for the moved object(s).
Note:
Any filters that have been set are
also used in the Move Objects dialog box.
Choose the button.
To move objects using drag-and-drop
In the Natural Server view, select one or more nodes.
Click and hold down the left mouse button.
Drag the mouse to the node in the Natural Server view to which you want to move the objects.
Release the mouse button.
When you drag an object to a different environment (for example, from a Linux environment to a mainframe environment), the object is copied and not moved. The object is not deleted at its original position.
Notes:
When renaming an object or library, make sure to adhere to the Natural naming conventions.
Note:
It is not possible to rename error messages, mainframe DDMs,
and the library SYSTEM.
To rename an object
In the Natural Server view, select the node that is to be renamed.
Invoke the context menu and choose .
A dialog box appears.
Enter a new name and choose the button.
When you delete an object in the Natural Server view, both source and generated program are deleted. It is not possible to delete an object when it is currently locked on the server.
A library is deleted in the same way as a Natural object. If you
are working in a multiple-user environment, you should only delete a Natural
library if you have exclusive access to the library involved. It is not
possible to delete the library SYSTEM.
To delete objects or libraries
In the Natural Server view, select one or more nodes.
Invoke the context menu and choose .
Or:
Press DEL.
When the corresponding option has been set in the Natural preferences (see Runtime Execution in Setting the Preferences), you are prompted to confirm the deletion.
When you are working in Natural server mode, it may happen that the connection to the Natural server is lost. In this case, any objects that you are editing directly on the Natural server remain locked until they are manually unlocked.
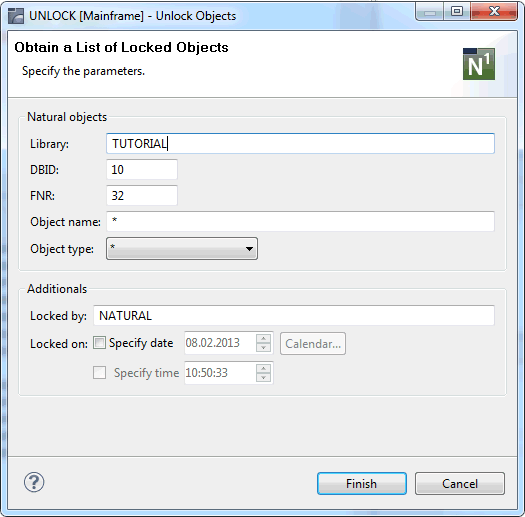
You can view the Natural objects that are locked. If required, you can unlock them.
To unlock locked objects
In the Natural Server view, select a node in the appropriate Natural server environment.
For example, select the node for a library containing locked objects. The library name and all available information will then be provided in the dialog box which is used for unlocking.
Invoke the context menu and choose .
A dialog box appears. When a library was selected, its name and the appropriate database ID and file number are automatically provided.
Notes:
You can limit your search by specifying further options (for example, an object type or a specific date and time). The following options are available:
| Option | Description |
|---|---|
| Library |
The name of the library which contains the locked object. Asterisk notation (*) can be used. |
| DBID |
The database ID of the specified library. Asterisk notation (*) can be used. On mainframe servers with parameter
|
| FNR |
The file number of the specified library. Asterisk notation (*) can be used. On mainframe servers with parameter
|
| Password |
This option is available only for a mainframe
server and when the profile parameter The password for the specified system file (DBID and FNR). Needs not be specified when the DBID and FNR of
the current |
| Cipher |
This option is available only for a mainframe
server and when the profile parameter The cipher key for the specified system file (DBID and FNR). Needs not be specified when the DBID and FNR of
the current |
| Object name |
The name of the object to be unlocked. Asterisk notation (*) can be used. For a list of all objects from a specific start value, the notation ">" can also be used. |
| Object type |
If you want to restrict the objects to be unlocked to a specific object type, select the corresponding object type from the drop-down list box. The asterisk (*) in the drop-down list box means that all locked objects will be found. |
| Locked by |
The ID of the user who caused the object to be locked. Asterisk notation (*) can be used. Your own user ID is provided by default. If Natural Security is used, you can only specify another user ID if the security unlock flag is set to "F" (forced unlock) in the Natural Security user profile. |
| Locked on |
When the Specify date check box is selected, you can specify a date (either in the spin box or in the dialog box which appears when you choose the button). All locked objects between this date and the current date will then be found. When you select the Specify time check box, you can also define a time. All locked objects between this time on the specified date and the current date will then be found. |
Choose the button.
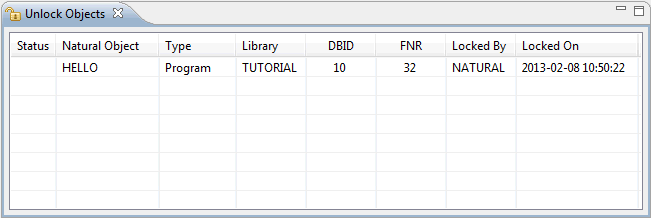
When locked objects exist, they are shown in the Unlock Objects view.
Note:
This view is automatically shown when locked objects are
found. It is not shown by default when you open the NaturalONE perspective. See
also Showing a View of
the NaturalONE Perspective.
In the Unlock Objects view, select the object(s) that you want to unlock.
Invoke the context menu and choose .
All selected objects are unlocked. For each unlocked object,
the following icon is shown in the Status column:
![]() .
.
How DDMs are shown in the Natural Server view depends on the type of server environment (see also Contents of the Natural Server View).
In previous versions of NaturalONE, the way in which protected libraries were shown depended on the setting of the Display DDMs in library option in the Natural preferences. The Display DDMs in library is no longer available. Instead, the following behavior applies:
If the server has Natural Security installed, all DDMs which are accessible to the current user in a specific library are shown in a DDMs group node of this library, regardless of whether the DDMs are public or protected. The DDMs system file node is no longer available in this case.
If the server has no Natural Security installed:
For Mainframe servers and other servers with
FDDM, the DDMs will be displayed below the
DDMs system file node.
For Linux or Windows environments where the DDMs are
stored in libraries (that is, the FDDM parameter has not been
set), the DDMs will be displayed below the DDMs group node
in the libraries.
The commands which can be executed on DDMs which are displayed in a library are restricted to , , , and . File operation commands such as or cannot be used.
You can work with dialogs when NaturalONE has been installed in a Windows environment.
Dialogs cannot be edited with a NaturalONE editor. However, when Natural Studio is installed on the same machine as NaturalONE, you can invoke Natural Studio from the Natural Server view and then edit the dialog directly in Natural Studio, using the dialog editor.
The prerequisites are:
You have a license for Natural for Windows. This must be a development environment, not a runtime environment.
Natural for Windows, which includes Natural Studio, is installed on the same machine as NaturalONE.
Important:
This feature only works as of Natural Version 6.3.9
for Windows. Therefore, Natural Version 6.3.9 or a later version must be
installed.
Natural Development Server (NDV) has been installed together with Natural for Windows.
You have mapped the development server so that it is available in the Natural Server view. With a default installation, this server can be mapped with the name "localhost" and the port number "2700".
When these prerequisites are fulfilled and Natural Studio can be found in the development environment, the command is visible in the context menu for a selected dialog in the view.
Natural Studio's dialog editor can only be invoked for dialogs that are accessible via the Natural Server view. Dialogs which are stored in the Eclipse workspace (in the Project Explorer view or in the Natural Navigator view) can only be edited with NaturalONE's source editor (however, this is not recommended). If you want to edit a dialog that is stored in the Eclipse workspace with Natural Studio's dialog editor, you have to upload the dialog to an appropriate development server.
To edit a dialog
In the Natural Server view, select the dialog that you want to edit.
Invoke the context menu and choose .
Natural Studio's dialog editor is invoked for the selected object and you can now edit it. For detailed information on the dialog editor, see the Natural for Windows documentation.
Note:
If you want, you can also use any other features of Natural
Studio. All installed functionality will be available to you.
In Natural terminology, resources are non-Natural files (such as images or HTML files) that are used in a Natural application.
In the Natural Server view, the resources in a library are contained in a node called Resources. When you expand this node, additional nodes are shown for the available types of resources. For example, all bitmaps (*.bmp) are shown in a node called Bitmap Images, and all icons (*.ico) are shown in a node called Icons.
If you want to modify a resource, you have to double-click it. This downloads the resource into a temporary project in your Eclipse workspace and opens the appropriate internal editor. You can then apply changes to the resource and save them; the resource is then changed on the server. When you close the internal editor, the resource is automatically removed from the temporary project. When the temporary project no longer contains any resources or Natural objects, it is automatically removed from the Eclipse workspace.
Caution:
There are some resource types (for example, icons) for which
an internal editor is not available. In this case, an external program is
started which is registered as the system default editor for that file type.
When you close an external program, Eclipse (and thus NaturalONE) is not aware
of this. As a result, the resource is not removed from the temporary project.
In this, case you have to delete the resource manually from the temporary
project and, if the resource was the last object in the temporary project, you
also have to delete the temporary project manually.
When you switch on private mode in the properties of a Natural project which is located in the Eclipse workspace, one or more private-mode libraries are automatically created on the associated Natural server when you build the project. These private-mode libraries are visible in the Natural Server view.
It is not possible to change a private-mode library in the Natural Server view, and it is not possible to change any object in a private-mode library (for example, it is not possible to edit such an object). The corresponding commands in the context menu are unavailable (gray).
For further information, see Private-mode Libraries in NaturalONE in a Nutshell, and the description for private mode in Changing the Project Properties.