
This document covers the following topics:
When you have chosen to work in local mode, you have to deal with Natural projects which are shown in the Project Explorer view and/or in the Natural Navigator view. Projects are essential parts of the Eclipse environment. In Eclipse, the resources (folders and files) in the workspace are always organized in projects.
The Project Explorer view is a standard Eclipse view which always shows a project as it is physically stored in the file system. The Natural Navigator view, however, allows you to manage, view and/or filter your Natural projects in several Natural-specific ways; see Using the Natural Navigator View for further information.
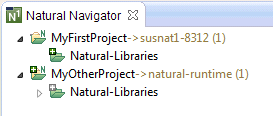
The following example shows how the projects that are shown in the Project Explorer view can be shown in the Natural Navigator view. According to the settings of the toggle buttons, the Natural Navigator view shows only Natural projects, the root folder "Natural-Libraries" is hidden and the objects are logically grouped by type.
A Natural project contains the contents of one or more Natural
libraries, and also other folders and files which are added by other components
of NaturalONE such as Ajax Developer. A Natural project is indicated by the
following icon:
![]() .
.
By default, the environment to which a Natural project pertains is shown next to the project name. The number in parentheses which is also shown next to the project name indicates the number of Natural libraries in this project. This is part of the so-called label decoration.
Important information for this environment (such as the Natural parser settings or whether the environment is protected by Natural Security) is stored in the properties of the project. See Changing the Project Properties.
Caution:
Each Natural project includes standard project information
which is required by Eclipse (.settings folder and
.project file) and by Natural
(.natural file). You must not change these items manually
since this may result in damaging your project.
The Natural Navigator view is a Natural-specific view. If it is currently not shown, you can display it as described under Showing a View of the NaturalONE Perspective.
Whereas the Project Explorer view, which is a standard Eclipse view, always shows your projects as they are physically stored in the file system, the Natural Navigator view can be configured to show your projects in a logical way. It allows you to switch on and off different Natural-specific options for displaying your Natural projects in the tree. In addition, it provides enhanced support, for example, for copying and pasting Natural objects (for detailed information, see Copying and Pasting Objects and Libraries).
The local toolbar of the Natural Navigator view provides the toggle buttons described below. The view menu of the Natural Navigator view (drop-down menu at the top right of the view) contains the corresponding menu commands. When none of the toggle buttons is selected in the local toolbar of the Natural Navigator view, the Natural Navigator shows the same information as the standard Eclipse Project Explorer view.
| Toggle Button | View Menu Command | Description |
|---|---|---|
| N |
When selected, only the Natural projects are shown. When not selected, all projects in your Eclipse workspace (including, for example, your Java projects) are shown. |
|
| R |
When selected, the root folders are not shown. When not selected, all root folders (for example, "Natural-Libraries") are shown in the Natural projects. |
|
| L |
When selected, all objects in a Natural library are shown as they would be stored on the server. The special folders SRC, ERR and RES are not shown. When library folders have been defined, they are not shown. When not selected, the Natural libraries and all objects in a library are shown as they are physically stored in your Eclipse workspace in the file system. In addition, if library folders have been defined, their names are shown (if more than one library folder has been defined for a single library, more than one node is shown for the same library). This is similar to the representation in the Project Explorer view. |
|
| G |
When selected, all objects in a Natural library are logically grouped into different nodes, according to their object types. This is similar to the Natural Server view. For example, your programs are grouped into a Programs node and your subprograms are grouped into a Subprograms node. The special folders SRC, ERR and RES are not shown. When not selected, all objects in a library are shown as they are physically stored in your Eclipse workspace in the file system. However, whether the special folders SRC, ERR and RES are shown depends on the setting of the command (L toggle button). Note: |
|
| U |
When selected, only the modified Natural objects which still need to be updated in the Natural environment are shown for a Natural project. These are the objects which contain specific flags in the label decoration. For further information, see Flags in a Label Decoration. When not selected, all objects of a Natural project are shown. |
|
| F |
When selected, the file extensions of the Natural objects are not shown. When not selected, the file extensions of the Natural objects are shown (for example, ".NSP" for a Natural program). |
When the Natural Navigator view shows the objects in a logical way (that is, when they are not shown as they are physically stored in the file system), the icons for the virtual libraries and group folders and are shown with a gray color.
Note:
When the .settings folder, the
.project file and the .natural file
are not shown in the Natural Navigator view, the option
.*resources has been selected in the Available
Customizations dialog box (see
Customizing the
Natural Navigator View).
You can customize the Natural Navigator view so that the items that you do not want to see are not shown.
 To customize the Natural Navigator
view
To customize the Natural Navigator
view
From the view menu of the Natural Navigator view (drop-down menu at the top right of the view), choose .
The Available Customizations dialog box appears.
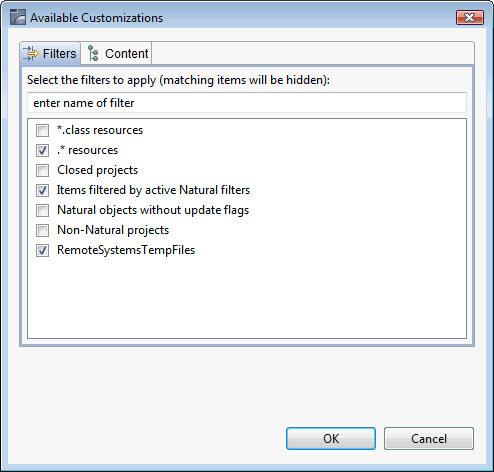
You can define the following filters, in addition to the standard Eclipse filters which are shown in this dialog box:
| Option | Description |
|---|---|
| Items filtered by active Natural filters | When selected, the Natural filters that have been applied to a node are active and it is possible to set additional filters. The items that you do not want to see in the Natural Navigator view are not shown. This corresponds to the Activate Natural filters option in the Natural Filters dialog box. For further information, see Filtering Natural Objects and Libraries. |
| Natural objects without update flags | When selected, all Natural objects are hidden which do not have update flags. Only the modified objects which still need to be updated in the Natural environment are shown. This corresponds to the command in the view menu (U toggle button in the local toolbar) of the Natural Navigator view. |
| Non-Natural projects | When selected, non-Natural projects (for example, Java projects) are hidden and only the Natural projects are shown. This corresponds to the command in the view menu (N toggle button in the local toolbar) of the Natural Navigator view. |
Select the filters that you want to apply.
Choose the button.
Using a filter, you can reduce the number of items that are shown in the Natural Navigator view. Filtering involves several steps: First you define a filter and then you set the filter on a node of the Natural Navigator view (for example, on a project or library node). Detailed information is provided in the following topics:
Note:
The information below only applies for the Natural
Navigator view. Eclipse also offers filtering functionality in its
Project Explorer view: you can define resource filters in
the properties of a project or folder. These resource filters will be written
to the .project file. If you are using a version control
system, keep in mind that you also have to keep the
.project file in your versioning repository. For Natural
projects, however, filtering information in the .project
file is not desirable. It is therefore recommended that you use the filtering
functionality of the Natural Navigator view, which is
described below, because the Natural filters are not written to the
.project file.
If you want to define a new Natural filter, you first have to invoke the Natural Filters dialog box as described below. Using this dialog box, you can also edit and delete existing Natural filters, or you can deactivate all Natural filters that have already been set in the Natural Navigator view.
To manage the Natural filters
From the view menu of the Natural Navigator view (drop-down menu at the top right of the view), choose .
The Natural Filters dialog box appears.
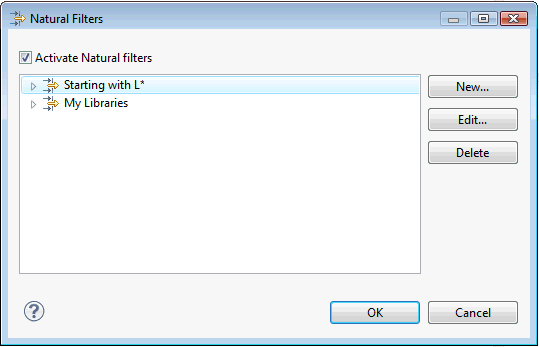
When the Activate Natural filters check box is selected (default), it is possible to add new filters, and to edit or delete existing filters. In addition, all Natural filters that have been set in the Natural Navigator view are active and it is possible to set further filters. See also Setting a Natural Filter.
Notes:
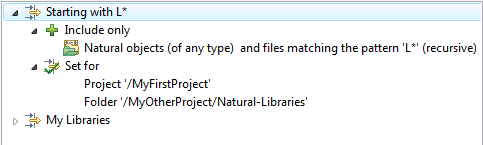
When filters are already defined, they are shown in the Natural Filters dialog box. When you move the mouse pointer over a filter, a tooltip is shown providing information on this filter. When you expand the node for a filter, you can see more detailed information on the filter. When the filter is currently active in the Natural Navigator view, a Set for node is shown, informing you on which nodes this filter has been set. For example:
The following command buttons are provided:
| Command Button | Description |
|---|---|
| Defines a new filter. See also Defining a New Natural Filter. | |
| Edits the selected filter. | |
| Deletes the selected filter. See also Removing a Natural Filter. |
Choose the button to save the setting of the Activate Natural filters check box and to close the Natural Filters dialog box.
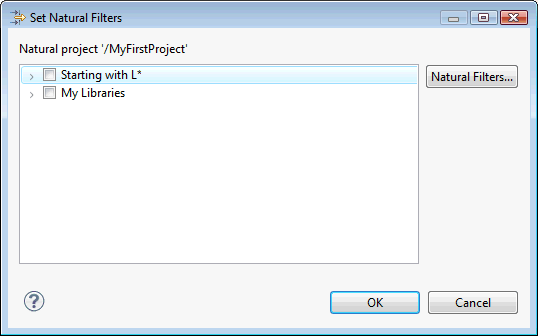
When you define a new Natural filter, you specify a name, a pattern (for example, that only items are to be shown which start with the letter "L"), and additional optional filter attributes. The filters that you define can then be set on a node of a Natural project in the Natural Navigator view.
To define a new Natural filter
Invoke the Natural Filters dialog box as described above.
Make sure that the Activate Natural filters check box is selected. Otherwise, it is not possible to define a new filter.
Choose the button.
The Define Natural Filter dialog box appears.

Specify the following information:
| Option | Description |
|---|---|
| Filter name | The name for the filter. You can use any name (for example, "My Libraries"). |
| Filter pattern | The pattern for the filter,
that is, the names of all items that are to be filtered. You can use wildcards
(? or *) within the names if you do not want to enter each name individually.
The question mark (?) may be specified at any position inside the name. The
asterisk (*) is only allowed at the end of a name. You can also use the escape
character (/) for literals.
Note: |
| Case sensitive | If selected, only items which match exactly the defined uppercase or lowercase letters in the pattern are shown. |
| Regular expression | If selected, the filter pattern is interpreted as a regular expression. In this case, you can press CTRL+SPACEBAR to invoke content assist for the regular expression. |
Optional. Expand Filter scope and/or Filter type.
Further filter attributes are shown in the dialog box.
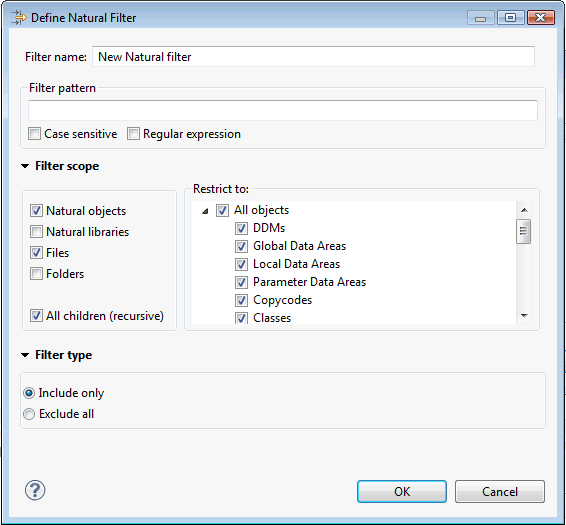
To define the filter scope, select one of more of the following check boxes:
| Option | Description |
|---|---|
| Natural objects | If selected (default), the filter applies to the names of the Natural objects selected in the Restrict to group box. This group box is only visible when Natural objects is selected. |
| Natural libraries | If selected, the filter applies to the names of Natural libraries. |
| Files | If selected (default), the filter applies to the physical file names of Natural objects and non-Natural files. |
| Folders | If selected, the filter applies to the names of library folders and non-Natural folders. |
| All children (recursive) | If selected (default), all children of the selected node are filtered. |
Make sure to define a reasonable filter scope. By default, the filter applies to the names of all Natural objects, the corresponding physical file names, and the names of all child nodes. If you would select, for example, the Natural libraries check box in addition to the default setting, the filter would also apply to the names of the Natural libraries, which is redundant.
To define the filter type, select one of the following option buttons:
| Option | Description |
|---|---|
| Include only | An Include only filter (default) allows only items that match the filter condition to be shown in the Natural Navigator view. If multiple Include only filters exist, the items shown will be those which match any of the existing Include only filters. |
| Exclude all | An Exclude all filter prevents all items that match the filter condition to be shown in the Natural Navigator view. If multiple Exclude all filters exist, the items excluded will be those which match any of the existing Exclude all filters. |
If both Include only and Exclude all filters exist in a given folder or project, only items that match any of the Include only filters and do not match any of the Exclude all filters will be shown in the Natural Navigator view.
Choose the button to save your changes and to close the Define Natural Filter dialog box.
The following settings are stored after the dialog box has been closed: size and position of the dialog box, and collapsed or expanded state of the Restrict to, Filter Scope and Filter Type group boxes.
Each Natural filter can be set on a node of a Natural project in the Natural Navigator view.
When a Natural filter has been set, the icons that are shown for the nodes contain additional plus signs. The background color of a plus sign indicates where the filter has been set. A green background indicates that the filter has been set on that node. A gray background indicates that the filter has been set on a parent node. Example:
Note:
The label decorations for the Natural filters are controlled
by the preferences under General > Appearance > Label
Decorations. If you do not want to have label decorations for the
Natural filters, just go to the above mentioned preference page and deselect
Natural Filters.
To set a Natural filter
In the Natural Navigator view, select the node on which you want to set a Natural filter.
When you select a project node, you can reduce the number of Natural objects, Natural libraries, Natural library folders, files or folders in this node.
When you select a library node or a library folder node, you can reduce the number of Natural objects, files or folders in this node.
Invoke the context menu and choose .
Note:
This command is only available if the use of Natural
filters has been activated in the Natural Filters dialog
box (see Managing
the Natural Filters) or in the Available
Customizations dialog box (see
Customizing the
Natural Navigator View).
The Set Natural Filters dialog box appears. It lists all filters that are currently defined. The type and name of the node on which you are about to set the filter is shown at the top of the dialog box.
Activate the check box for each filter that you want to set.
As in the Natural Filters dialog box, tooltips are provided for the defined filters, and you can see more information when you expand the node for a filter. See also Managing the Natural Filters.
Note:
When you choose the button, the Natural Filters dialog box
appears in which you can define additional filters or change the existing
filters.
Choose the button.
The content of the selected node in the Natural Navigator view changes so that only the items that match your filter are shown. These filter settings are always applied to the node, no matter which toggle buttons in the toolbar of the Natural Navigator view are currently selected.
You can either deactivate a filter for a node or you can delete a filter so that it is no longer available.
To deactivate a Natural filter for a node
In the Natural Navigator view, select the node for which you want to deactivate a filter. Make sure to select the parent node. The icon on such a node has a plus sign with a green background.
Invoke the Set Natural Filters dialog box as described above (see Setting a Natural Filter).
Deselect the check box for each filter that you want to deactivate.
Choose the button.
To delete a Natural filter
Invoke the Natural Filters dialog box as described above (see Managing the Natural Filters).
Make sure that the Activate Natural filters check box is selected. Otherwise, it is not possible to delete a filter.
Select the filter that you want to delete.
Choose the button.
You are asked whether you really want to delete the filter. If the filter is currently used on a node of the Natural Navigator view, a corresponding message is shown.
Choose the button to delete the filter.
The Details view is a Natural-specific view. If it is currently not shown, you can display it as described under Showing a View of the NaturalONE Perspective.
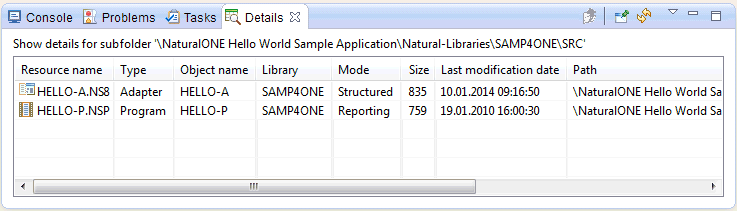
The Details view always shows detailed information on the children of the project, library, or folder that is currently selected in the Project Explorer view or in the Natural Navigator view. Example:
You can sort a column by clicking on its column header, and you can move a column by dragging the column header to another location.
Using the command in the view menu (or the corresponding button in the local toolbar), you can freeze the content of the Details view. This means, that the content of the Details view does not change when you select a different node in the Project Explorer view or in the Natural Navigator view.
By default, the Details view is updated automatically if one of the values shown in this view changes. You can switch off this behavior by deactivating the command in the view menu. In any case, you can always refresh the view manually by pressing F5 or by using the command in the view menu (or the corresponding button in the local toolbar).
The Details view only shows the columns which currently contain at least one value. If a column does not contain any value, it is not shown. For example, the Size column is not shown if only folders are contained in the view.
The following columns can be shown in the Details view.
| Column Name | Description |
|---|---|
| Resource Name | The Eclipse resource name, which is either a file name or a folder name. |
| Type | Either the type of a Natural object (for example. "Program") or the type of a folder (for example, "Library Folder"). |
| Object Name | The Natural object name. This column is only filled for Natural objects. |
| Long Name | The long name of a Natural object. This column is only filled for Natural objects which have a long name (for example, DDMs). |
| Library | The Natural library to which a Natural object or folder belongs. For folders which are not assigned to a specific library, this column is not filled. |
| Private-mode Library | The name of the private-mode library for Natural objects and folders when private mode has been defined for the project or library. This column is not filled for projects and libraries for which shared mode has been defined. |
| Mode | The programming mode of a Natural object. This can be either "Structured" or "Reporting". |
| Count | The number of direct children for libraries and folders. |
| Size | The size of a file. This column is not filled for libraries and folders. |
| Server Encoding | The server encoding of a Natural object. This column is not filled for libraries and folders. It is also not filled for Natural objects for which a server encoding has not been defined. |
| Last Modification Date | The date and time of the last modification of the Eclipse resource. |
| Path | The path to the Eclipse resource. In the case of a virtual library or group folder (Natural Navigator view), the string "<virtual>" is shown. |
Note:
The Mode and Server Encoding columns are
not shown by default. These columns can be switched on and off by opening the
View menu and toggling the menu items Show Column
Mode and Show Column Server Encoding.
You can invoke a context menu for each item that is currently selected in the Details view. For example, you can use the command to upload and stow selected sources. Keep the following in mind when working with the context menu:
Selecting several items
When you select several items in the
Details view, the context menu only contains the commands
which are allowed for all selected items.
command (or
double-click)
When you use the command with
a folder or library (or when you double-click a folder or library), the
children of that folder or library are shown in the
Details view. When you then select an item in the
Details view and choose from the view menu (or choose the corresponding
button in the local toolbar), the parent folder of the selected item is shown
in the Details view.
When you use the command with a file (or when you double-click a file), the file is opened in the appropriate editor.
command
Using the Copy command, you can copy the
visible columns of all selected rows to the clipboard, from where you can paste
them into an application of your choice. The column headers are also copied.
The contents of the individual columns are separated by semicolons (;).