
This document covers the following topics:
For Natural to be able to access a database file, a logical definition of the physical database file is required. Such a logical file definition is called a data definition module (DDM).
For more information on DDMs, see Accessing Data in a Database in the Programming Guide in the Natural documentation for the appropriate platform.
You can create DDMs directly from the field definitions in a database. This can be an Adabas, SQL or XML database, or any other database (such as VSAM).
Note:
DDMs from XML databases cannot be created for mainframe
servers.
 To create a DDM
In the Project Explorer view or in the Natural Navigator view, select the library in which you want to store the new DDM.
From the menu, choose .
The wizard for creating a new DDM appears (see also Creating Natural Objects). Several pages are provided in the wizard, in addition to the page on which you enter the DDM name.
Enter a name for the new DDM.
Choose the button.
NaturalONE now checks the available databases on the Natural server which is defined for the current project. When the corresponding server is currently mapped in the Natural Server view, all defined databases on this server are shown on the next page. When the corresponding server is not mapped or is currently not active, the table of defined databases remains empty.
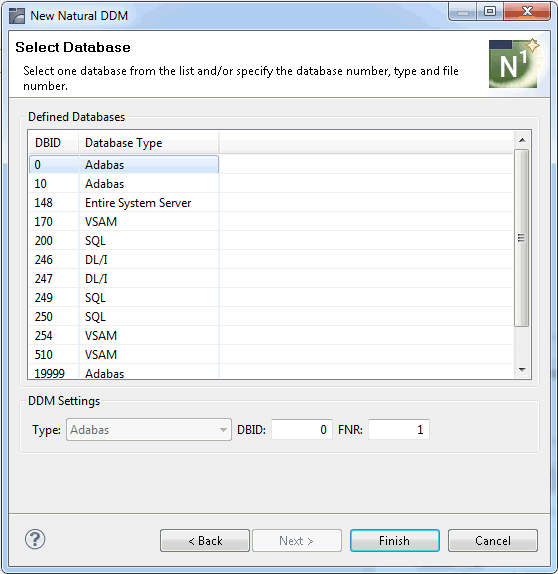
Select the database from which you want to create the DDM from the table of defined databases.
Or:
Enter the corresponding DDM settings at the bottom of the
page (this is helpful when the table of databases is empty):
Select the required database type from the drop-down list box.
As the database ID (DBID), enter a numeric value in the range from 0 to 65535 (except 255).
If you enter a 0 (zero) as the database ID, the database
ID specified with the Natural profile parameter UDB (see
the Natural documentation for the appropriate platform) of the Natural
parameter file NATPARM is used.
A file number (FNR) is only required for Adabas databases and any other database types except SQL and XML. Enter a numeric value in the range from 1 to 5000.
For SQL and XML databases, choose the button.
The resulting page depends on the type of database that you have selected:
SQL
A page is shown on which you have to specify the
selection criteria for the SQL table retrieval:
To list all SQL tables for selection, use the asterisks (*) in the text boxes Owner and Name. The asterisks (*) are entered by default.
To list a particular range of SQL tables, use asterisk (*) notation (for example, AB* selects all SQL tables with names that start with AB).
Note:
When an SQL database is accessed via the ODBC
interface, a table catalog is not provided. This means that you can only
specify a table name but not a table owner.
Choose the button.
Depending on your SQL database settings, a database logon dialog appears if you access this SQL database for the first time in this session. Enter the user ID and the password for the database and choose the button.
You can now select the required SQL table from the next page.
XML
A page is shown on which you have to select a Tamino
doctype.
A database logon dialog appears, if you are accessing this Tamino database for the first time in this session. Enter the user ID and password for the database and choose the button.
Note:
For Adabas and other database types, additional pages are
not shown.
Choose the button.
If the specified database and the file are available, the DDM editor is invoked and the fields contained in that database file are read into the DDM editor.
If the specified database is not active or cannot be accessed or if the file does not exist, a corresponding error message is issued. Nevertheless, an empty DDM editor window appears (containing a single dummy field) in which you can enter new field attribute definitions and save the DDM source. However, in this case you cannot check any definitions against the database file description.
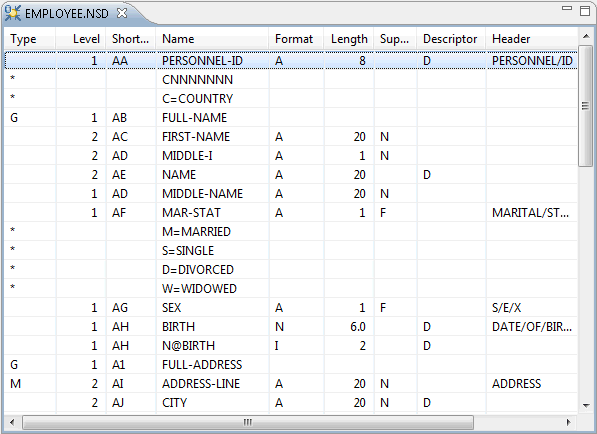
When you create or open a DDM, the DDM editor is invoked. Example:
When the DDM editor is active, a corresponding toolbar is available. See Managing the Fields of the DDM.
The behavior of the DDM editor can be influenced by changing the Natural preferences. See DDM Editor in Setting the Preferences.
The DDM editor uses the following views of the NaturalONE perspective:
This view shows the hierarchical structure of the DDM and the DDM fields in a tree. The top-level node contains the long name of the DDM, the first child node represents the DDM header and the other child nodes represent the DDM fields.
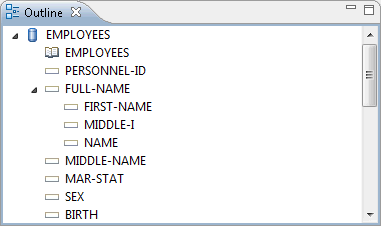
You can invoke a context menu to insert, cut, copy, paste or delete fields. See also Managing the Fields of the DDM.
You can navigate to a particular item in the DDM editor by selecting it in the Outline view, and vice versa. In the Properties view (see below), the selection is changed accordingly.
This view shows the dependencies between the DDM which is currently shown in the active editor window and other objects. For example, when the passive cross-references are currently displayed, you can see all Natural objects that reference the DDM being edited.
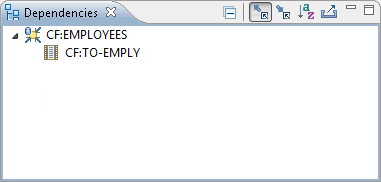
For further information on this view, see Dependencies View in the description of the source editor.
This view shows information on the DDM, the DDM header or the field that is currently selected in the DDM editor or in the Outline view.
In general, the attribute values shown in the Properties view are not modifiable. As an exception, information that cannot be edited in the table view can be supplied here. This includes for all database types the database ID, the file number, the default sequence and, in particular, definitions required for VSAM databases.
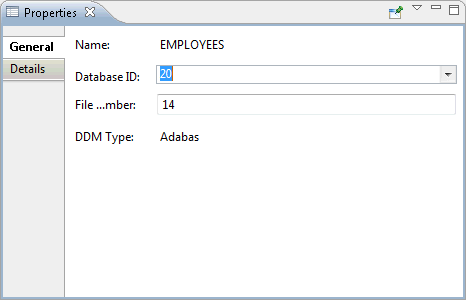
The General page shows common information. When a DDM or DDM field is selected, it shows the name of the DDM or DDM field. When the DDM header is selected, it shows the name of the DDM header, database ID, file number and database type. Database ID and file number can be changed here, the name of the DDM and the database type are not modifiable.
If available, the Details page shows additional, more specific information that depends on the currently selected object:
For Adabas DDMs, it shows information on coupled files. For Adabas DDM headers, it shows the default sequence. For Adabas DDM fields, it shows the parent fields of the selected superdescriptor.
For SQL DDM headers, it shows the default sequence.
For Tamino DDM headers, it shows information on the XML schema definition, doctype, collection and namespaces. For Tamino DDM fields, it shows field-specific information taken from the XML schema such as XML tag and XML path.
For VSAM DDMs, it shows extended information on the VSAM header and the VSAM field definitions.
Using the commands from the menu, you can cut, copy, paste and delete fields in the DDM editor, and you can undo and redo your last change. Some of these commands are also available when you invoke the context menu for a row in the DDM editor, and they are also available in a toolbar. The DDM editor also offers a toolbar of its own which you can use to insert fields in the DDM editor.
In addition, it is possible to invoke a context menu in the Outline view. Using the commands in this context menu, you can also insert, cut, copy, paste and delete fields.
The commands / and are used to copy or move one or more fields within the current DDM source or between different DDM sources. The copied or cut fields are placed on the clipboard and can be pasted into the current or another DDM source; the fields are inserted either before or after a selected field, depending on the insert location that has been defined in the preferences for the DDM editor.
In the DDM editor, you can move from one field to another using the TAB key.
To select a row in the DDM editor (for example, if you want to copy or delete a row), you can either double-click the row or press ESC so that the entire row is selected.
To add or modify a specific value, you simply click the corresponding cell in the DDM editor. Or, when a row is currently selected, you can also press F2 to edit the cell which was active before the row was selected (when no cell was previously active, the first cell is activated for editing). For some columns, simple text boxes are provided in which you have to enter information. For other columns, drop-down list boxes are provided from which you can select a value.
If you want to rearrange the columns in the DDM editor, you simply drag the column header to the desired position.
Each row in the DDM editor represents a DDM field. The following field attributes can be viewed or defined in the different columns of the DDM editor.
All types of DDMs have the following columns in common:
| Column | Description |
|---|---|
| Type | Type of field.
blank: Elementary field. |
| Level | Level number assigned to the field. |
| Name | Name of the field. |
| Format | Natural data format of an elementary field, such as A (alphanumeric). |
| Length | Standard length of an elementary field. |
| Descriptor | Descriptor type.
blank: No descriptor. |
| Header | Header to be produced for each field
specified in a DISPLAY statement.
|
| Edit Mask | Edit mask to be used. |
| Remarks | Comment which applies to a field and/or the DDM. |
Adabas DDMs and SQL DDMs additionally show the following columns:
| Column | Description |
|---|---|
| Short Name | Two-character short name of the corresponding field in the database file. |
| Suppression | Null-value suppression option.
blank: Standard Adabas
suppression. |
| Format Option | Only shown for database type ADA2. Adabas format option for alphanumeric fields. |
| SQL Type | Only shown for SQL DDMs. Information generated from the data types BLOB (binary large object) or CLOB (character large object) if contained in an Oracle database. |
For detailed information on the field attributes that can be defined in the different columns, see the description of the DDM editor in the Natural documentation for the appropriate platform.