
This document covers the following topics:
Opening Referenced Objects and Jumping to Variable and Internal Subroutine Definitions
Protected Lines in Sources Generated by Construct or Code Generation
The Natural source editor is based on the Eclipse text editor and supports, for example, syntax highlighting and content assist. In addition, it provides Natural-specific features.
The behavior of the source editor can be influenced by changing the Natural preferences. See Source Editor in Setting the Preferences.
An intelligent parser is used. During the input of the source code, you will receive a message in the case of a syntax error. In the project properties, you can determine for which platform the Natural syntax is to be parsed (see the description of the parser options in the section Changing the Project Properties).
For information on the Natural programming language (for example, on statements which can be specified in the Natural source editor), see the Natural documentation for the appropriate platform.
Note:
For your convenience, the NaturalONE documentation (and help)
includes the documentation for the Natural programming language on the
different platforms. See
Natural Language for
Mainframes,
Natural Language for
Linux, and
Natural Language for
Windows.
The source editor uses the following views of the NaturalONE perspective:
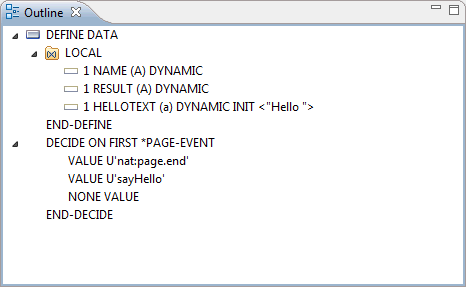
This view shows all control structures that are used in the
source which is currently shown in the active editor window. This includes all
structures which can be displayed in the editor window in a collapsed way, such
as DEFINE DATA, IF and DECIDE. When you
select an object in the Outline view, the corresponding
position is shown in the editor.
This view shows the dependencies between the Natural object which is currently shown in the active editor window and other objects. It is refreshed each time the object is saved.
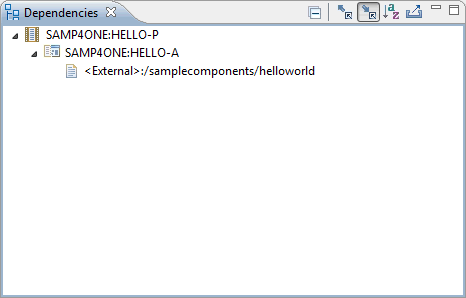
Other than what is shown in the Project Explorer view or in the Natural Navigator view, the Dependencies view always shows the Natural object names (not the alternative file names which may be up to 255 characters long). However, for subroutines, functions and DDMs, it always shows the so-called long names (that is, the name that is defined in the source itself, not the name under which the source was saved).
Displaying Active and Passive Cross-References
You can display the information in the
Dependencies view in two different modes:
| Icon | Mode | Description |
|---|---|---|
| Active cross-references (callees) | Shows the objects that are referenced in the current source. | |
| Passive cross-references (callers) | Shows the objects in which the current source is referenced. |
You can switch between these modes by choosing the corresponding icon in the local toolbar or by choosing the corresponding command ( or ) from the context menu.
Opening Objects
When you select an object in the
Dependencies view, you can choose the
command from the context menu. Or you can
double-click the object. This opens the object in the appropriate editor.
If you have enabled the option Mark occurrences of the selected called object in the current source in the Source Editor preferences, the cursor is positioned to the first occurrence of the corresponding called object and all references are marked.
When you have added a reference to an object in your code
(for example, when you have added an INCLUDE
object-name statement) and the referenced
object is not yet available in your workspace, the object is indicated as
follows in the Dependencies view (this example assumes
that you have specified "TEST" as the object name):
<Unknown>:TEST
When you use the command (or a double-click) with an unknown object, a dialog box appears asking whether you want to download the object from the Natural server. If you agree, NaturalONE tries to establish a connection to the server (using the connection properties stored in the associated Natural project). When the connection can be established, the object is downloaded and then opened in the appropriate editor.
Note:
Using the Handling of missing
objects option in the Natural preferences, you can determine that
specific types of unknown objects are automatically made available to the
parser. See Natural
> Project in Setting the
Preferences.
Sorting Alphabetically
You can sort the objects in the
Dependencies view alphabetically using the
![]() icon in the local toolbar. The sort
order is library name first, then object name.
icon in the local toolbar. The sort
order is library name first, then object name.
Copying Nodes as Text to the Clipboard
When you select a node in the
Dependencies view, you can choose the
command from the context menu. Or you can press
CTRL+C. This copies the selected node and all of its visible
subnodes as text to the clipboard, depending on the current mode (active or
passive cross-references). Invisible nodes (that is, nodes which are not
expanded) are not copied. You can then paste the text from the clipboard into
any other application (for example, a text editor), using the paste
functionality that is provided by the target application (for example,
CTRL+V).
Other than what is shown in the Dependencies view, the copied text also includes the file extensions of the Natural objects. The file extensions are shown in brackets behind the Natural object names. In case of subroutines, functions, and DDMs, they are shown behind the long names of the objects.
Exporting Nodes as Text to a File
You can also export the contents of the
Dependencies view as text to a file, depending on the
current mode (active or passive cross-references). This file is stored in a
project of your Eclipse workspace. In this case, it is not required that you
select a node first. All visible nodes are written to the file. Invisible nodes
(that is, nodes which are not expanded) are not written. To start the export,
choose the
![]() icon in the local toolbar. In the resulting
Save As dialog box, select the project in which you want
to store the file (if you want, you can select any folder in this project),
enter a file name and then choose the button. If the
specified file name already exists at the selected location, a dialog box
appears, asking whether you want to replace the existing file.
icon in the local toolbar. In the resulting
Save As dialog box, select the project in which you want
to store the file (if you want, you can select any folder in this project),
enter a file name and then choose the button. If the
specified file name already exists at the selected location, a dialog box
appears, asking whether you want to replace the existing file.
Other than what is shown in the Dependencies view, the exported text also includes the file extensions of the Natural objects. The file extensions are shown in brackets behind the Natural object names. In case of subroutines, functions, and DDMs, they are shown behind the long names of the objects.
Content assist is a standard feature in Eclipse. With NaturalONE, basic content assist support is provided. It offers Natural syntax and variable support, based on the current context of the position inside the source code. This feature uses the templates which are defined in the Natural preferences. See Source Editor > Templates in Setting the Preferences.
Content assist can be switched off in the Natural preferences. See Source Editor in Setting the Preferences.
 To invoke content assist
Enter a keyword or part of it and press CTRL+SPACEBAR.
Or:
Do not enter anything and press CTRL+SPACEBAR in
an empty line.
A window appears providing a number of choices from which you can select the code that is to be included in your program. The shown choices depend on the context and can be, for example, variable names, statements, program names or templates.
For example, when you type "DEFINE DATA " (including the blank after the letters), all valid keywords are shown.
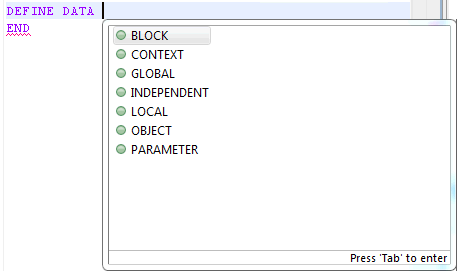
Choose the code that you want to insert into your program.
For more information on content assist, see the Eclipse online help.
In addition to content assist, the source editor provides context-sensitive help for the following syntax elements:
Statements (for example, WRITE).
System variables (for example,
*USER).
System functions (for example, COUNT).
Parameters (for example, AD).
To invoke context-sensitive help
In the source editor, move the insertion point to the keyword within a syntax element for which you require help.
Press F1.
The corresponding section in the Natural language documentation is listed in the Help view.
NaturalONE uses the host type that is currently defined on the Runtime page of the project properties to determine whether the Natural language documentation for the mainframe, Linux or Windows platform is to be shown. In case the host type is "<unknown>", the language documentation for the mainframe is shown by default.
Note:
The descriptions in the Natural language documentation
may contain references to parts of the Natural documentation which are not
included in the NaturalONE documentation set. If you want to view the
referenced pages, refer to the Natural documentation at
http://documentation.softwareag.com/
(Empower login required).
When you are working with the source editor and you want to set reminders (for example, for programming steps that still need to be done), you can add tasks to your source code. The tasks are also shown in the Tasks view. You can add tasks in different ways, as described below. For more information on tasks, see the Eclipse online help.
The following topics are covered below:
NaturalONE uses the task tags that are defined for the Java
compiler (Preferences > Java > Compiler > Task
Tags). Standard Java task tags are TODO and
FIXME, but you can also define your own task tags. See also the
Parser > Task
Tags page in the Natural preferences.
Note:
Other than the Java compiler, NaturalONE does not support
project-specific configurations.
The color for the task tags used in the Natural sources can be changed in the Natural preferences. See Source Editor > Syntax Coloring in Setting the Preferences.
To add a task tag to the source code
In the source editor, enter a comment containing a task tag, followed by any text you want. Example:

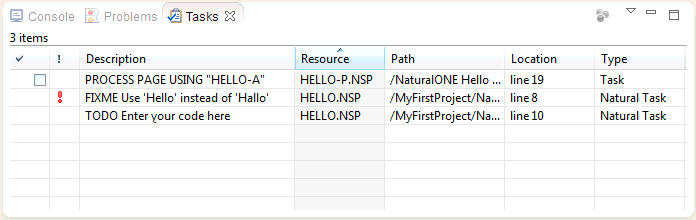
Save your changes to display the new task tag in the Tasks view. Such a task is of type "Natural Task".
If you do not want to add a visible task tag to your source code, you can add a task using a dialog box. In this case, only the task marker is shown on the left side of the source editor.
To add a task using a dialog box
In the source editor, position the mouse on the marker bar, directly next to the line for which you want to add a task.
Note:
The marker bar is the narrow gray area at the very left
of the source editor.
Open the context menu for the marker bar and choose .
A dialog box appears.
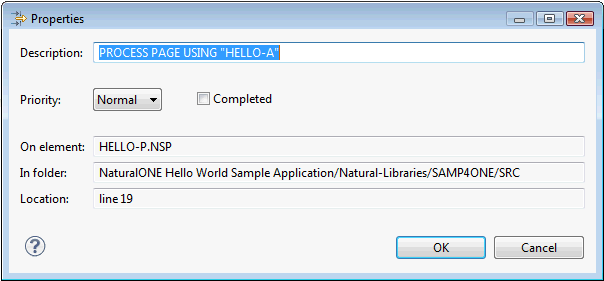
Initially, the Description text box contains the text from the selected line. This is the text which will also be shown in the Tasks view. You can change this to any text you want.
The file name, path and line number are automatically provided.
Choose the button.
The task is now shown in the Tasks view. This task is of type "Task", that is, it is a standard Eclipse task.
The Tasks view is a standard Eclipse view. It is part of the NaturalONE perspective. If it is currently not shown, you can redisplay it with .
When you double-click a task in the Tasks view, the corresponding file is automatically opened and the appropriate line is selected. For more information on the Tasks view, see the Eclipse online help.
When you are working with the source editor, you can add a bookmark for a source code line. A bookmark icon for this line will then appear in the marker bar, and a new entry is added to the Bookmarks view. The Bookmarks view enables you to return to a file quickly.
The Bookmarks view is a standard Eclipse view. It is not part of the NaturalONE perspective. You can display it with .
To add a bookmark for a specific source code line
In the source editor, position the mouse on the marker bar, directly next to the line for which you want to add a bookmark.
Note:
The marker bar is the narrow gray area at the very left
of the source editor.
Open the context menu for the marker bar and choose .
A dialog box appears.
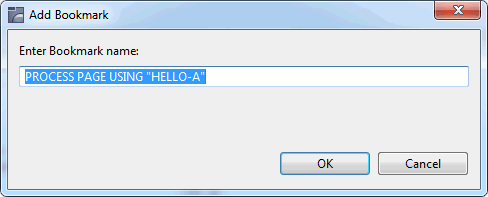
Initially, the text box contains the text from the selected line. This is the text which will also be shown in the Bookmarks view. You can change this to any text you want.
Choose the button.
For more information on bookmarks, see the Eclipse online help.
In case of a syntax error, the vertical ruler on the left side of the editor contains a red error marker, indicating the error position. You may have several errors in a source. The incremental parser recovers from different error situations and parses the code until the end of the source. If the source contains multiple syntax errors, you can directly go to a different error location using one of the red error markers in the overview ruler on the right side of the editor.
The general preferences for the annotations (Preferences > General > Editors > Text Editors > Annotations) also apply for NaturalONE. For example, when configured accordingly, squiggly lines appear under the word which causes the error and an annotation is shown next to the affected line. After a program containing errors has been saved, the errors are shown persistently in the Problems view.
A tooltip with the Natural error number and error text appears when you position the mouse over an annotation.
See also: Problems in Your Natural Sources
The command is similar to the standard Eclipse command. The command refers to the Eclipse line numbers. The command, however, refers to the four-digit Natural line numbers which are used on a Natural server. Due to the existence of a source header in the Eclipse workspace and to different increments that may be used on a Natural server, the Natural line numbers are not identical with the Eclipse line numbers. See also Line Numbers.
The command is helpful, for example, when a runtime error occurs in the production environment and the corresponding Natural sources are located in an Eclipse workspace. You can use the information that was provided with the runtime error (that is, the object name and four-digit Natural line number): you open the corresponding Natural source in your workspace and then use the command in order to jump to the corresponding line in the source editor.
To go to a specific Natural line number
Open the source which contains the required line in the source editor.
From the menu, choose .
Or:
Press CTRL+G.
The Go to Natural Line dialog box appears.

Enter the Natural line number.
You need not specify all four digits of the Natural line number, leading zeros can be omitted.
Choose the button.
Note:
The button is not enabled when
the specified Natural line number does not exist in the current source or when
a character other than a number has been specified.
Applies only to local mode (that is, when the sources are available in a project in the Eclipse workspace).
You can open a referenced object directly from the source editor. For example, when your source code contains the following statement, you can directly open the local data area with the name "LDA01":
LOCAL USING LDA01
When the referenced object is not yet available in the Eclipse workspace (that is, when it is listed as "<Unknown>" in the Dependencies view), a dialog box appears asking whether you want to download the object from the server.
Note:
You can also open a referenced object from the
Dependencies view.
In addition to opening referenced objects, you can also jump to variable definitions and you can use hyperlinking.
To open a referenced object
In the source editor, put the cursor on the name of the referenced object.
Invoke the context menu and choose .
Or:
Press F3.
The referenced object is now opened in the appropriate editor.
To jump to a variable definition
In the source editor, put the cursor on the name of the variable.
Invoke the context menu and choose .
Or:
Press F3.
When the variable definition is located in the DEFINE
DATA block of the current object, it is selected there. When it is
located in a different object (for example, in a local data area), the object
is opened and the variable definition is selected there.
To jump to an internal subroutine definition
In the source editor, put the cursor on the name of the internal subroutine.
Invoke the context menu and choose .
Or:
Press F3.
The subroutine name of the internal subroutine definition
(DEFINE SUBROUTINE statement) is selected.
To use hyperlinking
In the source editor, press the modifier key (by default, this is CTRL) and move the mouse over your source code.
When hyperlinking is enabled, a hyperlink appears when the mouse is positioned over a referenced object or variable name.
Note:
By default, hyperlinking is enabled in the general
preferences (Preferences > General > Editors > Text Editors
> Hyperlinking). A special option is available for NaturalONE:
Natural Element.
Click the hyperlink.
The corresponding action is performed: either a referenced object is opened or you jump to the variable definition.
If a copy code is opened, it can only be parsed without any context. In order to realize a jump to variable and internal subroutine definitions, the first of probably multiple possible root sources which include this copy code is selected via the Dependencies view.
This selected root source is then parsed internally. Based on the result of the internal parsing, the location of the variable or internal subroutine definition is determined.
Applies only to local mode (that is, when the sources are available in a project in the Eclipse workspace).
You can move a code fragment from the current source to a new object in the same library. This is helpful, if you want to reuse this piece of code. The new object can be of the following object type: subprogram, subroutine, copycode or program.
As long as you do not close the editor from which you have externalized the code fragment, you can undo/redo your last externalization (this is standard Eclipse functionality). The editor must be active for this purpose.
To externalize a code fragment
In the source editor, select the code fragment that you want to externalize.
Note:
When you have not selected all lines which belong, for
example, to a loop, the selection is automatically expanded in order to include
all required lines.
Invoke the context menu and choose .
Or:
Press ALT+SHIFT+S.
The following dialog box appears.
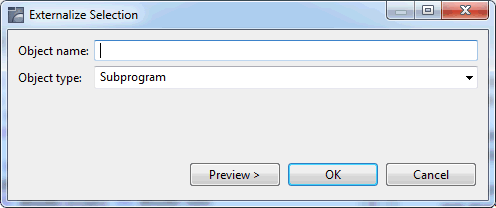
Specify a name for the new object and select an object type.
Optional. Choose the .
The following dialog box appears.
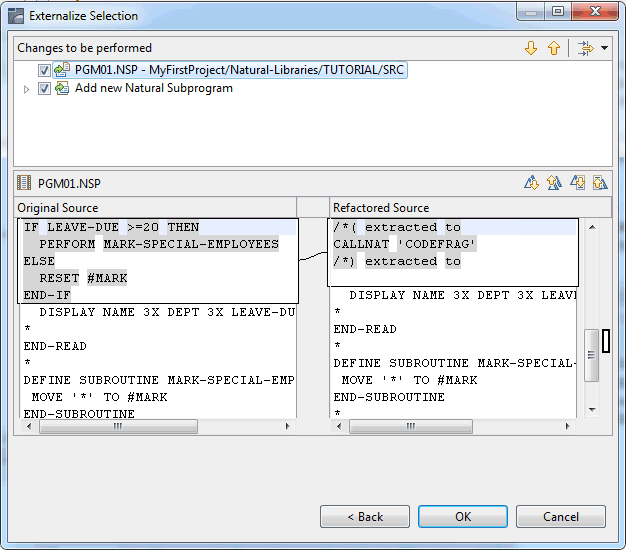
This dialog box shows how your code will be changed. At the
position of the selected code fragment, the corresponding call will be
inserted. For example, if you want to externalize code to a subprogram, a
CALLNAT statement will be inserted. A comment will also be
inserted, indicating that code has been extracted.
Note:
When you deselect a check box at the top of the dialog
box, the corresponding change will not be performed.
Choose the button.
The selected code is removed from the current source and a new object containing this code is shown in the Project Explorer view or in the Natural Navigator view.
Applies only to local mode (that is, when the sources are available in a project in the Eclipse workspace).
You can invoke a dialog box in which you can specify a Natural object that is to be referenced in the current source. The corresponding statement is then automatically inserted in your source code.
The following table gives an overview of the different statements that are inserted for the different object types:
| Object Type | Statement |
|---|---|
| Adapter |
|
| Copycode | INCLUDE
copycode-name |
| Function |
function-name(<
[parameter]... >) |
| Global data area | GLOBAL USING
gda-name |
| Local data area | LOCAL USING
lda-name |
| Map | INPUT USING MAP
"map-name" |
| Parameter data area | PARAMETER USING
pda-name |
| Program | FETCH RETURN
"program-name" |
| Subprogram | CALLNAT
"subprogram-name"
[parameter]... |
| Subroutine | PERFORM
subroutine-name
[parameter]... |
To insert a call or include statement
In the source editor, position the cursor where you want to place the object reference.
Invoke the context menu and choose .
Or:
Press ALT+SHIFT+C.
The following dialog box appears.
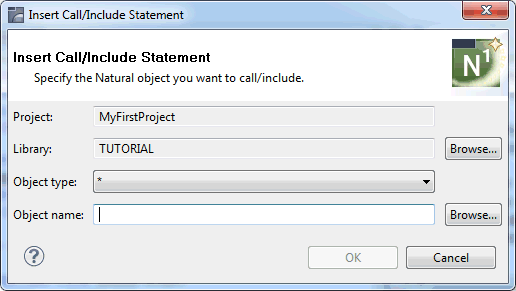
Optional. Use the button to select the library that contains the object that you want to reference.
From the Object type drop-down list box, select the type of object that you want to reference.
The asterisk (*) which is shown by default is used as a filter for the Select Natural Object dialog box that can be accessed using the button for the object name. If you do not want to use this button, it is important that you select the appropriate object type for the object name that you specify. Otherwise, the OK button will not be enabled.
In the Object name text box, enter the name of the object that you want to reference.
If you want to use the button, you can enter wildcard characters: an asterisk (*) for optional multiple characters, and/or a question mark (?) for a single character. This specification is only used as a filter for the Select Natural Object dialog box.
Or:
Choose the button to select
the object from the Select Natural Object dialog box.
Unless a Natural object is currently selected, the Select Natural Object dialog box only shows the objects matching the type (if any) displayed in the Object type drop-down list box. In addition, if the Object name text box contains wildcard characters, the Select Natural Object dialog box only shows the objects matching this name pattern.
Choose the button.
The corresponding statement is inserted at the cursor position.
Applies only to local mode (that is, when the sources are available in a project in the Eclipse workspace).
You can invoke a dialog box in which you can select data field definitions from another object that are to be imported into the current source.
Note:
The data field definitions are only available for Natural
objects that contain a DEFINE DATA statement.
To import data fields
In the source editor, position the cursor where you want to
place the imported data field(s). This is usually the first position of a line
within the DEFINE DATA block.
Invoke the context menu and choose .
Or:
Press ALT+SHIFT+I.
The following dialog box appears.
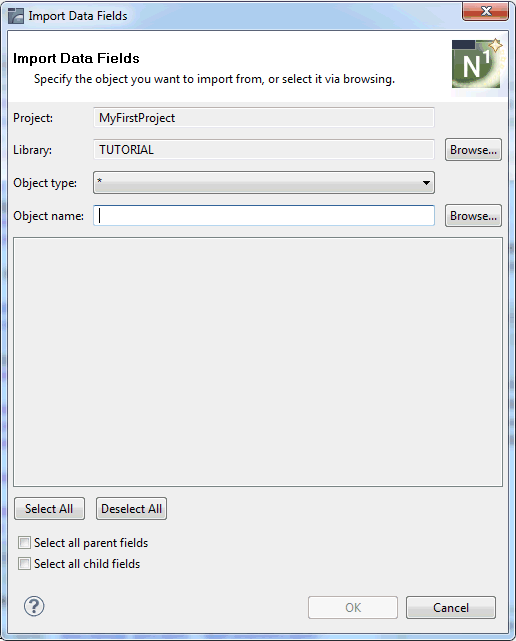
Optional. Use the button to select the library that contains the object from which you want to import data fields.
From the Object type drop-down list box, select the type of object from which you want to import data fields.
The asterisk (*) which is shown by default is used as a filter for the Select Natural Object dialog box that can be accessed using the button for the object name. If you do not want to use this button, it is important that you select the appropriate object type for the object name that you specify. Otherwise, the fields that can be imported will not be shown.
In the Object name text box, enter the name of the object that you want to import.
If you want to use the button, you can enter wildcard characters: an asterisk (*) for optional multiple characters, and/or a question mark (?) for a single character. This specification is only used as a filter for the Select Natural Object dialog box.
Or:
Choose the button to select
the object from the Select Natural Object dialog box.
Unless a Natural object is currently selected, the Select Natural Object dialog box only shows the objects matching the type (if any) displayed in the Object type drop-down list box. In addition, if the Object name text box contains wildcard characters, the Select Natural Object dialog box only shows the objects matching this name pattern.
All data fields that can be imported from the selected object are listed in the Import Data Fields dialog box. For example:

Activate the check box for each data field that you want to import.
When the Select all parent fields check box is selected, all parents fields are automatically selected when you select a child field.
When the Select all child fields check box is selected, all child fields are automatically selected when you select a parent field.
You can also use the command buttons and to select or deselect all check boxes.
Choose the button.
Note:
This button is only enabled when at least one data field
to be imported has been selected.
The selected data fields are imported into the source code.
Applies only to local mode (that is, when the sources are available in a project in the Eclipse workspace).
A counter field (C* notation) is used to retrieve the
number of occurrences of a multiple-value field or a periodic group from an
Adabas database. For example, the counter field C*INCOME returns
the count of the number of occurrences for the periodic group
INCOME. For more information on referencing the internal count for
a database array, see the Programming Guide for your
Natural platform.
You can generate counter fields for periodic groups and
multiple-value fields. You can do this in all objects where a DEFINE
DATA statement may be used (for example, in programs, data areas, or
processing rules in maps).
To generate a counter field
In the source editor, position the cursor in the name of a
multiple-value field or periodic group within the DEFINE DATA
block.
Invoke the context menu and choose .
Note:
This command is only visible for a multiple-value field
or periodic group.
Or:
Press ALT+SHIFT+G.
A new line is generated into the DEFINE DATA
block, before the selected multiple-value field or periodic group.
The following examples show where a generated counter field occurs.
Periodic group:
DEFINE DATA LOCAL
1 EMP-VIEW VIEW OF EMPLOYEES
2 NAME
2 CITY
2 C*INCOME
2 INCOME (1:12)
3 SALARY
...
Multiple field:
DEFINE DATA LOCAL
1 EMP-VIEW VIEW OF EMPLOYEES
2 NAME
2 C*LANG
2 LANG (1:3)
...
Multiple field within a periodic group:
DEFINE DATA LOCAL
   1 EMP-VIEW VIEW OF EMPLOYEES
     2 NAME
     2 C*BONUS (1:12)
     2 INCOME (1:12)
       3 SALARY
       3 BONUS (1:2)
       ...
In this case, the counter is generated directly above the periodic group, with the same index as the periodic group.
The index of the periodic group is always used, even if the periodic group is not defined within the view:
DEFINE DATA LOCAL
   1 EMP-VIEW VIEW OF EMPLOYEES
     2 NAME
     2 C*BONUS (1:12)
     2 BONUS (1:12,1:2)
     ...
You can mark several lines in your source code as comment lines all at once, or you can remove the comment marks from several lines.
To mark several lines as comment lines
In the source editor, select all lines that you want to turn into comment lines.
Invoke the context menu and choose .
Or:
Press CTRL+ALT+C.
All selected lines are turned into comment lines, where each comment line starts with an asterisk (*) followed by one blank character.
To remove the comment marks from several lines
In the source editor, select all comment lines from which you want to remove the comment marks.
Invoke the context menu and choose .
Or:
Press CTRL+ALT+U.
The comment marks (* , ** or /*) are removed from the beginnings of all selected lines.
Note:
When you select part of a line, the selection is automatically
expanded in order to include the entire line.
You can select several lines in your source code and toggle between commenting or uncommenting the selected lines.
To toggle comment lines
In the source editor, select all lines where you want to toggle between commenting and uncommenting.
Invoke the context menu and choose .
Or:
Press CTRL+7.
All selected lines will be turned into comment lines.
If you press CTRL+7 again on the same selection of lines, you revert the previous action and the original status of the selected lines is displayed again.
Note:
When you select part of a line, the selection is automatically
expanded in order to include the entire line.
You can protect one or more lines in your source code by using read-only tags. Protected source code lines cannot be edited.
Protected lines have a special background color. This background color can be changed in the Natural preferences. See Syntax Coloring in Setting the Preferences.
To protect a single line
At the end of the line to be protected, enter a blank character and append the following tag:
/*<RO>
To protect a code block
At the end of the line where the block to be protected begins, enter a blank character and append the following tag:
/*<RO>>
At the end of the line where the block to be protected ends, enter a blank character and append the following tag:
/*<<RO>
When the first line of a source (that is, the line directly below
the Natural source header) starts with **SAG GENERATOR, this
indicates that the source has been generated by Construct or by the Code
Generation component of NaturalONE. Most lines in such a source are protected
and cannot be edited. The following rules apply:
You can edit the lines that start with **SAG.
You can edit the lines between **SAG DEFINE EXIT
and **SAG END-EXIT.
All other lines are protected.
The protection can be enabled or disabled in the Natural preferences. See Protection in Setting the Preferences.
When case translation is enabled in the Natural preferences, you can translate source code from upper case to lower case, or from lower case to upper case. See Case Translation in the section Setting the Preferences.
Case translation can either be performed manually using the commands described below, or (when the corresponding option is enabled in the preferences) automatically when you save or stow your source code.
To translate text from lower case to upper case
In the source editor, select the text you want to translate.
Invoke the context menu and choose .
Or:
Press ALT+U.
To translate text from upper case to lower case
In the source editor, select the text you want to translate.
Invoke the context menu and choose .
Or:
Press ALT+L.
Notes:
The Natural source editor makes use of the standard Eclipse source
formatter. However, it is possible to indent the source code lines in such a
way that the indentation reflects the structure of the program. This feature
corresponds to the Natural system command STRUCT.
The number of positions that a line is indented is determined in the Natural preferences. See Struct in Setting the Preferences.
The following types of statements are affected by a structural indentation:
processing loops (READ, FIND,
FOR, etc.),
conditional statement blocks (AT BREAK,
IF, DECIDE FOR, etc.),
DO/DOEND statement blocks,
DEFINE DATA blocks,
inline subroutines.
You can exclude sections of your source code from structural
indentation by using the special statements /*STRUCT OFF and
/*STRUCT ON. These statements must be entered at the beginning of
a source code line. The source code lines between these two statements will
remain as they were before you performed the indentation.
To indent the source code lines
In the source editor, invoke the context menu and choose .
Or:
Press CTRL+ALT+S.
The entire source is indented, according to the settings in the Natural preferences.