
The following topics are covered below:
When you develop a Natural application, you may want to separate error or information messages from your Natural code and manage them separately. This makes it easy for you, for example, to standardize messages, to have predefined message ranges for different kinds of messages, to translate messages into other languages or to attach to a message a long text that explains it in more detail.
The Natural statements INPUT and REINPUT
are used to issue the messages from a Natural program.
This section explains how to write your own
application-specific messages. For more information on messages, see the
description of the SYSERR utility in the Natural documentation for
the appropriate platform.
There are two types of messages:
User-defined Messages
User-defined messages are issued by applications written by a
user. In the Eclipse workspace, they are normally stored in the
ERR folder of a library. Each language is stored in a
separate message file. A maximum of 9999 messages can be stored per library and
message file.
A user-defined message file always has the following name:
NnnAPMSL.ERR
where nn is the language code (01 through 60), for example, N01APMSL.ERR for English.
For an overview of the language codes, see the description of
the system variable *LANGUAGE in the Natural
documentation for the appropriate platform.
Natural System Messages
Natural system messages are delivered by Software AG. They are
not stored in a library. They are stored in internal structures of NaturalONE
and cannot be modified.
In the Eclipse workspace, error message files are stored in readable format (ASCII) with the extension ERR. When an error message file is uploaded to a Natural server, the file is automatically converted to the appropriate format.
In the project properties, you can determine whether all error messages are to be deleted on the server before a new error message file is uploaded (see the description of the Natural page in the section Changing the Project Properties).
In the Eclipse workspace, you can create message files in different ways:
by downloading a library containing message files or by downloading only single message files from a Natural server, see Downloading an Existing Library or Object from a Natural Server,
by using a wizard, see below,
by checking out a message file from the repository of your version control system.
 To create a new message file using a wizard
In the Project Explorer view or in the Natural Navigator view, select the library in which you want to store the new message file.
From the menu, choose .
Or:
Invoke the context menu and choose .
The following dialog box appears.
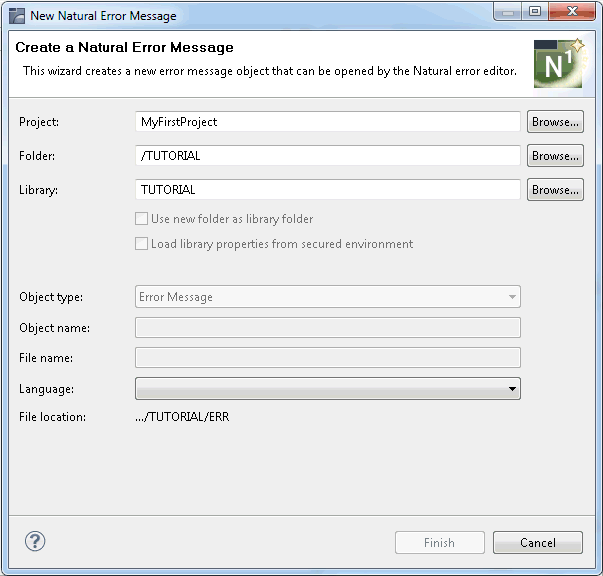
From the Language drop-down list box, select the language for the message file.
The name for the message file (containing the language code for the selected language) is then shown in the Object name text box. The name is also shown in the File name text box. File names, however, are not supported for error messages.
The File location text box, which is read-only, shows the path where the new object will be created. The path that is shown here depends on the setting of the Group new objects by object type option in the project properties. When this option is not selected, this path may include the special folder ERR or a library folder. When this option is selected, the path includes the appropriate group folder. For further information, see Group Folders.
For information on other options in this dialog box, see Creating Natural Objects.
Choose the button.
The new message file is created in the selected library and the error message editor is automatically invoked.
Add all required messages as described below.
Save the message file using the standard Eclipse functionality (for example, by pressing CTRL+S).
When you open a message file, the error message editor is invoked.
To open message files
In the Project Explorer view or in the Natural Navigator view, select the message file(s) that you want to edit.
Invoke the context menu and choose .
Or:
Double-click each message file that you want to open.
For each selected message file, an editor appears in the Eclipse editor area. You can now modify the messages as described below.
When you create or open a message file, the error message editor is invoked. The error message editor is a multi-page editor which provides the following types of pages:
Form-based editor
The tab of this page contains the number of the message which
is currently active. The page itself provides a form-based editor.

To add a new message, you simply enter the new message number in the Number text box. Empty input fields are then shown in which you enter all information: a short text (mandatory) and, if required, a long text for the message. The long text is entered in the text boxes labeled Text, Explanation and Action.
When you enter the number of an existing message in the Number text box, all text for this message number is shown. If required, you can then modify the existing text.
Text editor (read-only)
The tab of this page contains the name of the error message
file. The page itself, which is read-only, shows the contents of the error
message file in text format (see also Layout of a Message
File). To add new messages, you have to use the form-based
editor (see above).
The error message editor uses the following views of the NaturalONE perspective:
This view shows the language and all defined messages in a tree.
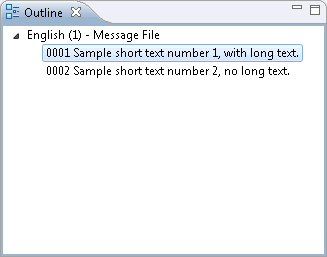
You can navigate to a particular message in the editor by selecting it in the Outline view, and vice versa.
If you want to delete a message, you do this in the Outline view. The context menu for a selected message provides the corresponding command.
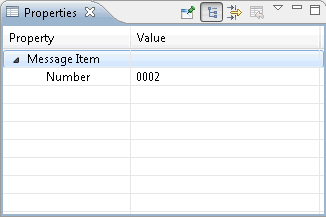
This view shows the properties of the item that was last selected in the error message editor or in the Outline view.
The following properties are shown for the selected message. If you want to renumber a message, you do this in the Properties view; you can define any message number that is not yet used (it is not possible to define an existing number).
When you select the top-level node in the Outline view, the following properties are shown. You can change all values except for the language.
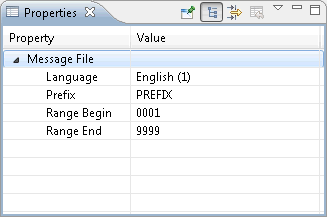
| Property | Description |
|---|---|
| Language | The language that is defined for this message file. The language code is shown in parentheses. This value cannot be modified. |
| Prefix | The prefix of the message number to be displayed with the message. For example, the library ID. |
| Range Begin | The starting number for a range of messages. |
| Range End | The ending number for a range of messages. All message numbers that are defined in this message file must be within this range. |
Messages can be translated into different languages. Each language is stored in a separate message file.
To translate a message file
Copy the message file that you want to translate.
Make sure that the name of the copied message file corresponds to the format described in Type, Name and Location of the Message Files and that it contains the correct language code.
Use the error message editor to overwrite the original messages with the messages in the appropriate language.
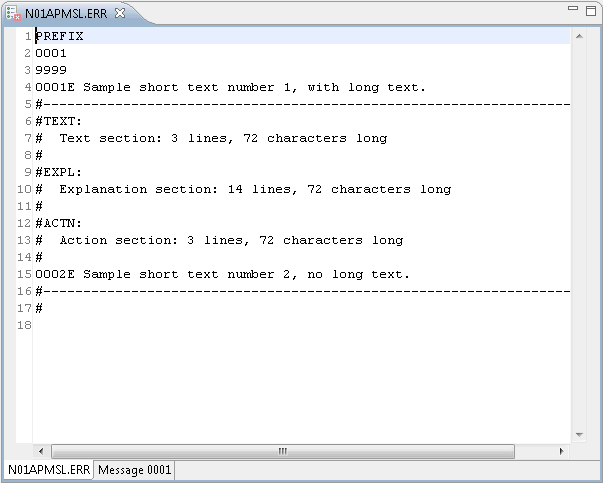
A specific layout is required for message files, as shown in the following example. This format is automatically created when you use the form-based editor.
PREFIX
0001
9999
0001E Sample short text number 1, with long text.
#-------------------------------------------------------------------------------
#TEXT:
#  Text section: 3 lines, 72 characters long
#
#EXPL:
#  Explanation section: 14 lines, 72 characters long
#
#ACTN:
#  Action section: 3 lines, 72 characters long
#
0002E Sample short text number 2, no long text.
#-------------------------------------------------------------------------------
#
The first three lines contain the prefix and the message range (begin and end).
The messages start in line 4. Each error number is followed by an "E", which stands for "error".
Each message has at least a short text which follows directly after the message number.
There is a separator line (#---) below the short text.
The long text is optional. It follows below the corresponding short text (that is, below the separator line). Each line of the long text starts with a hash (#).
The following keywords identify the individual sections of the long text. These keywords must not be translated into other languages.
| Keyword | Description |
|---|---|
#TEXT: |
Extended version of the short message text. |
#EXPL: |
Further explanation of the message. |
#ACTN: |
The action to be taken to resolve a problem, if relevant. |