
This document covers the following topics:
In the Eclipse workspace, you can create a Natural object in different ways:
by downloading a library or object from a Natural server, see Downloading an Existing Library or Object from a Natural Server,
by creating a new object using a wizard, see below,
by checking out an object from the repository of your version control system.
 To create a new Natural object using a wizard
In the Project Explorer view or in the Natural Navigator view, select the Natural library in which you want to store the new object.
From the menu, choose , where can be one of the following:
Or:
Invoke the context menu and choose .
Tip:
When you invoke the context menu in the Natural
Navigator view, the items under are
grouped according to the plug-ins by which they are provided.
A dialog box appears for the selected object type. For example:
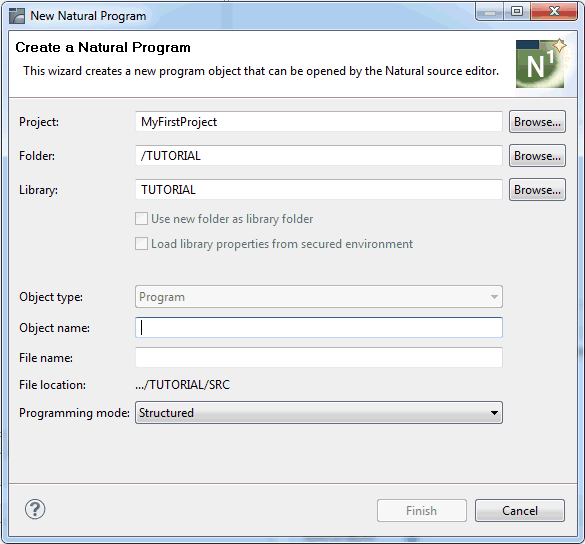
Specify the following information:
| Option | Description |
|---|---|
| Project | The project in which the object is to be created. If you have selected a library before invoking this dialog box, the project name is automatically shown in this text box. However, if you have not selected a library (or if you have invoked the dialog box, for example, in a new empty workspace), you have to enter the name of a project to be created. |
| Folder | The folder in the file system in which the object will be created. Using the button, you can select a different folder. |
| Library | The library in which the object is to be created. If you have selected a library before invoking this dialog box, the library name is automatically shown in this text box. However, if you have not selected a library, you have to specify the library yourself. The dialog box that is invoked by choosing the button only offers Natural libraries for selection. Other folders on the same level which are not recognized as Natural libraries are not offered for selection. |
| Use new folder as library folder | Only enabled when you have
specified a new folder name. If you want to store the new object in a new
library folder, enable this check box. In this case, a new library is created
as a library folder. It is important that you specify the new folder name as
shown in the following example:
/TUTORIAL/mylibfolder Do not omit the slashes and the library name. |
| Load library properties from secured environment | Only enabled when Natural
Security is active in the associated Natural environment. When enabled, this
check box is automatically activated when you add the object to a library which
does not yet exist in your workspace. In this case, the library properties for
the newly created library are loaded from the server. If a corresponding
library does not exist on the server, the properties from the logon library of
that server are used. If the associated Natural environment is not accessible,
a dialog box appears. In this case, you can either cancel or continue the
operation. If you continue, the properties are set to the defaults of the
selected project.
When Natural Security is active and this check box is deactivated, the properties for the newly created library are set to the defaults of the selected project. |
| Object type | Read-only. Indicates the object type that will be created. |
| DDM name | Only shown when you create a DDM. This is the long name of the DDM as it is used in a program. |
| Object name | A name for the new object. This
name must correspond to the Natural naming conventions.
The object name is not relevant for DDMs and therefore is not shown for this object type. |
| File name | The name from the DDM
name text box (for DDMs) or Object name text
box (for all other object types) is automatically provided as the file name. If
you want, you can enter a different file name for this object.
As long as both the object name and file name are identical, a file name is not used. The file name is only shown in the Project Explorer view or in the Natural Navigator view when it is different from the object name. This enables you to use a file name which does not adhere to the Natural naming conventions (for example, when it contains lowercase characters). |
| File location | Read-only. Shows the path where
the new object will be created in the file system.
The path that is shown here depends on the setting of the Group new objects by object type option in the project properties. When this option is not selected, this path may include the special folder SRC or a library folder. When this option is selected, the path includes the appropriate group folder for the current object type. For further information, see Group Folders. The notation ".../" which is shown in front of the path is used to indicate that the project name and, if used, the name of the library root folder are also part of the path. For example, ".../" can stand for "/MyFirstProject/Natural-Libraries/". |
| Programming mode | Select either
Structured or Reporting.
The programming mode as specified in the project properties is provided as the
default value (see the description of the
parser
options). For further information on the programming modes, see the
Programming Guide in the Natural documentation for the
appropriate platform.
Note: |
Note:
When you create a new DDM, additional pages are available
in the wizard. See Creating a
DDM for further information.
Choose the button.
The new object is created in the specified library and the associated editor is automatically invoked. See Using the Natural Editors for further information.
Note:
When you create a new Natural object which uses the
source editor, a skeleton which is typical for this type of object is
automatically provided in the source editor. If you want to change a skeleton,
see Object
Templates in Setting the
Preferences.
Some of the object properties (such as programming mode and code page) are stored in the source header.
To change the object properties
Select the object in the Project Explorer view or in the Natural Navigator view.
Invoke the context menu and choose .
In the tree of the resulting dialog box, select the Natural node.
The following property page is shown (example for a program).
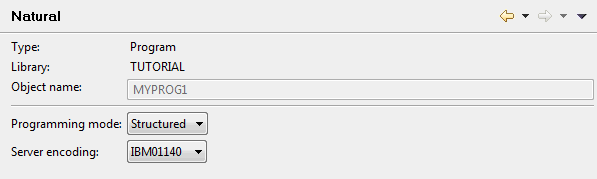
If available, the long name of an object is shown. For a DDM, the database ID and file number are also shown.
Note:
If the object is currently open in an editor and if the
editor content has been changed but not yet saved (indicated by an asterisk in
the editor tab), the options on this property page are disabled. It is only
possible to change the options when the editor content does not contain unsaved
changes (that is when the editor tab does not contain an
asterisk).
Make all required changes.
| Option | Description |
|---|---|
| Object name |
The object name must adhere to the Natural naming conventions. When a file name has been defined, you can only change the object name in the object properties. This property is not relevant for DDMs and therefore is not shown for this object type. Note: With the default label decorations, the new object name is shown in parentheses in the Project Explorer view or in the Natural Navigator view, directly behind the file name. Important: |
| Programming mode |
Structured mode is intended for the implementation of complex applications with a clear and well-defined program structure. It is recommended to use structured mode exclusively. Reporting mode is only useful for the creation of ad hoc reports and small programs which do not involve complex data and/or programming constructs. For further information on the programming modes, see the Programming Guide in the Natural documentation for the appropriate platform. |
| Server encoding |
This drop-down list box provides for selection the same code pages that are available in the properties of the corresponding project. Select the code page that is to be used when the object is stored on the server. For further information, see Unicode and Code Page Support. |
Choose the button to save your changes and to close the dialog box.
When you edit a Natural object, the appropriate editor is invoked.
To edit Natural objects
In the Project Explorer view or in the Natural Navigator view, select the object(s) that you want to edit.
Invoke the context menu and choose .
Or:
Double-click each object that you want to open.
An editor window appears for each selected object. See Using the Natural Editors for further information.
Object sources are saved using the standard Eclipse functionality.
Note:
In the Natural preferences, you can specify that all changes to
an object source are automatically updated on the server. See also
Updating the Objects in
the Natural Environment.
To save an object
Activate the editor window for the source that you want to save.
From the menu, choose .
Or:
Press CTRL+S.
You can print object sources in two different ways, either directly from the source editor or from the Natural Navigator view.
When you print an object source from the source editor, the Eclipse functionality is used. The printout always contains the same information which is currently shown in the editor. This includes the source header, expanded and collapsed nodes, and, if enabled, line numbers.
When you print an object source from the Natural Navigator view, the printout contains Natural-specific information. It has a header containing the object name and object type, the name of the library in which is its stored, and the date and time of printing. The printout always shows the source header and the complete Natural code. Whether line numbers are printed depends on the setting of the corresponding option in the Natural preferences (see Natural Navigator in Setting the Preferences).
To print an object from the Natural
Navigator view
In the Natural Navigator view, select the object(s) that you want to print.
From the menu, choose .
Or:
Invoke the context menu and choose
.
Or:
Press CTRL+P.
In the resulting Print dialog box, specify all required information and choose the button.
Note:
The settings given under Page Range
in the Print dialog box are ignored if you print from the
Natural Navigator view. In this view, always the complete
Natural code of all selected members is printed.
To print an object from the source editor
Edit the Natural source and set the focus to the editor area.
Eventually select individual lines of source code that you want to print.
From the menu, choose .
Or:
Press CTRL+P.
In the resulting Print dialog box, specify all required information and choose the button. If you want to print only the selected lines or specific pages, provide the appropriate settings under Page Range in the Print dialog box.
To execute a Natural program with NaturalONE, you must first compile it in your Natural environment in order to create a generated program in this environment. See also Updating the Objects in the Natural Environment.
The library in which a generated program is executed is determined by the mode you have defined for the project (either shared mode or private mode). See Steplibs in Changing the Project Properties for further information.
Important:
On a Natural server, Web I/O must be enabled. Otherwise,
the output of an executed program cannot be displayed.
This section covers the following topics:
For details concerning the Default Launch settings, see Launching Natural Applications.
To execute an object
Select the program that you want to execute.
Invoke the context menu and choose .
Or:
Press ALT+SHIFT+X, N.
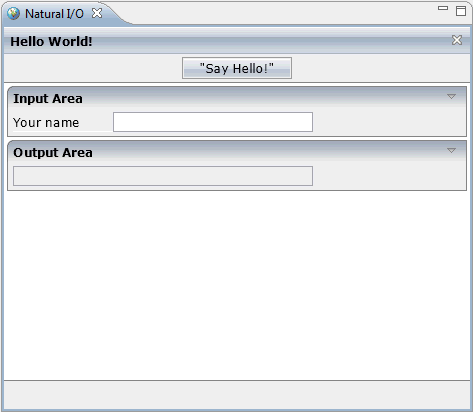
The object is executed in your Natural environment (either the local Natural runtime or a Natural server). The output is either shown in the internal browser or in an external browser, depending on the settings in the Natural preferences or in the launch configuration that you have created (see Launching Natural Applications). Example for the internal browser:
You can use the commands Copy and in the Project Explorer view and in the Natural Navigator view. Whereas the Project Explorer view follows the Eclipse-specific rules, the Natural Navigator view provides enhanced, Natural-specific support for copying and pasting Natural objects and libraries.
Caution:
While the creation of new Natural sources via the wizards is
under the control of NaturalONE, the creation of Natural sources via
copy-and-paste is under the control of Eclipse. This does not cause problems
with Natural projects since they use UTF-8 by default. However, it may cause
problems with the copy when you are pasting into a non-Natural project - wrong
characters may be shown because Eclipse uses a different code page. To solve
the problem with the code page, you have to set the default encoding for text
files to UTF-8 in the Eclipse preferences (under
Preferences > General > Workspace > Text file
encoding).
This section covers the following topics:
When you copy and paste objects in the Project Explorer view, there are no special restrictions as to the folder structure. However, you have to make sure that the pasted objects are always assigned to a library. You also have to make sure that valid Natural object names are used, especially when you copy an object and paste it in the same location as the original object. The name proposal that is offered by Eclipse does not meet the Natural naming conventions.
How objects and libraries are copied and pasted in the Natural Navigator view depends on the settings of the toggle buttons in the local toolbar of that view and also on your project settings. For a description of the toggle buttons and their corresponding commands in the view menu of the Natural Navigator view, see Using the Natural Navigator View.
Group new objects by object type
When this option is active in the
project
properties, the Natural objects you have copied are automatically
pasted into the appropriate group folders, according to
their object types. If a group folder does not yet exist for a Natural object
that you paste, the corresponding folder is automatically created in the file
system.
This behavior is independant of the setting of the command (G toggle button).
Copying group folders
When the
command (G toggle button) is currently selected and you copy a virtual group
folder such as "Programs", only the content of that
group is copied. The virtual group folder itself is not pasted at the new
position.
However, when you copy a physical group folder, that group folder including all of its contents is physically pasted at the new position.
Tip:
If you want to copy group folders, make sure that the
command (G toggle button) is
not selected. Thus, only the physical group folders are shown and you can see
immediately how the pasted objects are stored in the file system.
Copying libraries
If you want to copy the contents of one or more libraries,
it is recommended that you select the command (L toggle button). Thus, you can copy all objects of
these libraries, no matter in which
library folders
they are currently stored.
Special folders SRC,
RES and ERR
When the special folders SRC,
RES and ERR exist in a library and
you want to copy their contents to a virtual folder, make sure to copy only the
contents of these folders (and not the special folders themselves). It is not
possible, for example, to copy an SRC folder and paste it
on a virtual folder.
Make sure not to use both special folders and physical group folders within the same library.
When you copy, for example, a virtual "Error Messages" group folder and a virtual "Programs" group folder in one library and you want to paste the contents of these folders in another library which contains the special folders, you can simply select the library before pasting. When you paste the objects, they are automatically sorted into the appropriate special folders. When a special folder (for example, for the error messages) does not yet exist, it is automatically created.
When the special folders are visible, it is not possible to paste an object in a special folder which is not of the appropriate type (for example, it is not possible to paste an error message into an SRC folder).
Root folders
When the root folders are currently not shown and you paste
objects onto the project node, a dialog appears in which you have to select the
destination folder.
When the root folder is shown, however, NaturalONE assumes that you want to paste your items directly below the project folder and the dialog does not appear.
Duplicating an object or library
When you copy an object (except for error messages, see
below) or a library and paste it in the same location, a dialog box appears
which already contains a proposal for a new name. In this case, you can either
use the proposed name or you can enter a different name which does not yet
exist. When you paste an object, the dialog box also allows you to change the
object type.
When a file name exists for an object, a proposal for a new file name is also given. You must not enter a file extension. This is automatically provided, depending on the object type that is selected in the dialog box.
When you copy an error message and paste it in the same location, a dialog box appears which already contains a proposal for a language which does not yet exist in the library. In this case, you can either use the proposed language or you can select a different language from the drop-down list box. The selected language is automatically reflected in the object name.
When you paste an object, the Natural Navigator view checks whether another folder of the target library already contains an object with the same name. If such an object already exists, a dialog box appears asking, for example, if you want to create the object in the selected folder and at the same time remove the duplicate object from the other folder.
Undo commands in the Edit menu
When a paste operation in the Natural
Navigator view causes the deletion of an object (for example, when
you confirm to remove a duplicate object from another folder of the same target
library), the Edit command contains separate commands for
undoing the delete operation and for undoing the copy operation. If you want to
undo both operations, you first undo the delete operation, and then the copy
operation.
Different parents
In the Natural Navigator view, it is
possible to copy and paste objects from different parents. This is not possible
in the standard Eclipse Project Explorer view. If you copy
objects from different parents in the Natural Navigator
view and then paste them in the Project Explorer view, an
error occurs, indicating that the resources must have the same parent.
All Natural objects in the workspace follow specific format conventions. Each object is automatically converted into the appropriate code page during the download from the Natural server.
If the contents of your files follow the Natural format conventions and if the file names adhere to the naming conventions for Natural objects, you can drag (or copy and paste) your files from the file system (for example, from the Windows Explorer) to the Project Explorer view or to the Natural Navigator view, or you can drag them within the file system to the folder which is defined as your Eclipse workspace. NaturalONE will recognize these files as Natural objects.
In addition to the Natural objects which adhere to the Natural naming conventions, your workspace may also contain Natural objects for which alternative file names have been defined (with any combination of uppercase and lowercase in the file name, but with uppercase in the file extension). In this case, it is important that the Natural object name which adheres to the Natural naming conventions can be found in the source header of the file. Otherwise, the file will not be considered as a valid Natural object when you copy (or drag) it to your Eclipse workspace or to the Project Explorer view or Natural Navigator view.
If the new files are not immediately shown in the Project Explorer view or Natural Navigator view, you have to refresh the display.
In the Project Explorer view, which follows the Eclipse-specific rules, you can use the Move command, or you can use drag-and-drop. When you use the Move command with a selected library or object, a dialog box appears in which you can choose the destination for the selected objects. Such a dialog box does not appear when using drag-and-drop.
The Natural Navigator view provides enhanced, Natural-specific support for cutting and pasting Natural objects and libraries. How objects and libraries are cut and pasted in the Natural Navigator view depends on the settings of the toggle buttons in the local toolbar of that view and also on your project settings. See also the information under Copying and Pasting Objects and Libraries.
When you cut an object in the Natural Navigator view and paste it on a node in the Natural Navigator view, the source object is deleted after it has been copied to the target node. The deletion, however, will only work if the paste operation is also performed in the Natural Navigator view. If you cut an object in the Natural Navigator view and paste it in the standard Eclipse Project Explorer view, this will be handled as a copy operation.
You can use the command in the Project Explorer view and in the Natural Navigator view. Whereas the Project Explorer view follows the Eclipse-specific rules, the Natural Navigator view provides enhanced, Natural-specific support for renaming Natural objects and libraries.
Important:
On the Natural server, only object names and library names
are used. They must adhere to the Natural naming convention for this platform.
When you update the Natural server, the handling for renamed objects on the
Natural server is determined by the option Scratch server
objects in the Natural preferences (see
Natural >
Builder in Setting the Preferences).
This section covers the following topics:
When you rename an object or library in the Project Explorer view, keep the following in mind: As long as the new name adheres to the Natural naming conventions, the name is considered as an object name or library name. When the new name no longer adheres to the Natural naming conventions (for example, when it is longer than 8 characters and/or contains lowercase characters), it is considered as a file name or library folder name. However, when a library folder name is renamed in such a way that it again adheres to the Natural naming conventions, the new name is then considered as a library name. With file names, this is slightly different: The new name is only considered as an object name when the original object name (which is shown in parentheses when a file name exists) and the new name are identical.
When a file name is defined, the object name can be changed in the object properties. When a library folder name is defined, a different library can be assigned in the library properties.
To rename an object or library
In the Project Explorer view, select the node that is to be renamed.
Invoke the context menu and choose .
Enter a new name.
| Warning: Do not change the file extension of an object. This will corrupt your application, and the object can no longer be edited with the appropriate editor. |
Optional. If you want to see which changes are performed and which objects are affected by this operation, choose the button.
Information such as the following can be shown. The object reference will automatically be changed in all objects (callees) for which the corresponding check box is selected.
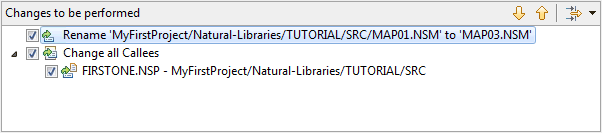
Note:
A list of callees is only shown when the Natural object
name is changed, that is, the name which is referenced in the code of other
Natural objects. When the name change results in a file name, a list of callees
is not shown since such a change does not affect the code in other Natural
objects.
Choose the button to rename the node.
When you rename an object in the Natural Navigator view, you can be sure that the names of the libraries and objects follow the Natural naming conventions and that they meet the requirements for Natural objects (for example, when you change the object type).
To rename an object or library
In the Natural Navigator view, select the node that is to be renamed.
Invoke the context menu and choose .
Or:
Press F2.
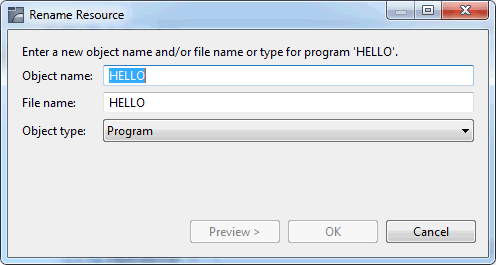
The following dialog box appears when you rename an object.
The following dialog box appears when you rename a library.
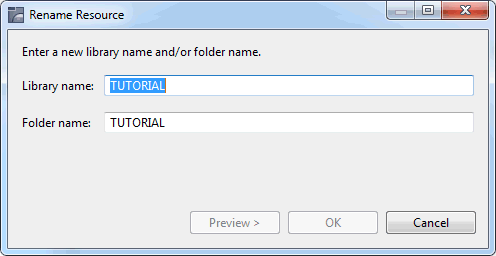
Enter a new object name or library name.
Or:
Enter a new file name for an object, or a new folder name
for a library.
Or:
Enter both a new object name and a new file name for an
object, or a new library name and a new folder name for a library.
Optional. If you want to change the object type (for example, from program to subprogram), select the corresponding entry from the Object type drop-down list box.
Only the allowed object types are available from this drop-down list box. A local data area, for example, can only be changed to a global data area or to a parameter data area.
It is not possible to change the object type for a map. Therefore, this drop-down list box is dimmed when renaming maps.
Optional. If you want to see which changes are performed and which objects are affected by this operation, choose the button.
The same information is shown as when renaming an object in the Project Explorer view. The object reference will automatically be changed in all objects (callees) for which the corresponding check box is selected.
Note:
A list of callees is only shown when the Natural object
name is changed, that is, the name which is referenced in the code of other
Natural objects. When the name change results in a file name, a list of callees
is not shown since such a change does not affect the code in other Natural
objects.
Choose the button to complete the rename operation.
You can delete any Natural objects and libraries in the Project Explorer view or Natural Navigator view.
When you update the Natural server, the handling for deleted objects on the Natural server is determined by the option Scratch server objects in the Natural preferences (see Natural > Builder in Setting the Preferences).
To delete an object or library
In the Project Explorer view or in the Natural Navigator view, select the node that is to be deleted.
Invoke the context menu and choose .
A dialog box appears, asking whether you really want to delete the node from the file system.
In the Natural Navigator view, it is possible to delete nodes which do not physically exist in the file system (for example, a Programs group node). If you are about to delete such a node, a special dialog box appears, asking, for example, if you want to delete all programs located in the current library or library folder from the file system.
Choose the button (Project Explorer view) or the button (Natural Navigator view) to delete the node.