
This document covers the following topics:
With a master deployment, you can combine the different types of deployment which are available with NaturalONE into a single common process. A master deployment is an Ant script that simply runs any existing project-specific Ant scripts in a configurable manner. Prerequisites:
The deployment scripts of the projects that you want to include in the master deployment must have been generated previously.
All prerequisites that apply for each of the selected projects also apply for the master deployment. See the corresponding deployment chapters in this NaturalONE documentation for further information.
The wizard for a master deployment collects information about the deployments to be processed and creates a full deployment kit, containing all necessary Ant scripts as well as the necessary JAR files used for deployment.
Note:
With a master deployment, it is no longer required to manually
copy the JAR files and the files that are created by the different deployment
wizards. When you specify the corresponding options for the creation of the
external deployment package, these files are automatically added to the
deployment package. You can also specify to create a zip archive which then
contains the required JAR files.
The deployment wizard creates the following files:
The master deployment file. This is an Ant script for starting the deployment process. It is created in the root directory of the selected project. You can create one or more master deployment files, and you can also load an existing master deployment file and modify the current settings.
Zip archive containing the deployment files for all selected projects and, if the corresponding option was selected, the JAR files necessary for running the deployment outside Eclipse. This zip archive is only created when the corresponding option is enabled in the deployment wizard. It is created in the package directory that has been specified in the wizard.
Note:
In the zip archive, the deployment files, which are taken
from the different projects, are renamed so that they include the project name
in the file name.
 To use the deployment wizard
In the Project Explorer view or in the Natural Navigator view, select the project in which you want to create the master deployment file.
Any type of project can be used here. It is not required that you select a Natural or Java project. For example, this may be a project that you have created for the sole purpose of holding the master deployment script.
Or:
If you want to load the settings of an existing master
deployment file, select this file in the Project Explorer
view or in the Natural Navigator view.
From the menu or from the context menu, choose .
In the resulting New dialog box, expand the Natural node, select Deploy Natural Master Ant and then choose the button.
The first page of the wizard appears (see below).
Specify all required information as described in the topics below. Use the button repeatedly to proceed from the first page of the wizard to the last page.
When all required information has been provided, choose the button.
The different pages of the deployment wizard are described in the following topics:
On the first page of the wizard, you can define a different name for the master deployment file.
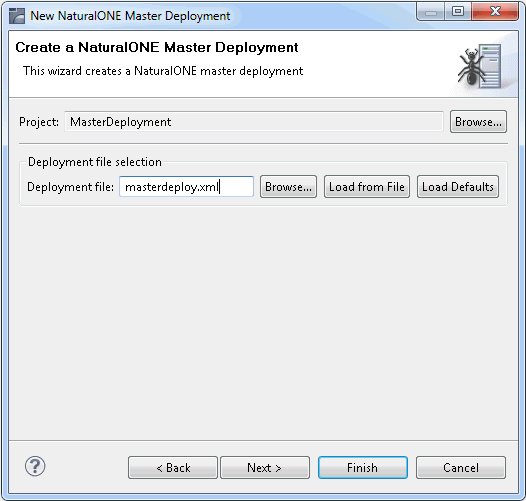
- Deployment file
The default name for the master deployment file is masterdeploy.xml. This name is shown in this text box when an existing master deployment file was not selected while invoking the wizard. However, when an existing master deployment file was selected, the name of the selected file is shown and the settings from this file are automatically loaded.
You can enter any other name for your new deployment file. It is recommended that your new deployment file also has the extension ".xml".
Note:
If you keep the name masterdeploy.xml, the settings from an existing master deployment file with the same name are loaded the next time you select the project and invoke the wizard.If you want to load an existing master deployment file, choose the button. A dialog appears, providing for selection all master deployment files in the current project. Next, you have to choose the button. Otherwise, the settings in this file are not shown in the wizard and may thus be overwritten unintentionally.
If you want to return to the default settings of the deployment wizard, choose the button.
On the second page of the wizard, you select the deployment files that are to be included in the master deployment (by selecting the check boxes in the Selected column). By default, all deployment files that can be found in your workspace are listed on this page.
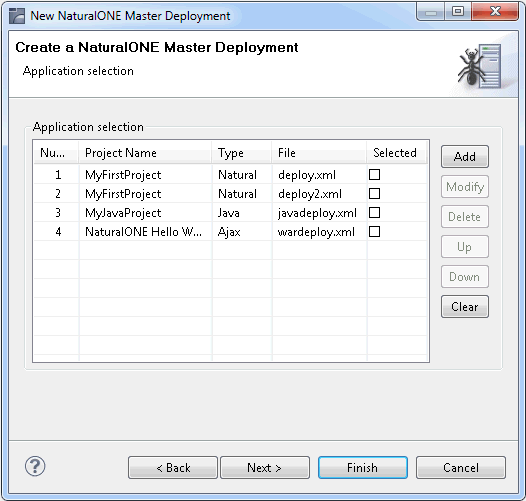
Using the buttons to the right of the list of deployment files, you can change the sequence of the deployment files, you can delete deployment files and you can add them again. You can also modify the name of a deployment file.
On the third page of the wizard, you specify whether an external deployment package is to be created. If you want to start the deployment outside of Eclipse, you have to create such a package.
An external deployment package consists of all necessary Ant deployment scripts (as determined by the selected projects on the previous wizard page) and optionally the set of necessary JAR files.
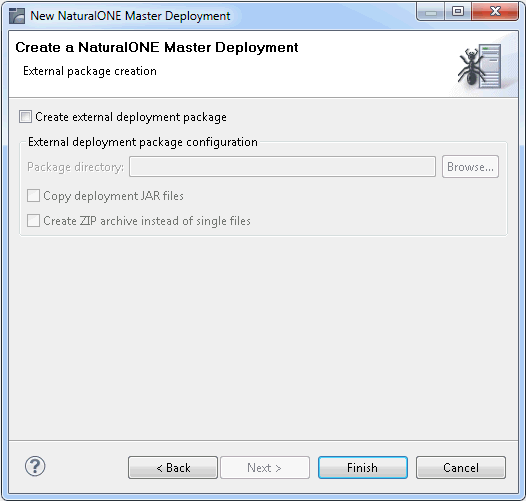
- Create external deployment package
When selected, all other options on this page are enabled. It is important that you specify the package directory.
When not selected, only the master deployment file will be created in the root directory of the selected project. In this case, the deployment can only be started from within Eclipse.
- Package directory
The path to the directory to which the deployment files are to be copied.
- Copy deployment JAR files
When enabled, the JAR files which are listed under Prerequisites in the section Deploying Natural Applications are added to the deployment package.
- Create ZIP archive instead of single files
When enabled, a zip archive is created instead of single files. The zip archive has the same name as the master deployment file, but with the extension ".zip".
When you start the deployment process from Eclipse, it is not
possible to execute the checkout and update targets
of the deployment file since these targets would access the versioning
repository, and this is not feasible from within an Eclipse environment. If you
want to check out a specific revision from the versioning repository or if you
want to update your project with sources from the versioning repository, you
have to start the deployment from the command line as described below.
For testing purposes, for example, it is helpful to start the
deployment process from Eclipse. Since the master deployment file is an Ant
script, the built-in Eclipse functionality of starting Ant scripts is used
here. The build target of the Ant script will then be
executed.
To start the deployment from Eclipse
In the Project Explorer view or in the Natural Navigator view, select your master deployment file, invoke the context menu and choose .
The deployment process is started, and the output of the deployment script is written to the Console view.
Note:
If you want to change the limit for the console output,
you can do this in the general Eclipse preferences under Run/Debug
> Console.
You can start the deployment process from a Windows command line such as the Command Prompt (cmd.exe) or from a shell command line on a Linux system. When you start the deployment from the command line, special requirements must be met.
The following topics are covered below:
The prerequisites for a master deployment are the same as for deploying Natural applications. See Prerequisites in Deploying Natural Applications. However, you do not have to copy any files manually. This is automatically done by the master deployment.
Make sure that all necessary tools which are referred to in the project-specific build scripts are available and accessible on the processing platform.
Make sure that the files from the external package are in place. If you have chosen to create a zip archive, you have to unpack this file.
When all prerequisites are in place, the deployment can be started by issuing specific Ant calls. This section just provides some examples (where the default name masterdeploy.xml is used). It is assumed that the JAR files have been placed in the directory in which you are currently working.
Print the help screen of the Ant script:
ant -lib . -f masterdeploy.xml help
Perform an initial checkout of all sources from all selected projects from the versioning repositories:
ant -lib . -f masterdeploy.xml checkout
Perform an update of all sources from all selected projects from the versioning repositories:
ant -lib . -f masterdeploy.xml update
Call the build targets of the selected
project-specific deployment scripts:
ant -lib . -f masterdeploy.xml build
With a single call, perform an update of all sources from
all selected projects from the versioning repositories, and then call the
build targets of the selected project-specific deployment
scripts:
ant -lib . -f masterdeploy.xml update build
In the above examples, the logging information is written to standard output. If logging information is to be written to a file, use a call such as the following:
ant -lib . -f masterdeploy.xml update build -logfile mylogfile.txt
Note:
When using the checkout, update and
build targets of the master deployment file, the master deployment
file actually makes calls into the corresponding project-specific deployment
files for Natural, Java and/or Ajax.