
This document covers the following topics:
This section describes how to list all job masters defined for a network.
Listing Active Jobs in the section Active Job Networks
 To list all jobs defined for a network
In the object workspace, select the Job Master node of the required network.
From the context menu, choose , or press F8.
All jobs defined for the selected network are listed in the Job Master List window as shown in the following example:
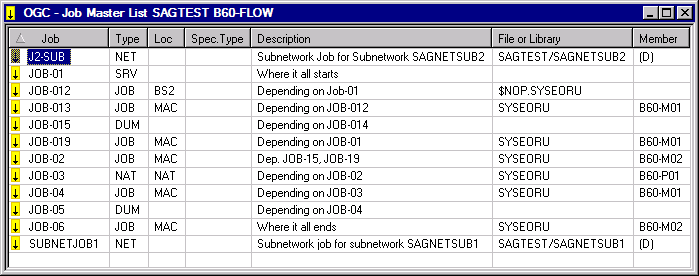
The window columns are described in Columns: Job Master List.
This section covers the following topics:
The following table explains the columns of the Job Master List window.
| Column | Description | |
|---|---|---|
| Spec. Type | Special job type. Possible indicators are: | |
C |
Cyclic execution. | |
D |
Execute as a dummy job but keep definitions | |
G |
Pre-generated JCL is available. See
also Pregenerating Active
JCL.
This indicator is only displayed if no other indicator is already used for the job. |
|
P |
For job type SRV: Stop a Windows service.
For job type |
|
R |
Recovery job, usually not activated.
See also Defining Recovery Actions. |
|
| Job | User-defined job name. | |
| Type | Job type. They are
described in the section Job
Types.
See also the field Job Type described in Fields: Job Definition (Master). |
|
| Loc | JCL location.
(Empty if no JCL is defined, or if no JCL is required for the job type.) For possible JCL locations, see List of JCL Locations. |
|
| Description | Short description of the job. | |
| File or Library | Physical storage of JCL
according to the JCL location.
For a job of the type Subnetwork ( |
|
| Member | The member which
contains the JCL. This refers to the JCL
location.
For possible members, see List of JCL Locations. For a job of the type Subnetwork ( |
|
To list all functions available for a Job Master metanode
In the object workspace, select a Job Master metanode and open the context menu.
The following functions are available:
| Function | Shortcut | Description |
|---|---|---|
| List | F8 | See Listing Jobs. |
| New | CTRL+N | See Adding a Job Definition. |
| Refresh | F5 | See Refreshing Object Lists. |
| Filter | F3 | See Filtering Objects. |
| Paste data | CTRL+V | See Pasting Objects. |
| Export | --- | See Exporting Objects in the Import/Export Functions documentation. |
| Set Drag And Drop Function | --- | See Drag & Drop. |
To list all functions available for a Job Master instance
In the object workspace, select a Job Master instance and open the context menu.
The following functions are available:
| Function | Shortcut | Description |
|---|---|---|
| Open | CTRL+O | See Displaying and Modifying a Job Definition. |
| Display | CTRL+D | See Displaying and Modifying a Job Definition. |
| Mass update | --- | Change the setting of the
Execute if Temporary Dummy option in End-of-Job actions of
multiple jobs.
See Changing Execute if Temporary Dummy Settings for Multiple Jobs. |
| Network Diagram | --- | This function is used for
navigation purposes. It opens the diagram of the network that contains the job.
You can work with the diagram as described in Viewing and Maintaining a Job Network Diagram in the section Network Maintenance. |
| Open Subnetwork | --- | Open the Maintenance
Network Master window for the network that is linked to a job of the
type Subnetwork (NET).
|
| Zoom Subnetwork | --- | Open a list of jobs associated with
the network to which a job of the type Subnetwork
(NET) is linked.
See also Listing Jobs of a Subnetwork. |
| Subnetwork Diagram | --- | This function is used for
navigation purposes. It opens the network diagram for the network linked to a
job of the type Subnetwork (NET).
You can work with the diagram as described in Viewing and Maintaining a Job Network Diagram in the section Network Maintenance. |
| Delete | DELETE | See Deleting a Job Definition. |
| Copy data | CTRL+C | See Copying Objects. |
| Usable Symbol Tables | --- | Open the Usable Symbol
Tables window to view or modify symbol table definitions available
for the job.
See also Listing Usable Symbol Tables in the section Symbol Table and Symbol Maintenance for details. |
| Browse Master JCL | --- | See Displaying Master JCL. |
| Edit Master JCL | --- | See Editing Master JCL and Natural Sources. |
| Activate Job | --- | See Activating a Single Job Manually. |
| Pre-generate Active JCL | --- | See Pregeneration of Active JCL. |
| Remove pre-generated Active JCL | --- | See Removing Pregenerated JCL. |
| Edit pre-generated JCL | --- | See Editing Pregenerated JCL. |
| List Active Jobs | --- | Open a list of active jobs for the
selected job.
See Listing Active Jobs in the section Active Job Networks. |
| Browse Log | --- | See Displaying Logged Information - Browse Log Function. |
| Export | --- | See Exporting Objects in the Import/Export Functions documentation. |
| Add to Workplan | --- | See Add to Workplan. |
| Set Drag And Drop Function | --- | See Drag & Drop. |
To view a job definition
In the object workspace, select a Job Master instance.
Open the context menu and choose , or press CTRL+D.
A Display Job Master window opens.
The protected fields and tabbed pages in the window correspond to the fields and pages of the Maintenance Job Master window. They are explained in Fields: Job Definition (Master).
To modify a job definition
In the object workspace, select a Job Master instance.
Open the context menu and choose , or press CTRL+O.
A Maintenance Job Master window similar to the example below opens:
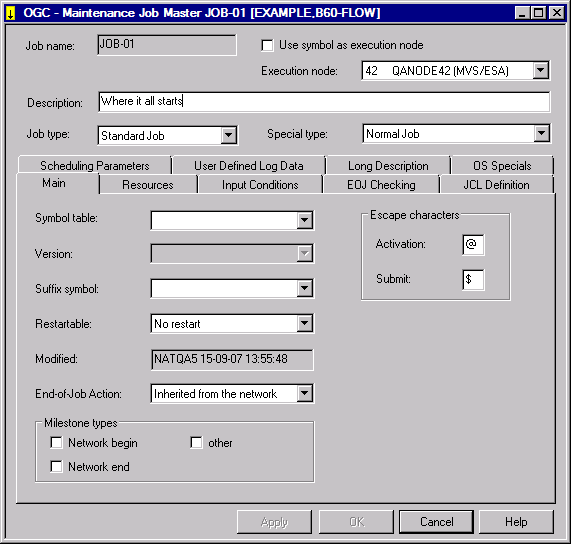
Edit the fields you want to change. The fields are explained in Fields: Job Definition (Master).
When you are finished, choose .
Your changes are saved.
This section covers the following topics:
The fields in the Job Master window are described in the following table.
Note:
The fields and tabbed pages available depend on the
Job Type,
the Special
Type and the operating system of the Execution
Node specified for the job.
| Field/Tabbed Page | Description | |
|---|---|---|
| Job name | Job name.
Entire Operations recognizes a job by this name. It can, but need not be the same name as the JCL source used by the job (the operating system recognizes a job by its JCL name). Note: |
|
| Description | Short description of the
job.
The maximum input is 50 characters. This text appears in the list of jobs in the Job Master List window. You can add a long description for the job: see Writing and Viewing Online Documentation for a Job. |
|
| Job type | Job type as defined to Entire Operations. For further information, see the section Job Types. | |
| Special type |
You can select one of the following types from the list box:
|
|
| Execution node | Node on which to submit
the job.
The default is the value specified in the job network definition (see the field Execution Node in the section Network Maintenance). You can enter a different node for the job here. You can define the execution node as a symbol if the Use symbol as execution node option (see below) is selected. For details, see Symbols in Node Definitions in the section Symbol Table and Symbol Maintenance. |
|
| Use symbol as execution node | Select this check box if you want to use a symbol for the execution node (see above). | |
| Main page: | ||
| Symbol table | Name of the symbol table
to be referenced for substitution of variables in dynamic JCL.
Select
a name from the list. Alternatively, you can enter a new name
to define a new
symbol table. See Modifying
a Symbol Table Master in the section Symbol Table
and Symbol Maintenance for more information.
Note: |
|
|
Version (Symbol table) |
Version of the symbol
table to be used.
Reserved names (are replaced). |
|
current |
Current version for the activation date or determination date. | |
nv |
Version of the using network. | |
svn |
Symbol table version of the using network. | |
| Suffix symbol | (Optional field)
If several instances of the job are to be activated in parallel, this field must contain a symbol name which is in the defined symbol table. The symbol itself must contain the suffixes to be appended to active job names and output conditions. The sum of the lengths (prefix+suffix) must not exceed the maximum field lengths for job names or conditions. For example, if the job master name is
If Suffix symbol does not contain any values, the job is activated as a temporary dummy job. For information about the definition of multiple symbol values, see Defining Multiple Symbol Values in the section Symbol Table and Symbol Maintenance. For information about the assignment of multiple symbol values to Suffix symbol, see Symbol Replacement with Multiple Symbol Values. |
|
| Restartable | Only
applies to BS2000.
Job can be restarted automatically. Possible selection options:
Additional Restart
Criteria:
Job submission time must be before the last IPL time and
the job must not be terminated. The field Monitor JV must
contain |
|
| Modified | User ID, date and time of the last modification of the job definition. | |
| End-of-Job Action | Job output conditions.
Possible selection options:
See also the field End-of-Job Action in the network master definition. |
|
| Milestone types |
Milestone job types.
You can set single or multiple milestone attributes (types) for a job that performs an important task within a job network, such as tracking significant events or controlling the successful completion of other jobs. Possible selection options for user-defined milestones:
Possible values for system milestones dynamically set by Entire Operations during job submission (applies to active jobs only):
You can use the application programming interface
For further information on milestone jobs, see the section Event Store Milestones in the System Automation Tools documentation. |
|
| Escape Characters: | This is the
activation escape
character. It is a prefix for Natural code lines and symbols to be
replaced at activation time. If you change this character, dynamic JCL can
become invalid.
See also Symbol Escape Characters (Symbol Maintenance) and Notes about Escape Characters. |
|
| Escape Characters: | This is the
submission escape character.
It is a prefix for symbols to be replaced at submission time. If you change
this character, dynamic JCL can become invalid.
Default is the dollar sign ( See also Symbol Escape Characters (Symbol Maintenance) and Notes about Escape Characters. |
|
| Other pages: | ||
| Resources | This tabbed page is used
to define a prerequisite resource for a job master.
The fields and options on this page are explained in Handling Prerequisite Resources for a Job. |
|
| Input Conditions | This tabbed page is used
to define input conditions for a job master.
The fields and options on this page are explained in Defining and Managing Job Conditions. |
|
| EOJ Checking | This tabbed page is used
to add, modify and delete an End-of-Job check for a job master and define a
user message for the check. Furthermore, you can define an output condition for
the End-of-Job check.
The fields and options on this page are explained in Defining and Managing End-of-Job (EOJ) Checking and Actions. |
|
| JCL Definition |
This tabbed page is not available for all types of jobs. The fields and options on this page are explained in Defining JCL for a Job. |
|
| FTP Definition | This tabbed page is not
available for all types of jobs.
The fields and options on this page are explained in Defining Parameters for an FTP Job. |
|
| Scheduling Parameters | This tabbed page allows
you to define a schedule for the job.
The fields and options on this page are explained in Scheduling a Job in the section Schedule Maintenance. |
|
| User Defined Log Data | The fields and options on this tabbed page are explained in Defining Job-Specific Log Information. | |
| Long Description | This tabbed page provides
the option to write a long descriptive text for a job, in addition to the short
job description you can enter in the Description field.
See also Writing and Viewing Online Documentation for a Job. |
|
| Subnet | This tabbed page is only
available for jobs of the type Subnetwork
(NET).
The fields and options on this page are described in Fields: Job Type Specific Execution Features in the section Defining a Subnetwork. |
|
| OS Specials | This tabbed page is not available for all types of jobs.
The fields and options available on this page are described in Fields: Operating System Specific Execution Features. |
|
- Note about Escape Characters
The job escape character is always used for symbol replacements and macro JCL.
When a job is created or when an escape character is reset, the default value is taken in the following order from:
Network defaults (operating system specific) if defined for the current operating system;
Network definition if non-blank;
Global operating system specific defaults for z/OS and z/VSE, BS2000, UNIX and Windows (Administration documentation).
See also Symbol Escape Characters in the section Symbol Maintenance.
When defining a new job, you can either enter all required attributes individually, or copy all attributes from an existing job master including all input conditions and End-of-Job activities defined for the job.
This section covers the following topics:
To add a job definition
In the object workspace, select a Job Master node and choose from the context menu, or press CTRL+N.
Or:
Open the Job Master
List window and choose the
context function from within the list table, or press CTRL+N.
A Create new Job Master opens. The fields contained in the window correspond to the fields in the Maintenance Job Master window. They are described in Fields: Job Definition (Master).
Enter the required values.
Choose to save your entries.
The new job master is created and ready to use within the job network.
You can copy a job within the current network or between networks.
Prerequisites for copying are:
You must be allowed to perform the copy function; see the settings of the write permissions in the Network Maintenance Functions of your user profile (Administration documentation).
You must be granted access to the networks of a specified target owner.
The target network must exist; you cannot create a new network with the copy function.
To copy a job definition
In the object workspace, select the job you want to copy from Job Master node and proceed as described in Copying Objects.
You can add a short description of a job when defining a job in the Maintenance Job Master window. This short description appears in the list of jobs in the Job Master List window.
If you wish to add more online documentation for a job, proceed as described in the following instruction.
As an alternative to a descriptive text, you can also enter an URL address that be used as a hyperlink to open another page inside or outside your Windows application.
This hyperlink also works when you display the long description of a job.
To create, view or modify a long description or hyperlink (URL)
reference
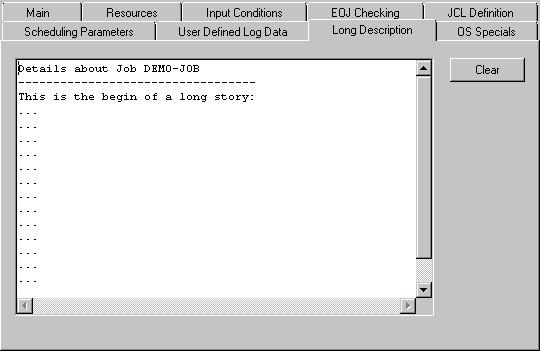
In the Maintenance Job Master window, open the tabbed page Long Description.
Enter an explanatory text or a hyperlink by choosing either of the following options.
(You can choose Clear if you want to remove all entries on the Long Description page.)
Enter an explanation concerning the job master or replace existing text as shown below:
Or:
Enter a URL address that starts with http:// or
https:// as shown below:
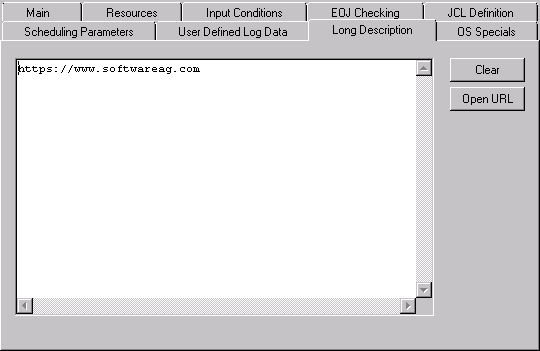
The URL must not contain any blank characters but it can extend over several lines. The lines are then concatenated without trailing blanks.
You can use one URL only.
Choose Open URL to open the default browser associated with your Windows application and view the destination page.
(This button only appears when you enter http://
or https://.)
When you are finished, choose Apply or OK.
Once online documentation is written, it can be read by any user who is authorized to access the network to which the job belongs.
You can also display or print online documentation by using the Reporting function described in the section Reporting. If long job descriptions exist, they are included in the Network Description (detailed) report as indicated in the Example of Network Description (detailed).
Note:
Deleting a job definition also deletes all definitions made at
the job level, including its input conditions and
End-of-Job checking and
actions. The original JCL is not deleted.
To delete a job definition
In the object workspace, select the job you want to delete from the Job Master node.
From the context menu, choose .
Or:
Press DELETE.
A dialog opens where you have to confirm the deletion.
The Network Diagram function allows you to see which jobs must run before a specific job can start, and which jobs run after it.
You can trace job dependencies through whole networks and display cross-network job links.
To view job dependencies in a network
In the object workspace, select a job from the Job Master or Job Active node.
Open the context menu and choose the function.
Depending on the node selected, a Diagram Network Master or Diagram Active Run window (see the examples in the section Network Maintenance) opens with a graphical view of the selected network.
The symbols used to represent the network components and the functions available from the context menu in the diagram, are described in Explanations of Diagram Symbols and Maintenance Functions for Diagrams in the section Network Maintenance.
In a complex network, you can use the Find function to locate the required job.
Entire Operations allows you to define which information is to be logged in addition to the Entire Operations default system log.
This information is defined at the job level and can be job SYSOUT, JCL or selected operating system messages from the SYSOUT.
This section covers the following topics:
To specify extended log information
In the Maintenance Job Master window, open the tabbed page :

Make your definitions. The input fields and options are explained in User Defined Log Data.
Choose OK to save your definitions.
The logged information can be viewed after job termination using the Browse Log function described in the section Log Information.
The input fields of the User Defined Log Data page are described in the following table:
| Field/Column | Description | |
|---|---|---|
| Log SYSOUT | Specifies logging of job SYSOUT files after job termination. Possible check box settings: | |
| checked | Logs SYSOUT. | |
| unchecked | No SYSOUT files are logged. | |
| SYSOUT logging can also
be defined as SYSOUT
action.
If the SYSOUT file or spool data set exceeds a given line limit, the log display is truncated: see SYSOUT line limit in Defaults for Network Options in the Administration documentation. |
||
| Files | (z/OS only)
Input valid only if Log SYSOUT is specified. Enter number(s) of SYSOUT file(s) to be logged. |
|
| Log JCL | Specifies logging of JCL
after job termination.
This is useful for dynamically generated JCL or if JCL is frequently modified for different job runs. Possible check box settings: |
|
| checked | Logs JCL. | |
| unchecked | No JCL is logged. | |
| See also JCL Log. | ||
| Log System Messages | Specifies operating
system messages to be logged.
Enter a message code in a field under the Code column. |
|
| Log the selected message if it contains one of the following strings | Specifies additional
selection strings for the message entered and selected in the
Code column.
The message is logged if no additional string is specified, or if at least one specified string is found in the message. |
|
- JCL Log
The JCL log is generated from the following sources:
BS2000 From the ENTER file. (The ENTER file is deleted after copying into the Entire Operations Log.)
z/OS If Entire Operations runs on a mainframe: from the SYSOUT.
If Entire Operations does not run on a mainframe: from the active JCL.
z/VSE From the active JCL. UNIX From the effectively submitted shell script. Windows From the effectively submitted BAT file.