
 To list all functions available for a Network Active node
In the object workspace, select a Network Active node and open the context menu.
The following functions are available:
| Function | Shortcut | Description |
|---|---|---|
| List | F8 | See Listing Active Job Networks. |
| Refresh | F5 | See Refreshing Object Lists. |
| Filter | F3 | See Filtering Objects. |
| Set Drag And Drop Function | --- | See Drag & Drop. |
To list all functions available for a Network Active
instance
Select a Network Active instance and open the context menu.
The following functions are available:
| Function | Shortcut | Description |
|---|---|---|
| History | CTRL+C | See Viewing the Execution History of a Network Active. |
| List Active Jobs | --- | See Listing Active Jobs. |
| Browse Log | --- | See Displaying Logged Information - Browse Log Function. |
| Set Drag And Drop Function | --- | See Drag & Drop. |
To list all active job networks of an owner
In the object workspace, select the Network Active node of an owner.
From the context menu, choose .
Or:
Press F8.
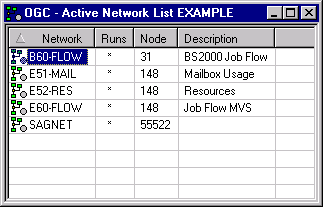
An Active Network List window similar to the example below opens:
This section covers the following topics:
The following table explains the column headings for the data listed in the Active Network List window:
| Field | Description |
|---|---|
| Runs | Asterisk (*) in this column indicates
that one or more active job runs exist for the network.
|
| Network | Network name. |
| Node | Execution node specified for the network as the default for its jobs. |
| Description | Short description of network as defined in the job network definition on the master database. |
There are several ways of preventing or interrupting the execution of an active job network. These are described in the following section.
Deactivation requires active job deletion user rights and either network master deletion rights or network activation rights. See User Definitions and Profile Settings in the Administration documentation.
If you wish to prevent Entire Operations from submitting active jobs for a network, you can deactivate a network before the first job run is performed.
To deactivate single or multiple active runs
In the object workspace, select an and choose from the context menu.
A confirmation dialog similar to the example below opens:
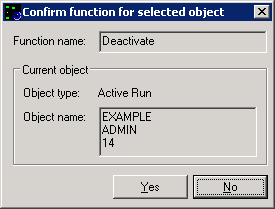
Choose .
The currently selected active run is deactivated.
To deactivate multiple active runs
In the object workspace, select an Active Run node and choose List from the context menu.
An Active Run List window opens with a table of all active runs.
Select multiple active runs and choose Deactivate from the table's context menu.
In the confirmation dialog that opens, choose Yes to deactivate one active run after the other, or choose Yes to All to delete all active runs at once.
The system administrator can stop the Entire Operations Monitor to halt the execution of all job networks. Jobs currently being executed continue until normal termination, unless they are explicitly cancelled from the operating system.
To interrupt a running network, add an input condition, e.g.
WAIT-HERE, for the job before which the network is to stop
running, and ensure that it will not be set. For more information, see
Adding an Active
Condition.
To restart the network at the point of interruption, you can manually set the input condition, or remove it from the active job definition (see Displaying and Modifying an Active Job Definition).
To view the history of a Network Active instance
In the object workspace, select a Network Active instance and choose from the context menu.
A History Network Active window opens for the selected network. This window corresponds to the History Network Master window described in Displaying the Network Execution History in the section Schedule Maintenance.
In the calendar, click on the scheduled date for which you want to view the history data.
If history data exists for the selected network and date, execution information on all network starts is contained in the right-hand table columns of the window. The columns are explained in Columns: Network History in the section Schedule Maintenance.
An active run is identified by owner, network and run number. Run numbers are unique per network. If a single job is activated, it will get a run number of the network to which it belongs.
Note:
You can maintain active runs from either the Active
Run node under Network Active or the
Active Run node under Network Master.
Both nodes control the same active runs. If you use both nodes to change active
runs during a session, consider refreshing them manually to make sure that you
view the latest status.
This section covers the following topics
To list all functions available for an Active Run node
In the object workspace, select an Active Run node and open the context menu.
The following functions are available:
| Function | Shortcut | Description |
|---|---|---|
| List | F8 | List all active runs in a network: see Listing Objects. |
| Refresh | F5 | See Refreshing Object Lists. |
| Filter | F3 | See Using Filter Criteria to list Active Runs in a Network. |
| Set Drag And Drop Function | --- | See Drag & Drop. |
To list all functions available for an Active Run instance
Select an Active Run instance and open the context menu.
The following functions are available:
| Function | Description |
|---|---|
| Diagram | See Viewing a Network Diagram. |
| Deactivate | See Deactivating Active Runs for a Network. |
| Release | Release job(s) from hold status for the selected active run. See Releasing an Active Job. |
| Repeat | See Repeating an Active Run. |
| Modify Latest Start | See Modifying the Latest Start Time for an Active Run. |
| List Active Jobs | See Listing Active Jobs. |
| Browse Log | See Displaying Logged Information - Browse Log Function. |
| Add to Workplan | See Add to Workplan. |
| Set Drag And Drop Function | See Drag & Drop. |
To filter active runs
Select an Active Run node and choose Filter from the context menu.
A Filter Active Run window similar to the example below opens:

In the Show last input field, enter the number of latest active runs you want to view.
Or:
Remove the mark from the Show last
check box and enter the range of run numbers you want to view in the
Active Run from/to input fields (default is 1
to 99999). The most recent run number is indicated for
orientation.
In addition, you can mark the Hide planned runs check box to hide planned runs from the display list.
You can set default values for an active run filter in your user profile by using the Filter option (see the Administration documentation).
For information on naming a filter, see Filtering Objects.
Diagrams are provided for network masters and active networks. In case of active networks, they can be used to define an active run within a network and to monitor the progress within the network.
To view a network diagram
In the object workspace, select an instance of Active Run and choose Diagram from the context menu.
Or:
In the object workspace, select an instance of Job
Active and choose .
Open the context menu and choose or Network Diagram, respectively.
A Diagram Active Run window with a network diagram opens similar to the example shown in the Network Maintenance section.
Here you can see all network components available for the currently selected Active Run in a graphical view.
For explanations of the symbols used in the diagram and the functions provided, see Explanations of Diagram Symbols and Maintenance Functions for Diagrams in the section Network Maintenance.
To repeat an Active Run
In the object workspace, select an instance of Active Run.
Invoke the context menu and select Repeat.
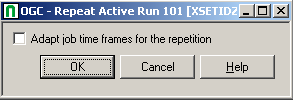
You can adapt job time frames for the repetition.
If you select this option, then the time frames are adapted as follows:
| Formula | Example |
|---|---|
| time delay = current time - old earliest start | 13:00 - 9:00 = 4 hours |
| new earliest start = current time | 13:00 |
| new latest start = old latest start + time delay | 17:00 + 4 hours = 21:00 |
| new deadline = old deadline + time delay | 18:00 + 4 hours = 22:00 |
Choose OK.
The active run is repeated immediately.
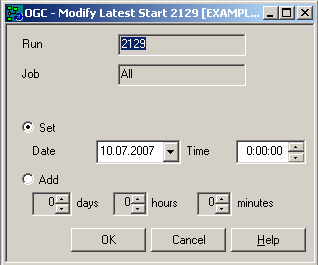
You can change the latest start time for all jobs of an active run where the active job status permits it. The latest start time may be changed for an active job that is not started or is already terminated.
To modify the latest start for an active run
In the object workspace, select an instance of Active Run.
Invoke the context menu and select .
A window similar to the following opens:
You may choose only one of two methods to modify the latest start time:
Set: Enter date and time values of new latest start;
Add: Enter days, hours and minutes that shall be added to the latest start time value of active job.
The deadline value may get changed during this modification to ensure the following rule is honored: latest start time + estimated elapsed time <= Deadline.
All actions are logged in the Entire Operations log file.