
This document covers the following topics:
 To display the schedule defined for a network
In a Network Master window, open the tabbed page Scheduling:
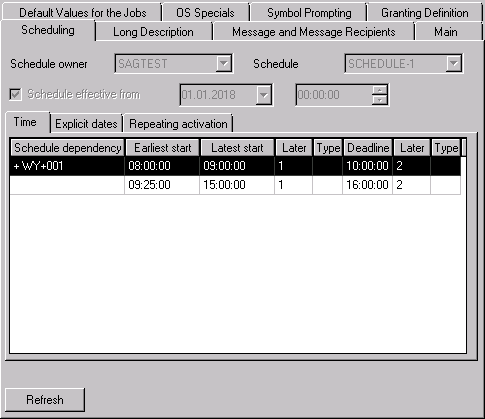
The fields and tabs available in the window are for information only. You cannot change any entries. Changes are performed by using the Define Scheduling context menu function described in the following section.
The fields and tabs are explained in Fields and Columns: Network Scheduling.
You can choose Refresh to view the latest definition of the schedule after most recent changes performed with the Define Scheduling function.
To define a schedule for a network
In the object workspace, select a Network Master instance and choose Define Scheduling from the context menu.
A Define Scheduling window similar to the example below opens:
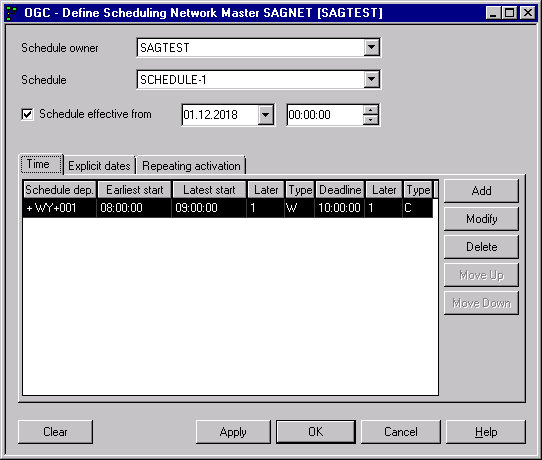
Enter the required values or replace existing entries. The fields and tabs available in the window are explained in Fields and Columns: Network Scheduling.
You can choose Clear if you want to remove all current definitions.
Choose when you are finished.
If you modify a network schedule and this modification affects any planned starts, you have the option to cancel the starts or to keep them active.
If you select , a dialog similar to the example below appears:
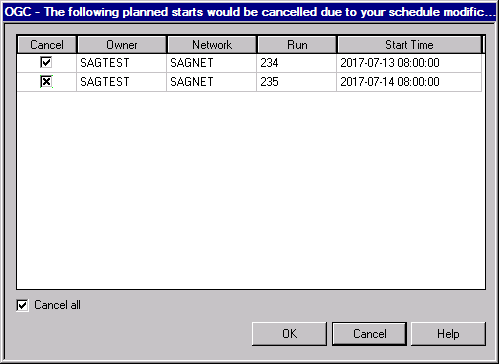
You can select the following functions:
Select the check box to cancel all starts.
In the table, select the check box next to starts you want to cancel .
Select the button if you do not want to cancel any starts. This keeps all listed starts active, regardless of your schedule modifications.
This section covers the following topics:
The input fields and corresponding columns (if relevant) on the tabbed pages of the Define Scheduling window are described in the following table:
| Field | Column | Description | ||
|---|---|---|---|
| Schedule Owner | Owner of the schedule to
be used.
Default: Owner of the network |
||
| Schedule | Name of the schedule to
be used.
Schedule comprises a link to a calendar. Definition of dates on which the network is to be executed. |
||
| Schedule effective from | Schedule effective from
(date and time)
Select this field (not selected by default) to activate the schedule and/or change the date and time. If a schedule should not become effective immediately, enter the date (and time) of the validity begin here. If no time is specified, the schedule becomes effective at 00:00. |
||
| Time page: | |||
| Schedule dependency | Schedule dep. | This option is used to specify days when the network is deactivated and not executed. | ||
| Earliest Start | Earliest start time for
the network.
No job in the network can start before this time. The Earliest Start time is used to compute network schedule times. See also Processing of Time Frame Definitions. |
||
| Latest Start | Latest start time for the
network.
The first job in the network must start by this time, if possible. If not, a warning message is sent and the job is not submitted. You can specify the number of workdays or calendar days to be used for later starts: see Calendar days later | Workdays later below. See also Processing of Time Frame Definitions. |
||
| Deadline | Time by which the last
job in the network must be finished.
The deadline is used to compute the earliest and latest start times for the jobs in the network. See also Processing of Time Frame Definitions. |
||
| Calendar days later |
Later
Workdays later | Later |
This field is to be used
if Latest Start and/or Deadline are
later than 24 hours after the Earliest Start.
Valid values: 1 - 999 days. Default for Deadline: 2 calendar days later. See also Processing of Time Frame Definitions. Note: |
||
| Calendar days later | Type
Workdays later | Type |
Specifies the day type: |
||
|
Column entry: C
(or empty) |
Calendar day (default). | ||
|
Column entry: W |
Workday as defined in the calendar linked to the schedule. | ||
| Explicit Dates page: | See Defining Explicit Dates for a Single Network only. | ||
| Repeating Activation page: | See Defining Multiple Network Activations. | ||
| Number of Activations | This field is used to
activate a network more than once a day. In this case,
select the button next to this field and enter the number of activations per
day.
If the network is to be activated once per schedule day only, leave this field blank. Valid input values: |
||
|
every ...
minutes:
If a network is to be activated more than once per day, you can enter the time interval between two subsequent network activations. This field can be used without Number of Activations, too. In this case, the number of activations will be limited by the defined latest network start time. Unit: minutes See also Defining Multiple Network Activations for further information. |
|||
| Activate at | In these fields, you can
enter up to 10 activation times, as an alternative to Number of
Activations.
Format: HH:MM or H:MM Examples: Note: See also Defining Multiple Network Activations for further information. |
||
| Day Deadline | If a Day
Deadline is defined, the Deadline of multiple
activations (every …
minutes or
) is limited to this time on the day of the
activation.
Format: HH:MM |
||
This section describes the rules and processes that apply when specifying time frames for a network or job schedule on the Time page of a Define Scheduling Network window or the Scheduling Parameters page of a job master or job active:
Time frames defined on the job level override time frame definitions made on the network level for this job. If no time frames are defined here, the job network defaults apply.
All modifications to time frames of an active job affect the active database and the current job run only. Time frame definitions for the job master remain unchanged.
Time frames are selected according to the following rules:
A table row with no time frame dependency entry is applied as the network start date if no other time frame dependency entry matches the network start date.
From top to bottom, each table row with a defined schedule dependency condition is applied to the network. If a condition is satisfied, the respective time frame values are used for the active network.
Example: The definition +CW+3 means this
definition applies if the network starts on Wednesday. -CW+3 means
this definition applies if the network starts on all other weekdays except
Wednesday.
If none of the defined table rows is selected, the network uses the default time settings. See also Defaults for Time Ranges in the Administration documentation.
If both Latest Start or Deadline and Days later are not specified, the Entire Operation defaults specified for Default Latest Start after Earliest Start and Default Deadline after Earliest Start on the Time Ranges page apply (see the Administration documentation).
If Latest Start or Deadline is given and Days later is not specified, Days later is automatically filled as described above.
If applying any of the above rules and Days later of Latest Start or Deadline becomes greater than 999, it remains empty and an error message is issued.
If Latest Start is before Earliest Start and Days later is not specified, the Days later value for Latest Start is set to 1 by default.
If Deadline is before Earliest
Start and Days later is not specified,
Days later is set to 1 so that this time
follows the earliest start time.
To add or modify a time frame definition for a network
In the Define Scheduling window, open the Time page.
The table columns are explained in Fields and Columns: Network Scheduling.
Choose Add to add a new time frame definition.
Or:
Select a time frame definition from the table and choose
Modify.
Depending on the function chosen, a Create new Time Frame or Maintenance Time Frame window similar to the example below opens:
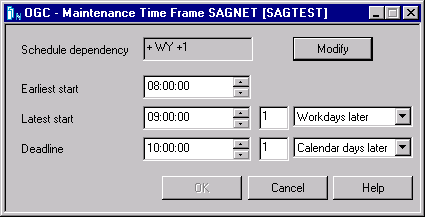
Entire the required values. The input fields contained in the window are described in Fields and Columns: Network Scheduling.
See also Time Frame Selection Rules for a Network and Processing of Time Frame Definitions.
If you want to add or modify the schedule dependency for a time frame, choose Modify next to Schedule dependency.
A Schedule Dependency Definition window similar to the window provided for a job opens.
The input fields contained in the window are described in Fields: Schedule Dependency Definition.
Choose OK when you are finished.
The time frame definition is shown in the table of the Time page as shown in the example below:
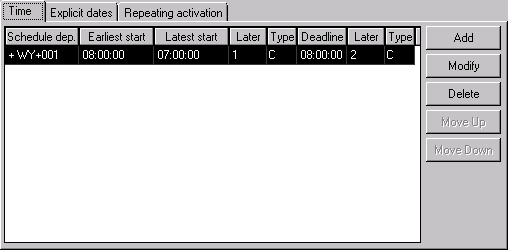
If a schedule dependency is defined for the time frame
definition, a code is shown in the Schedule dep. column
(here: +WY+001).
You can move up or down a selected column row by choosing Move up or Move down, respectively.
You can choose Delete for a selected column row to remove a time frame definition.
Choose Clear to remove all entries from the table.
Choose OK when you are finished.
To delete a time frame dependency from a time frame
definition
Open the tabbed page Time of the tabbed page Scheduling.
Select the table row that contains the definition you want to delete and choose Delete.
Note:
Clear removes all
Scheduling entries as described in
Deleting a Schedule
Definition.
Choose Apply or OK to confirm the deletion and close the window.
The time frame definition is removed from the table.
You can define explicit dates on which a network always or never executes, regardless of any other schedule definitions. Explicit dates supersede all other schedule definitions.
You can define explicit dates for all networks linked to a schedule or for a single network only.
This section covers the following topics:
To add or modify explicit dates for a schedule
In the Create new Schedule or Maintenance Schedule window, open the tabbed page Explicit Dates shown in the following example:
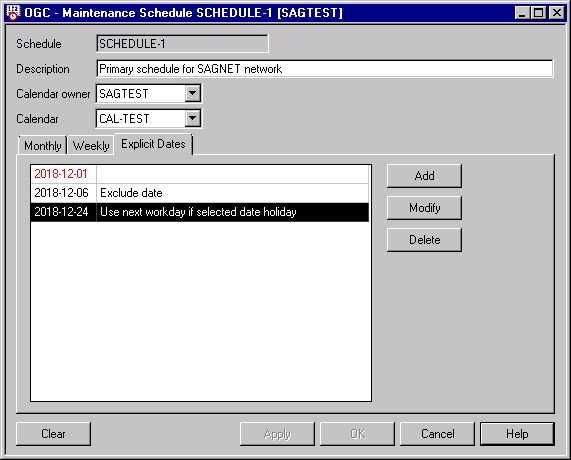
Choose Add for a new definition or select an existing entry and choose .
You can choose Clear to remove all table entries or Delete to remove a selected table entry only.
When adding or modifying a definition, an Explicit Dates window similar to the example below opens:
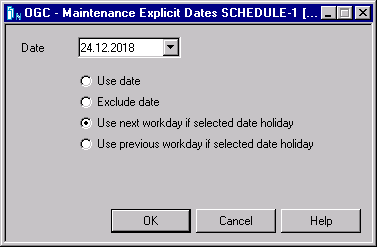
Open the drop-down list box and select the required date or replace the date entered in the date format specified within Entire Operations defaults (here: DD.MM.YYYY).
If you want to associate the date with a special condition, select one of the following options:
Use date: Execute a network on the specified date (default).
Exclude date: Do not execute a network on the specified date.
Use the next workday if the specified date is a holiday: Execute a network on the workday that follows the specified date.
Use the previous workday if the specified date is a holiday: Do not execute a network on the specified date.
Choose when you are finished.
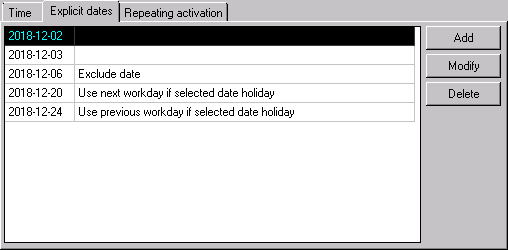
The Explicit Dates window closes and the specified dates are shown on the Explicit Dates page.
A date highlighted in red denotes that the date entered is past the date currently set as default in the Explicit Dates window.
On the Explicit Dates
page above, the date 2018-12-01, was entered in the
Explicit Dates window on December 3, 2018, for
example.
Choose OK to save the date specification.
You can define explicit schedule dates on the network level. Dates defined here are network-specific in contrast to schedule definitions which affect all linked networks.
Notes:
To define explicit dates for a single network
In the Define Scheduling window, open the Explicit Dates page shown in the following example:
Proceed with Step 2 of Defining Explicit Dates for a Schedule.
You can repeat network activations multiple times.
Note:
If activation times are defined for a network, the job-specific
time frames will be adapted to fit into the network time frame.
To define multiple network activations
In the Define Scheduling window, open the Repeating Activation page shown in the following example:
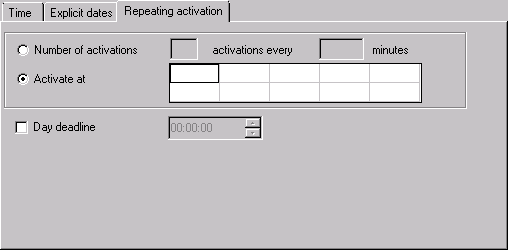
Enter (or replace) either or both of the following:
In the Number of activations field, enter the required number of activations.
In the every ... minutes field, enter the time interval to be used for activation.
Or:
Enter (or replace) the following:
In the input fields next to Activate at, enter single or multiple times to be used for network activation.
You can choose Clear to remove all entries from the Repeating activation page.
If required, select or enter a time limit for activation in the Day Deadline.
Choose OK to save your entries and close the window.
The rules that apply when defining multiple activations are described in the following section:
Multiple activations are limited
until the end of the schedule day,
until the latest start,
by the defined number of activations,
whichever comes first.
The following applies if both Number of
Activations (na) and every ...
minutes (em) have a non-zero value:
The latest start time of a time frame
(tf_latest_start) is interpreted as the latest start time of the
first multiple activation.
For activation 1 <= n <= na, the latest
start time of the specific activation will be set to tf_latest_start + (n
- 1) * em .
The multiple activation end time (mae) will be
calculated as mae = schedule_date + tf_latest_start + (na * em)
If the multiple activation end time (mae) is after
the defined deadline of a time frame, it will be set to the deadline of the
time frame.
If the multiple activation end time (mae) is after
the end of the schedule day, it will be set to the end of the schedule day.
Note:
A network is no longer treated as "already activated on
the current day" if there was a multiple activation on the day before,
which resulted in some runs that were executed after midnight. In this case,
automatic activations (due to schedule) will not be blocked by the
"activation on current day" check.
To display the calendar view of a network schedule
In the object workspace, select a Network Master instance and choose from the context menu.
A Display Schedule window similar to the example below opens:
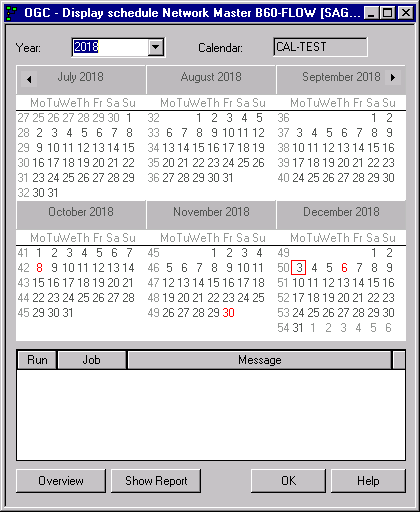
Select the year you want to display.
Dates outlined in red indicate that a schedule is provided.
Select a date and choose .
All activities scheduled for this date are displayed for online viewing in the lower area of the window.
Select a date and choose .
A list of available reports is displayed in a separate window.
Select the required report for printing purposes.
Note:
For further information on reports, see the section
Reporting.
This section describes how to produce a network start summary for a single network. The report looks similar to the example of a Network Start Summary shown in the Reporting section.
If you want to produce a Network Start Summary for all network activations on a given day, see the corresponding report described in the section Reporting.
To produce a network start summary for the current network
In the Display schedule window, select a valid date and choose .
All activities scheduled for this date are displayed for online viewing in the lower area of the window.
Select a date and choose .
A list of available reports is displayed in a separate Reporting window.
Select the required report, choose from the context menu and determine the file to be created from the report: see Report Output Options.
For detailed information on generating reports, see the section Reporting.
Scheduled starts are extracted from the network schedules and put into a pre-activation status. The extraction is usually performed at midnight, one day in advance.
Manual starts are explicitly invoked as manual activations by any user. If a special start time was not entered, the daily time frame is used. See Activating a Job Network Manually in the section Network Maintenance.
This section covers the following topics:
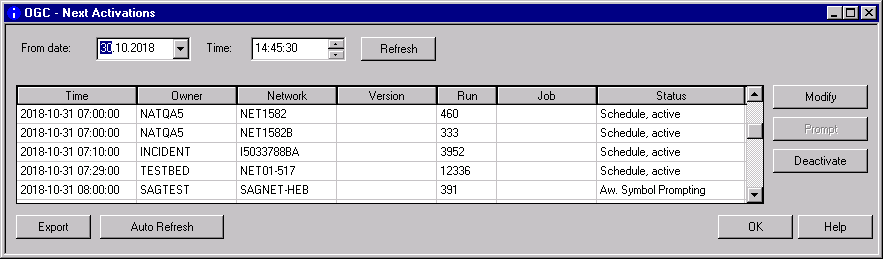
The context menu function Next Activations invokes the display of the future network activations. These activations are, in general, maintained by a schedule or a calendar but can also be invoked manually. You can view, modify or delete a planned activation.
To view and modify the next network activations
In the object workspace, select a General node, an Owner instance or a Network Master instance.
Open the context menu and choose .
For a General node, the Next Activations window lists all network activations planned for all networks in your current Entire Operations environment as shown in the following example:
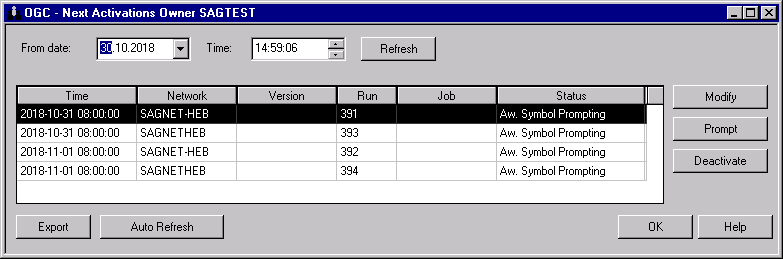
For an Owner instance, the Next Activations window lists all network activations planned for all networks that belong to the selected owner. Example:
For a Network Master instance, the Next Activations lists all activations planned for the selected network master. Example:
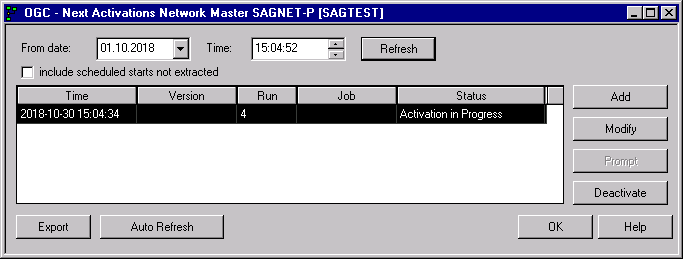
The Next Activations window displays a chronological list of all planned network or job starts, both scheduled and manual.
Note:
The table view is filled dynamically with data if
scrolled to the end of the table.
The columns contained in the window are described in Columns: Next Activations.
You can refresh the list by choosing and Auto Refresh (see also Refreshing Object Lists).
You can cancel a future activation by selecting the respective row and choosing .
You can only cancel a job network to which a run number is assigned.
You can prompt symbols (if defined) by selecting the respective row and choosing .
This button is only active for activation with type
Aw. Symbol Prompting and if a run number is assigned to the
network.
You can edit a future activation by selecting the respective row and choosing .
A window similar to the example below opens:
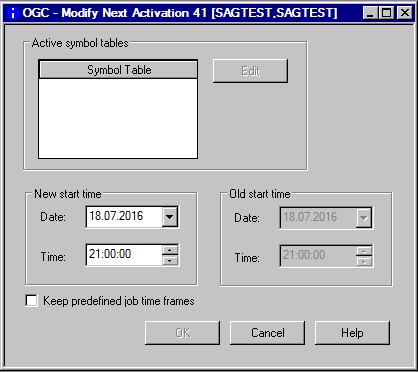
This window allows you to define a new start date and time for execution, edit a symbol table if used for this activation (see also Displaying and Modifying a Master or Active Symbol Table), and select the option to keep predefined job time frames.
If you want to export the current Next Activation settings, choose .
An Export Objects window opens. Proceed as described in Exporting Objects in the Import/Export Functions documentation.
To add a next activation
Next activations can only be added for a network master because the objects have to be specified in advance of any activation.
In the object workspace, select a Network Master instance and choose from the context menu.
The Next Activations window opens.
Choose .
The Activation Network Master window opens.
Define the time schedule for activation.
Choose .
The network is now marked and scheduled for its next activation and appears in the activations list.
To keep predefined job time
frames
If you select the check box Keep predefined Job Time Frames, Jobs with master time frame definitions will not be adapted.
Or:
If you do not select the check box Keep predefined
Job Time Frames, all job time frames will be adapted (default
setting).
The columns contained in the Next Activations window depend on whether you execute the Next Activations function from the General node or an Owner instance (see also Viewing and Maintaining Next Network Activations). All columns that can be available are described in the following table:
| Column | Description |
|---|---|
| Owner | Owner of the network to be activated
Above this column, you can make an owner preselection.
If this field only contains an asterisk ( |
| Network | Network to be activated
Above this column, you can make a network preselection.
If this field only contains an asterisk ( Your selection is stored in the user profile and is available when you invoke this function the next time. |
| Run | Run number for this activation. |
| Version | Version of the network |
| Job | If the activation is for one job only, the job name appears in this column. |
| Date | Date of activation
You can enter a start date and/or time in the fields above the Date and Start columns to display only those activations due to start after that time. |
| Start | Starting time of activation. |
| Type | Displays the current status of the activation.
Possible status types are, for example:
|
The execution history is a record of past schedules. It shows the days on which the network was scheduled for execution. The data in a History window cannot be modified.
There is history data on past network executions for the current and for the two preceding years (provided the network already existed at that time).
To view the history of a network master
In the object workspace, select a Network Master instance and choose from the context menu.
A History Network Master window similar to the example below opens:
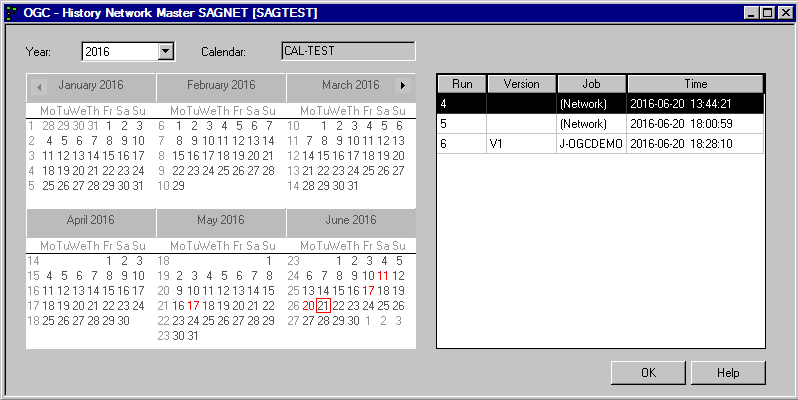
A calendar is displayed where the dates on which the network ran are highlighted in red.
If available, select a year from the drop-down-list box next to Year to switch the display of the calendar to the selected year.
Click on the highlighted date for which you want to view the history data.
If history data exists for the selected network and date, execution information on all network starts is contained in the right-hand table columns of the window as shown in the example above. The columns are explained in Columns: Network History.
If no history data exists, an appropriate message occurs. Log data is only retained for the number of days specified in the Long-term log field of the Entire Operations Defaults described in Defaults for Time Ranges in the Administration documentation.
This section covers the following topic:
The columns of the History Network Master or History Network Active window are described in the following table:
| Column | Description |
|---|---|
| Run | Run number of the job network that executed. |
| Version | Network version (if available) of the network that executed. |
| Job | Job name if a single job was activated for execution,
or (Network) if the entire network was activated.
|
| Time | Date and time when the network
executed.
See also Date and Time Formats. |
To delete a scheduling definition for a single network
In the Define Scheduling window, open the tabbed page that contains the definition you want to delete.
On the Time or Explicit Dates page, select the table row that contains the definition you want to remove and choose Delete. On the Repeating Activation page, remove all entries.
Note:
Removing the name of a schedule from the Define
Scheduling window does not delete the corresponding schedule object.
See also Deleting a
Schedule.
Or:
If you want to delete all definitions defined in the schedule,
choose Clear.
Choose Apply or OK to confirm the deletion.
The schedule definition is deleted for the selected network and the window closes.
If you choose Clear, the name in the Schedule field and all entries on the Time, Explicit Dates and Repeating Activation pages are removed from the schedule. The Schedule effective from option is unchecked (deactivated).