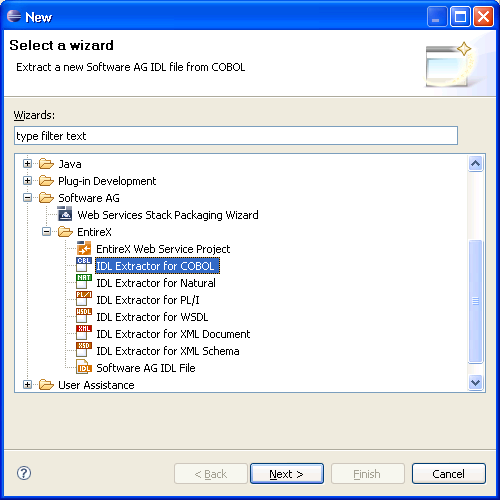
To continue, press and continue with Step 2: Select a COBOL Extractor Environment or Create a New One.
If no COBOL extractor environments are defined, you only have the option to create a new environment. An IDL Extractor for COBOL environment provides defaults for the extraction and refers to COBOL programs and copybooks that are
stored locally on the same machine where the EntireX Workbench is running: a local COBOL extractor environment
or
stored remotely on a host computer: a remote COBOL extractor environment. The extractor service is required to access COBOL programs and copybooks remotely with a remote COBOL extractor environment. The extractor service is supported on platforms z/OS and BS2000/OSD. See Extractor Service in the z/OS Batch | IMS | BS2000/OSD Batch RPC Server documentation.
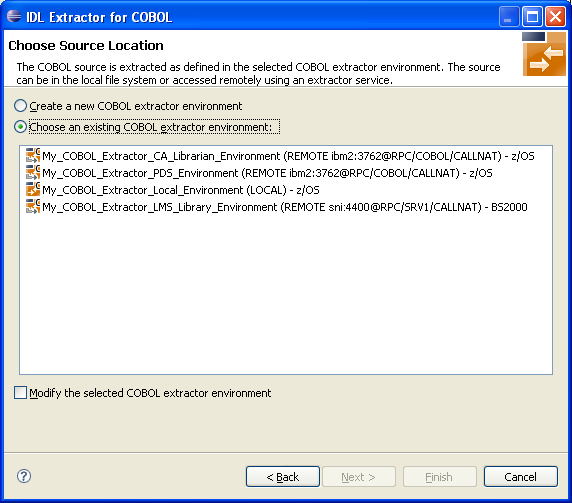
This page offers the following options:
 To select an existing local COBOL extractor environment
Check radio button Choose an existing COBOL extractor environment and select a local COBOL extractor environment.
Continue with Step 3: Select the COBOL Source below.
To select an existing remote COBOL extractor environment
Check radio button Choose an existing COBOL extractor environment and select a remote COBOL extractor environment.
Continue with Step 3: Select the COBOL Source below.
To create a new local COBOL extractor environment
Check radio button Create a new COBOL extractor environment.
Follow the instructions in the Preferences section under Create New Local Extractor Environment (z/OS, z/VSE, BS2000/OSD and IBM i) | Micro Focus (UNIX and Windows) in the IDL Extractor for COBOL documentation.
Continue with Step 3: Select the COBOL Source below.
To create a new remote COBOL extractor environment
Check radio button Create a new COBOL extractor environment.
Follow the instructions in the Preferences section under Create New Remote Extractor Environment z/OS | BS2000/OSD in the IDL Extractor for COBOL documentation.
Continue with Step 3: Select the COBOL Source below.
Selecting the COBOL source is different depending on whether the COBOL source is stored locally on the same machine where the EntireX Workbench is running, or on a remote host computer.
Selecting a Member from a Partitioned Data Set on Remote Host (z/OS)
Selecting a Member from a CA Librarian Data Set on Remote Host (z/OS)
Selecting a Member Archive Level from a CA Librarian Data Set on Remote Host (z/OS)
Selecting an Element (S) from an LMS Library on Remote Host (BS2000/OSD)
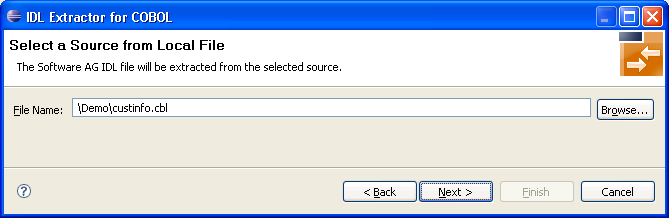
In step 2 above you selected or created a local extractor environment for z/OS. If you select a local COBOL extractor environment, you can browse for the COBOL program in the local file system. If you selected the COBOL source file before you started the wizard, and do not have a directory defined in the preferences of your Local Extractor Environment, the file location is already present. See Create New Local Extractor Environment (z/OS, z/VSE, BS2000/OSD and IBM i) | Micro Focus (UNIX and Windows) in the IDL Extractor for COBOL documentation. To browse for the COBOL source file, choose .
In step 2 above you selected or created a remote extractor environment. The following page offers all data sets starting with the high-level qualifier defined in the Filter Settings of the remote extractor environment. See Create New Remote Extractor Environment (z/OS) under IDL Extractor for COBOL Preferences.
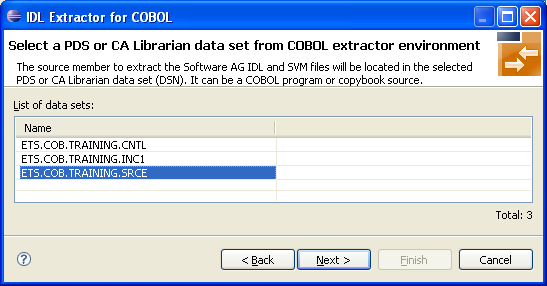
Select the partitioned data set from which you want to extract and choose . Proceed depending on the selected data set type. See Selecting a Member from a Partitioned Data Set on Remote Host (z/OS).
The following page offers all members contained in the partitioned data set selected in the previous step, starting with the member name prefix defined in the Filter Settings of the remote extractor environment. See Step 3: Define the Remote Extractor Environment under IDL Extractor for COBOL Preferences.
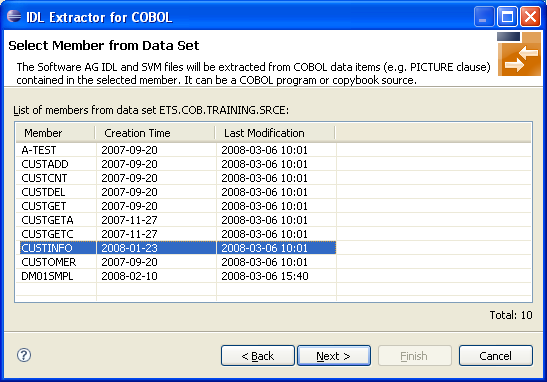
Select the member from which you want to extract. You can select only one COBOL source. The source can be a COBOL program or a COBOL copybook.
Choose and continue with Step 4: Define the Extraction Settings and Start Extraction below.
In step 2 above you selected or created a remote extractor environment. The following page offers all data sets starting with the high-level qualifier defined in the Filter Settings of the remote extractor environment. See Create New Remote Extractor Environment (z/OS) under IDL Extractor for COBOL Preferences.
Select the CA Librarian data set from which you want to extract and choose . Proceed depending on the selected data set type. See Selecting a Member from a CA Librarian Data Set on Remote Host (z/OS).
The following page offers all members contained in the CA Librarian data set selected in the previous step, starting with the member name prefix defined in the Filter Settings of the remote extractor environment. See Step 3: Define the Remote Extractor Environment under IDL Extractor for COBOL Preferences.
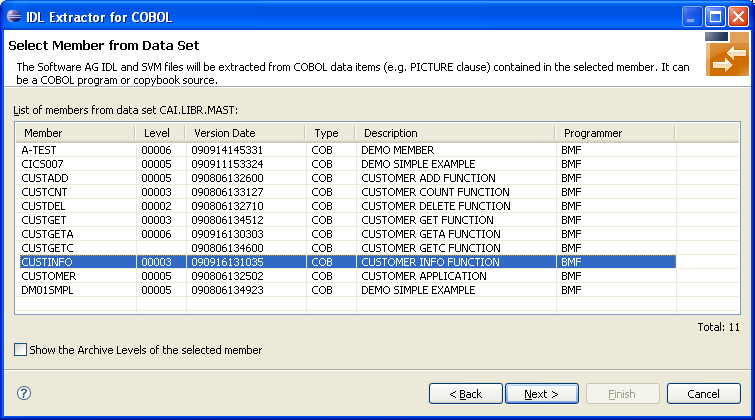
You can select only one COBOL source. The source can be a COBOL program or a COBOL copybook. If you want to extract from
the latest (current) version of the member, select the member, choose and continue with Step 4: Define the Extraction Settings and Start Extraction below.
a previous (archived) version of the member, check the box Show the Archive Levels of the selected member, select the member, choose and continue with Selecting a Member Archive Level from a CA Librarian Data Set on Remote Host (z/OS).
The following page offers all archive levels of the previously selected member.
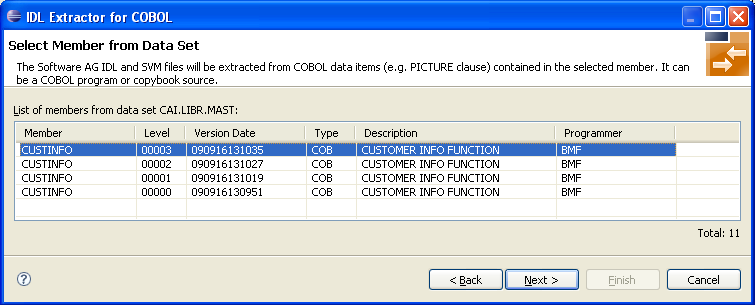
Select the member from which you want to extract. You can select only one archive level. Choose and continue with Step 4: Define the Extraction Settings and Start Extraction below.
In step 2 above you selected or created a remote extractor environment.
The following page offers all data sets starting with the high-level qualifier defined in the Filter Settings of the remote extractor environment. See Create New Remote Extractor Environment (BS2000/OSD) under IDL Extractor for COBOL Preferences .
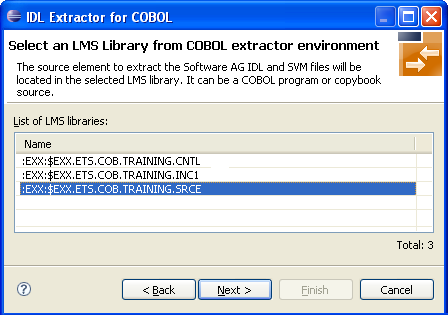
The following page offers all elements contained in the LMS library selected in the previous step, starting with the member name prefix defined in the Filter Settings of the remote extractor environment. See Step 3: Define the Remote Extractor Environment under IDL Extractor for COBOL Preferences.
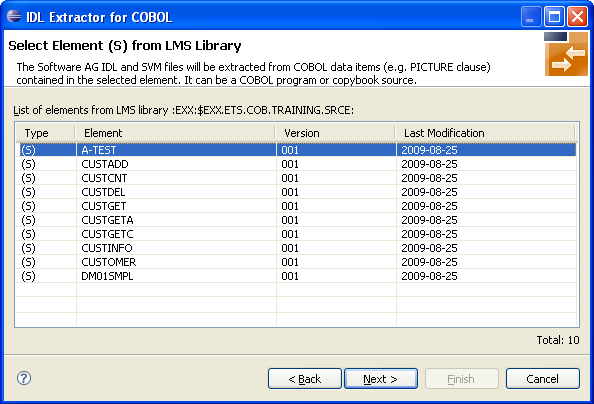
Select the element from which you want to extract. You can select only one COBOL source. The source can be a COBOL program or a COBOL copybook.
Choose and continue with Step 4: Define the Extraction Settings and Start Extraction below.
In this page you specify the COBOL source and Software AG IDL target options used for IDL extraction.
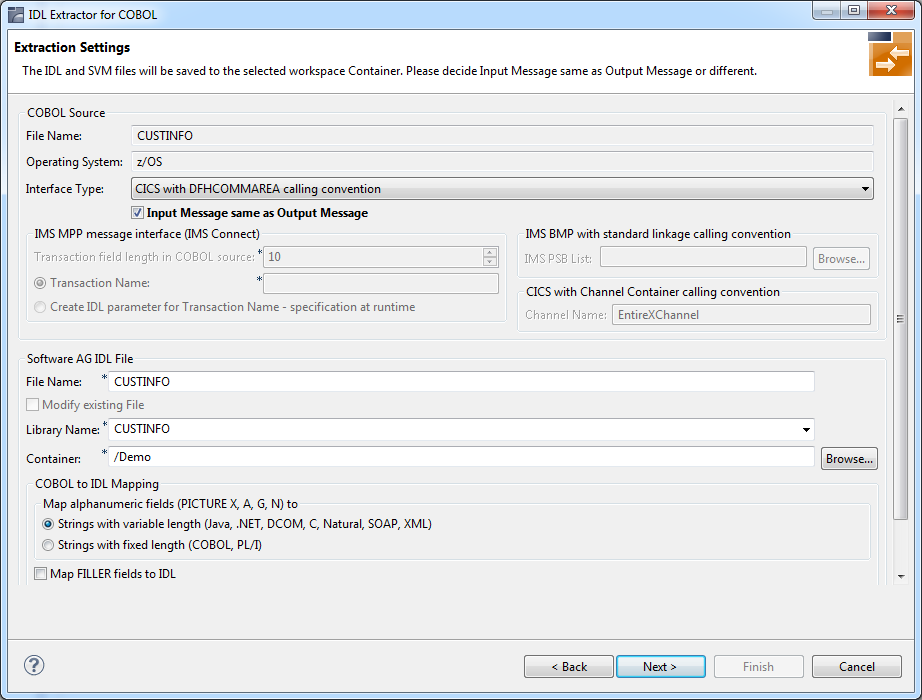
The operating system is already defined in the extractor environment in the IDL Extractor for COBOL preferences, see IDL Extractor for COBOL Preferences.
The interface type must match the type of your COBOL server program. It is used by the RPC server and the EntireX Adapter at runtime to correctly call the COBOL server and must be a supported interface type of the RPC server used. See Compatibility between COBOL Interface Types and RPC Server.
Additional information may be required depending on the interface type:
CICS with DFHCOMMAREA Calling Convention
Specify Input Message same as Output Message.
If the COBOL server program uses a different COBOL output data structure compared to its input data structure, that is,
the input message layout is overlaid with another layout on output, you need to uncheck Input Message same as Output Message.
See the following COBOL server examples:
If the COBOL server program uses the same COBOL data structure on input as well as on output, you need to check Input Message same as Output Message. See the following COBOL server examples:
CICS with Channel Container Calling Convention
Optionally, specify a channel name. See Extracting from a CICS Channel Container Program.
CICS with DFHCOMMAREA Large Buffer Calling Convention
Specify Input Message same as Output Message.
If the COBOL server program uses a different COBOL large output buffer data structure compared to its large input buffer data
structure,
you need to uncheck Input Message same as Output Message.
IMS MPP Message Interface (IMS Connect)
Specify how you want the transaction name to be determined. See Extracting from an IMS MPP Message Interface Program.
IMS BMP with Standard Linkage Calling Convention
You can optionally set the IMS PSB List. See Extracting from an IMS BMP Standard Call Interface.
Batch with Standard Linkage Convention
No further information is required.
MicroFocus with Standard Linkage Convention
No further information is required.
For an introduction to interface types, see Supported COBOL Interface Types.
With the Software AG IDL file target options you specify the IDL file and IDL library names used:
File name specifies the file name used by the operating system.
Modify existing file is enabled only when the IDL file already exists. If enabled, check this option to continue the extraction.
Library name defines the IDL library name used in the IDL file. The dialog box cannot be edited when you modify an existing IDL file. If there are multiple libraries, you can select one of these; if there is only one library, the box is disabled. When you extract the IDL the first time or you specify the name of an existing IDL file, the box can be edited (like a text widget). If you specified an existing IDL file, the currently existing library names are available in the box.
For the interface type "Micro Focus with standard linkage calling convention" and if the COBOL server is an operating system standard library (.so|.sl on UNIX or .dll on Windows) or a Micro Focus proprietary library (*.lbr), the IDL library name used must match the operating system file name. For Micro Focus proprietary formats, intermediate code (*.int) and generated code (*.gnt), any IDL library name can be used. See Locating and Calling the Target Server in the Micro Focus RPC Server documentation.
Container specifies the eclipse container used for the IDL file
With these target options you specify how COBOL data items are mapped to IDL:
If the target RPC clients support variable length strings without any restriction, we recommend you map alphanumeric fields to "Strings with variable length". This is true for most modern target environments such as Java, .NET, DCOM, C, Natural, SOAP, XML.
If the target RPC clients do not support variable length strings or support them with restrictions, we recommend you map alphanumeric fields to "Strings with fixed length"
Check the box Map FILLER fields to IDL if COBOL
FILLER pseudo-parameters are to be part of the RPC client interface. By default
they are not mapped to IDL.
Choose and start the extraction. The wizard now analyzes the COBOL program. During this process the following situations are possible:
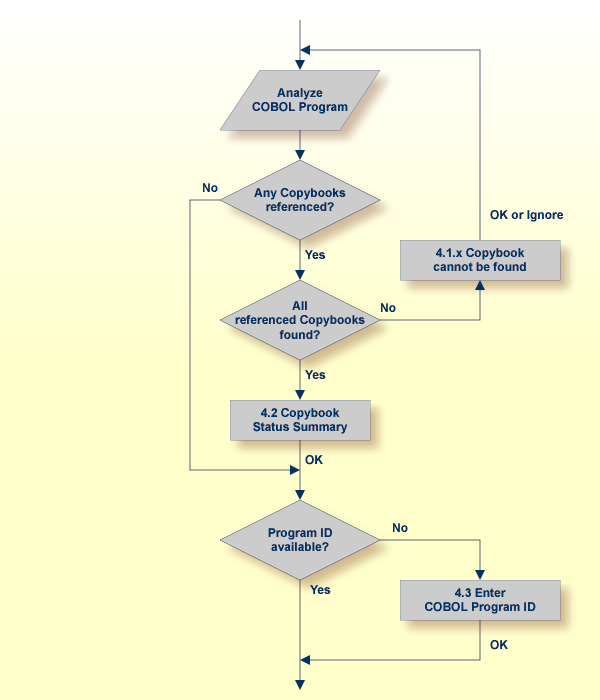
Referenced copybooks cannot be found. In this case the wizard prompts you for every missing copybook. Continue with optional step Step 4.1x: Copybook Cannot be Found - Local Extraction | Remote Extraction (z/OS) | Remote Extraction (BS2000/OSD) in the IDL Extractor for COBOL documentation depending on your situation.
If referenced copybooks are not available, you can choose or , a copybook status summary page is displayed, see Step 4.2: Copybook Status Summary (Optional).
No COBOL program ID can be located if you extract, for example, from a copybook that contains COBOL data items only. In this case, the wizard prompts you to enter the COBOL program ID. Continue with Step 4.3: Enter COBOL Program ID (Optional).
There is no copybook reference in your COBOL source or all referenced copybooks are found. Also the COBOL program ID can be located. In this case continue with Step 5: Select the COBOL Interface and Map to IDL Interface under Scenario I: Create New IDL and Server Mapping Files.
This dialog enables you to browse directories where missing copybooks might be found. If there are any specific copybook file extensions, you can define them here.

The copybook that cannot be found is given in the window, here its name is "ACPYBK21". In the extractor Preferences, the copybook directory that contains the copybook or the copybook file extension is not defined.
Continue with one of the following actions:
To ignore this copybook only
Choose and go back to Step 4: Define the Extraction Settings and Start Extraction.
Choose to start extraction again.
To ignore this and all further copybooks
Choose and go back to Step 4: Define the Extraction Settings and Start Extraction.
Choose to start extraction again.
To complete the extractor environment
Choose or to browse for the copybook directory.
Check the copybook file extensions. Both will be saved in the COBOL extractor preferences and reused in further extractions.
Choose and go back to Step 4: Define the Extraction Settings and Start Extraction.
Choose to start extraction again.
This dialog enables you to browse remote locations (partitioned or CA Librarian data sets) where missing copybooks might be found.
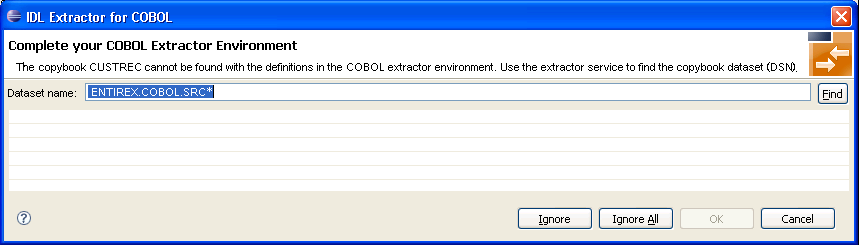
The copybook that cannot be found is given in the window; here its name is "CUSTREC". In the extractor preferences, the copybook data set that contains the copybook is not defined.
Continue with one of the following choices:
To ignore this copybook only
Choose and go back to Step 4: Define the Extraction Settings and Start Extraction.
Choose to start extraction again.
To ignore this and all further copybooks
Choose and go back to Step 4: Define the Extraction Settings and Start Extraction.
Choose to start extraction again.
To complete the extractor environment
Choose to browse for the copybook data set. It will be saved in the COBOL extractor preferences and reused in further extractions.
Choose and go back to Step 4: Define the Extraction Settings and Start Extraction.
Choose to start extraction again.
This dialog enables you to browse remote locations (LMS libraries) where missing copybooks might be found.
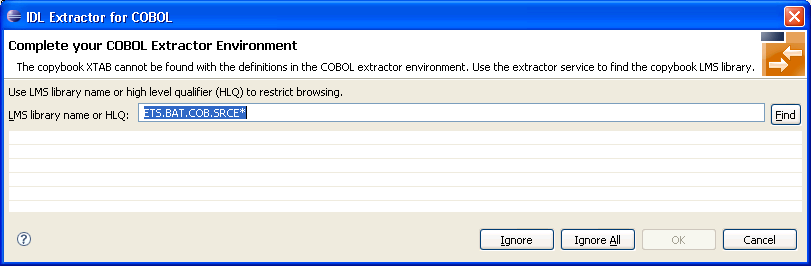
The copybook that cannot be found is given in the window; here its name is "XTAB". In the extractor preferences, the copybook LMS library that contains the copybook is not defined.
Continue with one of the following choices:
To ignore this copybook only
Choose and go back to Step 4: Define the Extraction Settings and Start Extraction.
Choose to start extraction again.
To ignore this and all further copybooks
Choose and go back to Step 4: Define the Extraction Settings and Start Extraction.
Choose to start extraction again.
To complete the extractor environment
Choose to browse for the copybook LMS library. It will be saved in the COBOL extractor preferences and reused in further extractions.
Choose and go back to Step 4: Define the Extraction Settings and Start Extraction.
Choose to start extraction again.
This summary page lists all COBOL copybooks which were not available during extraction.
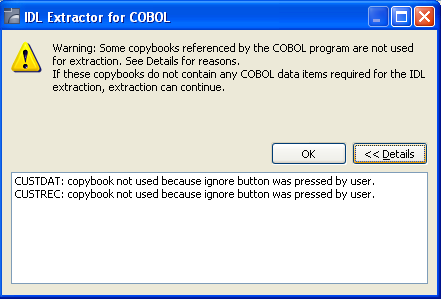
If any relevant COBOL data item describing the server interface is contained in one of the listed copybooks, you cannot continue. Terminate the extraction and try to get the missing copybooks.
If no relevant COBOL data item describing the server interface is contained in the copybooks, you can continue. Choose .
This page is shown whenever the program ID of the COBOL source is missing. Entering a COBOL program name is compulsory.
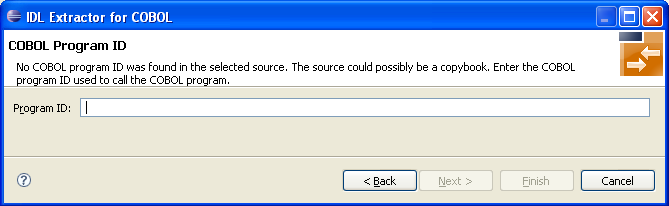
No COBOL program ID can be located if you extract, for example, from a copybook that contains COBOL data items only. The COBOL program ID
is the COBOL program name
is often the name of the executable or load module
can be found in the IDENTIFICATION DIVISION
(abbreviated to"ID" ). Example
ID DIVISION.
PROGRAM-ID.   CUSTINFO.
AUTHOR.       BMF.
DATE-WRITTEN. 26-11-1996
To complete the extraction
Enter the COBOL program ID.
Choose to continue with Step 5: Select the COBOL Interface and Map to IDL Interface.
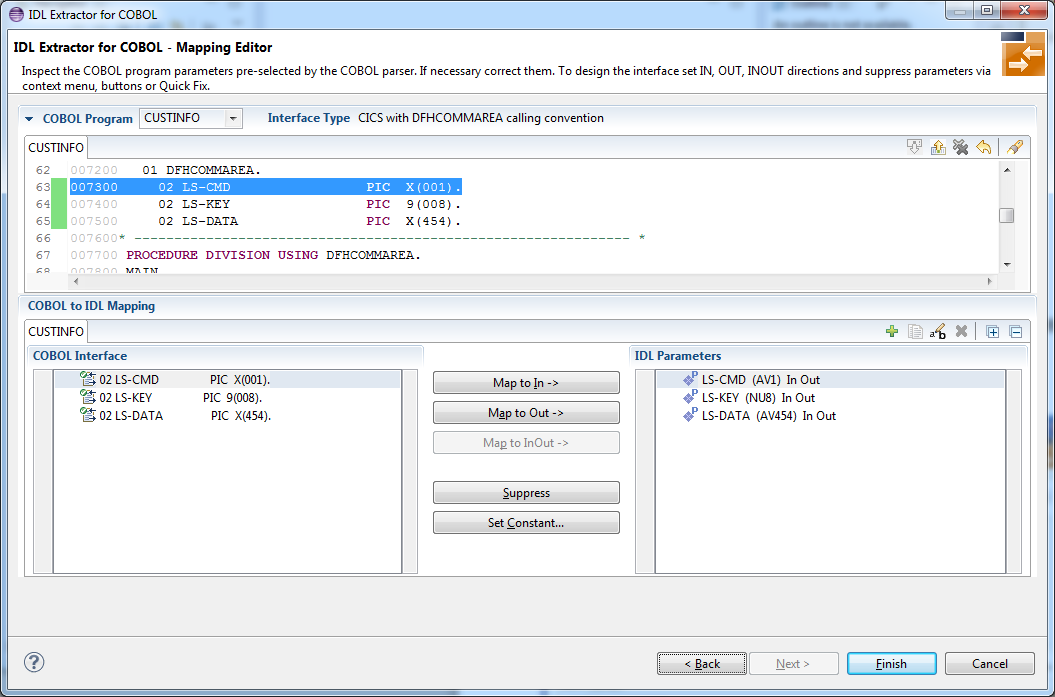
In general, mapping the COBOL data items to IDL with the COBOL Mapping Editor is a two-step process:
First select the COBOL data items describing the COBOL interface from the COBOL source view. In this example the COBOL interface
is preselected as defined in the PROCEDURE DIVISION USING clause.
Then map the COBOL interface to the IDL interface.
See the guidelines on IDL extraction below for further information.
The following table provides guidelines on IDL extraction per interface type. For the CICS interface types DFHCOMMAREA and DFHCOMMAREA Large Buffer, the guidelines distinguish further between COBOL server programs overlaying the input data structure with a different output data structure and COBOL server programs using same structures on input and output. You already selected this in the checkbox Input Message same as Output Message in Step 4: Define the Extraction Settings and Start Extraction.
| Environment | Interface Type | CICS Message on Input and Output | Guidelines |
|---|---|---|---|
| CICS | DFHCOMMAREA (3) | same (1,4) |  More info More info |
| different (2,5) | More info |
||
| Large Buffer | same (1) | More info |
|
| different (2) | More info |
||
| Channel Container | More info |
||
| Batch | Standard Linkage | More info |
|
| IMS | BMP with Standard Linkage | More info |
|
| MPP Message Interface (IMS Connect) | More info |
||
| Micro Focus | Standard Linkage | More info |
|
Notes:
DFHCOMMAREA COBOL server must be DPL-enabled to be directly supported by EntireX.
The distributed program (DPL) link function enables a CICS client program to call another CICS program
(the server program) in a remote CICS region.
Technically, a COBOL server is DPL-enabled if
CICS is able to call the COBOL server remotely
the DFHCOMMAREA layout does not contain pointers
The outcome of the Mapping Editor is the IDL file and a server mapping file (optional). There are server-side mapping files (EntireX Workbench files with extension .svm) and client-side mapping files (extension .cvm). See Server Mapping Files in the EntireX Workbench and How to Set the Type of Server Mapping Files.
When you choose in the Mapping Editor, the IDL file is generated. If required, a server mapping file is generated,too. See When is a Server Mapping File Required? in the EntireX Workbench documentation The server mapping file is either of type client-side (extension .cvm) or server-side (extension .svm). See How to Set the Type of Server Mapping Files. Both files are written with the "File Name" entered for the IDL file in Step 4: Define the Extraction Settings and Start Extraction.
If you are using client-side mapping files, continue with Step 7: Validate the Extraction and Test the IDL File.
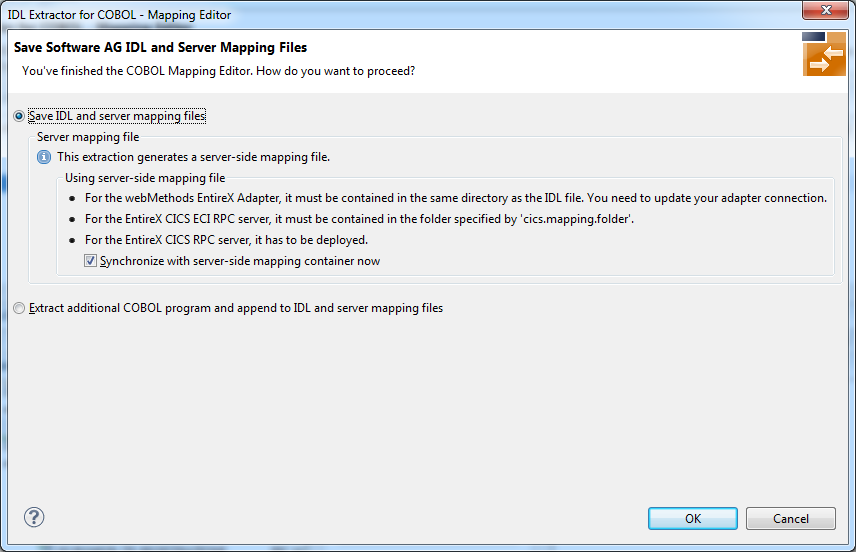
If you are using server-side mapping files, the dialog below is displayed whenever the COBOL Mapping Editor is saved. There are two options to choose from:
Save IDL and server mapping files
will save the generated files into the workspace and quit the COBOL Mapping Editor
The generated server-side mapping file need to be synchronized with the server-side mapping container of the target RPC server, except for IMS Connect and CICS ECI connections with the EntireX Adapter, where they are wrapped into the Integration Server connection - the same as client-side mapping files, see Integration Server Wrapper.
Check the option Synchronize with server-side mapping container now for the following RPC servers:
z/OS (CICS, Batch, IMS) | Micro Focus | BS2000/OSD | z/VSE (CICS, Batch)
Uncheck the option Synchronize with server-side mapping container now for
EntireX Adapter and IMS Connect and CICS ECI connections
the following RPC servers: CICS ECI | IMS Connect
later synchronization of other RPC servers
Extract additional COBOL program and append to the IDL and server mapping files
will save the generated files into the workspace, quit the Mapping Editor and start the IDL Extractor for COBOL again. The
additionally extracted COBOL source will then be added to the previously generated IDL and server mapping files.
To save the generated files into the workspace, quit the
Mapping Editor and deploy the server-side mapping file
Select Save IDL and server mapping files.
Check the option Synchronize with server-side mapping container now and choose . This calls the Deployment Wizard. See Server Mapping Deployment Wizard in the EntireX Workbench documentation.
If you are using the Server Mapping Deployment Wizard for first time with no predefined deployment environment preferences, continue with Step 2a: Create a New Deployment Environment in the Server Mapping Deployment Wizard documentation.
If deployment environments are already defined, you may also continue with Step 3: Select and Existing Deployment Environment and Deploy.
Continue with Step 7: Validate the Extraction and Test the IDL File.
To save the generated files into the workspace and quit the
Mapping Editor without deploying the server-side mapping file
Select Save IDL and server mapping files.
Clear the option Synchronize with server-side mapping container now and choose .
Synchronize the server-side mapping container of the target RPC server later. See Deploying Server-side Mapping Files to the RPC Server in the RPC server documentation for z/OS (CICS, Batch, IMS) | Micro Focus | CICS ECI | IMS Connect | BS2000/OSD | z/VSE (CICS | Batch).
For the webMethods EntireX Adapter and IMS Connect or CICS ECI connections, update your Adapter connection. See Step 3: Select the Connection Type in the Integration Server Wrapper documentation.
Continue with Step 7: Validate the Extraction and Test the IDL File.
To save the generated files into the workspace, quit the
Mapping Editor and start the IDL Extractor for COBOL
again
Select Extract additional COBOL program and append to the IDL and server mapping files and choose . Continue with Step 2: Select a COBOL Extractor Environment or Create a New One.
| Warning: Do not edit the IDL file manually or with the IDL Editor, except for changing parameter names. Otherwise, consistency between the IDL file and the server mapping file will be lost, resulting in unexpected behavior. For this purpose use the COBOL Mapping Editor instead and choose Scenario III: Modify Existing IDL and Server Mapping Files. |
| Warning: A server mapping file extracted this way must not be re-created by the COBOL Wrapper. Server mapping specifications of such a file would not be powerful enough to adequately describe your COBOL server program extracted here. |
The IDL file is used to build RPC clients using an EntireX Workbench wrapper of your choice. See EntireX Wrappers in the EntireX Workbench documentation.
If you are using client-side mapping files:
You need to rebuild all RPC clients communicating with this RPC server program and re-generate the client interface objects.
For connections with the webMethods EntireX Adapter you need to update your Adapter connection, see Step 3: Select the Connection Type in the Integration Server Wrapper documentation.
For a quick validation of your extraction, you can
use the IDL Tester to validate the extraction, see EntireX IDL Tester in the EntireX Workbench documentation.
generate an XML mapping file (XMM) and use the XML Tester for verification. See EntireX XML Tester in the XML/SOAP Wrapper documentation.