Create New Local Extractor Environment (z/OS, z/VSE, BS2000/OSD and IBM i)
Create New Local Extractor Environment for Micro Focus (UNIX and Windows)
The IDL Extractor for COBOL preferences are used to manage COBOL extractor environments. A COBOL extractor environment provides defaults for the extraction and refers to COBOL programs and copybooks
stored locally on the same machine where the EntireX Workbench is running, a so-called local COBOL extractor environment, or
stored remotely on a host computer, a so-called remote COBOL extractor environment. The Extractor Service is required to access COBOL programs and copybooks remotely with a remote COBOL extractor environment. The Extractor Service is supported on operating systems z/OS and BS2000/OSD. See Extractor Service in the z/OS Batch | IMS | BS2000/OSD Batch RPC Server documentation.
COBOL extractor environments are offered in the IDL Extractor for COBOL wizard to reference the COBOL programs and copybooks and retrieve defaults for the IDL extraction. To create, edit, duplicate and remove COBOL extractor environments, open the Preferences page and use the buttons on the right.
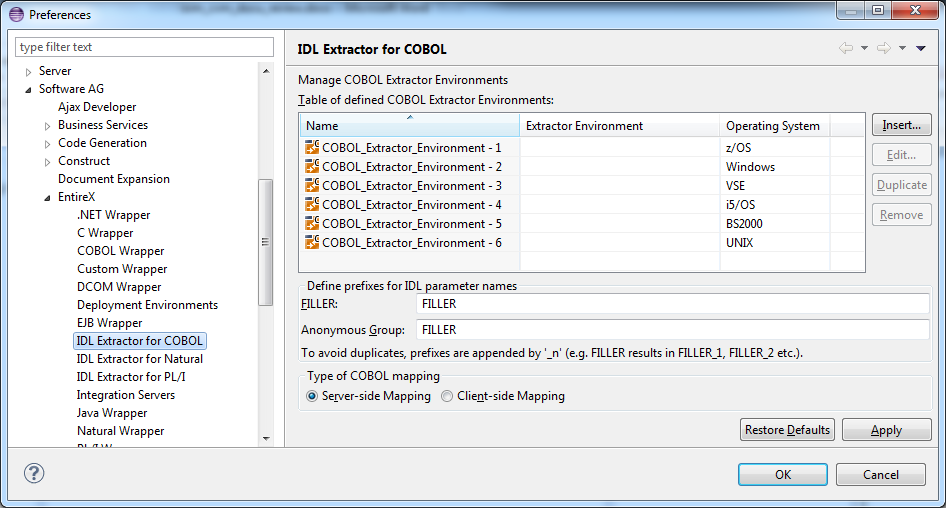
The Preferences page contains further settings valid for all COBOL extractor environments:
Define prefixes for IDL parameter names
The defined prefixes are used for FILLER Pseudo-Parameter.
Type of COBOL mapping
Every EntireX Workbench (Eclipse) workspace is either in client-side mapping mode (generating EntireX Workbench server mapping
files with extension .cvm) or server-side mapping mode (generating EntireX Workbench server mapping files with extension .svm).
See Server Mapping Files for COBOL for an introduction.
You can adjust the mode here, which will also set the mode of the COBOL Wrapper to the same value.
See Generation Settings - Preferences in the COBOL Wrapper documentation.
Server mapping files are generated automatically for RPC servers if required. See When is a Server Mapping File Required? - IDL Extractor for COBOL in the EntireX Workbench documentation.
This section describes the four steps for creating a new local COBOL extractor environment to extract z/OS, z/VSE, BS2000/OSD or IBM i COBOL programs.
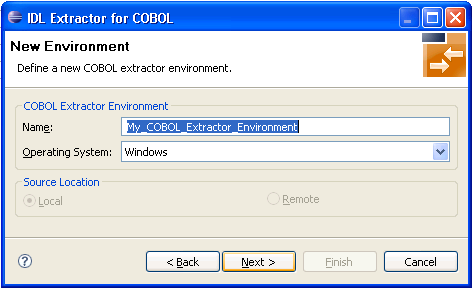
On the New Environment page you can specify Name and Operating system.

 To define the new environment settings
Enter a unique Name for the COBOL extractor environment.
Select the Operating system.
Select "Local" for Source Location.
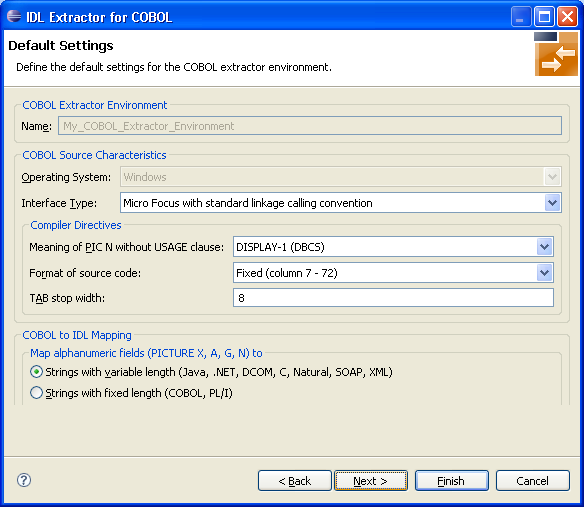
The Default Settings page provides defaults for Step 4: Define the Extraction Settings and Start Extraction in Using the IDL Extractor for COBOL - Overview. You can set defaults for interface type and COBOL to IDL mapping.
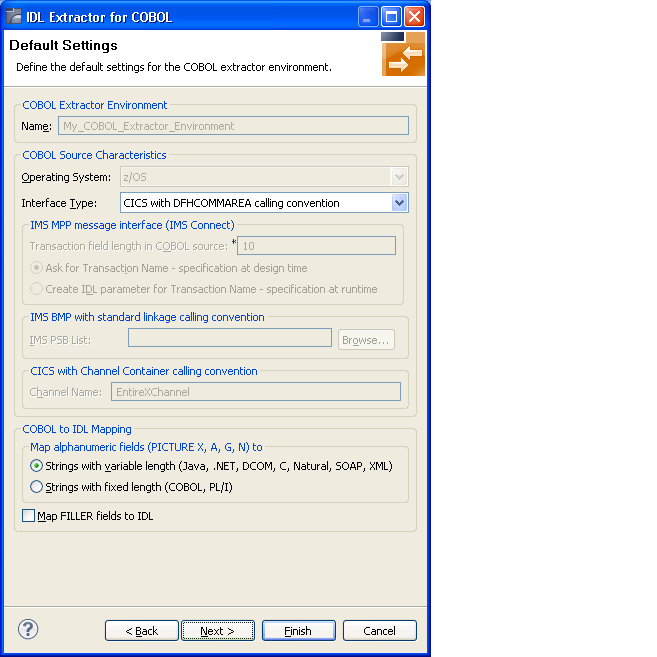
To define the default extraction settings
Select the default Interface Type. See Supported COBOL Interface Types.
Depending on the interface type, additional information can be set. For interface type
CICS with Channel Container Calling Convention, you can set the channel name.
IMS MPP Message Interface (IMS Connect), you can set defaults for the transaction name. Possible options are a constant transaction name defined during extraction process or an IDL parameter to be specified at runtime.
IMS BMP with Standard Linkage Calling Convention, you can set the default for IMS PSB List.
For more information refer to Step 4: Define the Extraction Settings and Start Extraction.
Specify a default value for COBOL to IDL Mapping. See COBOL to IDL Mapping.
Press and continue with Step 3: Define the Local Extractor Environment below.
On the Local Extractor Environment page you can provide a default directory name for the COBOL programs:
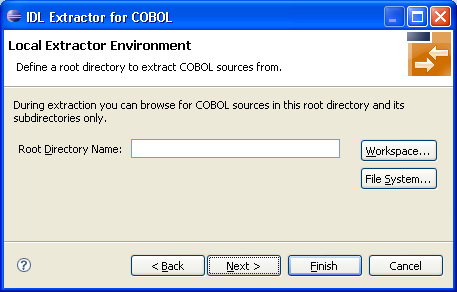
Choose Workspace... or File System... to browse for a folder.
Choose and continue with Step 4: Define the Local Copybook Locations below.
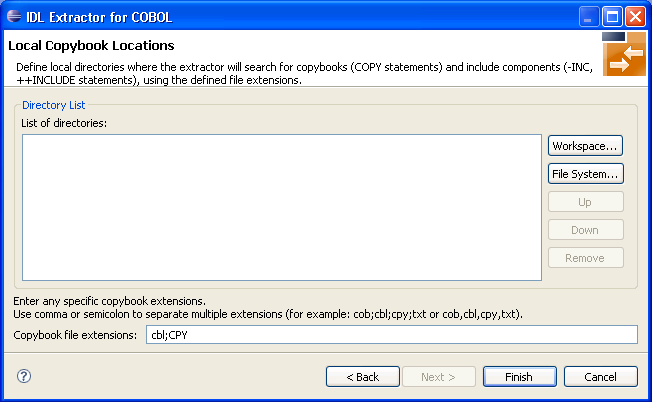
On the Local Copybook Location page you can add
directories that will be used to resolve copybooks. Copybooks and members
referenced with COPY statements, CA Librarian -INC statements and
CA Panvalet ++INCLUDE statements will be searched for in the
defined local directories:

The file extensions for copybooks can also be entered. If no extensions are specified, the IDL Extractor for COBOL wizard will try to locate copybooks without any file extensions.
Press Workspace... or File System... to browse for a folder.
Press .
This section describes the four steps for creating a new local COBOL extractor environment to extract Micro Focus COBOL programs.
On the New Environment page you can specify the Name and Operating system. Only UNIX and Windows operating systems can be used for Micro Focus COBOL.
To define the default extraction settings
Enter a unique name for the COBOL extractor environment.
Select the Operating system "UNIX" or "Windows".
Select "Local" for Source location.
The Default Settings page provides defaults for Step 4: Define the Extraction Settings and Start Extraction in Using the IDL Extractor for COBOL - Overview.
You can set defaults for Interface type, Compiler directives and COBOL to IDL Mapping.
To define the default extraction settings
Refer to Step 2: Define the Default Settings for a local extractor environment for field descriptions. Select the default Interface type. See Supported COBOL Interface Types.
Select a value for Meaning of PIC N without USAGE clause. Select "NATIONAL" for IDL mapping to data type U, or "DISPLAY-1" (DBCS) for data type K. "DISPLAY-1" (DBCS) is the default, which is the same as Micro Focus compilers. See also COBOL to IDL Mapping.
Select the source code format. Use "Fixed" (default) or "Variable" to change the interpreted source code columns. Refer to your Micro Focus documentation for further information.
Enter the TAB stop width. Typical values are 4 or 8 (default).
Specify the default COBOL to IDL Mapping. See COBOL to IDL Mapping.
Choose and continue with the Step 3: Define the Local Extractor Environment below.
Refer to Step 2: Define the Default Settings for a local extractor environment for field descriptions.
On the Local Extractor Environment page you can provide a default directory name for the COBOL programs:
Choose Workspace... or File System... to browse for a folder.
Choose and continue with Step 4: Define the Local Copybook Locations below.
On the Local Copybook Location page you can add
directories that will be used to resolve copybooks. Copybooks and members
referenced with COPY statements, CA Librarian -INC statements and
CA Panvalet ++INCLUDE statements will be searched for in the
defined local directories:
The file extensions for copybooks can also be entered. If no extensions are specified, the IDL Extractor for COBOL wizard will try to locate copybooks without any file extensions.
Choose Workspace... or File System... to browse for a folder.
Choose .
This section describes the four steps for creating a new remote COBOL extractor environment to extract remotely z/OS COBOL programs stored in partitioned data sets or CA Librarian data sets.
On the New Environment page you can specify Name, Operating system and the Remote Source Location.
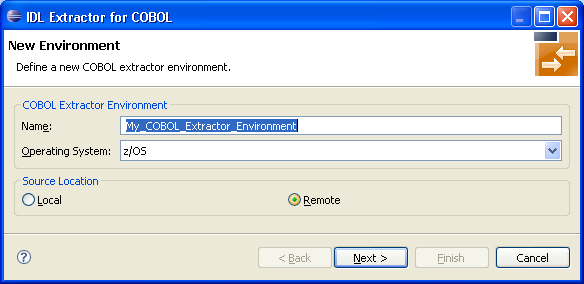
To define the new environment settings
Enter a unique name for the COBOL extractor environment.
Select the Operating system.
Select "Remote" for Source location.
The Default Settings page provides defaults for Step 4: Define the Extraction Settings and Start Extraction in Using the IDL Extractor for COBOL - Overview.
You can set defaults for Interface Type and COBOL to IDL Mapping.
To define the default extraction settings
See Step 2: Define the Default Settings in section Create New Local Extractor Environment (z/OS, z/VSE, BS2000/OSD and IBM i).
Press and continue with Step 3: Define the Remote Extractor Environment below.
The connection to the Extractor Service to browse for COBOL programs is defined on the Remote Extractor Environment page. See Extractor Service.
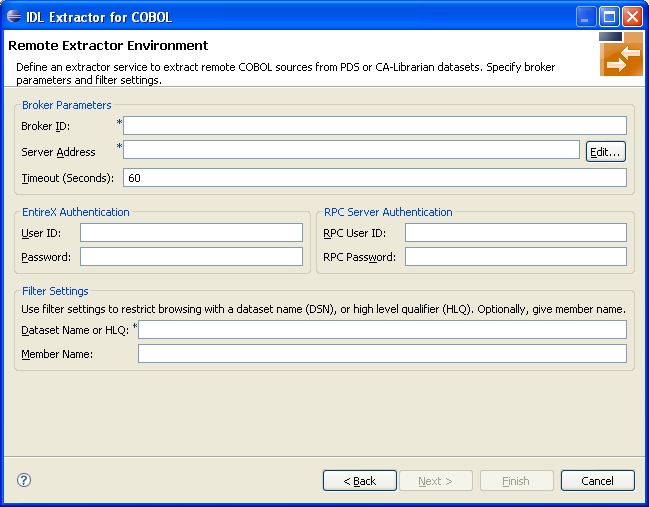
To define the remote extractor environment
Under Broker Parameters, enter the required fields Broker ID and Server Address, which will have the default format brokerID@serverAddress. The last part (broker service) of the server address must always be "EXTRACTOR". The timeout value must be in the range 1-9999 seconds (default is 60).
The EntireX Authentication parameters describe the settings for the broker. See Authentication of User.
The RPC Server Authentication parameters describe the settings for the RPC server. See Administering the Batch RPC Server | Administering the EntireX RPC Server under z/OS IMS.
A high-level qualifier is required in the Data Set Name or HLQ field. The extractor service will then offer only data sets with this high-level qualifier.
In the Member Name field you can provide a prefix for the partitioned data set or CA Librarian members. The extractor service will then offer only members beginning with this prefix.
Press and continue with Step 4: Define the Remote Copybook Locations below.
On the Remote Copybook Location page you can add
PDS or CA Librarian data sets that will be used to resolve copybooks. Copybooks
and members referenced with COPY statements and CA Librarian -INC
statements will be searched for in the defined remote data sets:
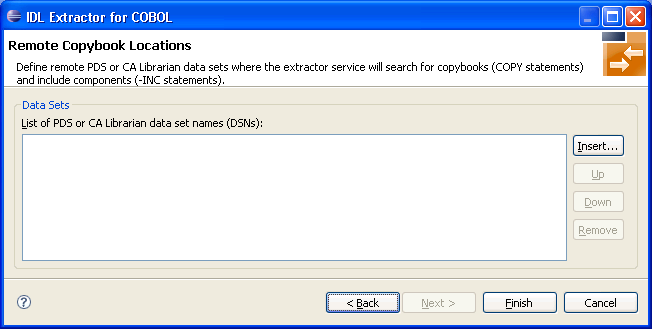
Press Insert... to add a new data set entry in the table. Use , and to manage the data set list.
Press .
This section describes the four steps for creating a new remote COBOL extractor environment to extract remotely BS2000/OSD COBOL programs stored in LMS libraries.
On the New Environment page you can specify Name, Operating system and the Remote Source Location.
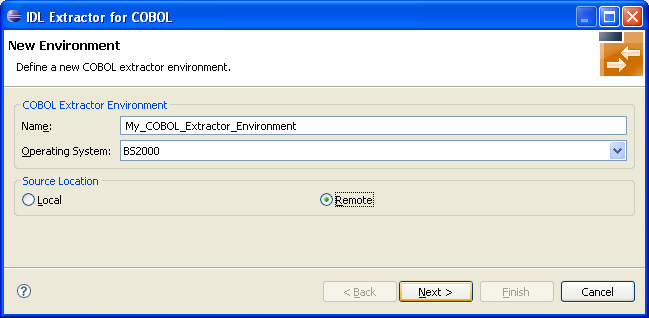
To define the new environment settings
Enter a unique name for the COBOL extractor environment.
Select the Operating system.
Select "Remote" for Source location.
The Default Settings page provides defaults for Step 4: Define the Extraction Settings and Start Extraction in Using the IDL Extractor for COBOL - Overview.
You can set defaults for Interface Type and COBOL to IDL Mapping.
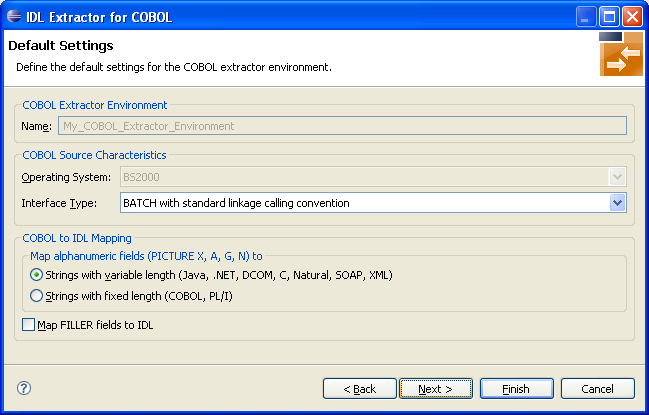
To define the default extraction settings
Select the default Interface Type. See Supported COBOL Interface Types.
Specify the default COBOL to IDL Mapping. See COBOL to IDL Mapping.
Press and continue with Step 3: Define the Remote Extractor Environment below.
The connection to the Extractor Service to browse for COBOL programs is defined on the Remote Extractor Environment page. See Extractor Service in the BS2000/OSD Batch RPC Server documentation.
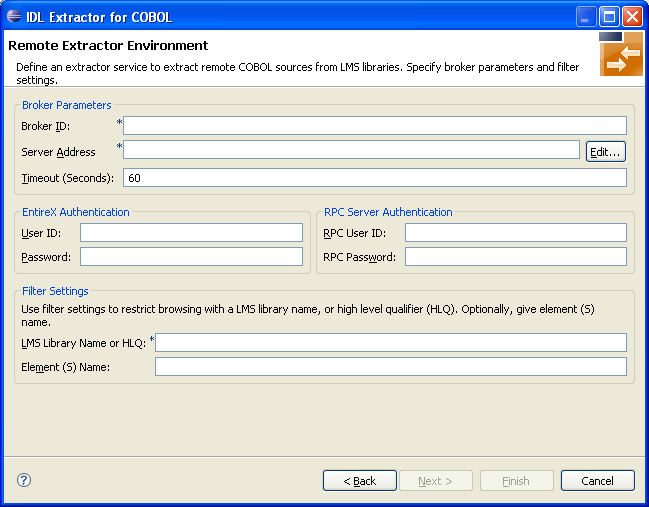
To define the remote extractor environment
Under Broker Parameters, enter the required fields Broker ID and Server Address, which will have the default format brokerID@serverAddress. The last part (broker service) of the server address must always be "EXTRACTOR". The Timeout value must be in the range 1-9999 seconds (default is 60).
The EntireX Authentication parameters describe the settings for the broker. See Authentication of User.
The RPC Server Authentication parameters describe the settings for the RPC server. See Configuring the RPC Server.
A high-level qualifier can be entered in the LMS Library Name or HLQ field. The extractor service will then offer only LMS libraries with this high-level qualifier. You can use wildcard notation with asterisk to specify a range of values.
In the Element Name field you can provide a prefix for LMS library source elements. The extractor service will then offer only COBOL programs beginning with this prefix.
Press and continue with Step 4: Define the Remote Copybook Locations below.
On the Remote Copybook Location page you can add
directories that will be used to resolve copybooks. Copybooks referenced with
COPY statements will be searched for in the defined remote LMS
libraries:
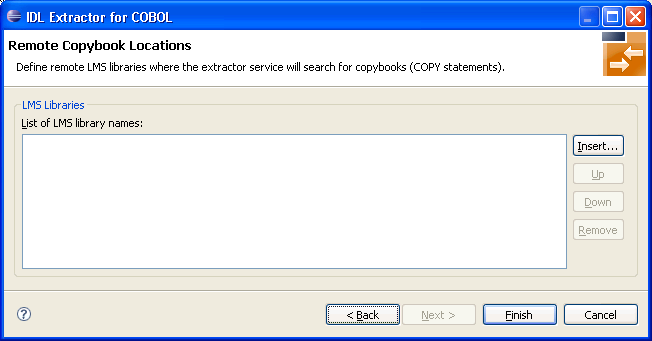
Press Insert... to add a new data set entry in the table. Use , and to manage the list of LMS libraries.
Press .