
This document covers the following topics:
This feature allows you to define a schedule for the job master. You can define the time frame for the schedule, insert a message, assign account information and edit the schedule dependency information.
![]() To define scheduling parameters for a job
To define scheduling parameters for a job
In the object workspace, open a Job Master instance.
In the Job Maintenance window, select the tabbed page :
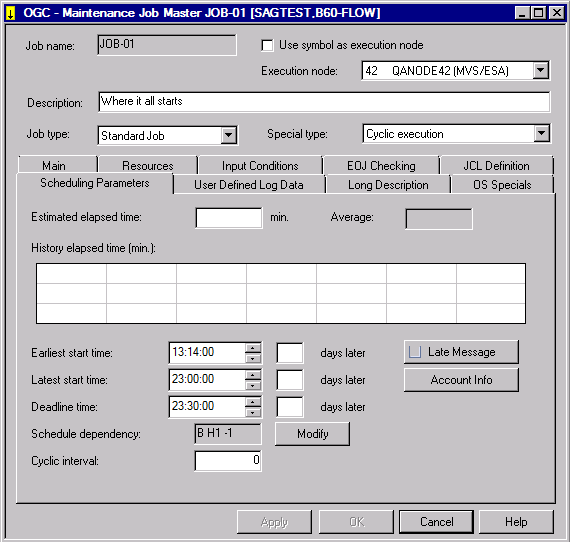
Make your definitions. The fields contained in the window are explained in Fields: Scheduling Parameters.
Choose .
This section covers the following topics:
The fields of the tabbed page Scheduling Parameters are described in the following table.
| Field | Description |
|---|---|
| Estimated Elapsed Time | The expected total running time (in minutes) for the job.
Special value: For jobs of the type Subnetwork, 999999 can be specified. In this case, all start times after that are set to the ending times in the subnetwork. |
| Average | Average running time computed from five previous runs (see the field History Elapsed Time (min.)). |
| History Elapsed Time (min.) | Shows real running times of previous runs of the job. The average running time of all previous runs is used to compute the probable time the job will finish. |
| Earliest Start Time | The job will not be started before this time.
Use days later if the Earliest Start Time is more than one day later than the network start time. See also Behavior for Schedule Times. |
| Latest Start Time | The job will not be started after this time.
If this time precedes the Earliest Start Time
and days later is null, days later is
set to See also Behavior for Schedule Times. |
| Deadline Time | Time by which the job must be finished
If the job cannot be finished before this time, it is not submitted. Dummy jobs with Estimated Elapsed Time not
equal to zero ( See also Behavior for Schedule Times. |
| days later | You can use this field for Earliest Start
Time, Latest Start Time and Deadline
Time to define a time span lasting longer than 24 hours.
See also Behavior for Schedule Times. |
| Schedule Dependency | A code shown in
this read-only field indicates that this job has a schedule
dependency.
The field is empty if no schedule dependency is defined for the job. You can choose Modify to open a window where you can view, add or modify a schedule dependency. |
| Cyclic Interval | This field is only available for cyclic jobs.
Wait time (in minutes) between two executions of a cyclic job (special type Cyclic execution). Default: Monitor wait time |
| Late Message | See Sending a Late Message to One or More Users. |
| Account Info | See Viewing Job Account Data. |
You can define whether job activation or input condition usage is valid (and checked) only on particular days of the week, month or year.
The date and time defined for job execution on the Scheduling Parameters page is then checked against the current schedule of the current network. For jobs in a subnetwork, we recommend you to specify that the topmost calling network is checked instead of the current network by using Check schedule of the topmost calling network option.
Note:
The job execution date and time can be different (one or more days
later) from the job activation date and time.
![]() To define schedule dependencies at the job level
To define schedule dependencies at the job level
On the tabbed page Scheduling Parameters of the Maintenance Job Master window, choose Modify next to Schedule dependency.
A Schedule Dependency Definition window similar to the example below opens:
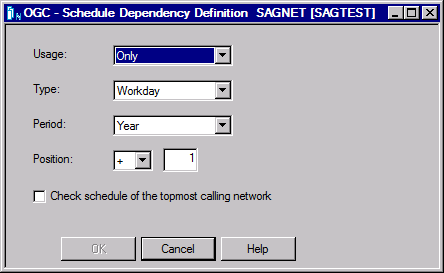
The input fields and options in the window are described in Fields: Schedule Dependency Definition.
This section covers the following topics:
The input fields of the Schedule Dependency Definition window provided for a job and/or input condition and the schedule dependency of a network are described in the following table:
The following are example combinations for day calculation:
| Type | Period | Position | Calculated Day |
|---|---|---|---|
| Calendar day | Week | +2 |
Tuesday |
-1 |
Sunday | ||
| Month | +1 |
01 | |
-1 |
28 ... 31 | ||
| Year | +1 |
January 01 | |
-3 |
December 29 | ||
| Workday | Month | -1 |
Last workday of the month |
| Is holiday | n/a | +1 |
Day after a holiday |
![]() To delete a schedule dependency entry for a job
To delete a schedule dependency entry for a job
On the tabbed page , choose next to the entry in the Schedule dependency field.
The Schedule Dependency Definition window opens.
Clear the Usage field by selecting a blank option from the drop-down list box.
All entries are removed from the window.
Choose .
The Schedule Dependency Definition window closes and the Schedule dependency entry is removed from the Scheduling Parameters page.
You can define an input condition that is not used on all activation dates of a job network. This can be done for the following reasons:
A predecessor job or network does not run on all schedule dates of the successor job or network.
Some predecessor jobs are also schedule-dependent.
![]() To define schedule dependencies for an input condition
To define schedule dependencies for an input condition
From the table on the tabbed page Input Conditions, select an input condition and choose .
A Schedule Dependency Definition window opens.
The fields contained in the window correspond to the fields of the Schedule Dependency Definition for Job window. They are explained in Maintaining Schedule Dependencies for a Job.
Make your definitions.
Choose .
The schedule dependency is allocated to the input condition and the window closes.
The schedule dependency is now indicated in the Sched.Dep. column.
You can define recipients (users) to be informed in the case that the job could not be executed in the defined time range.
![]() To add a late message definition
To add a late message definition
A Maintenance Message and Message Recipients window similar to the example below opens:
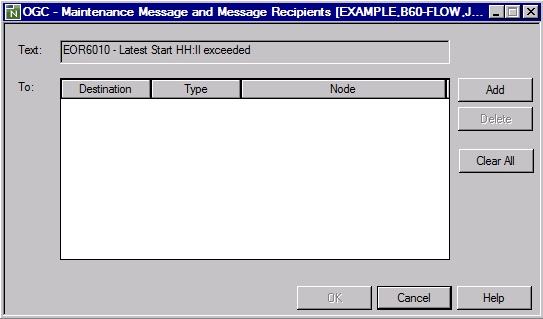
Choose Add to enter new destinations for the message in the table columns.
The columns in the window are explained in Field and Columns: Message and Message Recipients in the section End-of-Job Checking and Actions.
Choose .
You can view the start and end times, elapsed time and CPU time for previous runs of a job. The information is taken from the Entire Operations log file.
You can also generate reports from accounting data (see Example of Accounting Data as described in the section Reporting.
![]() To view accounting data
To view accounting data
An Accounting Data List Info window similar to the following example opens.
Enter dates, times and run numbers to specify the period and number range for which you want to view accounting data: see Fields: Range Specification for Accounting Data.
Select .
The Accounting Data List Info window is refreshed and the accounting information is listed as shown below:

The window contains job execution time information collected by the Entire Operations Monitor. The job elapsed time is in minutes and the CPU time is in seconds. Average values are available at the bottom of the window.
For further information, see Fields and Columns: Reporting in the section Reporting.
Choose .
This section covers the following topics:
The fields of the Accounting Data List Info window are described in the following table:
| Field | Description |
|---|---|
| From
Date/Time
To Date/Time |
Enter or select start
(From) and end (To) dates and times
to specify the time frame for which to display accounting data.
Default is the current date, from midnight until the current time. |
| From Run/To Run | Enter or select start
(From) and end (To) run numbers to
specify the number range for which to display accounting data.
Default is from 1 to 99999. |
| Averages from ... to ... are | Read-only field at the bottom of the window listing average consumption values which correspond to the values in the field History Elapsed Time (min.). |
- BS2000
Since the BS2000 LOGOFF message does not contain seconds, the elapsed time cannot be calculated exactly.
- UNIX
CPU time information is written to the SYSOUT of UNIX jobs. For this purpose, the shell
timescommand is used. The output is enclosed in the messages EOR0303 and EOR0304.Example:
%% EOR0303 - times - Begin
0m0.121s 0m0.025s
0m0.043s 0m0.066s
%% EOR0304 - times - End
Notes:
With Entire System Server for UNIX Version 2.1.2 PL 4 and above, this output is used to determine the CPU time consumption of UNIX jobs. The CPU time is included in the Entire Operations accounting data.
For Sun Solaris:
The
timescommand output is useful only if the script frame (*.BF) is executed under the Korn shell. Therefore, the *.BF scripts on Sun Solaris are started under the Korn shell.