This document covers the following topics:
Natural for Ajax Tools, which is an optional plug-in for Natural Studio, allows you to use some of the Natural for Ajax functionality which is described in this document directly from within Natural Studio. For further information, see Natural for Ajax Tools in the Natural Studio Extensions documentation which is provided for Natural for Windows.
After having generated the adapter, the next step is making it available to your Natural development project.
As described previously, the adapter code is generated into a directory in your application server environment. The way you access the adapter depends on the Natural development tool you use.
The following topics are covered below:
It is assumed that your development library is located on a Natural development server and that you have mapped this development server in Natural Studio.
![]() To import the adapter from a remote environment
To import the adapter from a remote environment
Use drag-and-drop.
Or:
Remote UNIX environment only: Use the
import function of SYSMAIN.
It is assumed that you have
installed Natural for Eclipse,
installed Application Designer's Eclipse plug-in,
created a Natural project in Eclipse,
established a target for the Natural project (a Natural development server).
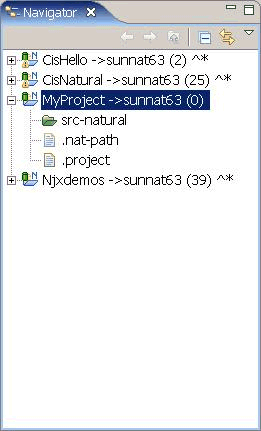
The Navigator view will then look similar to the following:

![]() To import the adapter from a remote environment
To import the adapter from a remote environment
Proceed as described below to create the Page Layouts folder in your Natural project. This is the folder where you edit your page layouts with Application Designer.
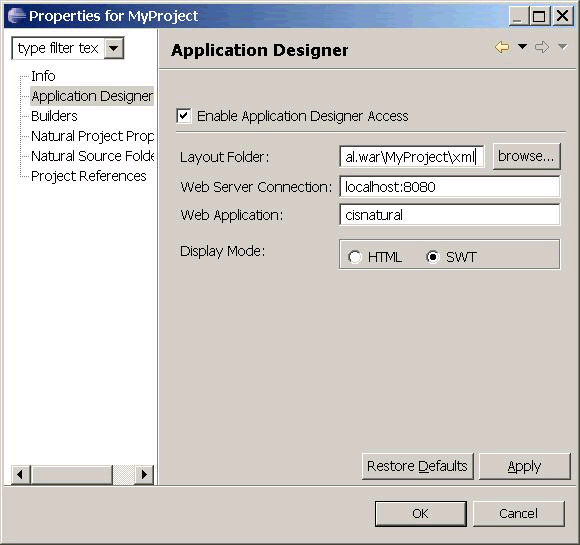
Invoke the Properties dialog for your Natural project.
Set the Application Designer properties as follows:
| Option | Description |
|---|---|
| Layout Folder | Specify the application server directory in which the page layouts of your project are stored. |
| Web Server Connection | Specify host name and port number of your application server. |
| Web Application | Specify "cisnatural". |

Proceed as described below to create an additional folder in your Natural project. This is the folder in which the generated adapters are located.
Select your Natural project, invoke the context menu and choose .
Expand the resulting dialog by choosing the button.
Specify a folder name of your choice (for example, "Adapters").
Enable the Link to folder in the file system check box and specify the application server directory in which the generated adapters of your project are stored.
Now you have access to your page layouts and adapters in your Natural project.
Copy or move the generated adapter from the new folder you have just created into your Natural source folder.
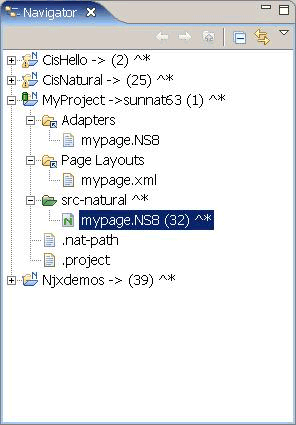
The Navigator view should now look similar to the following (with the new folders for the page layouts and adapters, and with your adapter in the Natural source folder).

Catalog or stow the adapter in the Natural source folder. To do so, you have to upload and compile the adapter with Natural for Eclipse.
After you have imported the adapter, you create a program that calls the adapter to display the page and handles the events that the user raises on the page. This program can be a Natural program, subprogram, subroutine or function. We use a Natural program as example.
The adapter already contains the data structure that is required to fill the page. It contains also a skeleton with the necessary event handlers. You can therefore create a program with event handlers from an adapter in a few steps.
Open or list the adapter in the development tool of your choice (Natural Studio or Natural for Eclipse).
* PAGE1: PROTOTYPE       --- CREATED BY Application Designer ---
* PROCESS PAGE USING 'XXXXXXXX' WITH
* FIELD1 FIELD2
DEFINE DATA PARAMETER
1 FIELD1 (U) DYNAMIC
1 FIELD2 (U) DYNAMIC
END-DEFINE
*
PROCESS PAGE U'/MyProject/mypage' WITH
PARAMETERS
 NAME U'field1'
  VALUE FIELD1
 NAME U'field2'
  VALUE FIELD2
END-PARAMETERS
*
*  TODO: Copy to your calling program and implement.
/*/*( DEFINE EVENT HANDLER
* DECIDE ON FIRST *PAGE-EVENT
*  VALUE U'nat:page.end'
*   /* Page closed.
*   IGNORE
*  VALUE U'onExit'
*   /* TODO: Implement event code.
*   PROCESS PAGE UPDATE FULL
*  NONE VALUE
*   /* Unhandled events.
*   PROCESS PAGE UPDATE
* END-DECIDE
/*/*) END-HANDLER
*
END
Create a new program, copy the adapter source into the program and then proceed as follows:
Remove the comment lines in the header.
Change DEFINE DATA PARAMETER into DEFINE DATA
LOCAL.
Replace the PROCESS PAGE statement with a
PROCESS PAGE
USING operand4 statement, where
operand4 stands for the name of your adapter.
Remove the comment lines that surround the DECIDE block.
Uncomment the DECIDE block.
Your program should now look as follows:
DEFINE DATA LOCAL 1 FIELD1 (U) DYNAMIC 1 FIELD2 (U) DYNAMIC END-DEFINE * PROCESS PAGE USING 'MYPAGE' * DECIDE ON FIRST *PAGE-EVENT VALUE U'nat:page.end' /* Page closed. IGNORE VALUE U'onExit' /* TODO: Implement event code. PROCESS PAGE UPDATE FULL NONE VALUE /* Unhandled events. PROCESS PAGE UPDATE END-DECIDE * END
Stow the program with a name of your choice. The resulting program can be executed in a browser where it displays the page. However, it does not yet do anything useful, because it handles the incoming events only in a default way and contains no real application logic.
The main program that displays the page and handles its events has the following general structure:
A PROCESS PAGE USING statement with the page adapter.
The PROCESS PAGE statement displays the page in the user's web
browser and fills it with data. Then, it waits for the user to modify the data
and to raise an event.
A DECIDE block with a VALUE clause for each
event that shall be explictly handled.
A default event handler for all events that shall not be explicitly handled.
Each event handler does the following:
It processes the data the has been returned from the page in the user's web browser.
It performs a PROCESS PAGE UPDATE FULL statement to
re-execute the previous PROCESS PAGE USING statement with the
modified data and to wait for the next event.
The default event handler does not modify the data. It does the following:
It performs a PROCESS PAGE UPDATE statement to
re-execute the previous PROCESS PAGE USING statement and to wait
for the next event.
When the PROCESS PAGE statement receives an event, the
data structure that was passed to the adapter is filled with the modified data
from the page and the system variable
*PAGE-EVENT
is filled with the name of the event. Now, the corresponding VALUE
clause in the DECIDE statement is met and the code in the clause
is executed.
The application handles the event by processing and modifying the data
and resending it to the page with a PROCESS PAGE UPDATE FULL
statement. Alternatively, it uses the PROCESS PAGE UPDATE
statement without the FULL clause in order to resend the original
(not modified) data.
There are built-in events and user-defined events.
The following built-in events can be received from the page:
This event is raised when the user closes the page with the Close button in the upper right corner of the page, opens another page or closes the web browser.
This event is sent if the Natural for Ajax client needs to
synchronize the data displayed on the page with the data held in the
application. It is usually handled in the default event handler and just
responded with a PROCESS PAGE UPDATE.
Other built-in events can be sent by specific controls. These events are described in the control reference.
User-defined events are those events that the user has assigned to controls while designing the page layout with the Layout Painter. The names of these events are freely chosen by the user. The meaning of the events is described in the control reference.
The PROCESS PAGE UPDATE statement can be accompanied by a
SEND EVENT clause. With the SEND EVENT clause, the
application can trigger certain events on the page when resending the modified
data.
The following events can be sent to the page:
This event is sent to display a text in the status bar of the page. It has the following parameters:
| Name | Format | Value |
|---|---|---|
type |
A or U | Sets the icon in the status bar ("S"=success icon, "W"=warning icon, "E"=error icon). |
short |
A or U | Short text. |
long |
A or U | Long text. |
This event is sent to pass values to a FIELD control with value help on request (see also the description of the FIELD control in the control reference). It has the following parameters:
| Name | Format | Value |
|---|---|---|
id |
A or U | A list of unique text identifiers displayed in the FIELD control with value help. The list must be separated by semicolon characters. |
text |
A or U | A list of texts displayed in the FIELD control with value help. The list must be separated by semicolon characters. |
This event is sent to switch several properties of controls on the page in one call to a predefined state. The state must be defined in an XML file that is expected at a specific place. See the information on XML property binding in the Application Designer documentation for further information.
| Name | Format | Value |
|---|---|---|
data |
A or U | Name of the property file to be used. |
A rich GUI page can be displayed as a modal pop-up in a separate
browser window. A modal pop-up window can open another modal pop-up window,
thus building a window hierarchy. If a PROCESS PAGE statement and
its corresponding event handlers are enclosed within a PROCESS PAGE
MODAL block, the corresponding page is opened as a modal pop-up
window.
The application can check the current modal pop-up window level with
the system variable *PAGE-LEVEL.
*PAGE-LEVEL = 0 indicates that the application code is currently
dealing with the main browser window. *PAGE-LEVEL > 0 indicates
that the application code is dealing with a modal pop-up window and indicates
the number of currently stacked pop-up windows.
In order to modularize the application code, it makes sense to place
the code for the handling of a modal pop-up window and the enclosing
PROCESS PAGE MODAL block in a separate Natural module, for
instance, a subprogram. Then the pop-up window can be opened with a
CALLNAT statement and
can thus be reused in several places in the application.
Example program MYPAGE-P:
DEFINE DATA LOCAL
1 FIELD1 (U) DYNAMIC
1 FIELD2 (U) DYNAMIC
END-DEFINE
*
PROCESS PAGE USING 'MYPAGE-A'
*
DECIDE ON FIRST *PAGE-EVENT
 VALUE U'nat:page.end'
  /* Page closed.
  IGNORE
 VALUE U'onPopup'
  /* Open a pop-up window with the same fields.
  CALLNAT 'MYPOP-N' FIELD1 FIELD2
  PROCESS PAGE UPDATE FULL
 NONE VALUE
  /* Unhandled events.
  PROCESS PAGE UPDATE
END-DECIDE
*
END
Example subprogram MYPOP-N:
DEFINE DATA PARAMETER
1 FIELD1 (U) DYNAMIC
1 FIELD2 (U) DYNAMIC
END-DEFINE
*
/* The following page will be opened as pop-up.
PROCESS PAGE MODAL
*
 PROCESS PAGE USING 'MYPOP-A'
*
 DECIDE ON FIRST *PAGE-EVENT
  VALUE U'nat:page.end'
   /* Page closed.
   IGNORE
  NONE VALUE
   /* Unhandled events.
   PROCESS PAGE UPDATE
 END-DECIDE
*
END-PROCESS
*
END
Rich internet applications written with Natural for Ajax need not only consist of rich GUI pages, but may also use classical maps. This is especially useful when an application that was originally written with maps shall only be partly changed to provide a rich GUI. In this case the application can run under Natural for Ajax from the very beginning and can then be "GUIfied" step by step.
Due to the similar structure of programs that use maps and programs that use adapters, it is easy for an application to leave a page and open a map, and vice versa. For each rich GUI page, you write a program that displays the page and handles its events. For each map, you write a program that displays the map and handles its events. In an event handler of the page, you call the program that handles the map. In an "event handler" of the map, you call the program that handles the page.
Example for program MYPAGE-P:
DEFINE DATA LOCAL
1 FIELD1 (U20)
1 FIELD2 (U20)
END-DEFINE
*
PROCESS PAGE USING 'MYPAGE'
*
DECIDE ON FIRST *PAGE-EVENT
 VALUE U'nat:page.end'
  /* Page closed.
  IGNORE
 VALUE U'onDisplayMap'
  /* Display a Map.
  FETCH 'MYMAP-P'
 NONE VALUE
  /* Unhandled events.
  PROCESS PAGE UPDATE
END-DECIDE
*
END
Example for program MYMAP-P:
DEFINE DATA LOCAL
1 FIELD1 (U20)
1 FIELD2 (U20)
END-DEFINE
*
SET KEY ALL
INPUT USING MAP 'MYMAP'
*
DECIDE ON FIRST *PF-KEY
 VALUE 'PF1'
  /* Display a rich GUI page.
  FETCH 'MYPAGE-P'
 NONE VALUE
  REINPUT WITH TEXT
  'Press PF1 to display rich GUI page.'
END-DECIDE
*
END
An application can also decide at runtime whether to use maps or rich
GUI pages, depending on the capabilities of the user interface. The system
variable *BROWSER-IO
lets the application decide if it is running in a web browser at all. If this
is the case, the system variable tells whether the application has been started
under Natural for Ajax and may thus use both maps and pages, or whether it has
been started under the Natural Web I/O Interface and may thus use only
maps.
Example:
DEFINE DATA LOCAL
1 FIELD1 (U20)
1 FIELD2 (U20)
END-DEFINE
*
IF *BROWSER-IO = 'RICHGUI'
  /* If we are running under Natural for Ajax,
  /* we display a rich GUI page.
  PROCESS PAGE USING 'MYPAGE'
  DECIDE ON FIRST *PAGE-EVENT
    VALUE U'nat:page.end'
      /* Page closed.
      IGNORE
    NONE VALUE
      /* Unhandled events.
      PROCESS PAGE UPDATE
  END-DECIDE
ELSE
  /* Otherwise we display a map.
  SET KEY ALL
  INPUT USING MAP 'MYMAP'
  DECIDE ON FIRST *PF-KEY
    VALUE 'PF1'
      /* Map closed.
      IGNORE
    NONE VALUE
      REINPUT WITH TEXT
      'Press PF1 to terminate.'
END-DECIDE
END-IF
*
END
In order to start a Natural application from the logon page, you proceed as decribed below.
![]() To start a Natural application from the logon page
To start a Natural application from the logon page
Enter the following URL inside your browser:
http://<host>:<port>/cisnatural/servlet/StartCISPage?PAGEURL=/cisnatural/NatLogon.html
where <host> and <port> are the host name and port number of your application server.
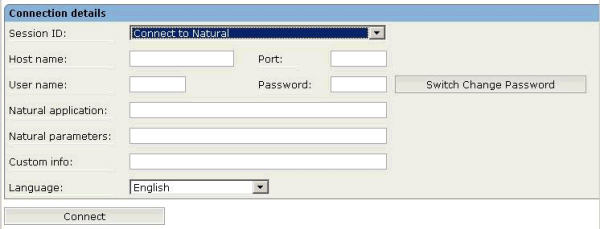
The logon page should now appear.

Enter the following connection parameters for the selected session:
| Parameter | Description |
|---|---|
| Host name | The name of the machine on which the Web I/O Interface daemon (Natural for UNIX), the Web I/O Interface service (Natural for Windows), or the Web I/O Interface server (Natural for Mainframes) is running. |
| Port | The port number on which the Web I/O Interface daemon (Natural for UNIX), the Web I/O Interface service (Natural for Windows), or the Web I/O Interface server (Natural for Mainframes) is running. |
| User name | Your user ID on the machine on which the Web I/O Interface daemon (Natural for UNIX), the Web I/O Interface service (Natural for Windows), or the Web I/O Interface server (Natural for Mainframes) is running. |
| Password | Your password on the machine on which the Web I/O Interface daemon (Natural for UNIX), the Web I/O Interface service (Natural for Windows), or the Web I/O Interface server (Natural for Mainframes) is running. |
| Natural application |
UNIX: The name of the script that the Web I/O Interface daemon will use to start a Natural session. See also Installing the Web I/O Interface Daemon on UNIX in the Installation documentation which is provided for Natural for UNIX. Windows: The name of the batch file that the Web I/O Interface service will use to start a Natural session. See also Batch File for Starting Natural in the Operations documentation which is provided for Natural for Windows. |
| Natural parameters | Additional Natural startup parameters that
will be passed to the script and the Natural session. You have to specify at
least the library and the name of the Natural program that is to be started,
for example:
|
| Custom info | An additional parameter that is to be passed to the Natural startup script. It is up to the script to evaluate this parameter or not. |
For the convenience of the end users of the application, all of the above parameters can be preconfigured in the configuration file for the session. See also:
Defining the Natural Sessions in the Configuration File in the Operations documentation which is provided with Natural for Windows and Natural for UNIX, or
Defining the Natural Sessions in the Configuration File in the Natural Web I/O Interface Server documentation which is provided with Natural for Mainframes.
This configuration file is located in the directory <installdir>/WEB-INF.
For each session definition that has been configured in the configuration file, an entry appears on the logon page. If the user selects the corresponding entry, only those parameters that were not pre-configured in the file need to be specified in the logon page in order to start the application. Usually, you will specify all connection parameters except User name and Password in the configuration file for the session.
The following shows an example of a session for which the connection parameters have been preconfigured in the configuration file:

An additional parameter that can be specified on the logon page is the language code. For detailed information on multi-lingual applications, see Multi Language Management.
Choose the button.
The connection parameters available in the configuration file for the session (see above) and on the logon page can also be specified as URL parameters of the logon page URL. This allows bookmarking the startup URL of a Natural application or starting an application by clicking a hyperlink in a document.
The following URL parameters are available for the logon page:
| URL Parameter | Description |
|---|---|
xciParameters.natsession |
A session ID as defined in the configuration file for the session. |
xciParameters.natserver |
The parameter Host name from the logon page. |
xciParameters.natport |
The parameter Port from the logon page. |
xciParameters.natuser |
The parameter User name from the logon page. |
xciParameters.natprog |
The parameter Natural application from the logon page. |
xciParameters.natparam |
The parameter Natural parameters from the logon page. |
In order to start the Natural program MENU-NJX from the
library SYSEXNJX, while your application server is running on
myappserver:4711, your Web I/O Interface daemon is running on
mywebio:4712, and the name of the Natural startup script is
nwo.sh, you can use the following URL:
http://myappserver:4711/cisnatural/servlet/StartCISPage?PAGEURL=%2Fcisnatural%2FNatLogon.html&xciParameters.natserver=mywebio&xciParameters.natprog=nwo.sh&xciParameters.natport=4712&xciParameters.natparam=stack%3D%28logon+SYSEXNJX%3BMENU-NJX%3Bfin%29
Important:
All parameters must be URL-encoded.