A server mapping file (SVM) enables the RPC server to correctly support special COBOL syntax such as
REDEFINEs, JUSTIFIED,
SYNCHRONIZE and OCCURS DEPENDING ON clauses,
LEVEL-88 fields, etc.
If one of these elements is used, the EntireX Workbench automatically extracts an SVM file in
addition to the IDL (interface definition language), or an SVM file is generated by the
COBOL Wrapper for a server skeleton.
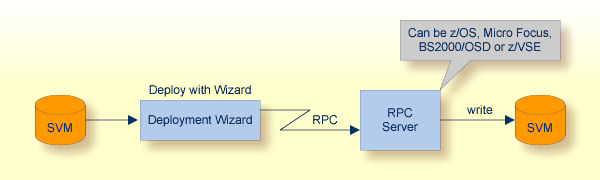
The SVM file is used at runtime to marshal and unmarshal the RPC data stream.
To make an SVM file available at runtime for the RPC server used, it has to be deployed. See Handling SVM Files in the RPC server documentation for z/OS (CICS, Batch, IMS) | Micro Focus | CICS ECI | IMS Connect | BS2000/OSD | z/VSE (CICS, Batch) or the EntireX Adapter documentation. As another prerequisite, the RPC server or EntireX Adapter must support the interface type of the COBOL server. This document covers the following topics:
To call a server successfully, the RPC server used must support the interface type of the COBOL server. In this context, there are two scenarios, where you need to select an appropriate interface type:
Scenario Calling an Existing COBOL Server under z/OS (CICS, Batch, IMS) | Micro Focus | BS2000/OSD | z/VSE (CICS, Batch)
within extraction stettings, see Step 4: Define the Extraction Settings and Start Extraction.
Scenario Writing a New COBOL Server under z/OS (CICS, Batch, IMS) | Micro Focus RPC Server | BS2000/OSD | z/VSE (CICS, Batch)
within the COBOL Wrapper IDL properties, see Server Interface Types under Generating COBOL Source Files from Software AG IDL Files.
The table below gives an overview of possible combinations of an interface type and a supporting RPC server:
| Interface Type | Supported by | ||||||||||
|---|---|---|---|---|---|---|---|---|---|---|---|
| Wrapper | Extractor | RPC Server | |||||||||
| z/OS | UNIX/Windows | BS2000/ OSD |
z/VSE | ||||||||
| CICS | Batch | IMS | ECI | Micro Focus | IMS Connect | Batch | CICS | Batch | |||
| CICS with DFHCOMMAREA calling convention | yes | yes | x | x | x | ||||||
| CICS with DFHCOMMAREA large buffer interface | yes | yes | x | x | |||||||
| CICS with Channel Container calling convention | yes | yes | x | ||||||||
| Batch with standard linkage calling convention | yes | yes | x | x | x | x | |||||
| Micro Focus with standard linkage calling convention | yes | yes | x | ||||||||
| IMS BMP with standard linkage calling convention | yes | yes | x | ||||||||
| IMS MPP message interface (IMS Connect) | no | yes | x | ||||||||
To deploy a server mapping, you can either use a wizard or copy the file manually to a target container. The approach depends on the RPC server used. For instance, not all RPC servers support both deployment by using a wizard and manual deployment. The table below gives an overview of supported approaches for available RPC servers and the webMethods EntireX Adapter for Integration Server, and provides further instructions for various forms of manual deployment:
| RPC Server | Wizard | Manual Deployment |
|---|---|---|
| CICS ECI RPC server (Windows and UNIX) | No | Copy the SVM file to the folder specified by
cics.mapping.folder. See Configuring the CICS ECI Side.
|
| CICS RPC server (z/OS, z/VSE) | Yes | Use FTP and IDCAMS. See Server Mapping Deployment using FTP and IDCAMS. |
| Batch RPC server (z/OS, z/VSE) | Yes | Use FTP and IDCAMS. See Server Mapping Deployment using FTP and IDCAMS. |
| Batch RPC server (BS2000/OSD) | Yes | No |
| Micro Focus RPC server (Windows and UNIX) | Yes | No |
| IMS Connect RPC server (Windows and UNIX) | No | Copy the SVM file to the folder specified by
property ims.mapping.folder. See Configuring the IMS Connect Side.
|
| IMS RPC server (z/OS) | Yes | Use FTP and IDCAMS. See Server Mapping Deployment using FTP and IDCAMS. |
| webMethods EntireX Adapter for Integration Server | No | No. Do not change the location of the generated SVM file. It has to be kept in the same folder as the IDL file and will be picked up automatically together with the IDL file when an adapter connection for IMS Connect or CICS ECI is generated. For more information, see the EntireX Adapter documentation under webMethods > Mainframe Integration on the Software AG Product Documentation website. |
The remainder of this section focuses on the major approaches:
Deploying with the wizard requires an active RPC server. Also, the Deployment Service of the RPC server must be properly configured. See the platform-specific documentation for more information:
UNIX or Windows for Micro Focus COBOL, see Deployment Service in the Micro Focus RPC Server documentation.
BS2000/OSD, see Deployment Service in the BS2000/OSD Batch RPC Server documentation.
Caution:
The codepage (locale string) of the RPC server used during
deployment must be the same as the one used with running RPC clients issuing
RPC requests.
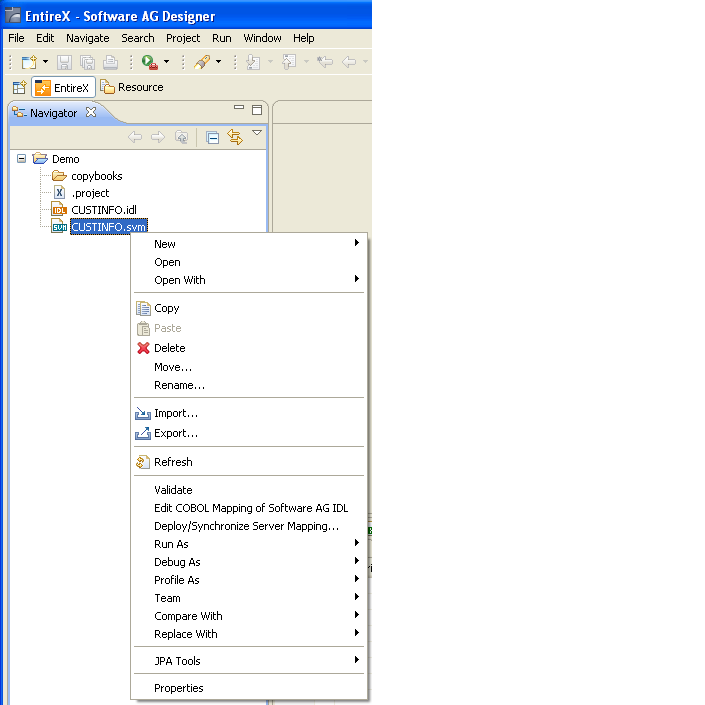
To deploy a server mapping with the wizard, follow the steps below:
To start the server mapping deployment wizard, select an SVM file and choose from the context menu.
To continue, press together with one of the following choices:
If you enter the server mapping deployment wizard the first time with no predefined deployment environment preferences (see IDL Extractor for COBOL Preferences), continue with Step 2a: Create a New Deployment Environment below.
If deployment environments are already defined, you may also continue with Step 3: Select an Existing Deployment Environment and Deploy below.
If no deployment environments are defined, you only have the option to create a new deployment environment.
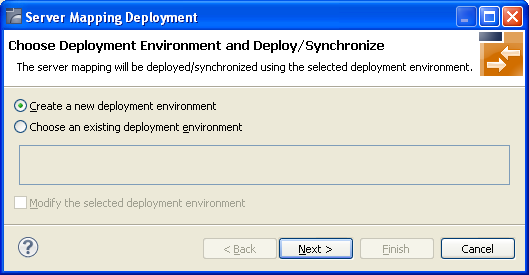
To proceed:
Select Create a new deployment environment.
Press and continue with Step 2b: Define the Connection to the Deployment Service and Deploy.
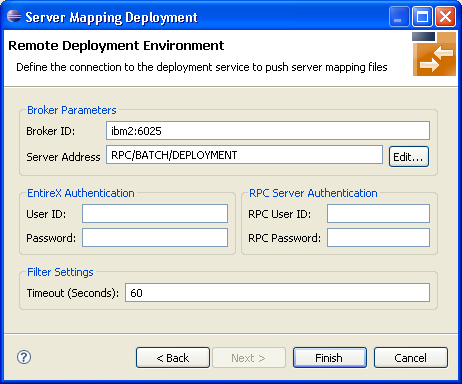
Use this page to define a connection to the deployment service of the RPC server.
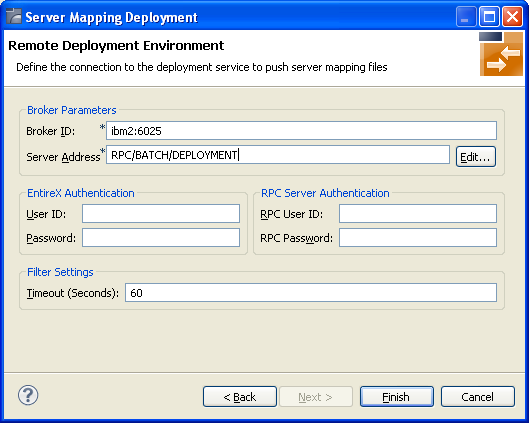
Enter the required fields:
Broker Parameters Broker ID and Server Address, which will have the default format. The last part (broker service) of the server address must always be "DEPLOYMENT".
The EntireX Authentication parameters describe the settings for the broker. These parameters apply if the broker is running with EntireX Security. See Which EntireX Security Solution.
The RPC Server Authentication parameters describe the settings for the RPC server. These parameters apply if the RPC server is running with security, for example a Natural RPC Server running with Natural Security.
The given Timeout value must be in the range from 1 to 9999 seconds (default: 60).
Press to deploy. Deployment of the server mapping is successful if the wizard ends. No confirmation message is given.
Use this page to select the deployment environment (i.e. the RPC server) to which you want to deploy.
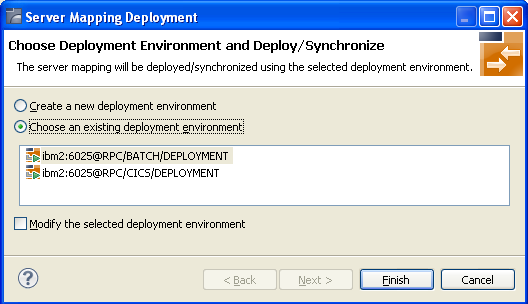
Check the option Choose an existing deployment environment and select a deployment environment from the list. Press to deploy. Deployment is successful if the wizard ends. No confirmation message is given.
In the preferences for the server mapping deployment wizard you define deployment environments, a connection to the Deployment Service of the RPC server. See Deployment Service in the RPC server documentation for z/OS (CICS, Batch, IMS) | Micro Focus | BS2000/OSD | z/VSE (CICS, Batch). The following sections are offered:
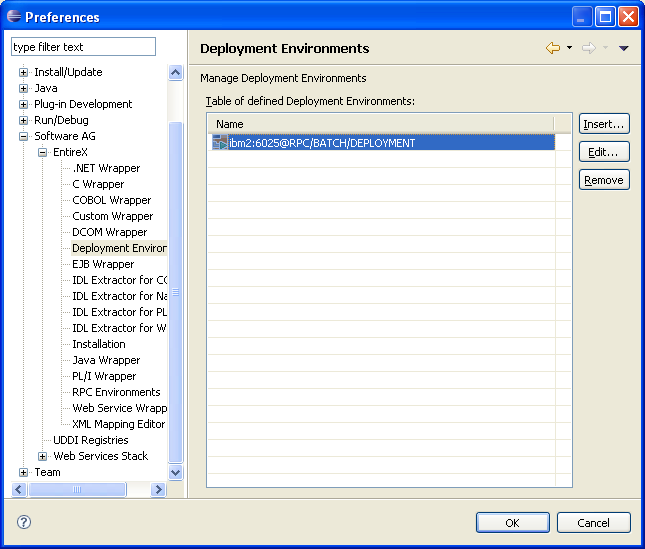
The deployment environment is managed from the deployment environment Preferences page. The deployment environments can be created, edited and removed. The deployment environment will be used for the selection lists in the Server Mapping Deployment Wizard. To manage these deployment environments, open the Preferences page:
![]() To create a new deployment environment
To create a new deployment environment
Press Insert.
![]() To edit an existing deployment environment
To edit an existing deployment environment
Select the table row and press Edit. If multiple entries are selected, the first entry is used.
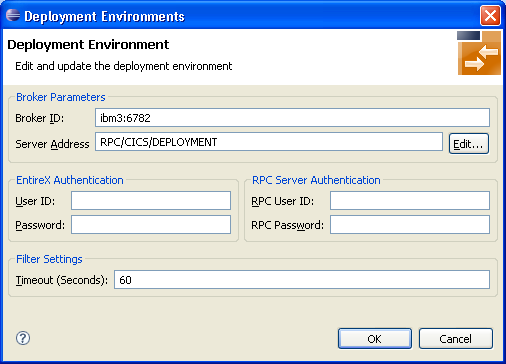
For more information on the input fields on this page, see Step 2b: Define the Connection to the Deployment Service and Deploy under Server Mapping Deployment Wizard.
![]() To remove an existing deployment environment
To remove an existing deployment environment
Select the table row and press Remove. Multiple selections are possible.
The command -deploy:cobol is provided to deploy server mapping files (SVMs) using the EntireX Workbench in command-line mode.
See Using the EntireX Workbench in Command-line Mode for general information.
To undeploy previously deployed server mapping entries on the server side,
remove the SVM file and execute the command -deploy:cobol with the IDL file only.
| Task | Command | Option | Description |
|---|---|---|---|
| Deploy SVM files. | -deploy:cobol |
-environment |
Target environment. Name of the COBOL deployment environment or an RPC server description. |
-brokeruser |
User used for broker authentication (optional). | ||
-brokerpassword |
Password used for broker authentication (optional). | ||
-rpcuser |
User used for RPC server authentication (optional). | ||
-rpcpassword |
Password used for RPC server authentication (optional). |
Note:
Run the command from the directory containing the IDL file and the corresponding SVM file.
If no SVM file is found, the previously deployed server mapping entries related to the IDL file will be removed on the server
side (undeployed).
-deploy:cobol /SVMDeployTests/idls/basicodo.idl  /SVMDeployTests/idls/basicdt.idl /SVMDeployTests/idls/basicarr.idl
 -environment ibm2:3980@RPC/RPCALL/DEPLOYMENT
 -brokeruser EXXUSR1
 -brokerpassword EXX$PWD1
This approach is available for z/OS and z/VSE only.
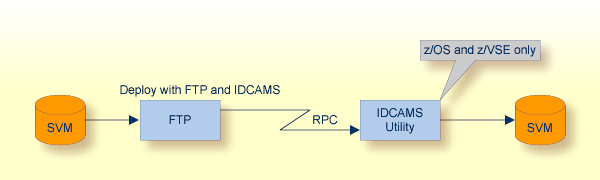
![]() To deploy a server mapping using FTP and IDCAMS
To deploy a server mapping using FTP and IDCAMS
Allocate a target sequential file on your mainframe.
Allow write access to the VSAM file mentioned above and usage of IDCAMS tools.
Transfer the SVM file to the target host, using FTP. You have to switch to text mode and the codepage of the FTP service must be the same as the codepage (locale string) of the RPC server used.
Install the server mapping into the VSAM SVM cluster with the IDCAMS job below. The following example applies to z/OS.
//EXPSVMR  JOB (,,,999),ENTIREX,NOTIFY=&SYSUID,MSGLEVEL=(1,1),
//             CLASS=K,MSGCLASS=X,REGION=0M,COND=(0,LT)
//*-----------------------------------------------------*
//* FILL THE SVM VSAM CLUSTER                           *
//*-----------------------------------------------------*
//IMPORT   EXEC PGM=IDCAMS
//RECORDS  DD DISP=SHR,DSN=EXP.SVM.TARGET.SEQ.RECORDS
//SVM      DD DISP=SHR,DSN=EXP.SVM.KSDS
//SYSPRINT DD SYSOUT=*
//SYSIN    DD *
  REPRO -
    REPLACE -
    INFILE(RECORDS) -
    OUTFILE(SVM)
Note:
If you omit the keyword REPLACE or define NOREPLACE in the SYSIN
data stream instead, existing server mappings are not overwritten. This protects SVM records from
being overwritten by duplicates.