Step 2: Select a COBOL Extractor Environment or Create a New One
Step 6: Map the COBOL Interface to IDL with the Mapping Editor
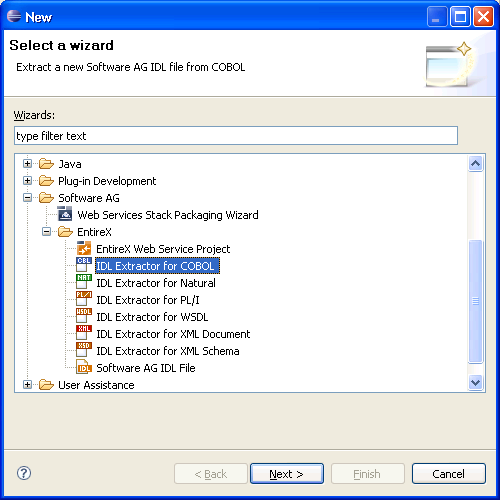
To continue, press and continue with Step 2: Select a COBOL Extractor Environment or Create a New One.
If no COBOL extractor environments are defined, you only have the option to create a new environment. An IDL Extractor for COBOL environment provides defaults for the extraction and refers to COBOL programs and copybooks that are
stored locally on the same machine where the EntireX Workbench is running: a local COBOL extractor environment
or
stored remotely on a host computer: a remote COBOL extractor environment. The extractor service is required to access COBOL programs and copybooks remotely with a remote COBOL extractor environment. The extractor service is supported on platforms z/OS and BS2000/OSD. See Extractor Service in the Batch | IMS | BS2000/OSD Batch RPC Server documentation.
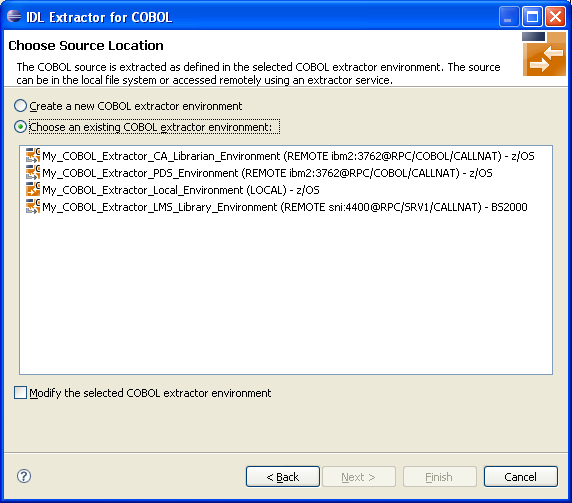
This page offers the following options:
![]() To select an existing local COBOL extractor environment
To select an existing local COBOL extractor environment
Check radio button Choose an existing COBOL extractor environment and select a local COBOL extractor environment.
Continue with Step 3: Select the COBOL Source below.
![]() To select an existing remote COBOL extractor environment
To select an existing remote COBOL extractor environment
Check radio button Choose an existing COBOL extractor environment and select a remote COBOL extractor environment.
Continue with Step 3: Select the COBOL Source below.
![]() To create a new local COBOL extractor environment
To create a new local COBOL extractor environment
Check radio button Create a new COBOL extractor environment.
Follow the instructions in the Preferences section under Create New Local Extractor Environment (z/OS, z/VSE, BS2000/OSD and IBM i) | Micro Focus (UNIX and Windows) in the IDL Extractor for COBOL documentation.
Continue with Step 3: Select the COBOL Source below.
![]() To create a new remote COBOL extractor environment
To create a new remote COBOL extractor environment
Check radio button Create a new COBOL extractor environment.
Follow the instructions in the Preferences section under Create New Remote Extractor Environment z/OS | BS2000/OSD in the IDL Extractor for COBOL documentation.
Continue with Step 3: Select the COBOL Source below.
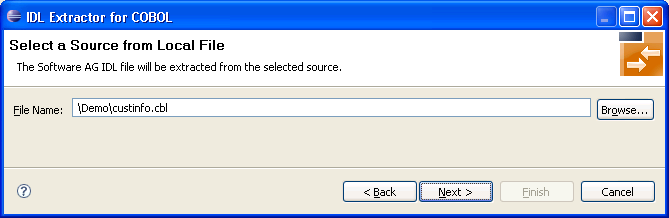
Selecting the COBOL source is different depending on whether the COBOL source is stored locally on the same machine where the EntireX Workbench is running, or on a remote host computer.
In step 2 above you selected or created a local extractor environment for z/OS. If you select a local COBOL extractor environment, you can browse for the COBOL program in the local file system. If you selected the COBOL source file before you started the wizard, and do not have a directory defined in the preferences of your Local Extractor Environment, the file location is already present. See Create New Local Extractor Environment (z/OS, z/VSE, BS2000/OSD and IBM i) | Micro Focus (UNIX and Windows) in the IDL Extractor for COBOL documentation. To browse for the COBOL source file, choose .
In step 2 above you selected or created a remote extractor environment. The following page offers all data sets starting with the high-level qualifier defined in the Filter Settings of the remote extractor environment. See Create New Remote Extractor Environment (z/OS) under IDL Extractor for COBOL Preferences.
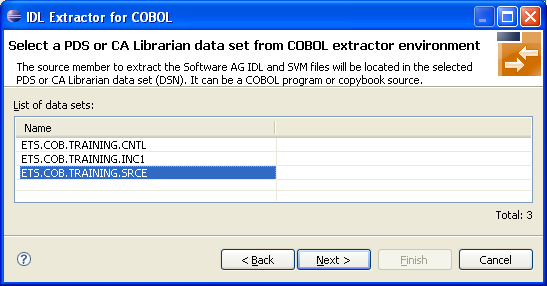
Select the partitioned data set or CA Librarian data set from which you want to extract and choose . Proceed depending on the selected data set type. See Selecting a Member from a Partitioned Data Set (z/OS) or Selecting a Member from a CA Librarian Data Set (z/OS).
The following page offers all members contained in the partioned data set selected in the previous step, starting with the member name prefix defined in the Filter Settings of the remote extractor environment. See Step 3: Define the Remote Extractor Environment under IDL Extractor for COBOL Preferences.
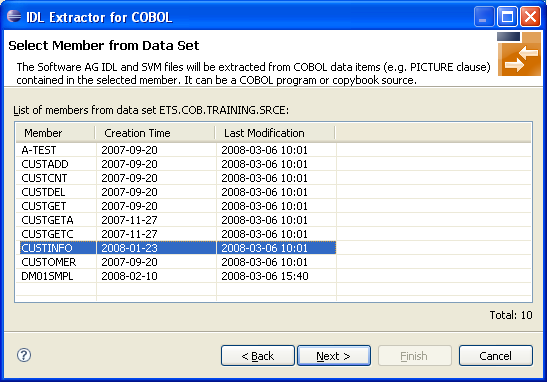
Select the member from which you want to extract. You can select only one COBOL source. The source can be a COBOL program or a COBOL copybook.
Choose and continue with Step 4: Define the Extraction Settings and Start Extraction below.
The following page offers all members contained in the CA Librarian data set selected in the previous step, starting with the member name prefix defined in the Filter Settings of the remote extractor environment. See Step 3: Define the Remote Extractor Environment under IDL Extractor for COBOL Preferences.
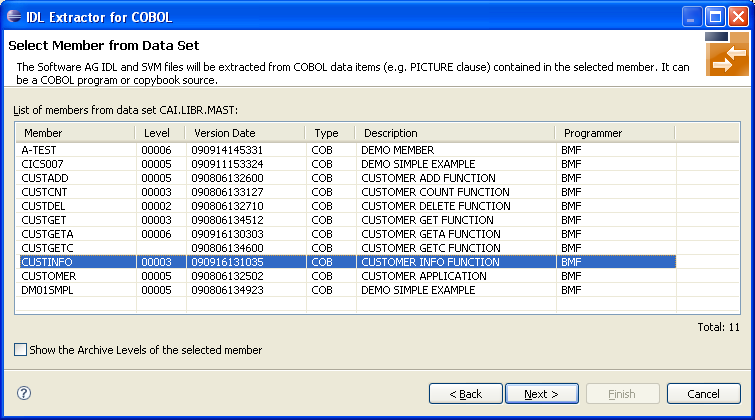
You can select only one COBOL source. The source can be a COBOL program or a COBOL copybook. If you want to extract from
the latest (current) version of the member, select the member, choose and continue with Step 4: Define the Extraction Settings and Start Extraction below.
a previous (archived) version of the member, check the box Show the Archive Levels of the selected member, select the member, choose and continue with Selecting a Member Archive Level from a CA Librarian Data Set.
The following page offers all archive levels of the previously selected member.

Select the member from which you want to extract. You can select only one archive level. Choose and continue with Step 4: Define the Extraction Settings and Start Extraction below.
In step 2 above you selected or created a remote extractor environment.
The following page offers all data sets starting with the high-level qualifier defined in the Filter Settings of the remote extractor environment. See Create New Remote Extractor Environment (BS2000/OSD) under IDL Extractor for COBOL Preferences.

The following page offers all elements contained in the LMS library selected in the previous step, starting with the member name prefix defined in the Filter Settings of the remote extractor environment. See Step 3: Define the Remote Extractor Environment under IDL Extractor for COBOL Preferences.
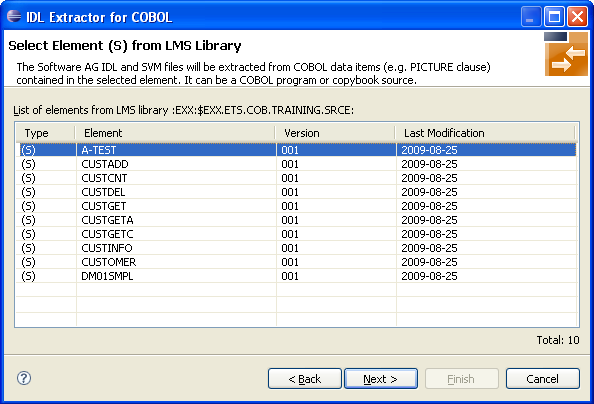
Select the element from which you want to extract. You can select only one COBOL source. The source can be a COBOL program or a COBOL copybook.
Choose and continue with Step 4: Define the Extraction Settings and Start Extraction below.
In this page you specify the COBOL source and Software AG IDL target options used for IDL extraction.
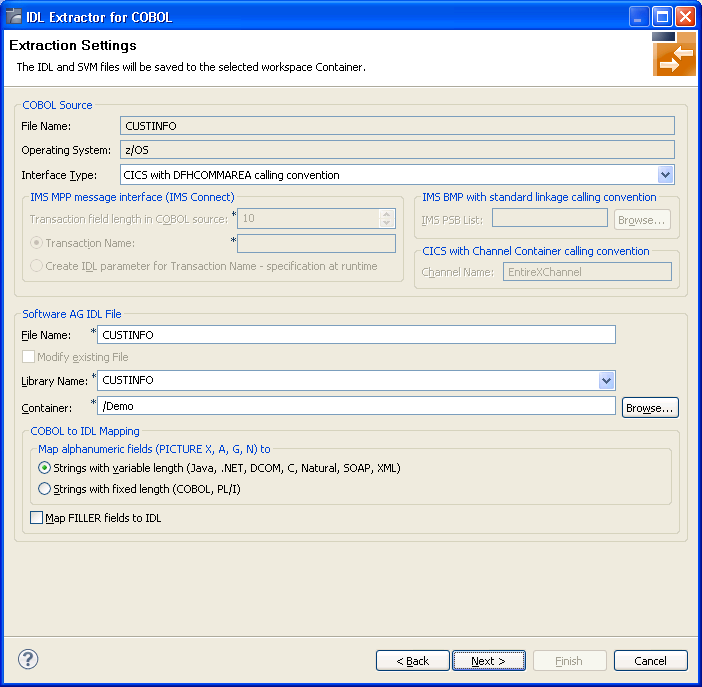
The entry for Operating system is already defined in the extractor environment in the IDL Extractor for COBOL preferences, see IDL Extractor for COBOL Preferences.
The Interface Type must match the type of your COBOL server program. It is used by the RPC server at runtime to correctly call the COBOL server. Selection of an unsupported interface type is likely to result in problems during execution. To select an appropriate interface type, see:
Supported COBOL Interface Types, for a list of interface types supported by the IDL Extractor for COBOL. (This section also provides an introduction to interface types).
Compatibility between Interface Type and RPC Server for possible combinations of an interface type and a supporting RPC server.
Depending on the interface type, additional information can be set. For the interface type
CICS Channel Container Calling Convention Interface, specify the channel name for the CICS RPC Server (max. 16 characters).
IMS MPP Message Interface (IMS Connect), specify the length of the transaction code field which is mostly the third physical field starting from offset 5 (bytes) declared in the input message layout within the server program. Example:
1 INPUT-MESSAGE.
  2 INPUT-IMS-META.
  3 INPUT-LL                   PIC S9(3) BINARY.
  3 INPUT-ZZ                   PIC S9(3) BINARY.
  3 INPUT-TRANSACTION          PIC X(10).
  2 INPUT-DATA.
  3 OPERATION                  PIC X(1).
  3 OPERAND1                   PIC S9(9) BINARY.
  3 OPERAND2                   PIC S9(9) BINARY.
In this example, the length to specify is "10".
Select either Transaction Name or Create IDL parameter for Transaction Name - specification at runtime. For a constant transaction name, specifiy the transaction code value here. In the latter case, the client application is responsible to set the correct transaction code value at runtime.
IMS BMP with Standard Linkage Calling Convention, you can set optionally the IMS PSB List. If your COBOL server contains PCB pointers, choose . Otherwise, the PCB pointers are not detected and cannot be provided by the IMS RPC Server to your COBOL server at runtime, and unexpected behavior may occur. For the contents of the IMS PSB list, see IMS PCB Pointer IDL Rules under Using the COBOL Wrapper for IMS BMP (z/OS) in the COBOL Wrapper documentation.
With the Software AG IDL File target options you specify the IDL file and IDL library names used:
File name specifies the file name used by the operating system.
Modify existing file is enabled only when the IDL file already exists. If enabled, check this option to continue the extraction.
Library name defines the IDL library name used in the IDL file. The dialog box cannot be edited when you modify an existing IDL file. If there are multiple libraries, you can select one of these; if there is only one library, the box is disabled. When you extract the IDL the first time or you specify the name of an existing IDL file, the box can be edited (like a text widget). If you specified an existing IDL file, the currently existing library names are available in the box.
For the interface type "Micro Focus with standard linkage calling convention" and if the COBOL server is an operating system standard library (.so|.sl on UNIX or .dll on Windows) or a Micro Focus proprietary library (*.lbr), the IDL library name used must match the operating system file name. For Micro Focus proprietary formats, intermediate code (*.int) and generated code (*.gnt), any IDL library name can be used. See Locating and Calling the Target Server in the Micro Focus RPC Server documentation.
Container specifies the eclipse container used for the IDL file
With the COBOL-to-IDL Mapping target options you specify how COBOL data items are mapped to IDL:
If the target RPC clients support variable length strings without any restriction ,we recommend you map alphanumeric fields to "Strings with variable length". This is true for most modern target environments such as Java, .NET, DCOM, C, Natural, SOAP, XML.
If the target RPC clients do not support variable length strings or support them with restrictions, we recommend you map alphanumeric fields to "Strings with fixed length"
Check the box Map FILLER fields to IDL if COBOL FILLER pseudo-parameters are to be part of the RPC client interface. By default they are not mapped to IDL.
Choose and start the extraction. The wizard now analyzes the COBOL program. During this process the following situations are possible:
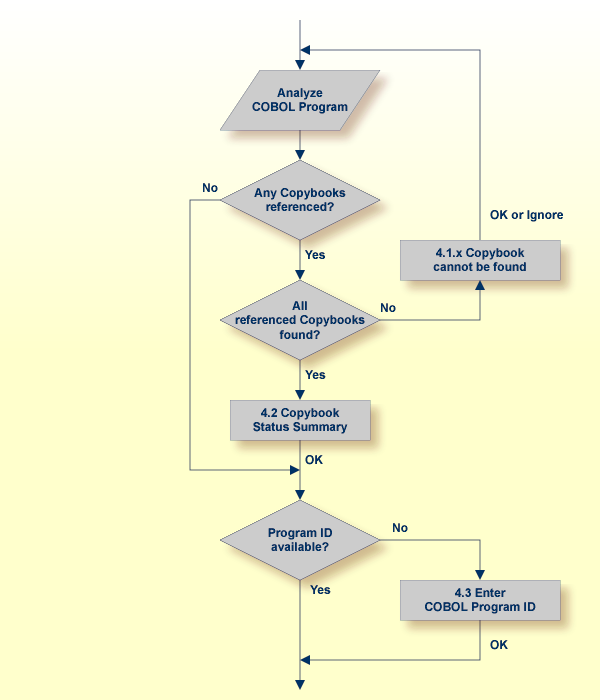
Referenced copybooks cannot be found. In this case the wizard prompts you for every missing copybook. Continue with optional step Step 4.1x: Copybook Cannot be Found - Local Extraction | Remote Extraction (z/OS) | Remote Extraction (BS2000/OSD) in the IDL Extractor for COBOL documentation depending on your situation.
If referenced copybooks are not available, you can choose or , a copybook status summary page is displayed, see Step 4.2: Copybook Status Summary (Optional).
No COBOL program ID can be located if you extract, for example, from a copybook that contains COBOL data items only. In this case, the wizard prompts you to enter the COBOL program ID. Continue with Step 4.3: Enter COBOL Program ID (Optional).
There is no copybook reference in your COBOL source or all referenced copybooks are found. Also the COBOL program ID can be located. In this case continue with Step 5: Select the COBOL Parameters under Scenario I: Create New IDL and SVM.
This dialog enables you to browse directories where missing copybooks might be found. If there are any specific copybook file extensions, you can define them here.
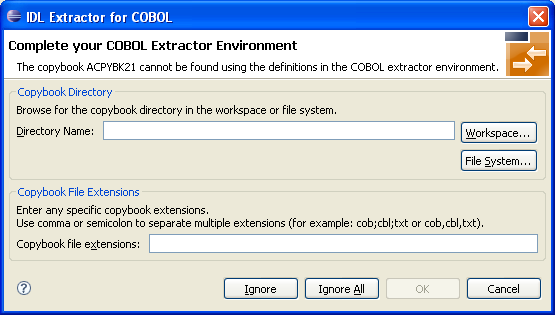
The copybook that cannot be found is given in the window, here its name is "ACPYBK21". In the extractor Preferences, the copybook directory that contains the copybook or the copybook file extension is not defined.
Continue with one of the following actions:
![]() To ignore this copybook only
To ignore this copybook only
Choose and go back to Step 4: Define the Extraction Settings and Start Extraction.
Choose to start extraction again.
![]() To ignore this and all further copybooks
To ignore this and all further copybooks
Choose and go back to Step 4: Define the Extraction Settings and Start Extraction.
Choose to start extraction again.
![]() To complete the extractor environment
To complete the extractor environment
Choose or to browse for the copybook directory.
Check the copybook file extensions. Both will be saved in the COBOL extractor preferences and reused in further extractions.
Choose and go back to Step 4: Define the Extraction Settings and Start Extraction.
Choose to start extraction again.
This dialog enables you to browse remote locations (partitioned or CA Librarian data sets) where missing copybooks might be found.

The copybook that cannot be found is given in the window; here its name is "CUSTREC". In the extractor preferences, the copybook data set that contains the copybook is not defined.
Continue with one of the following choices:
![]() To ignore this copybook only
To ignore this copybook only
Choose and go back to Step 4: Define the Extraction Settings and Start Extraction.
Choose to start extraction again.
![]() To ignore this and all further copybooks
To ignore this and all further copybooks
Choose and go back to Step 4: Define the Extraction Settings and Start Extraction.
Choose to start extraction again.
![]() To complete the extractor environment
To complete the extractor environment
Choose to browse for the copybook data set. It will be saved in the COBOL extractor preferences and reused in further extractions.
Choose and go back to Step 4: Define the Extraction Settings and Start Extraction.
Choose to start extraction again.
This dialog enables you to browse remote locations (LMS libraries) where missing copybooks might be found.
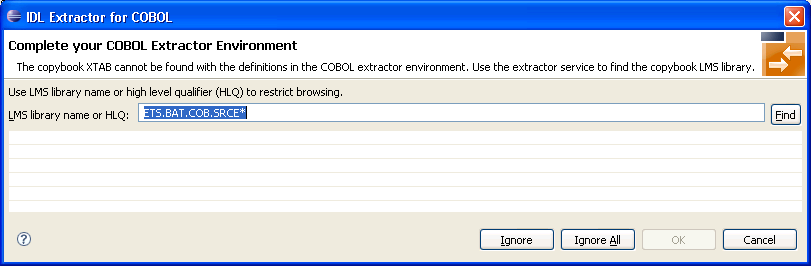
The copybook that cannot be found is given in the window; here its name is "XTAB". In the extractor preferences, the copybook LMS library that contains the copybook is not defined.
Continue with one of the following choices:
![]() To ignore this copybook only
To ignore this copybook only
Choose and go back to Step 4: Define the Extraction Settings and Start Extraction.
Choose to start extraction again.
![]() To ignore this and all further copybooks
To ignore this and all further copybooks
Choose and go back to Step 4: Define the Extraction Settings and Start Extraction.
Choose to start extraction again.
![]() To complete the extractor environment
To complete the extractor environment
Choose to browse for the copybook LMS library. It will be saved in the COBOL extractor preferences and reused in further extractions.
Choose and go back to Step 4: Define the Extraction Settings and Start Extraction.
Choose to start extraction again.
This summary page lists all COBOL copybooks which were not available during extraction.
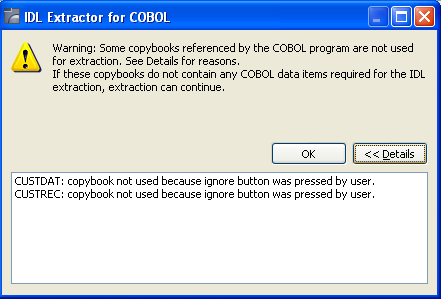
If any relevant COBOL parameter describing the server interface is contained in one of the listed copybooks, you cannot continue. Terminate the extraction and try to get the missing copybooks.
If no relevant COBOL parameter describing the server interface is contained in the copybooks, you can continue. Choose .
This page is shown whenever the program ID of the COBOL source is missing. Entering a COBOL program name is compulsory.
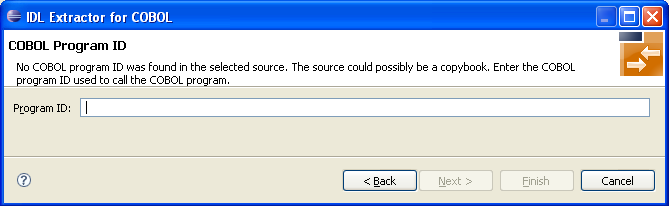
No COBOL program ID can be located if you extract, for example, from a copybook that contains COBOL data items only. The COBOL program ID
is the COBOL program name
is often the name of the executable or load module
can be found in the IDENTIFICATION DIVISION
(abbreviated to"ID" ). Example
ID DIVISION.
PROGRAM-ID.   CUSTINFO.
AUTHOR.       BMF.
DATE-WRITTEN. 26-11-1996
![]() To complete the extraction
To complete the extraction
Enter the COBOL program ID.
Choose to continue with Step 5: Select the COBOL Parameters.
In this page you select the COBOL data items that form the COBOL INOUT
parameters of your COBOL server program. For a detailed description of the
functionality, context menus, toolbars and main panes of this page, see COBOL Parameter Selection.
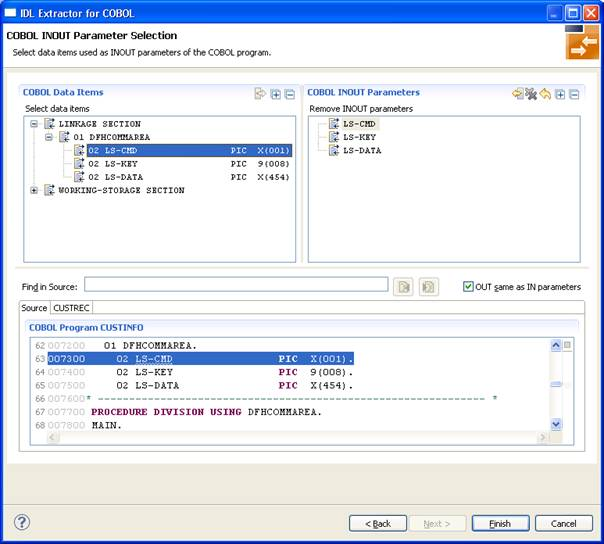
Selecting the COBOL parameters differs depending on the interface type and is described under How to Select COBOL Parameters.
| Interface Type | Proceed with ... |
|---|---|
CICS with DFHCOMMAREA calling convention
|
CICS DFHCOMMAREA |
| CICS with channel container calling convention | CICS Channel Container |
CICS with DFHCOMMAREA large buffer interface
|
CICS DFHCOMMAREA Large Buffer |
| Batch with standard linkage calling convention | Standard Linkage |
| Micro Focus with standard linkage calling convention | Standard Linkage |
| IMS MPP message interface (IMS Connect) | IMS MPP Message Interface (IMS Connect) |
| IMS BMP with standard linkage calling convention | IMS BMP Standard Linkage |
With the Mapping Editor you map the COBOL server interface selected in Step 5: Select the COBOL Parameters to Software AG IDL. The outcome of the Mapping Editor is the IDL and an SVM file.
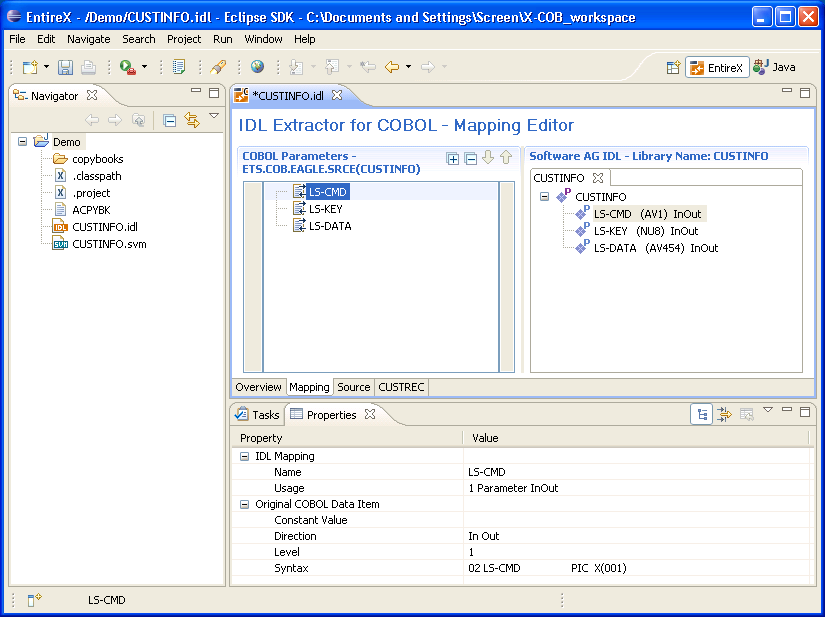
For more information on the COBOL mapping editor's user interface, its decision icons, mapping icons, context menus, toolbars and main panes, see Mapping Editor User Interface.
Before you start to define the mapping in the COBOL mapping editor, clarify whether your COBOL server implements multiple business functions controlled by an operation or function code field and you have to extract all the functions, or whether the COBOL server implements just a single function.
Multiple Business Functions
For COBOL servers with multiple business functions, the best approach
is to extract them as multiple IDL programs. Start with
Mapping COBOL Functions to Multiple IDL Programs. In this case, if the IDL is
processed further with a wrapper of the EntireX Workbench, the business
functions are provided as:
Web service operations if exposed as a Web service instead of a Web service with a single operation
methods if wrapped with the Java Wrapper or .NET Wrapper instead of a class with a single method.
etc.
Single Business Function
For COBOL servers with a single business function, start with
Mapping a COBOL Interface to an IDL Program.
Optional. COBOL level-88 data items can be mapped to operation using the function from the context menu.
![]() To map operations of the COBOL server to IDL programs
To map operations of the COBOL server to IDL programs
Call the context menu of the COBOL level-88 data item of the operation or function code field you want to map to an IDL program.
Use the function for this purpose. The following rules apply:
Each map to operation results in an IDL program with its own tab.
By default, the name of the IDL program is the name of the level-88 data item. If required you can rename the IDL program, see the Software AG IDL tree pane. See The Software AG IDL Tree Pane.
Only one COBOL data item can be the operation or function code of your COBOL server, thus the related base data item of the level-88 data items mapped first to operation becomes the operation or function code field.
If the operation or function code field is decided by the first map to operation action, the map to operation functions are removed on all level-88 data items which do not relate to the operation or function code field.
You can still map all other level-88 siblings of the operation or function code to operation, resulting in IDL programs and all rules listed here.
The RPC server provides the level-88 constant value to your COBOL at runtime.
Perform all the other mappings for the COBOL function described under Mapping a COBOL Interface to an IDL Program.
The following actions are required in the Mapping Editor if your COBOL server met the conditions:
If your COBL server contains COBOL REDEFINES, you need
to select REDEFINE paths. See Selecting REDEFINE Paths.
Provide IDL directions (see Providing IDL Directions (IN OUT INOUT)). This step can be
skipped for CICS servers that overlay the IN parameters
with different OUT parameters. See DFHCOMMAREA examples
1,
2,
3. In this case the check box OUT
same as IN in Step 5: Select the COBOL Parameters was cleared
and you selected the OUT parameters separately.
The following mapping editor actions are optional. They remove uneeded COBOL parameters during the mapping process, which simplifies the extracted IDL. See the following sections:
A very important task in the mapping editor is to choose the correct
IDL directions (see direction-attribute in
attribute-list under Software AG IDL Grammar) of the COBOL parameters, because in
COBOL programs there is no parameter direction. You have to do this in the
mapping editor because it is not possible to do this after extraction by simply
editing the IDL file extracted - the related SVM file would no longer match the
IDL. For CICS servers that overlay the IN parameters
with different OUT parameters, it is not possible to
provide IDL directions manually - there is only one IDL direction offered. It
is also not necessary, because the correct IDL directions are already implicit
in step Step 5: Select the COBOL Parameters.
![]() To provide IDL directions
To provide IDL directions
Go step-by-step through all top level COBOL data items and use the functions available in the Context Menu of the COBOL Parameters pane to provide the IDL directions.
Please note the following:
We recommend you define IDL directions at the top-level
COBOL data items. For CICS COBOL servers, the top-level COBOL data
items are the COBOL data items directly under DFHCOMMAREA. For all other COBOL
servers, the top-level COBOL data items are defined with COBOL level
1.
On top-level COBOL data items, IDL directions can always be set with the functions. If set on a top-level COBOL group, the direction is inherited by all subsequent child COBOL data items.
On higher-level COBOL data items, the IDL direction can be set to the same direction as the top-level COBOL data item - it is not permissible to set a conflicting direction.
Go step-by-step through all top level COBOL data items and use the functions available in the Context Menu of the COBOL Parameters pane to provide the IDL directions.
If your COBOL server contains COBOLREDEFINES, a required
and very important task in the mapping editor is to choose the correct
REDEFINE paths of a COBOL REDEFINE data item for your
mapping.
![]() To select redefine paths
To select redefine paths
Use the functions of the Context Menu for this purpose. The following rules apply:
Only one REDEFINE path of a COBOL
REDEFINE can be mapped to IDL. All other siblings are
suppressed.
If a REDEFINE path is actively mapped to IN, OUT or
INOUT in the IDL with the context menu functions, all siblings are mapped
automatically to "suppress" by the mapping editor.
You can suppress all REDEFINE paths of a COBOL
REDEFINE. Simply suppress the active REDEFINE path,
using the suppress function from the context menu.
Select the correct redefine paths beginning with a COBOL
REDEFINE defined at the top-level first. For a CICS COBOL server,
the top-level COBOL data items are the COBOL data items directly under
DFHCOMMAREA. For all other COBOL servers, the top-level COBOL data
items are defined with COBOL level 1.
Work through all inner COBOL REDEFINE data items,
going from higher levels to lower levels.
We recommend using the and
buttons of the
Toolbar to locate the COBOL
REDEFINE data items in the right order.
Optional. With the mapping editor you can make COBOL data items of
the COBOL server interface invisible for IDL clients. This means the fields are
not mapped to IDL, which makes sense for COBOL data items that do not have any
meaning, for example FILLER.
![]() To suppress or hide unneeded fields
To suppress or hide unneeded fields
Use the function from the Context Menu to suppress the COBOL scalar data items. The following rules apply:
The COBOL data item is not part of the IDL.
The RPC server provides the COBOL data item to your COBOL server with low value, managing the offset to the next COBOL data item.
COBOL groups can be suppressed as well, which means that all subsequent child COBOL data items are suppressed.
Optional. With the mapping editor you can provide fixed values to
COBOL data items of the COBOL server at runtime. In this case, the COBOL data
items are also invisible for IDL clients, which means the fields are not mapped
to IDL. This feature keeps the IDL short and tidy: IDL clients are not bothered
by fields that always contain constants, such as RECORD-TYPES.
![]() To map COBOL data items to constants
To map COBOL data items to constants
Use the function from the Context Menu to map COBOL level-88 data items to constants. The following rules apply:
The related level-88 base variable is not part of the IDL.
Only one COBOL level-88 data item can be selected per level-88 base data item as a constant. All COBOL level-88 siblings are set automatically to "suppress" by the mapping editor
The RPC server provides the constant in the related level-88 base variable to your COBOL server.
COBOL scalar data items can be mapped to constants as well. The following rules apply here:
The COBOL scalar data item is not part of the IDL.
You are prompted with a window to enter the constant value.
The RPC server provides the constant in the COBOL scalar data item to your COBOL server during runtime.
When you choose in the Mapping Editor, the IDL and SVM files are generated. Both files are written with the "File Name" entered for the IDL file in the IDL Extractor for COBOL wizard. See Step 4: Define the Extraction Settings and Start Extraction. The extension used for the IDL file is *.idl and *.svm for the SVM file.
The following dialog is displayed whenever the Mapping Editor is saved. There are two options to choose from:
will save the generated files into the workspace and quit the Mapping Editor. Additionally, the generated SVM file can be deployed if the option Deploy SVM is checked.
will save the generated files into the workspace, quit the Mapping Editor and start the IDL Extractor for COBOL again. The additionally extracted COBOL source will then be added to the previously generated IDL and SVM files.

![]() To save the generated files into the workspace, quit the
Mapping Editor and deploy the SVM file
To save the generated files into the workspace, quit the
Mapping Editor and deploy the SVM file
Select Save Software AG IDL and SVM files.
Check the option Deploy SVM and choose . Continue with Step 8: Deploy the SVM File (Optional).
![]() To save the generated files into the workspace and quit the
Mapping Editor without deploying the SVM file
To save the generated files into the workspace and quit the
Mapping Editor without deploying the SVM file
Select Save Software AG IDL and SVM files.
Clear the option Deploy SVM and choose .
![]() To save the generated files into the workspace, quit the
Mapping Editor and start the IDL Extractor for COBOL
again
To save the generated files into the workspace, quit the
Mapping Editor and start the IDL Extractor for COBOL
again
Select Extract additional COBOL program and append to the IDL and SVM files and choose . Continue with Step 2: Select a COBOL Extractor Environment or Create a New One.
| Warning: Do not edit the IDL file manually or with the IDL Editor, except for changing parameter names. Otherwise, consistency between the IDL file and the SVM file will be lost, resulting in unexpected behavior. |
| Warning: An SVM file extracted this way must not be re-created by the COBOL Wrapper. Server mapping specifications of such a file would not be powerful enough to adequately describe your existing COBOL server. |
If an SVM file is required, it has to be provided. For RPC servers this is done by deployment, either by using a wizard or by a manual approach specific to the RPC server used, see Server Mapping Deployment. For the webMethods EntireX Adapter, it is picked up automatically together with the IDL file when the adapter connection is generated. For further information, see the latest version of the EntireX Adapter under https://empower.softwareag.com/Products/Documentation/default.asp.
The IDL file is used to build RPC clients using an EntireX Workbench wrapper of your choice.
For a quick validation of your extraction, you can
use the IDL Tester to validate the extraction, see EntireX IDL Tester in the EntireX Workbench documentation.
generate an XML mapping file (XMM) and use the XML Tester for verification. See EntireX XML Tester in the XML/SOAP Wrapper documentation.