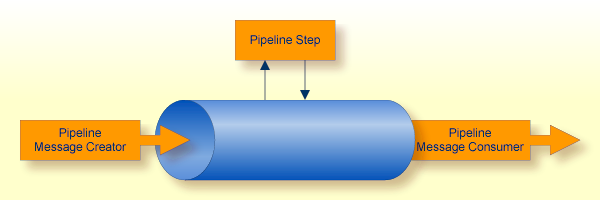
A pipeline transports the IDoc messages from a creator to a consumer. During transport, there may be several steps for transformation. A pipeline step works transactionally. The step must be committed or backed out. When a step is backed out, it will be performed later. When a step is committed, the pipeline continues processing and the next pipeline step is called.
From a technical or Broker view, a pipeline contains many queues. The pipeline page http://YourGateway:8080/sapr3gateway/manager/pipelines gives an overview of all pipelines.
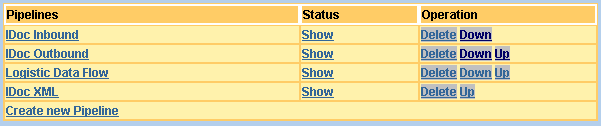
You can scroll down
to create and delete pipelines,
to create and change pipeline steps (press link for selected pipeline)
to see the status and contents of a whole pipeline and a pipeline step. Use the Show link.
It is possible to create your own pipeline on http://YourGateway:8080/sapr3gateway/manager/pipelines.
To create a new pipeline view, press the Create new Pipeline link.
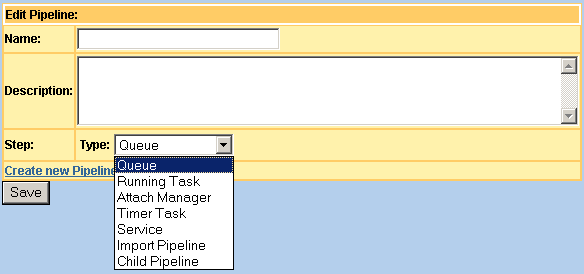
The next dialog asks for more parameters depending on the selected pipeline step.
| Parameter | Description |
|---|---|
| Name | Name of the pipeline. |
| Description | Document the pipeline or a pipeline step. |
| Create new Pipeline Step | Opens the dialog to create a new step at the end of the pipeline. You will be prompted for the type of step. After selecting the type, press the button. You will be prompted for more parameters depending on the type selected. |
| Delete | Delete this pipeline step |
| Up | Move the position of this step up |
| Down | Move the position of this step down |
| Type: Queue | Shows the status information of Broker queue.
The broker address and queue name are needed as additional parameters to
retrieve the information. For example: the number of accepted UOWs is
displayed. Depending on
EntireX Broker UWSTATP parameter, the number of
processed, backouted or canceled UOWs are displayed.
Tip: |
| Type: Queue Info Service | Shows the number of accepted UOWs, the lifetime and the limit number of UOWs for this service. |
| Type: Running Task | Shows the status information of the selected Running Task. The dialog shows the available tasks that can be selected. Start and Stop operations are still available. |
| Type Attach Manager | Shows the status information of the selected
Attach Manager. The dialog shows
the available items that can be selected. Start,
Stop and Simulate operations are
still available.
Note: |
| Type: Timer Task | Shows the status information of the selected Timer Task. The dialog shows the available items that can be selected. Start, Stop and Simulate operations are still available. |
| Type: Service | Shows the EntireX Broker service information. The broker address and service name (CLASS/SERVICE/SERVER) are needed as additional parameters to retrieve the information. For example: The number of active servers is displayed. |
| Type: Import Pipeline | Shows the referenced pipeline in the current
pipeline. The dialog shows all of the pipelines that are available.
Caution: |
| Type: Child Pipeline | Shows the referenced pipeline as a child of this
pipeline. The dialog shows all of the pipelines that are available.
Caution: Tip: |
| Queue Message Contents | Shows the command for reading the next UOW message and displays the contents in new browser window. To read the existing UOW as server, logon parameters Broker, Service, User ID and Token are required. |
| Save | Saves the selection and changes. |
| Type: Name | Shows the name of referenced component. The name
can be selected depending on the previously selected pipeline step type.
Note: |
| Hide | Select to show this pipeline step. With the step is hidden. |
The following sections (Inbound and Outbound) explain 2 examples of pipelines. Display these and use them as templates to create your own.
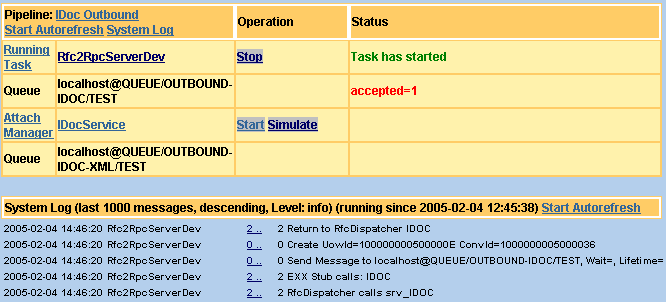
The IDoc Inbound pipeline is created on the Setup Wizard IDoc XML Gateway (http://YourGateway:8080/sapr3gateway/manager/setupWizardIDocXMLGW) with all steps. Use the Show link on the starting pipeline page to display the status of this pipeline.
Use Natural or COBOL to create an IDoc document for this pipeline. The development section Natural IDoc Client (or for COBOL) describes all of the steps. After running the Natural IDoc PMQ client, you will see a message in the first pipeline step as accepted. Start the other pipeline steps (Attach Manager and Rpc2Rfc kernel) to deliver the document.
Note:
The SAP R/3 application server must handle the IDoc type that is
created by a partner. Please read the section to
configure the partner for a specific
IDoc type.
The IDocService Attach
Manager receives a message from the EntireX Broker if one UOW is
created. Now, the associated stylesheet XMLToIDoc_FromPMQ will be
called. To display or change the following configuration, use the link with the
name of the attach manager in pipeline view.
The stylesheet performs the transformation and delivers the IDoc to SAP. For the delivery process, the Rpc2Rfc kernel is used. The function IDOC_INBOUND_ASYNCHRONOUS is called in transactional RFC (tRFC) mode. To call the Rpc2Rfc kernel service, the following parameters can be passed to the stylesheet.
| Parameter | Description |
|---|---|
| rpc-broker | Forwards the request to this broker |
| rpc-service | Sends the RPC request to this CLASS/SERVER/SERVICE. |
| rpc-userid | Connects with this user ID as client. |
| rpc-password | The EntireX security password for logon with user ID. |
![]() Trace Inbound Processing
Trace Inbound Processing
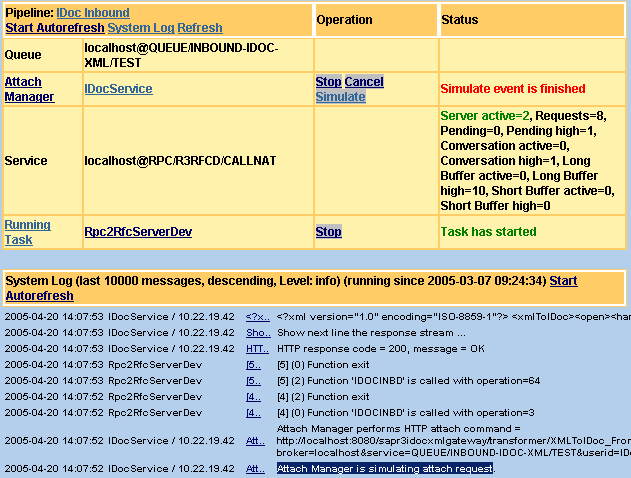
The System Log contains
information about the Rpc2Rfc and the
result of XMLToIDoc_FromPMQ stylesheet processing. The delivery
process is successful if there is a tRFC transaction ID logged.
To show the incoming IDoc in the SAP application server, start the
transaction we02.
To trace the incoming tRFC requests, use transaction sm58.
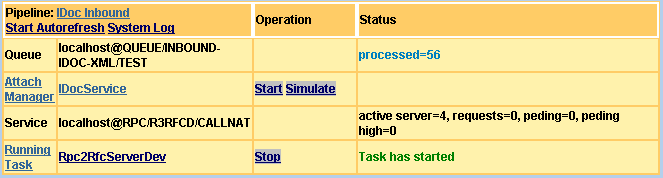
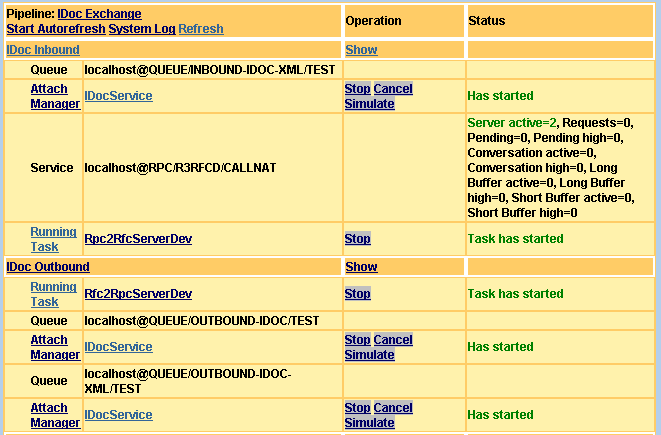
The IDoc Inbound pipeline is created on the Setup Wizard IDoc XML Gateway (http://YourGateway:8080/sapr3gateway/manager/setupWizardIDocXMLGW) with all of the steps. Use the Show link when starting a pipeline page to display the status of this pipeline. The following example displays one UOW in the pipeline
Use the and
links of the IDocService Attach
Manager to transform plain IDoc format to XML. After this pipeline step, the
IDoc is forwarded to the QUEUE/OUTBOUND-IDOC-XML/TEST queue.
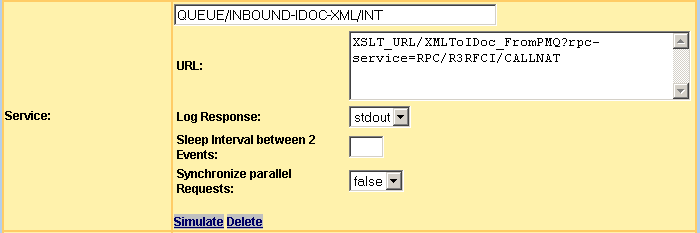
To deliver the XML IDoc to your application, change the stylesheet
which is called in Attach Manager IDocService for the service
QUEUE/OUTBOUND-IDOC-XML/TEST. Depending on the stylesheet, there
are additional parameters. Add these parameters as HTTP-GET parameters to the
configuration of IDocService.
| Available Stylesheet | Description |
|---|---|
| PMQdoc_toRPC | Reads the XML document from queue and forwards
it to an HTTP XML-RPC server. Adds the rpc-broker and
rpc-service parameters for the EntireX XML-RPC server. To develop
an XML-RPC server for receiving XML documents and calling RPC subprograms, use
the Outbound XML-RPC Development
section.
|
| PMQdoc_toMail | Reads the XML document from queue and sends the
contents as mail. Adds the to parameter for the receiver's e-mail
address.
|
| PMQdoc_toFile | Reads the XML document and saves the contents as
a file. The filename is created from the UOW ID. Adds the path
parameter for the target directory.
|
| PMQdoc_toPMQ | Reads the XML document and saves the contents in
the next PMQ. Addresses the receiver PMQ with the nextBroker (the
Broker IP/DNS) and nextService (CLASS/SERVER/SERVICE)
parameters.
|
| PMQdoc_toXBD | Reads the XML document and sends the contents to
the Service Orchestrator. The receiver is a
Mediator sequence. To address the sequence, add the
HTTP parameter href for the Mediator
web client and xbd.sequence.uri for calling the sequence.
|
All PMQdoc stylesheets include a customer stylesheet for
your own transformations. The name of this stylesheet is
XMLIDoc_ToCustom.xsl and does not perform transformation.
The contents of PMQ are delivered 1:1 to the target RPC, mail or file. Add
custom transformations to this stylesheet to receive IDocs in your business
application.
The UOW controller checks all accepted units of work (UOWs) in one webMethods EntireX Broker (see the section Using Persistence and Units of Work in the webMethods EntireX documentation). If forward processing has stopped for one UOW, the next pipeline step will be searched. The next pipeline step will be called to restart pipeline processing.
For example, at the end of an outbound pipeline, the pipeline consumer must send a message to an e-mail system. The consumer performs a backout if an error is detected. The next UOW controller process restarts the pipeline consumer to deliver the message.
Create a Scheduler Timer Task to start the UOW controller within a certain period of time. Use the URL SM_URL/UOWcontroller in the field Command. Optionally, the following parameters can also be passed
| HTTP-Get Parameter | Description |
|---|---|
| broker | The broker IP or DNS address. |
| deliveryCountLimit | The default is 1. It performs only UOWs with a delivery count of 1 or higher. Refer to the section Using Persistence and Units of Work in the webMethods EntireX documentation for more details. |
Tip:
Create two Scheduler Timer
Tasks. One timer task works with deliveryCountLimit=1
in a short period and the second with deliveryCountLimit=0 in a
1-day period.
If you call the UOW controller from the menu, you will be prompted for the Broker IP or DNS address.
The pipelines already defined allow you to control the business message flow. All of the pipeline steps defined for a pipeline are displayed on a page. To display this page, select the pipeline with the button on the pipeline page. On the selected pipeline, there are links to start the next activities.
This example shows the inbound and outbound in one parent pipeline view. The children are indented.
The link of the selected pipeline shows the pipeline definition with all steps.
, this pipeline view is automaticly refreshed. The refresh time is set on the System Constants page. Click this button to toggle this function, (to start and stop Autorefresh).
shows and refreshes the pipeline view additional with the System Log.
The button displays only this pipeline.
The pipeline title name is displayed if the parent definition contains a child pipeline step. This link shows the pipeline definition. The button displays only this pipeline on the next page. You can use this button to drill down to your information and display the page more quickly.
The Attach Manager is a working thread that waits for newly created UOWs and starts a stylesheet transformation process.
The first link shows all attach managers. The selected attach manager displays its own definition. The button starts the attach manager. Once an attach manager has been started, this button is toggled to . If you stop an attach manager, pipeline processing also stops.
The button creates an event to start the working process. The status of the attach manager is changed and this is displayed in the status column. To show the result of processing, use the System Log button in the head of the pipeline view. The attach manager has written the result with its name into the log. The button allows you to process one UOW in the queue to the next pipeline step.
The button displays the status of all tasks. The link with specific task name displays the parameters.
The operation coloumn contains the and button. Depending of the status, the or button is available and it is toggled once it has been clicked.
The timer task creates a processing event within a period of time and/or at a specific time. To show the configuration parameter, press the link with the name of the timer task.
The button starts the timer task. It toggles to the Stop button once it has been clicked. At a specific time or period of time the result of a performed event is stored in an internal document.
The button creates the processing event immediately. The result is saved in an internal document.
To display the result, press the button in the status coloumn. If an exception has occurred during the processing event, an button will become available.
The and rows display EntireX Broker resource information used by the pipeline messages.
This development environment allows you to receive IDoc documents as a pipeline message consumer. The goal is to receive the IDoc document with the business parameter in a sub-program. The sub-program is called at runtime from an EntireX RPC server. The following development steps are necessary.
![]() Deliver IDoc to RPC Server
Deliver IDoc to RPC Server
Create and setup the Outbound XML-RPC Development with the Setup Wizard on and , if this has not already been done. After creation, the development environment exists on the page.
Create the IDoc type information in IDoc XML gateway.
Select to create the IDL from the IDoc type information. Copy the content of the newly created windows to your clipboard.
Go to the Outbound XML-RPC Development on the developer page, choose and copy the contents of the clipboard to the end of the existing IDL. Check if the new contents already exist.
Edit and expand the IDL.
Change the program name if your called sub-programm has another name for its own naming convention. Delete the alias name if you only have an 8-character-long name for the sub-program.
Delete the EDI_DC40 group. These fields and
information are not necessary in the called sub-program.
Add a group for response message and code. This will allow error
handling if the IDoc document cannot be delivered. Set the direction of this
group to OUT.
In summary to make all of the changes, the following IDL can used as an example:
Program 'IDOCRCVN' Is       /*  'DEBCOR'
  Define Data Parameter
    1 MESSAGE  Out
      2 NO (N4)
      2 TEXT (A60)
    1 E1KNA1C  In /* Core Master Kundenstamm Grunddaten (KNA1)
      2 MSGFN (A3)        /* Function
      2 KUNNR (A10)        /* Customer number
      2 ANRED (A15)        /* Title
      ....
      2 SPRAS_ISO (A2)        /* Language according to ISO 639
  End-Define
Click to generate an XMM mapping file. The EntireX Workbench is called in batch mode. The mapping file is copied to the IDoc XML Gateway. To change the destination directory, go to , , and select this development environment. The XMM mapping file is used by an EntireX servlet adapter to map an XML document to an RPC call.
To activate the new XMM file, restart IDoc XML gateway. For example, use the Tomcat manager.
Develop a sub-program (e.g. Natural) with the name and parameter data area which is defined in the IDL (step 5 above).
Start and check the RPC server which is to call the developed sub-program.
Change the attach
manager configuration to send the outbound IDoc as XML. Set the
PMQdoc_toRPC stylesheet and the RPC HTTP-Get parameter for the
XML-RPC adapter.
| HTTP Get Parameter | Description |
|---|---|
| rpc-broker | Broker IP-address of the called sub-program. |
| rpc-service | Sevice (CLASS/SERVER/SERVICE) of the called sub-program. |
For example, use
XSLT_URL/PMQdoc_toRPC?rpc-broker=localhost&rpc-service=RPC/SRV1/CALLNAT
as URL on service
OUTBOUND-IDOC-XML.
XSLT_URL is replaced at runtime by the value defined in
System Constants. To activate
the change, stop and restart the Attach Manager.
Depending on step 5, the next section describes a transformation from IDoc to RPC.
![]() Develop IDoc to RPC Transformation
Develop IDoc to RPC Transformation
As default, the IDoc is transformed to XML and this XML document calls the RPC server. To transform between the IDoc-XML document and the required XML-RPC document, it is possible to add XSL transformation statements.
To transform between the two XML documents, the
XMLIDoc_ToCustom.xsl stylesheet is called from IDoc XML Gateway at
runtime. To add your own transformation, go to ,
and edit the file XML IDoc to Custom
Transformation, or start an editor with this file in the root
directory of IDoc XML Gateway.
Add an xsl:template that matches if the IDoc type is
transformed. Use the attribute priority to overwrite the
default.
<xsl:template match="DEBCOR01" priority="1">
  ....
</xsl:template>
In this example the DEBCOR01 IDoc type matches.
To this template, add rules to transform the IDoc type name to the sub-program name.
<xsl:template match="DEBCOR01" priority="1">
   <IDOCRCVN>
      ....
   </IDOCRCVN>
</xsl:template>
Copy 1:1 all IDoc segments to the XML-RPC document.
<xsl:template match="DEBCOR01" priority="1">
   <IDOCRCVN>
      <xsl:copy-of select="//E1KNA1C"/>
   </IDOCRCVN>
</xsl:template>
The called sub-program can determine at runtime if the document has
been successfully processed. The out parameter replies with this
information. The response code true commits the IDoc document as a
UOW and false backs out. It this case, the same document can also
be delivered later. To reply to the response, add an xsl:template
with mode doEvaluateResponseCode.
<xsl:template match="*" mode="doEvaluateResponseCode">
   ....
</xsl:template>
The RPC response document is passed to this template. It is now
possible to evaluate whether to commit the UOW (return true) or to
back it out (return false).
<xsl:template match="*" mode="doEvaluateResponseCode">
   <xsl:choose>
      <xsl:when test="//MESSAGE/NO = '4'">
         <!-- Adabas Record successfully stored -->
         <xsl:text>true</xsl:text>
      </xsl:when>

      <xsl:when test="//MESSAGE/NO = '5'">
         <!-- Adabas Record successfully updated -->
         <xsl:text>true</xsl:text>
      </xsl:when>

      <xsl:otherwise>
         <xsl:text>false</xsl:text>
      </xsl:otherwise>
   </xsl:choose>
</xsl:template>
Note:
The XPath expression contains the field names of IDL in the above
example.
To restart the delivery process after an UOW backout, implement a UOW Controller.
In case of error (backout of UOW), the response message of the
called sub-program can be logged. Add an xsl:template with mode
doEvaluateResponseMessage. The RPC response document is passed to
this template.
<xsl:template match="*" mode="doEvaluateResponseMessage">
   <xsl:value-of select="//MESSAGE/TEXT"/>
</xsl:template>