The normal way of working within a programming project is to maintain different environments, to allow for development and testing without impacting production. Development with SAP R/3 Gateway allows for development, integration (or quality-testing) and production environments. First, the generated applications are tested in the development environment. After passing the tests, the kernels must be copied to the integration environment and so on. This process of copying from one environment to another is called deployment.
The SAP R/3 Gateway supports the following default deployment process. Each environment has its own directory in the file system, depending on kernel type.
| Directory | Environment | Script |
|---|---|---|
| <kernel type>/dev | Compile and Link | |
| <kernel type>/run/dev | Development | deployFrom copy from compile and link. |
| <kernel type>/run/int | Integration (Quality) | deployFrom copy from development. |
| <kernel type>/run/dev | Production | deployFrom copy from integration. |
The deployFrom scripts copy the executables and IDL files from one environment to the next using operating-system commands. The IDL files are copied for documentation reasons. To search for differences in the environments, the IDL files can be compared.
All of the deployment steps can be started from the page of the menu or by using the URI http://YourGateway:8080/sapr3gateway/manager/dep.
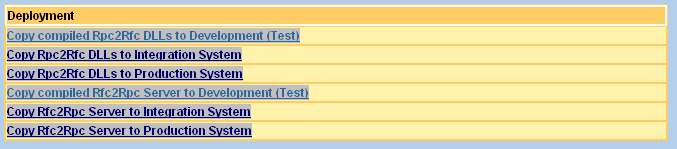
Choose the link to start the deployment process. A job is started with a batch file (on Windows) or a shell script (on UNIX) and the resulting output is displayed on an HTML page. You will see the copied files or an error message. The error message may indicate that it is not possible to overwrite executables if they are already running.
In this case, stop the Running Task (on the page of the menu) or use the URI http://YourGateway:8080/sapr3gateway/manager/run and repeat the deployment step.
It is, of course, possible to change the default deployFrom scripts if you are working in a distributed environment of SAP R/3 Gateway instances. In this case, the file copy statements must be changed, for example to an FTP command. The list of all the scripts is on the page of the menu or can be viewed using the URI http://YourGateway:8080/sapr3gateway/manager/parameter. The link starts an editor on the same page.
There is a new deployment page (since 2.3.1.04) from which a number of steps are performed automatically. This page is callable by http://YourGateway:8080/sapr3gateway/manager/deployRunningTask. After the first call by URI, this page is appended to the end of the menu with the item name . You must first select the running task.
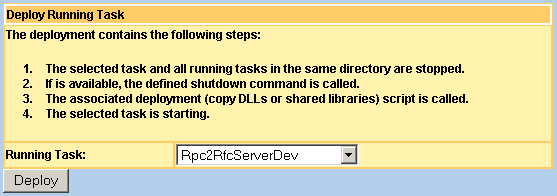
![]() Deployment contains the following steps, which will be performed in a
single submit.
Deployment contains the following steps, which will be performed in a
single submit.
The selected task and all running tasks in the same directory are stopped. All running tasks which use the directory are evaluated by the current configuration.
If the shutdown command is available for the selected task, it is called to release the resources from EntireX Broker.
The associated deployment script (copy DLLs or shared libraries) is called.
The selected task is started.
The package builder supports the deployment process between different application server instances. As protocol, an HTTP connection is used. The package builder creates a ZIP file (the package) and transports it (with HTTP) to the target application server. The Upload feature is called at the receiver (target). For example, the Rpc2Rfc kernel production environment runs on another application server. The executable files must copied between two machines.
This page can be called with http://YourGateway:8080/sapr3gateway/manager/packageBuilder. After the first call, the menu item is created in the menu. After the second request, you will see the menu item.
The initiator of a deployment process is the target system. If, for example, you want to copy the executable files from the integration to the production environment, the production system is the target and the initiator. The integration system is the source.
To define a package process deployment, the following parameters are needed:
| Parameter | Description |
|---|---|
| Name | Name of the deployment process. |
| Source URL | Defines the URL of the source system. This
source system builds the package for the target. Call the manager of
SAP R/3 Gateway in the source system. The URL looks like this:
http://integrationNode:8080/sapr3gateway/manager/xml.
Replace integrationNode with the IP or DNS name.
Tip: PackageBuilder resource.
checks this, too. If there is an error message, see
how to install the Package Builder
resource
|
| Source User ID | Connect with the user ID to the source system. The HTTP Basic Authentication method is used. |
| Source User Password | Identify the user with this password in the source system. |
| Source Directory | Define the subdirectory where the package is built. The link shows the contents of the file system on the next page. This directory is a subdirectory of $SM_HOME. |
| Selection | Select the files in the source directory. The
wildcard character* is supported. Separate multiple selections
with the ; character. For example: *.idl;
*.dll.
|
| Target Directory | Define the subdirectory in the target system. The link shows the contents of the file system on the next page. This directory is a subdirectory of $SM_HOME. |
| Target URL | Define the receiver of the package. The sender
(this is the source system) of the package must call the
Upload and Setup component. The
URL looks like this:
http://productionNode:8080/sapr3gateway/setup/xml.
Note: Tip: |
| Target User ID | Connect with the user ID to the target system. The HTTP Basic Authentication method is used. |
| Target Password | Identify the user with this password in the target system. |
| Backup | The value true creates a backup ZIP
file with the old files before they are overwritten by the new ones.
|
| Smart Deployment enabled | The value true
enables this
package definition for Smart
Deployment.
|
Tip:
Save the settings before a link for checking or directory listing is
used.
The following operations are available for the list:
| Operation | Description |
|---|---|
| Deploy | Start package processing and deployment. The result of the process is displayed on the next page. |
| Copy to | Copy this package process definition and add the new one to the end of the list. |
| Delete | Delete this package process definition from the list. |
| Up | Set this before the previous one. |
| Down | Set this after the next one. |
If you start the package and deployment process with the button, the next page shows the result of updated or created files.

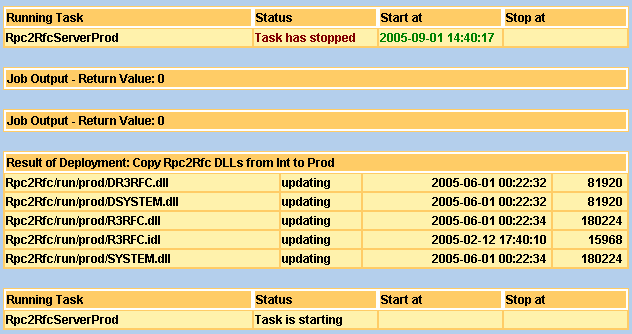
Smart deployment can
start the package builder. In
this case, the local default
deployment is switched off. In smart deployment you can select the
replaced running task, the associated package is built in the source
environment and deployed in the target environment. The following output shows
the result of package builder during smart deployment. The running task
Rpc2RfcServerProd is selected for deployment and the package
Copy Rpc2Rfc DLLs from Int to Prod is processed.
![]() How the system works
How the system works
Smart Deployment searches the package in the configuration environment.
The directory of the selected running task (e.g. Rpc2Rfc kernel) must be the same as the Target Directory of the package.
The flag for Smart Deployment enabled must also be enabled.
Now Smart Deployment calls the Package Builder instead of the local default deployment.
Every source system that builds a package for deployment must configure the Package Builder resource. As default, the package builder is not installed. Perform the following steps only for a source system. The target system, the receiver of packages, does not need the package builder.
![]() Add Package Builder as Resource
Add Package Builder as Resource
Call the resource administrator page http://YourGateway:8080/sapr3gateway/manager/resourceAdmin on the source system.
Create and add a new resource, if the class
PackageBuilder is not available.
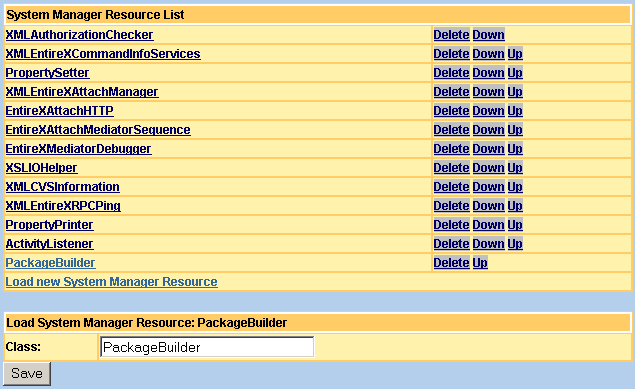
Save the changes.
Restart the SAP R/3 Gateway web application. For example, use the Tomcat Manager.
After restart, check whether the System Log has loaded the
PackageBuilder resource.