There are several pages available to help you to configure the SAP R/3 Gateway web application.
The global system-wide configuration parameters are described on the page System Constants.
The access control list can control each request for a user. The following screen snapshot shows the default configuration.
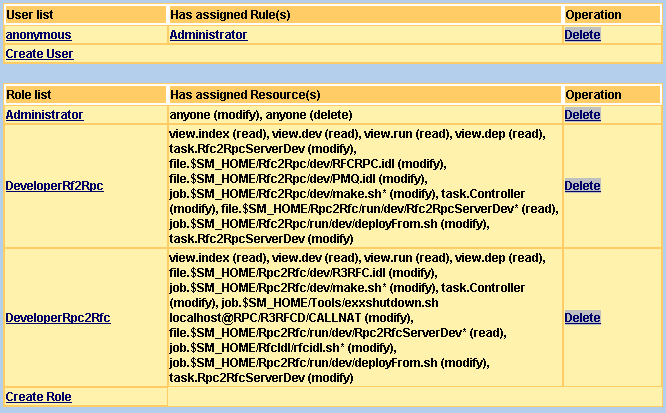
How is the default access control list read? Each request has a caller. This caller is searched for in the user list. If this caller is not found, anonymous is used. Each user (anonymous) has a role with several resources (anyone). The accessed resource of the request is checked in the request list of the assigned role. anyone is a placeholder for all resources.
Each request is logged in debug mode. The
System Log displays
identity information about user ID or IP/DNS address,
accessed resource and
access mode (READ. MODIFY or
DELETE).

A user request is identified is by user ID and/or IP/DNS address. You
will see the user ID only if this web application is configured with security.
Use the on the
menu to switch on security. If you want to identify the requests by IP/DNS
address, use the following naming convention: IP-#1-#2#-3-#4.
#1 up to #4 are decimal numbers of the IP address.
All dot characters are replaced with a hyphen. Examples:
IP-127-0-0-1 , IP-pcFrankfurt-de or
IP-localhost.
By default, there is a role DeveloperRf2Rpc and DeveloperRpc2Rfc assigns this role to a user. This user can only perform development steps. The following little workshop explains how to create a guest role for users.
Create and save a role Guest

Press new Guest link in role list.
Press in empty resource list
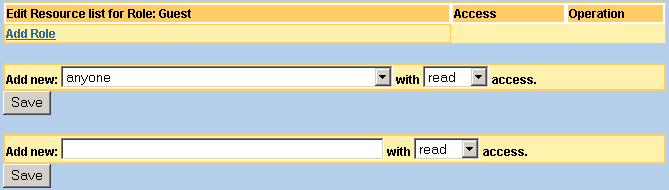
Press to add anyone with read access.
To exclude (disallow) the access to the configuration data for guest user, add with exclude option the resource view.xml*.
Create guest user.
Assign role Guest for user guest.

To test and authenticate a user, you must add the created user ID with password to the web server administration, for example Tomcat Administration (http://YourGateway:8080/admin).
It is possible to assign multiple roles to a user. A role can have
multiple resources. To identify the correct resource, you should make the
request and look in the System Log
with debug. The requested resource will be printed out.
Remember this resource string and assign it to the role. You can use the last dialog to copy and paste the resource name directly.
Caution:
During the development of an access control list, you should not
change your own role. If you delete your own rights to change the access
control list, you will no longer be able to work. The delete or modify steps
become effective immediately. Refer to History
of Configuration for information on how to undo them.
Tip:
If you work with anyone resource, you can
exclude explicit resources with the exclude option.
Tip:
The wildcard character * is supported if you do not want to assign
each resource. For example: The resource string view.a* allows
access to all pages starting with character a.
Tip:
Create your own administrator user ID with all rights as a fallback,
before you make any changes to your own rights.
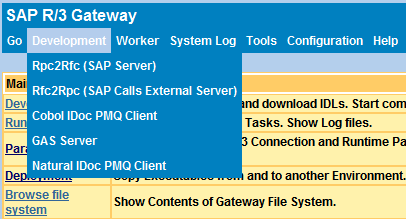
The development page can be configured by choosing from the menu (http://YourGateway:8080/sapr3gateway/manager/devAdmin).
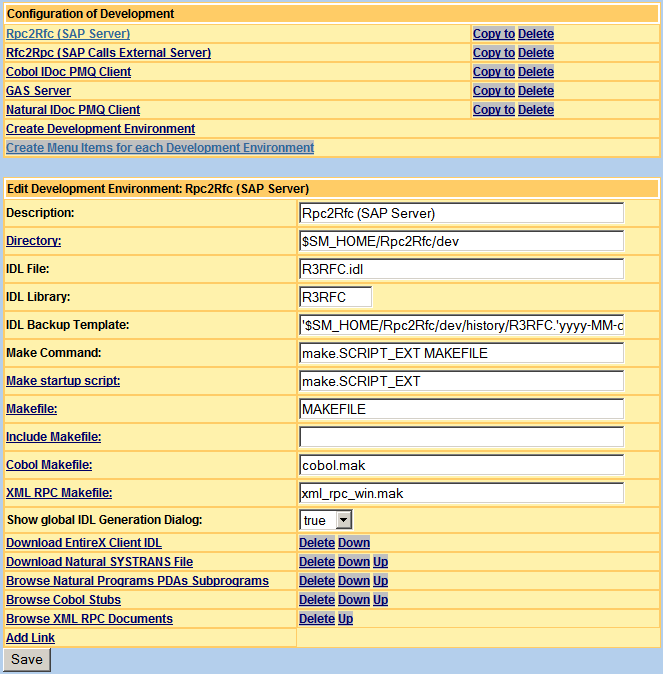
Each development environment allows you to define the directory where the IDL file and the makefile reside. We recommend creating a new development environment using the Environment Wizard, if you want to organize one IDL file for each project or organization department.
For fast access to development environments, the
Create Menu Items for each Development Environment
command extends the toolbar.
shows all environments. The submenu items only show the selected environment. To modify the toolbar, call Menu Administration (http://YourGateway:8080/sapr3gateway/manager/menuAdmin).
During the creation of a development environment you will be asked for a development type. The kind of parameters which can be defined depends on the development type. After the creation of a development environment you can define the following parameters
| Parameter | Development Type | Description |
|---|---|---|
| Description | all | Title of development environment. |
| Directory | all | Directory in file system. |
| IDL file | all | Filename if the IDL file. |
| IDL Library | all | The library name which is defined in the IDL library statement in the IDL file. |
| IDL Backup Template | all | Template to create the history file on saving an IDL file. |
| Make Command | all | Executable command in directory to perfom the compilation process. |
| Make startup script | all | Filename of the executable command. |
| Makefile | all | Filename of main makefile. |
| Include Makefile | all | Filename of the included makefile of the main makefile. |
| COBOL Makefile | all | Filename of makefiles which are only statements for COBOL source code generating. |
| XML RPC Makefile | Rpc2Rfc | Filename of makefiles which are only statements
for .XMM mapping generating.
|
| Show global IDL Generation Dialog | Rpc2Rfc | Value false suppresses the old IDL
generation dialog. It prefers to use the new
IDL Editor.
|
| IDL Asynchronous File | Rfc2Rpc | IDL filename. |
| IDL Asynchronous Library | Rfc2Rpc | The library name which is defined in the IDL library statement in the IDL file. |
| IDL Asynchronous Backup Template | Rfc2Rpc | Template to create the history file on saving an IDL file. |
| Make Result (Running Task Command): | Rfc2Rpc | The result executable filename. |
| Add link | all | Add new link with URL and title to the development page for download or navigation about generated source code. |
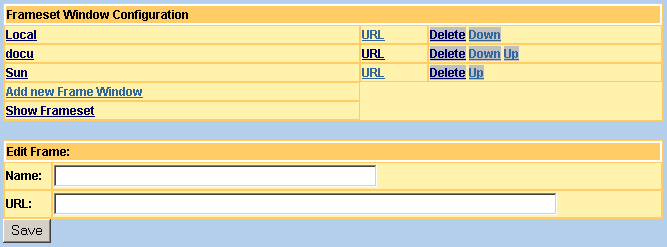
A frameset can help you to handle multiple installations of the SAP R/3 Gateway web application in one browser window. There is an example in the section Frameset under the heading Optimization Tools. This menu allows you to define the number, sequence and URLs of a frameset.
It is possible to set the Java Virtual Machine properties with the
dialog from the
menu. One main task of this feature is to set
the IP-address (or DNS name) of an SMTP server for sending mails. The following
example sets the mail.smtp.host to mailhost.
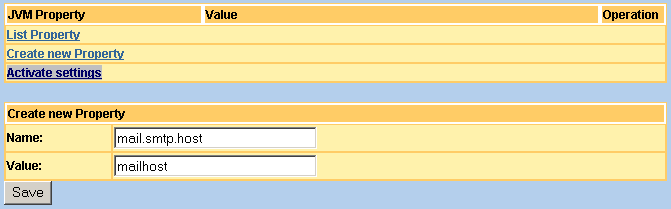
The properties are saved in the configuration file. When the System Manager is restarted, all properties will also be set. Before you create a new property, you should check whether it already exists. The link lists all active JVM properties.
After making changes, you must activate them with .
This feature allows you to transport one single file or one ZIP file from your desktop to the SAP R/3 Gateway web application. The page on the menu (http://YourGateway:8080/sapr3gateway/setup/upload) allows you to select a file on your desktop.

The upload handles two kinds of file depending on the file extension:
Files with ZIP extension are unzipped and all files contained in them are saved as in webapps/sapr3gateway directory.
Files without ZIP extension are saved in the webapps/sapr3gateway directory.
You can select between two uploads:
Upload all files without backupFiles .
Backup all existing files before overwriting.
When the command has been finished, the page displays the result of the upload. If you select the Backup option, the created backup ZIP file name is displayed. This created ZIP file can be used for undoing an upload. The version information in META-INF/MANIFEST.MF is saved too. This means you have the version information in the created ZIP file and on undoing, the version information is restored.
To support multiple environments created by
Clone Environment Wizard, the
upload wizard asks the System Manager for configuration information. The URL of
System Manager can be set to
http://YourGateway:8080/sapr3gateway/setup/SystemConstancy.
Set the value of System Manager URL (SM_URL) to
http://localhost:8080/sapr3gateway/manager.
This wizard provides support for step-by-step duplication of an existing environment.
If you wish to develop the IDL of Rpc2Rfc or Rfc2Rpc kernels in several departments or for different projects, we recommend cloning the current development, deployment and Running Task environments to a new one. It will then be possible to work with two or more IDLs and to have these executables running in parallel. The main advantage to this configuration is that the IDLs can be transferred to the production environment separately and independently. To provide support for multiple IDLs using this wizard, follow these main steps.
Copy the file system root directory of the selected kernel to a new one.
Add development, running task and deployment configurations to the System Manager.
Add a role for the access control list.
To install this wizard as a menu item, call the following URI http://YourGateway:8080/sapr3gateway/manager/cloneEnvironment. The first request creates the menu item, after the second request you will see the menu item in the menu.