
An object locking mechanism prevents concurrent updates when working with objects that are stored on a remote development server.
The exercises below demonstrate locking for an object that you are currently modifying in the program editor of Natural Studio. You will map the same development server once more. When you then try to open the same object from the new session, a locking message is shown.
For more information, see Object Locking in the Remote Development Using SPoD documentation of Natural for Windows.
This document covers the following topics:
When you open an object, it is locked for all other users until you close it.
You will now display the Natural code of the DEMO program
that you have previously created.
 To open the
 DEMO program in the logical view
In the library workspace, select the program DEMO,
invoke the context menu and choose .
Or:
In the library workspace, select the program DEMO and
press CTRL+O.
Or:
Double-click the name of the DEMO program.
The program is now shown in a program editor window.
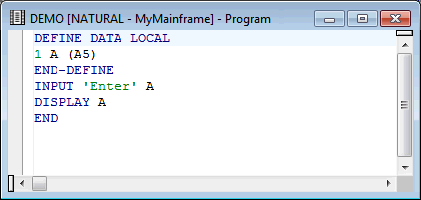
Do not close this program editor window. Leave it open so that locking can be demonstrated with the next exercise.
When you try to open an object that is currently being modified by another user, the corresponding lock message is shown. This message tells you which user is currently modifying the object and the date and time it was locked.
In order to demonstrate locking, you will first map the same development
server once more. You will then try to open the DEMO program from
the new session.
To open the same object from another session
From the menu, choose .
Or:
Choose the following toolbar button:
![]()
The Map Environment dialog box appears.
Enter all required information as described under Connecting to a Development Server for the First Time.
In the new session, expand the node of the library containing the
DEMO program.
Double-click the name of the DEMO program.
A lock message is now shown in a dialog box. It shows the ID of the user by whom the object was locked, and the date and time when the object was locked.
Choose the button to close the dialog box.
You will now unlock your DEMO program from the session in
which it is currently locked (not the session in which it was opened).
Note:
When Natural Security is active, it is possible that you cannot use
certain commands. Thus, it may be possible that you are not allowed to unlock
your own objects.
To unlock a locked object
In library workspace, select the library containing the locked
DEMO program.
From the menu, choose .
Or:
Choose the following toolbar button:
![]()
The Unlock Objects dialog box appears. The name of the library that is currently selected in library workspace is automatically provided.
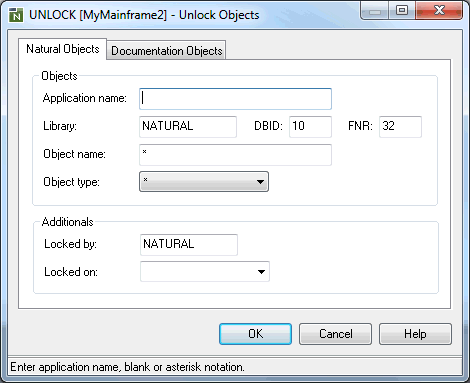
Choose the button (without entering any information).
When locked objects exist, they are shown on the Unlock Objects tab of the results window.

In the results window, select the object to be unlocked.
Invoke the context menu and choose .
The object is still shown on the Unlock Objects tab. The Message column, however, now indicates that the object has been unlocked.
To hide the results window, choose the standard close button at the top of the results window.
Or:
From the menu, choose
.
Or:
Press ALT+5.
When the results window is not shown in the Natural Studio window, no check mark is shown in the menu next to the command.
Note:
You can undock and
dock the results window as described previously in this
tutorial.
You can display a list of all locked objects for the currently active development server. This includes the objects of all users in all libraries. You can unlock any object contained in this list.
It is only possible to display and unlock objects from another user in a non-secure environment (i.e. when Natural Security is not active on the development server). In a secure environment, the administrator defines which user locks may be unlocked by other users.
To display all locked objects
From the menu, choose .
Or:
Choose the following toolbar button:
![]()
The Unlock Objects dialog box appears.
Enter an asterisk in the Library text box.
This will display the locked objects in all libraries.
Enter an asterisk in the Locked by text box.
This will display the locked objects of all users.
The dialog box should now look as follows:
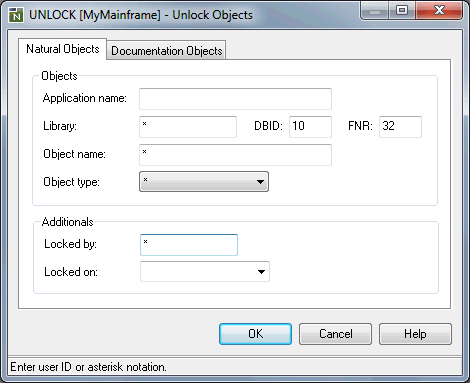
Choose the button.
The results window is shown again, displaying all locked objects.
If you want to delete the Unlock Objects tab from the results window, select an object name in the first column, invoke the context menu and choose . This tab will automatically be redisplayed the next time you display locked objects in the results window.
Before you continue with the next section, hide the results window as described above.
Locked objects cannot be moved.
When you try to move a folder containing locked objects to another folder (for example, via drag-and-drop), a lock message appears.
When you choose the button to close the dialog box, another dialog box appears, asking whether you want to continue the move.
When you choose the button, all objects except the locked objects are moved.
You can now proceed with the next exercise: Handling Applications.