
A Natural development environment contains all application components such as parameter modules, system files and buffer pool.
This document covers the following topics:
SPoD supports the following types of environment:
local environment on a workstation (this is also the runtime environment of Natural Studio)
remote environment on a development server
You can check which of these two environments is currently active. The active environment is always indicated in the command line, next to the Command drop-down list box. When the command line is not shown, you can display it as described previously in Displaying the Command Line.
In the example below, the local environment is active and you are
currently logged on the the library SYSTEM.
![]()
All commands that you issue are always applied to the active environment. When you edit a Natural object, the corresponding editor is invoked and the object is taken from the active environment. When you execute an object, it is executed in the active environment.
Only one environment can be active at one point in time.
In order to perform remote development, you have to activate a remote
Natural environment. You do this by connecting to the appropriate Natural
development server. Each Natural development server provides all remote
services (such as access or update) for a specific FUSER system
file.
If you want to connect to a development server for the very first time, you have to map it as described below. Once you have connected to a development server, a node for this development server session is automatically shown in the tree the next time you invoke Natural Studio.
If you do not know the name and port number for your development server, ask your administrator before proceeding with the next exercise.
Note:
It is possible to map the same development server more than once,
for example, if you want to have development server sessions with different
session parameters. To switch to another session, you simply select the
corresponding node in your library workspace.
 To connect (map) to a development server
From the menu, choose .
Or:
Use the following toolbar button:
![]()
The Map Environment dialog box appears.
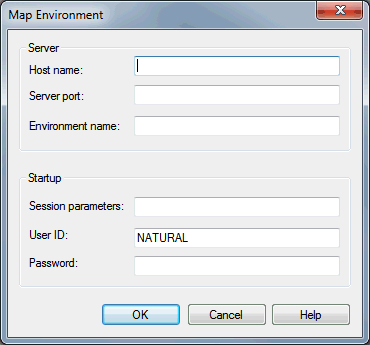
In the Host name text box, enter the name of the development server.
In the Server port text box, enter the TCP/IP port number of the development server.
Optionally. In the Environment name text box, enter the name that is to appear in the tree (for example, "My Mainframe"). If you leave this text box blank, a combination of server name and port number is shown in the tree.
If dynamic parameters are required for your development server, specify them in the Session parameters text box. Otherwise, leave this text box blank.
Your user ID is automatically provided. If you want to map the development server using a different user ID, specify it in the User ID text box. This is useful, for example, when Natural Security is active on the development server and administrator rights are to be used.
If Natural Security is installed on the development server, specify the required password in the Password text box. Otherwise, leave this text box blank.
Choose the button.
When the connection has been established, all libraries (according to the security profile) for this session are shown in your library workspace. You are automatically logged on to your default library.
The command line now shows the name of the library that is currently selected in the tree and the name of the active environment (i.e. the name you specified for the development server).
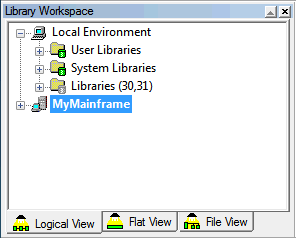
Once you have connected to a development server, its name is shown as a node in the tree of your library workspace.
You will now learn how to disconnect a development server and how to connect it again.
To disconnect a connected development server
In the library workspace, select the node for a connected development server.
From the menu, choose .
Or:
Invoke the context menu and choose
.
Or:
When the Tools toolbar is shown, choose the following toolbar
button.
![]()
When a development server has been disconnected, its state is shown as follows in the tree:
![]()
To connect a disconnected development server
In the library workspace, select the node for a disconnected development server.
From the menu, choose .
Or:
Invoke the context menu and choose
.
Or:
When the Tools toolbar is shown, choose the following toolbar
button.
![]()
The Map Environment dialog box appears. It shows the information that you have provided when you have mapped the development server.
If required, specify the Natural Security password in the Password text box. Otherwise, leave this text box blank.
You need not specify any other information.
Choose the button.
When the connection has been established, all libraries (according to the security profile) for this session are shown in your library workspace. You are automatically logged on to your default library.
Note:
When you invoke Natural Studio, a Map
Environment dialog box appears for each development server which was
active (that is: connected) when you terminated Natural Studio. You can then
decide whether you want to connect to this development server again.
A remote environment is mapped, if the environment is shown in the tree. A remote environment is connected if an appropriate session on the server exists. The command automatically includes a command.
It is possible to remove a development server from the tree: Select the server, invoke the context menu and choose the command. The command automatically includes a command. If the development server is still connected when unmapping it, the running session is shut down. All editor windows that have been opened for this server session are closed.
Connected environments can be disconnected, and disconnected environments can be connected.
You will now log on to the library SYSSPODA which contains
the objects that will be used in this tutorial.
To log on to a library
Make sure that the logical view is active in your library workspace.
Under the node for the development server session that you have just mapped, use the plus sign next to the node "System Libraries" to expand the tree.
The system libraries are now listed.
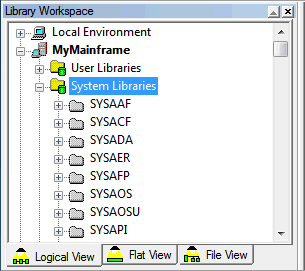
Scroll down the list until the library SYSSPODA is shown
in the tree.
To log on to the library, simply select the library name
SYSSPODA.
The status line at the bottom of the Natural Studio window informs you that this operation has been sent to the server.
To display the contents of the library, use the plus sign next to the
library name SYSSPODA to expand the tree.
You can now proceed with the next exercise: Issuing Commands.