This document tells you how to get started with the terminal application of Entire Connection.
If you do not specify otherwise during installation, an Entire Connection folder automatically appears in the folder of the menu after Entire Connection has been installed. It contains the shortcuts for the Entire Connection components, including the terminal application.
![]() To start the terminal application
To start the terminal application
From the menu, choose .
It is assumed that you logon as an administrator. Therefore, the following default settings are used:
"SYSTEM" as the default name.
"PASSWORD" as the default password.
It is recommended that you create a shortcut on your desktop.
If user information is required, the Entire Connection Logon dialog box appears and you must proceed as described below.
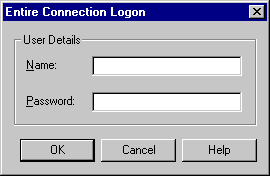
Enter the name that the administrator has assigned to you.
Enter your password (if required).
Choose the button.
The terminal application is now started with the rights that are defined for you.
When you start Entire Connection for the very first time, not all of the above elements are shown in the application window. These elements can be shown or hidden using the corresponding commands in the menu.
The following topics are covered below:
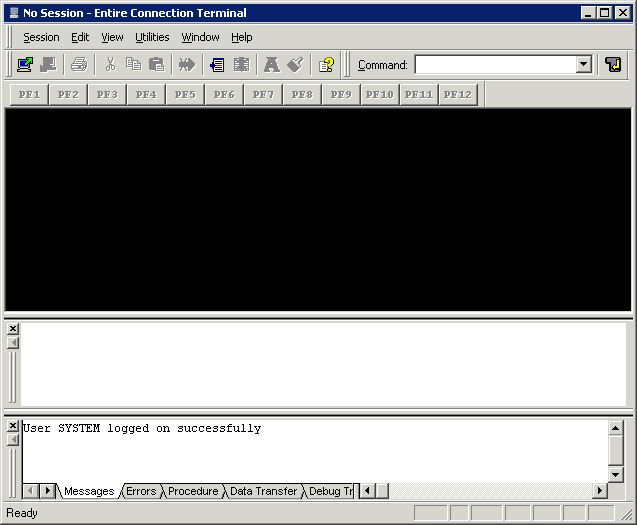
When a host session is active, its name is indicated in the title bar. Otherwise, "No Session" is shown.
The following menus are available:
| Using the commands in this menu you can start or end a host session. You can also modify the font and color used for the information shown in a host screen as well as print a host screen or define BS2000 P-keys. In addition, you can display security information for SSL sessions. | |
| Using the commands in this menu, you can copy or cut information from the host screen and paste it in a different location. | |
| Using the commands in this menu, you can show or hide the various elements of the application window (such as the toolbar, keypad, output window or input history). When you exit the terminal application, these settings are stored in the Windows registry. | |
| Using the commands in this menu, you can invoke the task list or unattended workstation. You can also cancel a data transfer, cancel a procedure file, lock the current session, switch to the Configuration Manager or to the Host Printer Manager, or define the maximum number of lines in the output window. | |
| When you choose from this menu, you access the Entire Connection
documentation.
When you choose from this menu, information about Entire Connection is shown. When you choose from this menu, you can check the Software AG web site for the latest information on products or events. |
Note:
The shortcut keys that are displayed next to a menu command are
not available when the active
key
scheme uses them for different purposes.
You can execute the most important Entire Connection functions using the standard toolbar.
Using the mouse, you can drag the standard toolbar to another position:
for example, so that it is shown behind or below the command line, or to the left or right of the terminal emulation screen,
so that it is shown in a window of its own:

You can move the window freely on your screen. You can move it back to the application window (e.g. back to its original position below the menu bar) so that it is no longer shown in a window. This process is called "docking". To prevent docking, press CTRL while moving the window.
The toolbar buttons represent the following menu commands:
|
|
( menu) |
|
|
( menu) |
|
|
( menu) |
|
|
( menu) |
|
|
( menu) |
|
|
( menu) |
|
|
( menu) |
|
|
( menu) |
|
|
( menu) |
|
|
( menu) |
|
|
( menu) |
|
|
( menu) |
|
|
( menu) |
![]() To switch the standard toolbar display on and off
To switch the standard toolbar display on and off
From the menu, choose .
When the standard toolbar is displayed in the application window, a check mark is shown next to the command.
You can execute an Entire Connection procedure file in debug mode using the buttons in the debug toolbar. This toolbar appears automatically when you start debugging. See Debugging a Procedure File for detailed information.
![]() To switch the debug toolbar display on and off
To switch the debug toolbar display on and off
From the menu, choose .
When the debug toolbar is displayed in the application window, a check mark is shown next to the command.
Note:
This command is only available as long as you are debugging a
procedure file.
You can execute the following directly from the command line:
By default, the command line is shown to the right of the standard toolbar. The current working directory is now shown as tooltip in the text box of the command line.
Entire Connection saves each character string you enter in the command line. Each string can be up to 255 characters long. The drop-down list box contains your last 20 entries. You can select an entry and execute it once more.
When the mouse pointer is positioned on the command line, you can use the right mouse button or press SHIFT+F10 to invoke a context menu. Using the commands from this context menu, you can, for example, copy a text string to the command line or undo your last input.
Using the mouse, you can drag the command line to another position:
for example, so that it is shown before or below the standard toolbar, or
so that it is shown in a window of its own:

You can move the window freely on your screen. You can move it back to the application window (e.g. back to its original position below the menu bar) so that it is no longer shown in a window. To prevent docking, press CTRL while moving the window.
![]() To switch the command line display on and off
To switch the command line display on and off
From the menu, choose .
When the command line is displayed in the application window, a check mark is shown next to the command.
![]() To execute a command from the command line
To execute a command from the command line
Enter the command and, if applicable, all required parameters.
For example:
DISCONNECT
Press ENTER.
Or:
Choose the following button:
![]()
![]() To execute a task from the command line
To execute a task from the command line
Enter the name of the task and, if applicable, all required parameters.
For example, to execute a Natural source program (Natural must be active on the host):
DSOURCE RPT01 SAGXX File1
Press ENTER.
Or:
Choose the following button:
![]()
The program RPT01 in library SAGXX is
downloaded to a PC file named "File1".
If you do not specify the parameters for DSOURCE in
the command line, a dialog box appears and you must supply the required
parameters (i.e. program, library and file name).
![]() To execute a procedure file from the command line
To execute a procedure file from the command line
Enter the command EXECUTE followed by a
blank, the name of the procedure file and, if applicable, all required
parameters.
For example:
EXECUTE LOGON
Press ENTER.
Or:
Choose the following button:
![]()
The status bar at the bottom of the application window is used to display system messages and help texts for the currently selected menu command or toolbar button.
![]() To switch the status bar display on and off
To switch the status bar display on and off
From the menu, choose .
When the status bar is displayed in the application window, a check mark is shown next to this command.
When communication with the host environment is established, terminal emulation is displayed in the application window. You can run several sessions with different hosts concurrently. For each session, a new terminal application window is invoked.
The following terminal types are emulated:
3270
VT
9750
See Working with Host Sessions for further information.
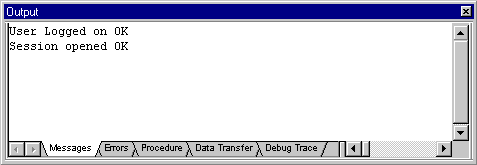
The output window is shown below the terminal emulation. It provides the following tabs:
Messages
Shows system messages (for example, whether logon was successful).
For BS2000 communication, information from the system line is also shown
here.
Errors
Shows all error messages that occur during the current terminal
emulation session.
Procedure
Shows all messages that result from executing a procedure, except
those that require user input.
Data Transfer
Shows all start, progress and end messages that result from
transferring a file.
Debug Trace
Intended for debugging purposes under the supervision of your
technical support.
When you select a tab, the corresponding pane is shown providing information on your recent actions. The appropriate pane is automatically shown, for example, when you execute a procedure file.
![]() To switch the output window display on and off
To switch the output window display on and off
From the menu, choose .
When the output window is displayed in the application window, a check mark is shown next to this command.
To modify the size of the output window, move the mouse pointer over the border between the output window and the window above it until the pointer changes, showing two arrows pointing into opposite directions. Then drag the border using the mouse until the output window has the desired size.
Using the mouse, you can drag the output window to another position so that it is shown in a window of its own:
You can then move the output window freely on your screen. You can move it back to its original position in the application window. To prevent docking, press CTRL while moving the window.
When the mouse pointer is positioned on the output window, you can use the right mouse button or press SHIFT+F10 to invoke a context menu. This context menu provides the following commands:
| Copies the selected text to the Windows clipboard. If text has not been selected, the contents of the current pane is copied to the clipboard. | |
| Clears the current pane so that no more text is shown. | |
| Writes the contents of the current pane to a file. | |
| Enables keyboard users to go to a specific pane of the output window. | |
| When a check mark is shown next to this command, the output window can be docked at its original position in the application window. When a check mark is not shown, docking is not possible; a previously docked output window is shown in a window of its own. | |
| Switches the output window display off. This corresponds to the command in the menu. |
You can define the maximum number of lines that are to be written to the output window. See below.
![]() To define the maximum number of lines in the output window
To define the maximum number of lines in the output window
From the menu, choose .
The following dialog box appears.
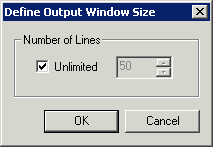
When the Unlimited check box is selected, the number of lines in the output window is not limited.
When the Unlimited check box is not selected, you can specify the maximum number of lines using the spin box.
Specify the required information in the dialog box.
Choose the button.
The window for the input history is shown below the terminal emulation. As soon as you press ENTER, your last character input is written to the input history. The input history contains your last 50 entries. Using the input history, you can execute a previously entered command once more or insert previously entered text in a field.
Identical input is only shown once in the input history. A triangle indicates the most often used entry.
The content of an invisible field (for example, a password) is not written to the input history. If you have entered information in more than one field, only the input in the current visible field is written to the input history. When you close the terminal application window, the input history is cleared.
This feature requires that the option Enable recall feature and input history has been enabled in the session properties of all required sessions. See the description of the Terminal property page in the Overview of Object Properties for further information. If it has not been enabled, it is only possible to open an input history file that was previously saved. You can then use the entries in this file to execute commands or insert text. New entries, however, are not written to the input history.
Note:
This option is not available for communication with terminals of
type VT.
![]() To switch the input history display on and off
To switch the input history display on and off
From the menu, choose .
When the input history is displayed in the application window, a check mark is shown next to this command.
To modify the size of the input history window, move the mouse pointer over the border between the input history window and the window above it until the pointer changes, showing two arrows pointing into opposite directions. Then drag the border using the mouse until the input history window has the desired size.
Using the mouse, you can drag the input history window to another position so that it is shown in a window of its own:

You can then move the input history window freely on your screen. You can move it back to its original position in the application window. To prevent docking, press CTRL while moving the window.
![]() To execute an entry in the input history
To execute an entry in the input history
Double-click the desired entry.
Or:
Select the desired entry, click the right mouse button or press
SHIFT+F10, and from the resulting context menu, choose
.
When the mouse pointer is positioned on the input history window, you can use the right mouse button or press SHIFT+F10 to invoke a context menu. This context menu provides the following commands:
| Clears the input history so that no more entries are shown. | |
| Deletes the selected entry from the input history. | |
| Locks the list so that new input is not written to the input history. This is helpful, if you have opened a file containing your own input history (see below). As long as the list is locked, the entries in the input history are shown with another color and certain commands in the context menu are not available. | |
| Inserts the selected entry at the current position of the terminal emulation and sends it to the host. | |
| Inserts the selected entry at the current position of the terminal emulation. | |
| Displays the most recent entry at the top of the list. | |
| Displays the entries in alphabetical order. | |
| Displays the most often used entries at the top of the list. | |
| Writes the contents of the input history to a file. A dialog box appears prompting you to enter a file name. | |
| Opens an input history that was previously saved and thus overwrites the current entries. A dialog box appears prompting you to specify the name of desired file. You can also create your own file (for example, containing frequently-used commands) and then read this file into the input history window. Your file must be in ASCII format and each entry must be written to a line of its own. When the file is opened, all entries in this file are read into the input history. Exception: if the file contains blank lines, all entries after the first blank line are ignored. | |
| When a check mark is shown next to this command, the input history window can be docked at its original position in the application window. When a check mark is not shown, docking is not possible; a previously docked input history window is shown in a window of its own. | |
| Switches the input history window display off. This corresponds to the command in the menu. |
When you start debugging a procedure file, two windows (a procedure window and a variable window) appear. See Debugging a Procedure File for detailed information.
![]() To switch the procedure window display on and off
To switch the procedure window display on and off
From the menu, choose .
When the procedure window is displayed in the application window, a check mark is shown next to the command.
![]() To switch the variable window display on and off
To switch the variable window display on and off
From the menu, choose .
When the variable window is displayed in the application window, a check mark is shown next to the command.
Note:
These commands are only available as long as you are debugging a
procedure file.
A keypad contains buttons that represent host function keys. You can display different keypads.
Using the mouse, you can drag a keypad to another position:
for example, so that it is shown below the toolbar, or to the left or right of the terminal emulation screen,
so that it is shown in a window of its own:

You can move a keypad freely on your screen. You can move it to the application window (e.g. below the toolbar) so that it is no longer shown in a window. To prevent docking, press CTRL while moving the window.
![]() To switch the keypad display on and off
To switch the keypad display on and off
From the menu, choose .
When a keypad is displayed, a check mark is shown next to its name.
When working with the keyboard, you can use the following shortcut keys:
| Shortcut Key | Function |
|---|---|
| CTRL+SHIFT+1 | Activate main window (terminal emulation). |
| CTRL+SHIFT+2 | Activate window for input history. |
| CTRL+SHIFT+3 | Activate output window. |
| CTRL+SHIFT+4 | Activate procedure window (debug mode). |
| CTRL+SHIFT+5 | Activate variable window (debug mode). |
| SHIFT+F10 | Open context menu. |
The complete Entire Connection documentation is available as an HTML help file.
![]() To access the documentation
To access the documentation
From the menu, choose .
Or:
Choose the following toolbar button:
![]()
![]() To invoke context-sensitive help
To invoke context-sensitive help
In a dialog box, choose the button.
When you quit the terminal application, the following is automatically executed:
If a host session is active for which an automatic logoff procedure has been defined, the procedure is processed. The session is then closed (i.e. it is disconnected from the host).
If a host session is active for which an automatic logoff procedure was not defined, the session is immediately closed.
If a shutdown task has been defined, it is processed when the last terminal application is closed.
Once the above conditions have been checked and processed, the terminal application is closed. The settings in the menu as well as position and size of the application window are stored in the Windows Registry. The next time, you start the terminal application, its application window is restored as it appeared when you last used it.
![]() To quit the terminal application
To quit the terminal application
From the menu, choose .
Or:
Choose from the Control menu.
Or:
Click the corresponding standard button in the title bar.
![]() To quit all terminal applications at once
To quit all terminal applications at once
From the menu, choose .
The terminal application is started by invoking Pccterminal.exe.
If you create a shortcut for Pccterminal.exe, you can modify its properties in order to define the parameters with which the terminal application is to be started.
Note:
This information applies only to shortcuts on your desktop (it does
not apply to the shortcut in the Start menu or a copy of it).
The syntax for starting the terminal application is the following:
[drive:\path\]Pccterminal.exe username password a b c d e f g h /NOSPLASH /SF:path-to-sharefile
User name and password are optional parameters. If a parameter is not required, you must specify an asterisk (*).
The optional parameters a through
h stand for the following (you cannot specify an
asterisk here):
| Parameter | Description |
|---|---|
a |
A task or procedure name. |
b through
h |
Seven parameters that can be passed to the task or procedure
specified in parameter a.
|
Examples:
Invoke the terminal application, prompt for user ID and password and then open the default session:
Pccterminal.exe * * te
Invoke the terminal application, prompt for password, if required, and then open the default session:
Pccterminal.exe MYNAME * te
When you specify the option /NOSPLASH, Entire
Connection's startup screen does not appear.
When you specify the option /SF:
path-to-sharefile, you define the share file
that is to be used. If the path to the share file contains blanks, you must put
the path in quotes. Example:
Pccterminal.exe /SF:"C:\My Files\mysharefile.sag"