The Session Properties dialog box provides the following property pages:
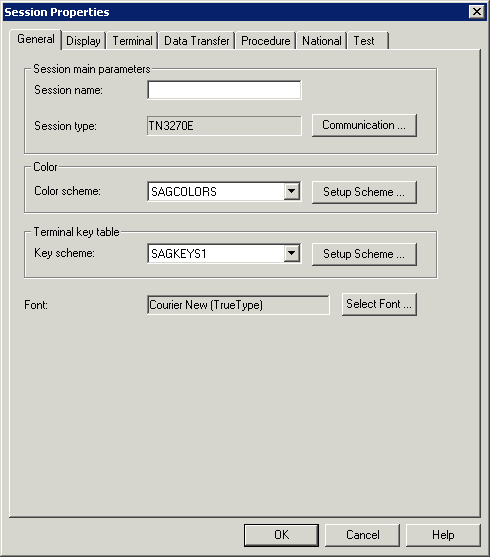
The name can be up to 32 characters long and may contain blanks. It is only possible to specify a session name, when you are currently adding a new session to the share file. Later, this text box does not allow modifications. It is not possible to define identical names for display sessions and printer sessions; an error message will appear in this case.
Displays the defined session type. To display the Communication dialog box for this session type, choose the button.
Select the desired color scheme from this drop-down list box. To display the dialog box for the color scheme that is currently selected in this drop-down list box, choose the button next to this drop-down list box.
Select the desired key scheme from this drop-down list box. To display the Terminal Emulation Key Scheme dialog box for the key scheme that is currently selected in this drop-down list box, choose the button next to this drop-down list box.
Displays the font defined for terminal emulation. To display the Font dialog box in which you can define another font, choose the button.
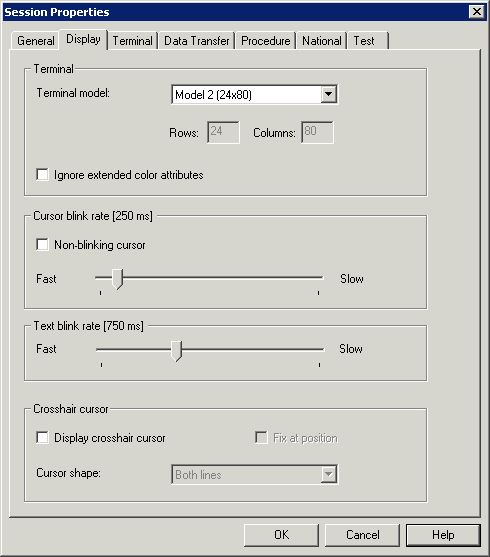
Select the primary terminal model you want to use from this drop-down list box. The terminal model you want to use must be defined or provided by the host system.
These text boxes can only be used with the session type TN3270(E) and only when the terminal model IBM Dynamic has been selected from the above drop-down list box. In order to use the terminal model IBM Dynamic, you have to use the IBM logmode D4C32XX3 in VTAM.
You can specify the screen size for IBM Dynamic using these text boxes. The maximum size is 80x200.
When this check box is selected, the extended color attribute bytes sent by the host are ignored. This means that the colors are not taken from the data stream; only the field colors are used for display. Other extended attributes are displayed (e.g. blinking oder underlined).
When the Non-blinking cursor check box is not selected, you can use the slider to specify the cursor blink rate in milliseconds. The currently defined value is shown in the header of the group box.
When the Non-blinking cursor check box is selected, the cursor in the terminal application does not blink.
Use the slider to specify the text blink rate in milliseconds. The currently defined value is shown in the header of the group box.
A crosshair cursor consists of two thin lines, one horizontal and one vertical, meeting at the lower left corner of the cursor. These lines help to see what is contained in the same line and column.
When this check box is selected, a crosshair cursor is displayed in addition to the regular cursor; it does not replace the regular cursor.
The setting of this option is the default setting for the menu command with the same name in the terminal application. However, each user can define individual settings in the terminal application; for further information, see Setting the Options in the section Terminal Emulation.
Note:
The color of the crosshair cursor can be changed in the
mainframe color scheme.
When the display of the crosshair cursor has been enabled, you can additionally define whether the crosshair cursor is to be fixed at the current position.
The setting of this option is the default setting for the menu command with the same name in the terminal application. However, each user can define individual settings in the terminal application; for further information, see Setting the Options in the section Terminal Emulation.
When the display of the crosshair cursor has been enabled, you can additionally define whether only the horizontal or the vertical line is to be shown. To do so, select either Horizontal line or Vertical line from the drop-down list box. By default, is active.
The setting of this option is the default setting for the corresponding menu commands in the terminal application. However, each user can define individual settings in the terminal application; for further information, see Setting the Options in the section Terminal Emulation.
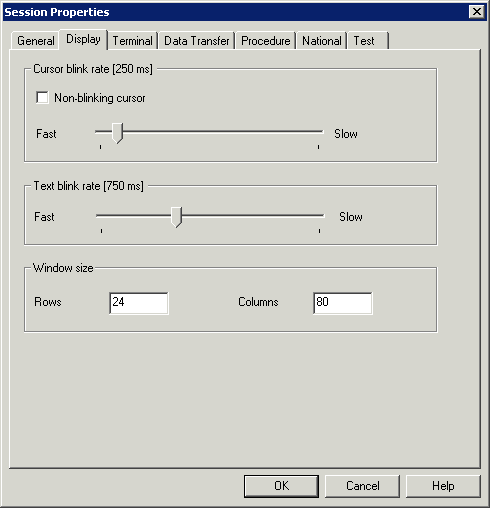
When the Non-blinking cursor check box is not selected, you can use the slider to specify the cursor blink rate in milliseconds. The currently defined value is shown in the header of the group box.
When the Non-blinking cursor check box is selected, the cursor in the terminal application does not blink.
Use the slider to specify the text blink rate in milliseconds. The currently defined value is shown in the header of the group box.
The window size for the VTxxx display. The default size is 24 rows and 80 columns.
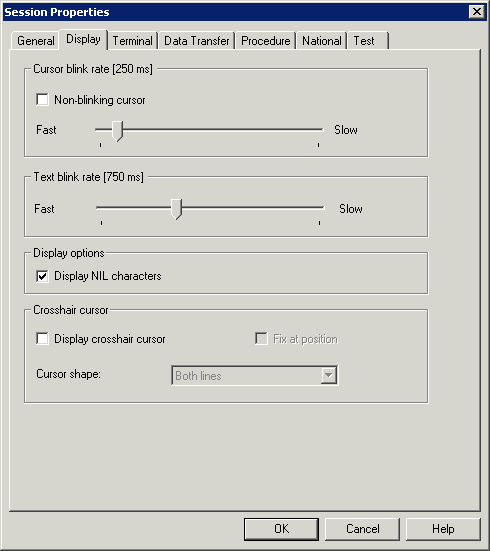
When the Non-blinking cursor check box is not selected, you can use the slider to specify the cursor blink rate in milliseconds. The currently defined value is shown in the header of the group box.
When the Non-blinking cursor check box is selected, the cursor in the terminal application does not blink.
Use the slider to specify the text blink rate in milliseconds. The currently defined value is shown in the header of the group box.
When this check box is selected, the BS2000 NIL characters (dots) are shown instead of blanks.
A crosshair cursor consists of two thin lines, one horizontal and one vertical, meeting at the lower left corner of the cursor. These lines help to see what is contained in the same line and column.
If this check box is selected, a crosshair cursor is displayed in addition to the regular cursor; it does not replace the regular cursor.
The setting of this option is the default setting for the menu command with the same name in the terminal application. However, each user can define individual settings in the terminal application; for further information, see Setting the Options in the section Terminal Emulation.
Note:
The color of the crosshair cursor can be changed in the
mainframe color scheme.
When the display of the crosshair cursor has been enabled, you can additionally define whether the crosshair cursor is to be fixed at the current position.
The setting of this option is the default setting for the menu command with the same name in the terminal application. However, each user can define individual settings in the terminal application; for further information, see Setting the Options in the section Terminal Emulation.
When the display of the crosshair cursor has been enabled, you can additionally define whether only the horizontal or the vertical line is to be shown. To do so, select either Horizontal line or Vertical line from the drop-down list box. By default, is active.
The setting of this option is the default setting for the corresponding menu commands in the terminal application. However, each user can define individual settings in the terminal application; for further information, see Setting the Options in the section Terminal Emulation.
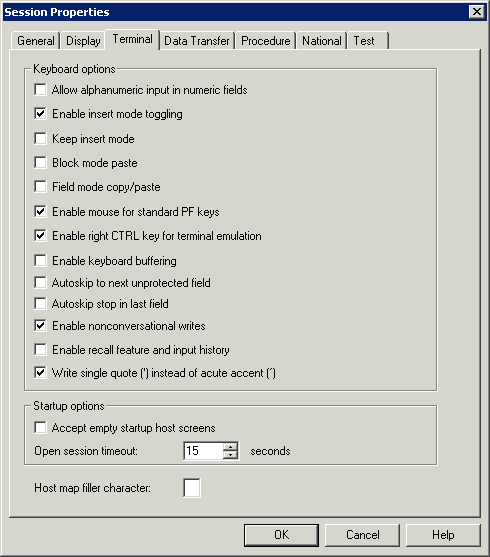
If this check box is selected, you can enter alphanumeric characters in numeric entry fields while in terminal emulation (for example, to enable you to enter plus or minus signs).
If this check box is selected, the INSERT key in terminal emulation mode acts like the INS key in other Windows applications (such as Word).
This option is affected by the setting of the Keep insert mode option. If Keep insert mode is enabled, it is recommended that you also enable Enable insert mode toggling. Otherwise, it is not possible to revert to overwrite mode.
By default, the terminal is in overwrite mode. If you want to insert characters, you have to press the INS key to activate insert mode. The insert mode is always reset to overwrite mode when you press ENTER, a PF key or any other key that sends the screen to the host.
If this check box is selected, the terminal is not reset to overwrite mode after sending a screen to the host.
The setting of this option is the default setting for the menu command with the same name in the terminal application. However, each user can define individual settings in the terminal application; for further information, see Setting the Options in the section Terminal Emulation.
This mode is helpful when working with editors. If this check box is selected, the following applies: When you select a block of text and paste it in the middle of a line, the block remains intact. The lines after the first line begin in the same column as the first line. When block mode paste is not enabled, the lines after the first line would start at the beginning of a line.
The setting of this option is the default setting for the menu command with the same name in the terminal application. However, each user can define individual settings in the terminal application; for further information, see Setting the Options in the section Terminal Emulation.
If this check box is selected, you can copy the contents of several input fields in a screen to another set of input fields which has the same structure. During the paste operation, the target input fields (which can also be on a different screen) are filled field by field as they were copied from the source fields. Any non-input fields (protected fields and screen areas) that are part of your selection are ignored during the paste operation.
The setting of this option is the default setting for the menu command with the same name in the terminal application. However, each user can define individual settings in the terminal application; for further information, see Setting the Options in the section Terminal Emulation.
If this check box is selected, you can double-click the name of a defined function key (PF key or PA key) on the screen in order to send the corresponding key code to the host.
The setting of this option is the default setting for the menu command with the same name in the terminal application. However, each user can define individual settings in the terminal application; for further information, see Setting the Options in the section Terminal Emulation.
If this check box is selected, the right CTRL key on the
keyboard is enabled to be a function key. This function key is mapped to the
terminal emulation key TE-ENTER which, by default, sends
ENTER to the host.
If the terminal emulation screen is locked by the host application, this is indicated in the status line (for example, "X ()") and keyboard input is rejected by Entire Connection. If this check box is selected, keyboard input from the user when the keyboard is locked is buffered by Entire Connection and immediately sent to the host once the keyboard status becomes unlocked.
When the last possible character has been entered in an unprotected field, further behavior of the cursor depends on the field attribute and this check box. If this check box is selected, the cursor jumps to the next unprotected field. If this check box is not selected, the cursor jumps to the next position or jumps to the next unprotected field if the field contains the skip attribute.
This option only applies if the autoskip feature is enabled by the above Autoskip to next unprotected field option or if the field contains the skip attribute.
When the last possible character has been entered in the last unprotected field of a screen, further behavior of the cursor depends on this check box. If this check box is selected, the cursor remains in the last unprotected field. If this check box is not selected, the cursor jumps back to the first unprotected field on the screen.
If this check box is selected, Entire Connection immediately displays every new screen it receives.
If this check box is not selected, Entire Connection waits for a complete screen from the host and the keyboard unlock condition before displaying a new host screen. This avoids screen flickering. Some host applications, however, send screens to the terminal repetitively or without unlocking the keyboard.
If this check box is selected, the following applies:
Recall feature
Entire Connection stores up to 20 character strings that have been
entered by the user. You can recall a previous character string and insert it
at the current cursor position, using a terminal emulation key for which the
RECALL
command has been defined.
Input history
Entire Connection stores up to 50 user entries. These entries are
provided for selection in the
input
history window which is an element of the Terminal application
window. You can then execute a previously entered command once more or insert
previously entered text in a field.
If this check box is selected, a single quote (') is written when you press the acute accent key (´).
If this check box is not selected, an acute accent is written when you press the acute accent key.
This option is only available for TN3270. Select this check box, if an empty startup screen causes a timeout during the initialization of the session.
This parameter specifies the number of seconds Entire Connection will wait while opening a session. When the session cannot be opened after the defined number of seconds, opening will be canceled.
You can specify the character which is used as a filler character in the host maps. In insert mode, this character is treated like a blank character and is thus moved beyond the end of a field.
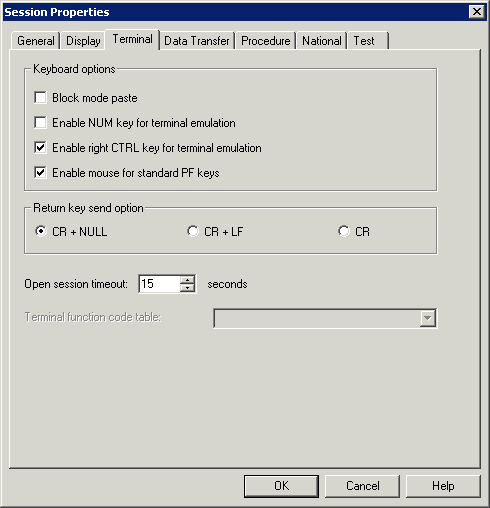
This mode is helpful when working with editors. If this check box is selected, the following applies: When you select a block of text and paste it in the middle of a line, the block remains intact. The lines after the first line begin in the same column as the first line.
The setting of this option is the default setting for the menu command with the same name in the terminal application. However, each user can define individual settings in the terminal application; for further information, see Setting the Options in the section Terminal Emulation.
If this check box is selected, the NUM key is used as a function key.
If this check box is selected, the right CTRL key on the
keyboard is enabled to be a function key. This function key is mapped to the
terminal emulation key TE-ENTER which, by default, sends
ENTER to the host.
If this check box is selected, you can double-click the name of a defined function key (PF key or PA key) on the screen in order to send the corresponding key code to the host.
The setting of this option is the default setting for the menu command with the same name in the terminal application. However, each user can define individual settings in the terminal application; for further information, see Setting the Options in the section Terminal Emulation.
Select the data that is to be sent to the host when the return key is pressed.
CR and NULL, or
CR and LF, or
CR only.
This parameter specifies the number of seconds Entire Connection will wait while opening a session. When the session cannot be opened after the defined number of seconds, opening will be canceled.
Optional. This drop-down list box is only available if you have created your own terminal function code table.
To create your own terminal function code table, copy the file Vtxxx.key in the tables folder of Entire Connection and give the copy a new name (e.g. Vt_hpux.key). Edit the new file: modify the table name "WiTeKeyTable VTXXX" (e.g. change it to "WiTeKeyTable VT_hpux") and the key definitions. The table name must start with "VT_" and may be up to 32 characters long. Import your terminal function code table using the Configuration Manager. You can then select your terminal function code table from this drop-down list box. When the text box of the drop-down list box is empty, the default terminal function code table Vtxxx.key is used.
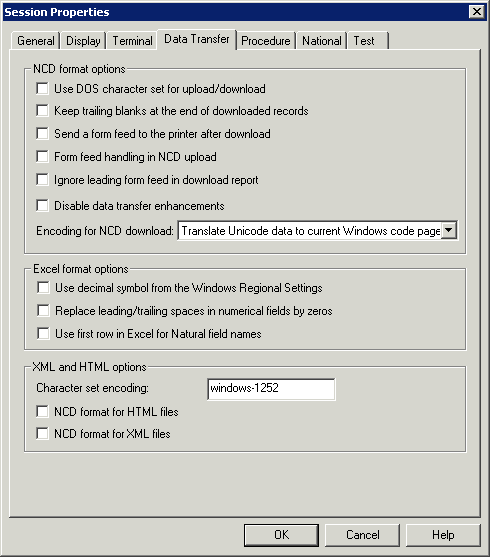
If this check box is selected, the DOS (OEM) character set is used in the following cases:
for data to be uploaded in NCD format;
for data to be downloaded to NCD format.
If this check box is not selected, the Windows ANSI character set is used.
When data are uploaded or downloaded using a dialog box, the character
set that is defined here is used as a default in the dialog box. When a dialog
box is not used (e.g. when a file name is specified using the
SET command), the character set that is defined here
is always used.
Normally, Entire Connection does not write to disk trailing blanks at the end of downloaded records. However, if this check box is selected, the trailing blanks are also written to disk, thus creating fixed length records in NCD format.
Normally, Entire Connection routes downloaded data to the printer transparently. However, if this check box is selected, a form feed is sent to the printer at the end of the download.
When you upload an ASCII file containing the ASCII form feed character (x'12') from the PC to the host, this ASCII character is converted to an EBCDIC space character (x'40).
To convert the ASCII form feed character to something other than a space on the host, you must mark this check box and edit the translation table for the appropriate communication method. The defined form feed character will then be used.
When you are downloading a report, an empty page precedes the report. However, if this check box is selected, this empty page is not generated.
If this check box is selected, the new field formats of Natural Version 4.1 for Mainframes and Natural Version 6.1 for UNIX (alphanumeric format greater than 253 and binary format greater than 126) are not supported. The format file (extension ncf) is written in the same way as with Entire Connection Version 4.3.1 or earlier.
If this check box is not selected, the new field formats are supported and the format file is written in a new form. See Format Files in section Terminal Emulation for further information.
Select the encoding for the NCD download from this drop-down list box. The encoding model that you want to use must be defined or provided by the host system. The format of the file that is created by the download depends on the encoding that has been selected here; the following options are available in this drop-down list box:
Translate Unicode data to current Windows code
page
If this option is selected in the drop-down list box, the Unicode
data that is downloaded will be converted to the current Windows code page that
is configured on the PC. Data conversion from Unicode to a Windows code page is
subject to data loss, because a given code page might not be able to represent
every character used in that particular Unicode data. The format of the file
created by the download is ANSI; this is the default setting when a new session
is created.
Download to UTF-16 if record contains Unicode
data
If this option is selected in the drop-down list box, the format of
the file created by the download depends on the data that is downloaded. If
there is no Unicode data in the downloaded data, the format is ANSI. If there
is Unicode data in the downloaded data, the format of the file is Unicode
UTF-16 LE (Little Endian).
Always download to UTF-16
If this option is selected in the drop-down list box, the data that
is downloaded is always stored in a file with the format Unicode UTF-16 LE
(Little Endian).
If this check box is selected, numbers are downloaded with the decimal symbol that has been defined in the Regional Settings of Windows.
If this check box is selected, all formats that can be defined in
Natural and SAP R/2 (for example, <X.Y> where X means digits
before the decimal symbol and Y means digits after the decimal symbol) appear
as cells with a custom format in Excel. According to the field definition on
the mainframe, the cell is filled with zeros to its maximum length.
| Example | |
|---|---|
| Definition: | #field N<3.8> |
| Initialization: | #field = 1.78 |
| Content of Excel cell: | 001.78000000
|
If this check box is selected, the Natural field names are downloaded to the first row of the Excel sheet that is created by the download. In addition, the comment "Natural Field Name" is added to each field in the first row in order to mark it as a Natural field name.
When you upload data from an Excel file, this option determines whether Entire Connection checks for the Natural field names or not. Make sure that the setting of this option corresponds to the data in your Excel file.
When creating a new session, the character set "windows-1252" is used as the default.
Specify the encoding that is to be
written to downloaded XML and HTML files,
used by the XML parser to interpret XML files correctly during upload; if an encoding is not specified, the character set "windows-1252" is used.
For download, the encoding is written to the file exactly as it has been specified it in this text box (including all possible errors). The application that is used to open the downloaded file (for example, Internet Explorer or Excel) uses the defined character set for displaying the contents of the file. The contents of the file (letters, numbers, special characters) are not converted to another format. The encoding is written to the downloaded file as follows:
XML
The encoding is written to the encoding declaration
which is part of the XML text declaration. Example:
<?xml version="1.0" encoding="windows-1252"?>
For further information on character encodings, see http://www.w3.org/TR/REC-xml/#charencoding.
HTML
The encoding is written to the META declaration.
Example:
<meta http-equiv=Content-Type content="text/html;
                  charset=windows-1252">
For further information on character encodings, see http://www.w3.org/TR/html4/charset.html#h-5.2.
If an encoding is not specified, the character set
"windows-1252" is written to the
encoding declaration (XML) or META declaration (HTML)
during download.
The following table lists some important character sets:
| Character Set | Description |
|---|---|
| ISO-8859-1 | ISO Latin 1 |
| UTF-8 | Unicode |
| windows-1250 | Windows Central Europe |
| windows-1251 | Windows Cyrillic |
| windows-1252 | Windows Western Europe |
| windows-1253 | Windows Greek |
| windows-1254 | Windows Turkish |
| windows-1255 | Windows Hebrew |
| windows-1256 | Windows Arabic |
| windows-1257 | Windows Baltic |
| windows-1258 | Windows Vietnamese |
| windows-874 | Windows Thai |
Normally, Entire Connection uses HTML format when uploading HTML files or downloading data to HTML. However, if this check box is selected, uploaded and downloaded HTML data are stored in NCD (ASCII) format.
Normally, Entire Connection uses XML format when uploading XML files or downloading data to XML. However, if this check box is selected, uploaded and downloaded XML data are stored in NCD (ASCII) format.
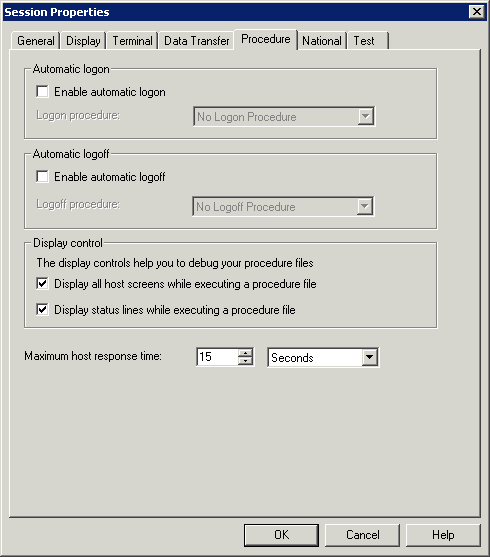
If this check box is selected, Entire Connection automatically executes the procedure file selected in the Logon procedure drop-down list box box when you start this host session.
Select the procedure file containing the necessary keystrokes to begin a host session from this drop-down list box. If the Enable automatic logon check box is selected, the procedure file is executed the first time you invoke a function that requires a connection with the host.
Logon procedures must be in the procedure directory specified in the user properties. Entire Connection assumes the procedure file has the extension ncp. This procedure file must be customized to work in your host environment.
If this check box is selected, Entire Connection automatically executes the procedure file selected in the Logoff procedure drop-down list box when you quit the terminal application. The logoff procedure is executed after your shutdown task, if you have one.
Select the procedure file containing the necessary keystrokes to end a host session from this drop-down list box. If the Enable automatic logoff check box is selected, the procedure file is executed when you quit the terminal application.
Logoff procedures must be in the procedure directory specified in the user properties. Entire Connection assumes the procedure file has the extension ncp. This procedure file must be customized to work in your host environment.
If this check box is selected, Entire Connection displays rows 1 through 24 of a host screen when executing a procedure file in terminal emulation mode. This parameter is useful for debugging procedure files.
If this check box is selected, Entire Connection displays host processing messages in the status line of the terminal emulation screen (this is not the status line of the application window).
This parameter specifies the length of time Entire Connection will wait for a host response before canceling the processing of a procedure file. You can either specify seconds or minutes. Select the desired unit from the corresponding drop-down list box. The default is set in the system preferences.
Use these parameter settings to localize the terminal emulation behavior.
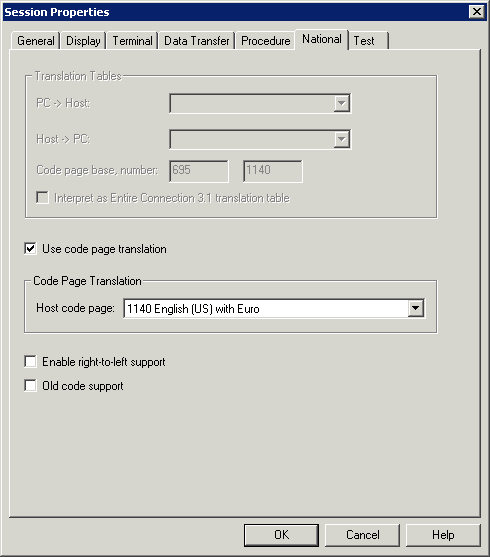
Only available when the Use code page translation check box (not available for all session types; see below) is not selected.
Tip:
It is recommended to use code page translation instead of translation
tables.
Select the translation tables to be used for data transfer from the following drop-down list boxes:
PC -> Host
Translation tables for PC-to-host transfer. The last two characters in
the name indicate the language. For example, ASC2(Ansi)EBCDICUS is US English
and ASC2(Ansi)EBCDICGR is German.
Host -> PC
Translation tables for the host-to-PC transfer. The characters
preceding "2ASC" indicate the language. For example,
EBCDICUS(Ansi)2ASC is US English and EBCDICGR(Ansi)2ASC is German.
English and German default tables for the different session types:
| Session Type | PC -> Host | Host -> PC |
|---|---|---|
| HLLAPI |
ASC2HLLAPIUS |
HLLAPIUS2ASC |
| BS2000 TCP/IP |
ASC2BS2TCPUS |
BS2TCPUS2ASC |
| TN3270 |
ASC2(Ansi)EBCDICUS |
EBCDICUS(Ansi)2ASC |
| VT100 Prot.-Converter |
ASC2VT7US |
VT7US2ASC |
| VTxxx |
ASC2VTXXUS |
VTXXUS2ASC |
These text boxes only shown for the session type TN3270(E). They are only available when the Use code page translation check box (not available for all session types; see below) is not selected.
When the the Translation Tables group box is not dimmed, the values for the code page base and number receive default values which are derived from the table names. However, this is only correct in the case when the customer has not changed the table in order to use a different code page and when the names have been kept. The values can/must be changed by the user.
For future use, Software AG recommends that you always use code pages and that you abandon the use of translation tables. For this reason, a code page is automatically used as the default setting when you create a new session (1141 when German has been selected as the user language; otherwise 1140).
However, if you want to continue using translation tables, you can manually enter the code page number that is to be sent to the host. The code page consists of a base and a number. Default values are automatically provided for the 3270 standard translation tables ASC2(Ansi)EBCDICxxx and EBCDICxxx(Ansi)2ASC.
The following page on the internet provides an overview of several standard CDCSGIDs (Coded Graphic Character Set Global Identifiers):
http://publibz.boulder.ibm.com/cgi-bin/bookmgr_OS390/BOOKS/CN7H6001/5.1.1?DT=19940512144120
Only available when the Use code page translation check box (not available for all session types; see below) is not selected.
If this check box is selected, the translation tables you have selected from the above drop-down list boxes are interpreted as Entire Connection Version 3.1 translation tables. This helps to facilitate the transition to the new version.
This check box is only shown for the session type TN3270(E). When it is selected, the information in the Translation Tables group box is dimmed.
If this check box is selected, ASCII is translated to EBCDIC using a standardized code page (instead of a translation table). Select the required code page from the Host code page drop-down list box.
This check box is only shown for the session type TN3270(E). If this check box is selected, right-to-left mode is supported in terminal emulation.
This check box is only shown for the session type TN3270(E). If this check box is selected, IBM's "Old Code" for Hebrew is supported in terminal emulation.
These parameters are intended for problem analysis. They should be used only under supervision of your technical support.
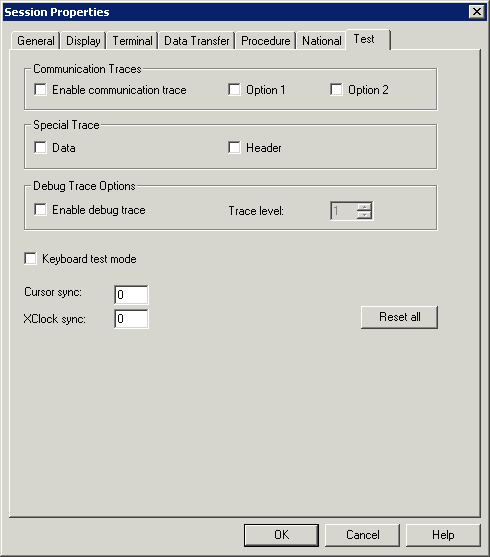
Enables the communication trace for the selected session type. Output is written to a file named Mon<nn>.trc which is placed in the log/trace directory.
Selects a trace option depending on the session type.
Selects another trace option depending on the session type.
Trace of the data layers.
Trace for the header sections.
Select this check box, if you want to turn on a debug trace.
When a debug trace has been enabled, you can specify a trace level. You can specify a value between 1 and 6. The higher the trace level, the more trace information is provided.
Turns on a keyboard test mode that helps you to adapt new or local keyboard types. Keyboard raw data is displayed in the output window (Messages pane) of the terminal application window. It is not passed to the terminal emulation. For details, see the file Keyboard_us.kyb in the tables directory of Entire Connection.
Specifies the loop counter to be used when checking the controller to see if Entire Connection and the mainframe are in sync with the location of the cursor on the screen.
Specifies the loop counter to be used when checking/waiting for the keyboard lock condition after a function key has been sent to the host.
When you choose this command button, all options on this property page are reset to their default values (i.e. switched off).
This property page is only shown when associated printing has been enabled in the communication parameters for a TN3270E display session. Make sure that Printer is defined as the print destination.
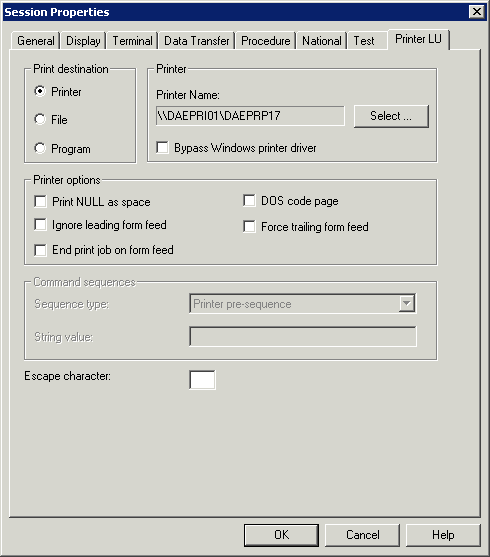
For further information on the options on this property page, see the description of the property page Printer LU in the section Host Printer Sessions.