
This section describes reporting transactions and the commands which you can use with them.
Note:
Data maintenance transactions are described in the section Data
Maintenance Transactions later in this documentation.
This section covers the following topics:
Reporting transactions are the most important part of Super Natural.
Super Natural's main task is to obtain data from a database file, work file or PC file. Reporting transactions provide you with the framework necessary to tell Super Natural which data you want.
Modes for reporting govern the basic conditions under which the transaction runs, for example report type and report destination.
For further information on modes, see Modes for Reporting in Defining Transaction Modes for Reporting.
When you have finished adding a reporting transaction and run it, Super Natural provides you with the data you have requested in the form of a report.
Note:
You can use the CHECKLIST function and the
NEXT function to help you add and modify reporting
transactions. For further information, see Using Super Natural.
 To obtain a list of transactions
Select the object type Transactions from the Menu
Or:
Issue the TRANSACTION command.
The Transaction List screen appears. The Transaction List screen lists both reporting and data maintenance transactions.
The Transaction List screen functions in the same way as all Object List screens in Super Natural.
For information on how to use object list screens, see Object List Screens in Starting Up.
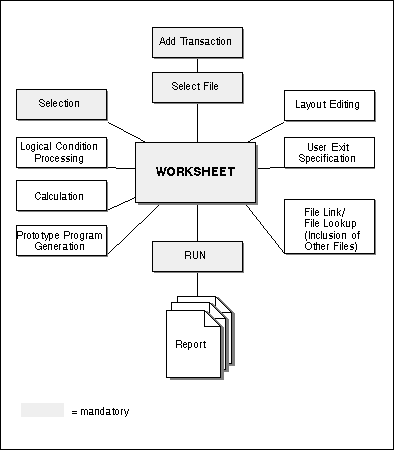
The following diagram gives you an overview of the paths you can take when adding a reporting transaction. The diagram shows you which steps are mandatory and which are optional.
To add a transaction
Enter a new transaction name in the Add field.
Or:
Issue the ADD TRANSACTION command.
The Add Transaction window appears:
 11:56                      ***** Super Natural *****                   93-01-04
                              - Transaction List -                        SN1110

 Cmd  Name     Descript +-------------------Add Transaction--------------------+
      *______           !                                                      !
  __  ADD      ________ ! Transaction ID .... _______                          !
  __  AUTO     ________ ! Description ....... (93-01-04 11:56)______________   !
  __  CHECKL   !91-11-2 !                     ______________________________   !
  __  CONT     (92-01-1 !                                                      !
  __  CONTROL  control  ! File name ......... ________________________________ !
  __  CONT2    (91-09-1 !                                                      !
  __  CONT3    1-09-18  ! Modify modes ...... _                                !
  __  CONT4    PERSONNE ! Data maintenance .. N (Y/N)                          !
  __  DATACH   (92-11-1 !                                                      !
  __  DATACH2  (92-11-1 +------------------------------------------------------+
|
Enter a new transaction name in the Transaction ID field if no name is present.
Modify or delete the transaction description if required.
If you know the name of the file you want to get your data from, enter it in the File Name field.
The file you choose here is called your primary file.
If you don't know the name of the file you want to use, enter an asterisk (*).
The File Selection List window appears:
 11:56                      ***** Super Natural *****                   93-01-04
                              - Transaction List -                        SN1110

 Cmd  Name     Descript + +----------------File Selection List-----------------+
      *______           ! !     File Name                         Access  Info !
  __  ADD      ________ ! !  _  SAG-TOURS-E-CH-PRICES               R      _   !
  __  AUTO     ________ ! !  _  SAG-TOURS-E-COMPANY                 R      _   !
  __  CHECKL   !91-11-2 ! !  _  SAG-TOURS-E-CONTRACT                D      _   !
  __  CONT     (92-01-1 ! !  _  SAG-TOURS-E-CONTRACT-WRKMKO         D      _   !
  __  CONTROL  control  ! !  _  SAG-TOURS-E-CRUISE                  R      _   !
  __  CONT2    (91-09-1 ! !  _  SAG-TOURS-E-PERSON                  R      _   !
  __  CONT3    1-09-18  ! !  _  SAG-TOURS-E-YACHT                   R      _   !
  __  CONT4    PERSONNE ! !  _  SPOOL-QUEUE                         R      _   !
  __  DATACH   (92-11-1 ! !  _  SUBMIT                              R      _   !
  __  DATACH2  (92-11-1 + !  _  SUE                                 R      _   !
  __  DATACH3  Destinatio !  _  SUP-AAA                             R      _   !
  __  DATACH4  DATA MAINT !  _  SYSSND                              R      _   !
 Add  _______             !  _  SYSTEM1                             R      _   !
                          !                                                    !
 Cmd(s): Modify, Execute, +More: - +-------------------------------------------+
|
The File Selection List window displays a selection list of the files which you can use and also contains the following columns:
| Column | Description | |
|---|---|---|
|
|
||
| Access | "S" indicates a superfile and "F" indicates a user file. For further information on superfiles, see Defining Files. For further information on user files, see User Files. The codes "R", "U", "A", "D" and "*" indicate file access level. File access levels are only relevant for data maintenance transactions. For further information on data maintenance transactions, see Working with Data Maintenance Transactions. | |
| Info | Mark this column to obtain first comments if available and then an extended file description from the data dictionary Predict. This feature is only available at sites where Predict is installed. No dictionary information is available for user files. | |
Inserting fields into a DDM or deleting them affects Super Natural's internal field referencing. This means that you may either not be able to run existing transactions or that running them will result in unpredictable data.
To insert a field
Select your primary file.
Press Enter.
You are returned to the Add Transaction window. The name of the file you have selected is entered in the File Name field.
Mark the Modify Modes field to modify your default transaction modes for the current transaction only.
If you don't mark this field, you continue to add the transaction
using your default modes.
For further information on transaction
modes, see Defining Transaction Modes for
Reporting and Defining Transaction Modes for Data
Maintenance.
Enter "Y" in the Data Maintenance field if you want to add a data maintenance transaction.
For further information on data maintenance transactions, see Working with Data Maintenance Transactions.
If you leave the default setting "N" (No), you continue to add a reporting transaction.
Press Enter.
The Worksheet appears:
 12:06                      ***** Super Natural *****                04.Jan.1998
 SN3011                           - Worksheet -                           Monday

 Ref DB    Field Name                         Seq   S/C  Func Def  Info Del
 AQ        ________________________________   ___   ___   __   __   __   __
 AR        ________________________________   ___   ___   __   __   __   __
 AS        ________________________________   ___   ___   __   __   __   __
 AT        ________________________________   ___   ___   __   __   __   __
 AU        ________________________________   ___   ___   __   __   __   __
 AV        ________________________________   ___   ___   __   __   __   __
 AW        ________________________________   ___   ___   __   __   __   __
 AX        ________________________________   ___   ___   __   __   __   __
 AY        ________________________________   ___   ___   __   __   __   __
 AZ        ________________________________   ___   ___   __   __   __   __
 BA        ________________________________   ___   ___   __   __   __   __
 BB        ________________________________   ___   ___   __   __   __   __
 BC        ________________________________   ___   ___   __   __   __   __
 BD        ________________________________   ___   ___   __   __   __   __


 Enter "*" in Fieldname column to select fields or enter NEXT
 Command ===>
 Enter-PF1---PF2---PF3---PF4---PF5---PF6---PF7---PF8---PF9---PF10--PF11--PF12---
       Help  Next  Exit  Incl        Flip  -     +           Sel   Run   Canc
|
For information on how to use the Worksheet, see Working with the Worksheet.
As shown in the diagram at the beginning of this section, you can leave the Worksheet to perform one of several major functions in any order you wish. The following table shows the major functions available from the Worksheet and where they are documented:
| Function | section Where it is Documented | |
|---|---|---|
|
|
||
| Selection criteria specification (mandatory) | Editors | |
| Calculation criteria specification | Editors | |
| Logical condition criteria specification | Editors | |
| User exit specification | User Exits | |
| Layout editing | Natural Report Manager | |
| File linking and/or lookup (Including other files in the transaction) | Files | |
| Prototype program generation | Prototype Programs | |
If you want to, you can keep a transaction which is either not finished or still has errors in it and finish it later.
To save a transaction which is incomplete or has errors in it
Issue the KEEP command from within the
transaction.
Note:
You cannot execute the transaction (for example from the
Transaction List) if it has errors or is
incomplete.
If you have completed a transaction but do not want to see the results immediately, you can save it.
To save a transaction
Issue the SAVE command from within the
transaction.
Note:
You cannot save a transaction which has errors in it.
If the report is too wide, the Report Line Length window appears. For further information, see Reports Which are Too Wide.
If you want to see the results of a transaction, you must run it.
To run a transaction
Issue the RUN command from within the
transaction.
Super Natural then provides you with the data you require in the form you have chosen. The transaction is saved.
Note:
You cannot run a transaction which has errors in it.
If you want to run an existing transaction without modifying
it, it is most efficient to issue the EXECUTE
command from the Transaction List screen.
Note:
For further information on the SAVE,
KEEP, RUN and
EXECUTE commands, see Command List.
If the report is too wide, the Report Line Length window appears. For further information, see Reports Which are Too Wide.
When using the transaction modes Destination SCREEN, PRINTER, CON-NECT or EDITOR, you may select so many fields for display that they exceed the width (line length) of the screen or printer to which you are sending the report. If your report is too wide, the Report Line Length window appears when you save or run the transaction:
 12:10                      ***** Super Natural *****                04.Jan.1998
 SNZUL-S                       - Selection Editor -                       Monday

                          +-----------------Report Line Length-----------------+
       1  < AA            !                                                    !
       2  <               ! The selected fields required a line size of .. 149 !
       3  <               ! The field headers required a line size of .... 193 !
       4  <               ! The available Online  line size at present ... 79  !
       5  <               !                                                    !
       6  <               !   _  Enlarge Available Line Size                   !
       7  <               !   _  Change to Report Type Vertical List           !
       8  <               !   _  Truncate Headers                              !
       9  <               !   _  Remove Excess Fields                          !
      10  <               !   _  Remove Excess Fields and Truncate Headers     !
      11  <               !   _  Modify Transaction                            !
      12  <               !                                                    !
      13  <               +----------------------------------------------------+
      14  <                                                              >   14
      15  <                                                              >   15
|
The Report Line Length window also appears if the headers of the fields you have selected for display exceed the width (line length) of the screen or printer to which you are sending the report.
The Report Line Length window tells you the line length of the fields and headers you have selected for display, the line length available at present and the Report Destination you are using. The Report Line Length window offers the following options:
| Option | Description | |
|---|---|---|
|
|
||
| Enlarge available line size |
Report Destination SCREEN: The line size can be enlarged
to 249 and you can look at the data using the shift functions.Report
Destination CON-NECT: You must make sure that the line size of your
report does not exceed that of your screen.Report
Destination PRINTER: You must make sure that the line size of your
report does not exceed that of your printer.Report
Destination EDITOR: The line size can be enlarged to 249. If the
length of the fields or headers you have selected for display exceeds these
values, this option is not available.
|
|
| Change To Report Type Vertical List | The report is displayed as for Report Type Vertical List. Each record is displayed on a separate screen with the display fields and their values listed vertically. | |
| Truncate Headers | If only the headers are too wide, you can opt to truncate them (only available if your transaction option setting for "Heading Width Override = N"). | |
| Remove Excess Fields | Fields are removed from the right-hand side of the report until the required line length is achieved. | |
| Remove Excess Fields | Fields are removed from the right-hand side of the and Truncate Headers/tab/report and headers are truncated until the required line length is achieved. | |
| Modify transaction | You are returned to the Worksheet where you can modify your report. For example, you can modify your transaction options to make the online screen size larger (for further information, see Working with User Files) or you can modify the width of the columns and their headers by changing their output definition (for further information, see The Field Definition Column in Working with the Worksheet). | |
You may want to go back and modify (change) a transaction once you have run it or modify an existing transaction.
To modify a transaction
Enter the command abbreviation MO in the
command column of the Transaction List screen next to
the transaction name.
Or:
Issue the MODIFY TRANSACTION
name command.
The Worksheet appears.
You may not change the following when modifying a transaction:
File specification
Certain reporting modes. For example, if you created a transaction using the data selection mode SQL-SELECT, you may not change it.
If you are in a common library, some transactions may have restricted access. Transactions with restricted access are marked with an exclamation mark (!) in the first position in the Description column and you can only execute them.
If you want to run an existing transaction without modifying it, it is
most efficient to issue the EXECUTE command from the
Transaction List screen. This is because when you
issue the EXECUTE command, Super
Natural uses the transaction as it was when the transaction was
last run or saved. When you run a transaction using the
RUN command, Super
Natural completely recreates the transaction even if you have not
modified it since it was last run or saved.
To execute a transaction
Enter the command abbreviation EX in the
command column of the Transaction List screen next to
the transaction name.
Or:
Issue the EXECUTE TRANSACTION
name command.
For further information on the SAVE,
KEEP, RUN and
EXECUTE commands, see Command List.
Note:
You cannot execute a transaction which you left using the
KEEP command.
You may not copy a transaction into a public library.
You may not copy transactions with destination USERFILE.
To copy a transaction
Enter the command abbreviation CO in the
command column of the Transaction List screen next to
the transaction name.
Or:
Issue the COPY TRANSACTION
name command.
The Copy window appears:
 13:55                      ***** Super Natural *****                04.Jan.1998
 SN1110                       - Transaction List -                        Monday

 Cmd  Name     Description               +----------------Copy-----------------+
      *______                            !                                     !
  __  ADD      _________________________ ! Source object ... AUTO              !
  CO  AUTO     _________________________ !                                     !
  __  CHECKL   !91-11-26 16:21)_________ ! Target object ... AUTO___           !
  __  CONT     (92-01-16 11:30)_________ ! Common library .. _______           !
  __  CONTROL  control breaks___________ !                   (leave blank for  !
  __  CONT2    (91-09-17 16:06)_________ !                    private library) !
  __  CONT3    1-09-18 14:24____________ !                                     !
  __  CONT4    PERSONNEL FILE + IA______ +-------------------------------------+
|
The Source Object field contains the name of the transaction you want to copy.
Enter the name you want the copy to have in the Target field.
If you do not make an entry in this field, the copy will have the same name as the original transaction.
You may not have two or more transactions with the same name in the same library. If you copy a transaction into another library where a transaction of the same name already exists, you are asked if you want to overwrite the existing transaction.
If you want to copy the transaction into a common library, enter its name in the Common Library field.
If you leave this field blank, the transaction is copied into your private library.
When you copy a transaction to a new name, the
Information function does not show the new name
until you modify the transaction.
To delete a transaction
Enter the command abbreviation DE in the
command column of the Transaction List screen next to
the transaction name.
Or:
Issue the DELETE TRANSACTION
name command.
The Confirm Delete window appears:
 13:56                      ***** Super Natural *****                04.Jan.1998
 SN1110                       - Transaction List -                        Monday

 Cmd  Name     Description
      *______
  __  ADD      ____________________________________________________________
  de  AUTO     _ +--------------Confirm Delete---------------+ ____________
  __  CHECKL   ! !                                           ! ____________
  __  CONT     ( !                                           ! ____________
  __  CONTROL  c !        Delete transaction AUTO            ! ____________
  __  CONT2    ( !                                           ! ____________
  __  CONT3    1 !        Enter Y to confirm: N              ! ____________
  __  CONT4    P !                                           ! ____________
  __  DATACH   ( !                                           ! ____________
  __  DATACH2  ( !                                           ! ____________
  __  DATACH3  D !                                           ! ____________
  __  DATACH4  D +-------------------------------------------+ ____________
 Add  _______
|
Enter "Y" to confirm the deletion.
You can also delete several transactions at the same time. In this case, the Confirm Multiple Delete window appears. You can choose if you want to confirm each deletion, delete without confirmation or cancel the deletion.
To obtain information about a transaction
Enter the command abbreviation IN in the
command column of the Transaction List screen next to
the transaction name.
Or:
Issue the INFO TRANSACTION
name command.
The Transaction Information window appears:
 13:57                      ***** Super Natural *****                04.Jan.1998
 SN1110                       - Transaction List -                        Monday

 Cmd  Name  +---------------------Transaction Information----------------------+
      *____ ! Transaction .......... DATACH   Version .... 3.1.0               !
  __  ADD   ! Created/modified by .. SBE      Date/Time .. 1992/11/11 14:30:43 !
  __  AUTO  ! Description .......... (92-11-11 11:39)                          !
  __  CHECK !                                                                  !
  __  CONT  ! Type ................. Report                                    !
  __  CONTR ! Selection ............ Full-screen                               !
  __  CONT2 ! Data change .......... Map                                       !
  __  CONT3 ! Report type .......... List                                      !
  __  CONT4 ! Report level ......... Detailed                                  !
  in  DATAC ! Destination .......... Screen                                    !
  __  DATAC ! Run mode ............. Online                                    !
  __  DATAC ! Primary file ......... SAG-TOURS-E-COMPANY                       !
  __  DATAC ! Sec. file ............                                           !
 Add  _____ ! Userfile .............                                           !
            !                                                                  !
 Cmd(s): Mo +More:   +---------------------------------------------------------+
|
The Transaction Information window supplies the following information:
Transaction name
Super Natural version with which the transaction was created
Who created/last modified the transaction
When the transaction was created/last modified
User-entered transaction description
Information about the transaction modes (Report Type, Data Selection etc.)
Primary file
Secondary file (if defined)
Name of user file (for Destination USER FILE)
You can page forward to obtain information on the following if relevant to the transaction:
Link and lookup fields used.
Selection criteria
Calculation
Logical conditions
Fields used
When you print the information, you are also provided with information on the entries made in the Worksheet.
Note:
When you copy a transaction to a new name, the Information
function does not show the new name until you modify the transaction.
The following commands are available from within a transaction (the default PF key functions and commands specific to the Worksheet are not included):
Note:
For a list of the default PF key functions, see
Using Super
Natural.
Note:
For a list of commands specific to the Worksheet, see
Working with the
Worksheet.