
This section describes the transaction modes available for reporting transactions and how to modify them for new and existing transactions. For information on transaction modes for data maintenance transactions, see Defining Transaction Modes for Data Maintenance. For convenience, transaction modes for reporting are referred to as reporting modes in this documentation.
This section covers the following topics:
Reporting modes control the basic conditions for reporting transactions, for example where data is to be obtained and how it is to be displayed.
Reporting modes are organized into six groups as shown in the following diagram:
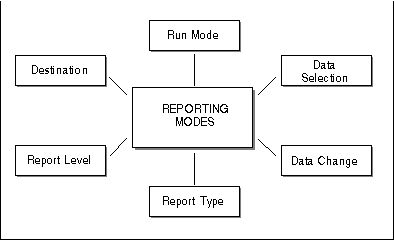
The following table gives a detailed list of the reporting mode settings available and the option code for each mode:
| Group | Transaction Modes | Option Code |
|---|---|---|
| Data Selection | FULL-SCREEN | F |
| SQL-SELECT | S | |
| DATA FROM WORK FILE | W | |
| DATA FROM PC FILE | P | |
| Data Change | CHANGE MAP | M |
| NONE | N | |
| Report Type | LIST | L |
| VERTICAL LIST | V | |
| CON-NECT | C | |
| TABULAR | T | |
| Report Level | DETAILED | D |
| SUMMARY | S | |
| Destination | SCREEN | S |
| PRINTER | P | |
| EDITOR | E | |
| WORK FILE | W | |
| PC FILE | F | |
| USER FILE | U | |
| CON-NECT OFFICE | C | |
| Run Mode | ONLINE | O |
| BATCH | B |
If you choose Run Mode BATCH, you can choose a batch printer (number 1-31) and whether Remote Job Entry (RJE) will be available for batch jobs.
The Super Natural administrator defines reporting mode settings for each user which are valid for all of that user's reporting transactions. These settings are called reporting mode defaults. Not all the reporting modes offered by Super Natural may be available at your site and you may not be authorized to use all those which are available.
You can set your own reporting mode defaults by changing your user profile. Your changes are valid for all the reporting transactions you subsequently create. You can also change your default settings for a particular transaction while creating or modifying it. Your changes do not affect any other transaction.
You can modify your reporting mode defaults either by modifying your User Profile or from within a transaction.
 To modify your user profile
Select the User Profile Maintenance option from the Menu.
Or:
Issue the PROFILE command where
appropriate.
Select the Transaction Modes option.
The Transaction Modes Reporting window appears.
When you modify your reporting mode defaults by modifying your user profile, your changes are valid for all the reporting transactions you subsequently create.
To modify you reporting mode defaults from within a reporting
transaction you are creating or modifying
Enter "Y" in the Modify Modes field on the Add Transaction screen.
When you modify your reporting mode defaults from within a transaction, the settings you specify are only valid for the transaction you are creating or modifying and do not affect your user profile.
The Transaction Modes Reporting window appears.
       Help        Exit              Flip                                Canc

 09:22                      ***** Super Natural *****                06.Jan.1993
 SNPROF                        - Modify Profile -                      Wednesday

                                            +---Transaction Modes Reporting----+
              _  Screen Colors              !                                  !
                                            ! Data Selection .. F  Full-screen !
              _  Screen Defaults            !                                  !
                                            ! Data Change ..... N  None        !
              _  Date/Time Formats          !                                  !
                                            ! Report Type ..... L  List        !
              _  PF Key Settings            ! Report Level .... D  Detailed    !
                                            !                                  !
              _  Language Code and Checklis ! Destination ..... S  Screen      !
                                            !                                  !
              _  Transaction Options        ! Run Mode ........ O  Online      !
                                            !                                  !
              X  Transaction Modes          ! Batch printer ...    (0 - 31)    !
                                            ! RJE available ... N  (Y/N)       !
                                            !                                  !
                                            +----------------------------------+
 Apply all required changes or enter "?" for help
 Command ===>
|
The Transaction Modes Reporting window shows your default settings. The option code for each setting is highlighted. If an option code is not highlighted, you cannot change it.
To change a transaction mode
Overtype the option code with another option code or, for Batch Printer, type a number.
Press Enter.
To obtain a selection list of the options available for a particular
reporting mode
Enter a question mark (?) next to it.
The following sections describe the transaction modes available for reporting:
Use this mode to select data using the Selection Editor. For further information, see Using Editors.
Users of this selection mode should already be familiar with SQL
Users of DB2 and SQL/DS can use this mode to enter selection criteria
using SQL (Structured Query Language) SELECT
statements in the SQL SELECT Editor.
When you add a transaction using the transaction mode Data Selection SQL-SELECT, you cannot enter a file name in the Add Transaction window because you define which DB2 tables you are going to use in the SQL SELECT Editor.
When you press Enter, the following version of the Worksheet appears:
 09:26                      ***** Super Natural *****                 1998-01-06
 SQL                              - Worksheet -                           SN3011

 Ref DB    Field Name                         Seq             Def  Info Del
 AE        ________________________________   ___   ___   __   __   __   __
 AF        ________________________________   ___   ___   __   __   __   __
 AG        ________________________________   ___   ___   __   __   __   __
 AH        ________________________________   ___   ___   __   __   __   __
 AI        ________________________________   ___   ___   __   __   __   __
 AJ        ________________________________   ___   ___   __   __   __   __
 AK        ________________________________   ___   ___   __   __   __   __
 AL        ________________________________   ___   ___   __   __   __   __
 AM        ________________________________   ___   ___   __   __   __   __
 AN        ________________________________   ___   ___   __   __   __   __
 AO        ________________________________   ___   ___   __   __   __   __
 AP        ________________________________   ___   ___   __   __   __   __
 AQ        ________________________________   ___   ___   __   __   __   __
 AR        ________________________________   ___   ___   __   __   __   __


 Fill in required definitions
 Command ===>
 Enter-PF1---PF2---PF3---PF4---PF5---PF6---PF7---PF8---PF9---PF10--PF11--PF12---
       Help  Next  Exit  Incl        Flip  -     +           Sel   Run   Canc
|
From the Worksheet you can do the following:
Define user fields
Include lookup files
Modify field output definitions
Define the field output sequence
Invoke the Logical Conditions Editor
Invoke the Calculation Editor
Invoke the SQL SELECT Editor.
When the Worksheet appears, the field list is empty. You can either define user fields in the Worksheet or go directly into the SQL SELECT Editor.
You can use the fields from a lookup file everywhere in the transaction except for in the SQL SELECT Editor.
Note:
Using the SQL mode, sort and control breaks (in the
S/C column) and the system functions ( Average, Count, Max
etc.) (in the FUNC column) are not
available.
You cannot use SQL for data maintenance within Super Natural.
Use this mode if you want to read the data for a Super Natural transaction from a sequential work file.
Note:
You may not specify selection criteria.
To read data from a sequential work file
Add a transaction using Data Selection WORK. Do not enter a file name in the File Name field in the Add Transaction window.
The Worksheet appears.
Issue the SELECTION command.
The Work File Description Editor appears:
 09:27                      ***** Super Natural *****                 1998-01-06
 WORK1                  - Work File Description Editor -                SNZUL-WF

             Fieldname                           Format  Length  Dec.Places
        1  <                                  >
        2  <                                  >
        3  <                                  >
        4  <                                  >
        5  <                                  >
        6  <                                  >
        7  <                                  >
        8  <                                  >
        9  <                                  >
       10  <                                  >
       11  <                                  >
       12  <                                  >
       13  <                                  >
       14  <                                  >
       15  <                                  >


 Command ===>
 Enter-PF1---PF2---PF3---PF4---PF5---PF6---PF7---PF8---PF9---PF10--PF11--PF12---
       Help  Next  Exit        Check Flip  -     +                 Run   Canc
|
Enter the name, format and length of the field(s) to be read from the work file.
To prevent errors when the transaction is run, the following restrictions are applied to the editor area as soon as one or more fields are used elsewhere in the transaction:
You cannot enter new fields
You cannot delete fields
You cannot change the field order
The fields used elsewhere in the transaction are locked
Fields only used in the editor can only be edited
The availability of line commands and editor direct commands are restricted accordingly.
To lift the restrictions, remove all fields from use in the transaction, for example from the Worksheet, any other editor or in a prototype program. The Info column in the Worksheet provides you with information on field usage.
Press Enter.
The Worksheet appears.
If Predict is installed, you can obtain a selection list of suggested descriptions for sequential or work files.
To get a selection list of suggested descriptions for sequential or
work files
Enter an asterisk (*) in the
File Name field in the Add
Transaction window.
The Sequential Files window appears. When you have selected a file description, the Worksheet appears with the fields from the description already entered.
Use this mode if you want to read the data for a Super Natural transaction from a sequential PC file.
Note:
You may not specify selection criteria.
To read data from a sequential PC file
Add a transaction using Data Selection. Do not enter a file name in the File Name field in the Add Transaction window.
The Worksheet appears.
Issue the SELECTION command.
The PC File Description Editor appears:
 09:28                      ***** Super Natural *****                 1998-01-06
 PCDATA                 - PC File  Description Editor -                 SNZUL-WF

             Fieldname                           Format  Length  Dec.Places
        1  <                                  >
        2  <                                  >
        3  <                                  >
        4  <                                  >
        5  <                                  >
        6  <                                  >
        7  <                                  >
        8  <                                  >
        9  <                                  >
       10  <                                  >
       11  <                                  >
       12  <                                  >
       13  <                                  >
       14  <                                  >
       15  <                                  >


 Command ===>
 Enter-PF1---PF2---PF3---PF4---PF5---PF6---PF7---PF8---PF9---PF10--PF11--PF12---
       Help  Next  Exit        Check Flip  -     +                 Run   Canc
|
Enter the name, format and length of the field(s) to be read from the PC file.
To prevent errors when the transaction is run, the following restrictions are applied to the editor area as soon as one or more fields are used elsewhere in the transaction:
You cannot enter new fields
You cannot delete fields
You cannot change the field order
The fields used elsewhere in the transaction are locked
Fields only used in the editor can only be edited
The availability of line commands and editor direct commands are restricted accordingly. To lift the restrictions, remove all fields from use in the transaction, for example from the Worksheet, any other editor or in a prototype program. The Info column in the Worksheet provides you with information on field usage.
Press Enter.
The Worksheet appears.
If Predict is installed, you can obtain a selection list of suggested descriptions for sequential files.
To get a selection list of suggested descriptions for sequential
files
Enter an asterisk (*) in the
File Name field in the Add
Transaction window.
The Sequential Files window appears. When you have selected a file description, the Worksheet appears with the fields from the description already entered.
Use this mode to modify report data before sending it to the selected destination. When you run the transaction, each record is shown on a screen where you can enter your data changes.
Use this mode to change data for reports with the following Destinations:
PRINTER
EDITOR
WORK FILE
PC FILE
USER FILE
CON-NECT OFFICE
Report data is changed for output purposes only. This mode does not perform data maintenance.
To change date for a report
Run a report with Data Change = MAP.
A screen appears showing the first record found.
Make your modifications.
Press Enter.
The next record found is displayed.
Continue as above until you have made all the changes you require.
When you reach the end of the report data, the report is sent to the Destination specified.
If you have modified the records desired, you can press
PF2 (EXIT) before reaching the end of the
report to send the data to the Destination specified.
Your changes are not saved. The next time you execute or run the transaction, you must make the changes again.
In order to change data for a report, the occurrences of multiple-value fields and periodic groups must be presented in separate records. This is called flattening records.
The user option FIELD FLATTENING determines whether the occurrences of multiple-value fields or fields contained in a periodic group are presented as individual records when data is changed for a report.
For further information on flattening, see Transaction Options in Adjusting a User Profile.
Use this option if you want the original report data to be sent to the destination selected.
Use this mode to produce output as a list with a title and column headings as shown in the example below:
 09:56:12  AA                                                         1998-01-06
 IDDM1                                                                  1

         CH-YACHT-TYPE          CH-BASE- SEASON-S SEASON-E    PRICE-1W       PRI
 ------------------------------ -------- -------- -------- -------------- ------

 ATLANTIC 25                    11       19900331 19900427        980.000
 ATLANTIC 26                    11       19900331 19900427       1120.000
 ATLANTIC 26                    14       19900303 19900330       1080.000
 ATLANTIC 29                    11       19900331 19900427       1260.000
 ATLANTIC 29S                   11       19900331 19900427       1380.000
 ATLANTIC 29S                   14       19900303 19900330       1360.000
 ATLANTIC 29S                   15       19891014 19891215       1573.000
 ATLANTIC 30                    11       19900331 19900427       1490.000
 ATLANTIC 32                    11       19900331 19900427       1650.000
 ATLANTIC 32S                   14       19900303 19900330       1700.000
 ATLANTIC 32S                   15       19891014 19891215       1969.000
 ATLANTIC 34                    11       19900331 19900427       1950.000
 ATLANTIC 34                    14       19900303 19900330       1920.000
 ATLANTIC 36                    11       19900331 19900427       2120.000
 ATLANTIC 36                    14       19900303 19900330       2150.000

 Enter-PF1---PF2---PF3---PF4---PF5---PF6---PF7---PF8---PF9---PF10--PF11--PF12---
             Print Exit              Flip        +     Posi  <     >     Canc
|
Use this mode to display the fields for each record in a vertical list (one or more pages per record).
The records are displayed individually when you run the transaction as shown in the example below:
 09:57:27  AA                                                         1998-01-06
 IDDM1                                                                  1

 CH-YACHT-TYPE .................. ATLANTIC 25
 CH-BASE-ID ..................... 11
 SEASON-START ................... 19900331
 SEASON-END ..................... 19900427
 PRICE-1W ....................... 980.000
 PRICE-2W ....................... 1862.000
 PRICE-3W ....................... 2646.000
 PRICES-STATUS ..................


 Enter-PF1---PF2---PF3---PF4---PF5---PF6---PF7---PF8---PF9---PF10--PF11--PF12---
             Print Exit              Flip        +     Posi  <     >     Canc
|
Use this mode to create a formatted report based on an existing Con-nect document which contains variables. The variables in the Con-nect document are replaced with the values of fields contained in records selected.
For further information on this mode, see Using Super Natural with Con-nect.
Use this mode to display reports in tabular form.
When you add a transaction of report type TABULAR, a reduced version of the Worksheet appears showing the Output Definition, Information and Delete columns.
Note:
You cannot access Natural Report Manager from transactions of Type
TABULAR.
To display a report in tabular form
Enter selection criteria in the selection editor.
Issue the TABULAR command to
determine the output of the report.
The Tabular Report Specification screen appears:
 12:05                      ***** Super Natural *****                14.Dec.1992
 SN3300                 - Tabular Report Specification -                  Monday

      Control Field(s)                  Chars   Increment
 1 .. ________________________________     __   ____________________
 2 .. ________________________________     __   ____________________
 3 .. ________________________________     __   ____________________

 Analyze Field                      Across Field
 ________________________________   ________________________________
 Analyze Field Functions            Across Field Ranges
   COUNT ........ _                 ____________________ to ____________________
   AVERAGE ...... _                 ____________________ to ____________________
   MIN .......... _                 ____________________ to ____________________
   MAX .......... _                 ____________________ to ____________________
   SUM .......... _                 ____________________ to ____________________
   TOTAL ........ _                 ____________________ to ____________________
                                    ____________________ to ____________________
 Include Zeros .. _ (Y/N)           ____________________ to ____________________
                                    ____________________ to ____________________

 Command ===> ____________________________________________________________
 Enter-PF1---PF2---PF3---PF4---PF5---PF6---PF7---PF8---PF9---PF10--PF11--PF12---
       Help  Next  Exit              Flip                    Sel   Run   Canc
|
To specify Control Fields
Enter the names of up to three fields which are to be used as control break fields in the numbered Control Fields fields.
To specify Chars
If you are using an alphanumeric control field you can cause a control break if the first n characters of the control break field value change.
Enter the value n next to the relevant control field in the Chars column.
For example, if you enter 3 under Chars a control break only occurs if the value in the first 3 characters of the control field has changed.
To specify Increment
If you are using a numeric control field, you can define a control break if the control break field value changes by a certain increment:
Enter the size of the increment next to the relevant control field in the Increment column.
For example, if you enter 10 under Increment for the field AGE, the data is displayed in increments of 10 beginning with the lowest value present.
Note:
You cannot specify both characters and increment.
The Analyze field is the field for which you define system functions to be performed at control breaks. The Analyze field must be an elementary numeric field.
When you run the transaction, the values of the Analyze field found for the records selected are not displayed. The results of the system functions performed on the Analyze field at control breaks are displayed.
To specify the Analyze Field
Enter the name of the elementary numeric field for which the tabular output is to be produced.
The Analyze Field functions are system
functions which must be defined for the Analyze field
and are performed at control breaks.
| Function | Description | |
|---|---|---|
|
|
||
COUNT |
The number of values processed for the field being analyzed. The count is reset to zero each time the value of a control break field changes. | |
AVERAGE |
The average of the values processed for the field being analyzed. The average is calculated each time the value of a control break field changes. | |
MIN |
The minimum value processed for the field being analyzed. The minimum is calculated each time the value of a control break field changes. | |
MAX |
The maximum value processed for the field being analyzed. The maximum is calculated each time the value of a control break field changes. | |
SUM |
The sum of all values processed for the field being analyzed. The sum is reset to zero each time the value of a control break field changes. | |
By default, zero values are not included in the calculation of the system functions mentioned above.
To specify Include Zeros
Enter a "Y" in the Include Zeros field to include zero values.
The results of the standard functions performed on the Analyze field can be displayed for ranges defined for an Across field. The Across field is displayed along the top of the report.
To specify an Across Field
Enter the name of the field to be the Across field in your table.
If you leave the Across Field field blank, the field you defined as the Analyze field is taken.
You can specify up to nine different ranges. An asterisk (*) in the first position indicates lowest value and an asterisk (*) in the to column indicates the highest value.
The lowest and highest numeric values possible are dependent on the format of the Across field as shown in the samples below:
| Sample Format of Across Field | Lowest Value | Highest Value |
|---|---|---|
| N5 | -99999 | +99999 |
| P3 | -999 | +999 |
| N3.2 | -999.99 | +999.99 |
To specify an Across Field Range
Enter the ranges of values for the Across field for which you want to see statistics provided by the system functions.
When you have completed your entries on the Tabular Report Specification screen, run the transaction.
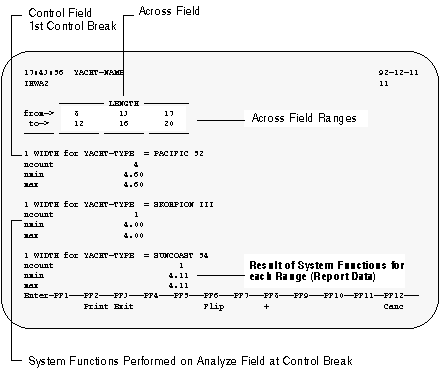
The following is a page from a report (from the demo DDM SAG-TOURS-E-YACHT) produced using transaction mode Report Type TABULAR and specifying the following on the Tabular Report Specification screen:
| Field | Entry |
|---|---|
| Control Field | YACHT-TYPE |
| Analyze Field | WIDTH |
| Analyze Field (System) Functions | COUNT, MIN, MAX |
| Across Field | LENGTH |
| Across Field Ranges | 8 to 12 13 to 16 17 to 20 |
Use this mode to display all records found in a report (detailed report data).
Use this mode to display report data only when a control break has occurred.
If you specify the Report Level SUMMARY, you cannot define a control break without defining a system function.
For further information on control break processing, see Function (Func) Column in Working with the Worksheet.
When you run a transaction which has fields marked in the Sequence
column and report level SUMMARY, the values in the last record found before
each control break are displayed in lines marked Old. You can avoid this by
issuing the NOSEQUENCE command from the Worksheet.
When no fields are marked in the Sequence
column, the Old lines do not appear.
Use this mode to write the results of system functions at one control break or grand totals only to file. You may not mix Summary with Detail format.
You may only define one field as a control break field. If no field is defined as a break field, only grand totals are downloaded.
The system functions are written to a PC or work file in the following order, regardless of the sequence in which they were specified:
Total, Sum, Average, Maximum, Minimum, Count, Ncount, Naver, Nmin
If you specify no system functions for a selected field, the old value (the last value before the control break) is written to file. Otherwise, when a field is selected and system functions are specified, only the system functions are written to file.
If you specify more than one control break, the summary data for the lowest level break field (control break with the highest number) only is written to file.
For handling the Destination USER FILE, see section Using the Worksheet with Report Destination USER FILE.
In the following sections, the expression report is used for a report with title lines, column headings and data. Transaction data denotes the data only, without title lines, headings and columns.
Use this mode to display the report on your terminal screen.
Use this mode to route reports to a printer. You can also use this mode to send reports to a PC to be printed as normal PC files.
To send a report to a printer attached to your PC
Enter the number assigned to your PC as Logical Printer Number in your transaction options (your Super Natural administrator can tell you which number you should enter).
For additional information on changing your transaction options, see Adjusting a User Profile.
Enter the PC file name at the prompt which appears when you run the transaction.
The report is sent to your PC as a PC file. You can now print the report following the procedure that you always use to print files from your PC.
Only use this method of sending a report to your PC if you want to store a report for printing. If you want to download data to your PC in order to process it and then uploading it back to Super Natural, use report destination PC FILE as described later in this section.
Use this mode to place the report in the Natural editor where it can be accessed and processed using Natural.
Use these modes to write reports to sequential work files or PC files. You can transfer or download the reports with or without headers.
Note:
The appropriate numbers must be set for the transaction options Work
File Number or PC File Number Ask your Super Natural
administrator which number(s) you should use.
For further information on transaction options, seeUser Profile.
To write data to a Natural work file or a PC file
Create and run a Super Natural transaction with Destination WORK FILE or PC FILE.
The Work/PC File Information window appears:
 10:06                      ***** Super Natural *****                 1998-01-06
 DESTWK                           - Worksheet -                           SN3011

 Ref DB    Field Name                        +----Work-/PC File Information----+
 AA  1K    CRUISE-ID ......................  !                                 !
 AB  1     CRUISE-TYPE ....................  ! Destination ......... W         !
 AC  1     CRUISE-STATUS ..................  ! Output Record Size .. 10        !
 AD  1G    START ..........................  !                                 !
 BE        ________________________________  !   _  Continue                   !
 BF        ________________________________  !   _  Write Headers and Continue !
 BG        ________________________________  !   _  Modify Transaction         !
 BH        ________________________________  !                                 !
 BI        ________________________________  +---------------------------------+
|
Mark the Continue field to download the report without headers.
Mark the Write Headers and Continue field to download the report with headers.
Mark the Modify Transaction field to modify the transaction.
Press Enter.
If you are using report destination PC FILE, you are prompted to enter the PC file name.
Enter the PC file name at the prompt.
The report data is written to the PC file or
Natural work file. In the example shown, the
following data is written:
SMITHbbbbbbbbbbbbbbbb25BOSTON (b =
blank)
A message is displayed giving the number of records sent to the work file/PC file.
A message tells you how many records have been transferred or downloaded and to which file.
You have now downloaded data to a PC file or a Natural work file, where it can be processed with the software provided. In addition, there are various options that exist to automatically convert the data to popular PC formats. For additional information, see the Super Natural administrator.
For information on the report destination PC FILE in conjunction with the report level SUMMARY, see Summary with Destination PC File in Report Level.
Note:
Work files and PCs may only be used if the required
Natural facilities are available at your
installation. Consult the Super Natural
administrator before you use this Super Natural
facility.
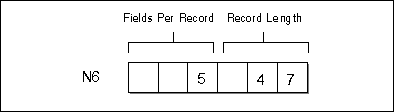
The first header record consists of one N6 field. This field contains the number of fields per record (three digits) and the length of the data records (three digits). The following diagram shows a header record for a report which contains 5 fields which have a total length of 47 characters:
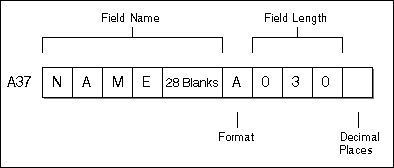
A separate header record is then created for each field. These header records each contain an A37 field. The A37 field is composed of the field name (32 characters), the field format (1 character), the field length (3 digits) and the number of decimal positions (1 digit). If the field name has less than 32 characters, the rest of this part of the field is filled with blanks. The following diagram shows the header record for an A30 field called NAME:
These header records are then followed by the records you selected.
If the data is written to a work file, the length of the header records is not necessarily identical with the data record length.
Writing the header information to the work file or PC when sending data has the advantage that the description of the data is located with the data itself.
Use this mode to write the transaction data to a new user file, which will be generated automatically during transaction execution, use report destination USER FILE. This report destination is discussed in detail in the section User Files later in this documentation.
Use this mode to write the report as a document in Con-nect.
For further information on this mode, see Using Super Natural with Con-nect.
If you want the transaction to be executed immediately, use the run mode option ONLINE.
If you want the transaction to be run in batch mode, where a number of transactions are grouped together and processed together as a batch job, use run mode option BATCH on the Modes for Reporting screen.
Batch printer no. indicates the number of the batch printer, and batch RJE available indicates whether remote job entry is available for batch jobs. If this option is set to "N", transactions for batch execution can be created but not submitted.
Your administrator will give you further information.