
This section describes the Super Natural user profile and how to modify it.
This section covers the following topics:
A user profile is defined by the Super Natural administrator for each user of Super Natural to suit his or her individual requirements. For example, the administrator decides which files and libraries you can use, and gives you authorization to use various features of Super Natural.
The Super Natural administrator defines certain default settings which you can modify yourself. You can influence the appearance of screens, PF key display, screen colors, how the date and time are displayed and many technical details concerning the environment, output and processing of transactions.
Your modifications are valid for all new transactions but not for existing ones.
The user profile default settings which you can modify are organized into seven groups as shown in the following diagram:
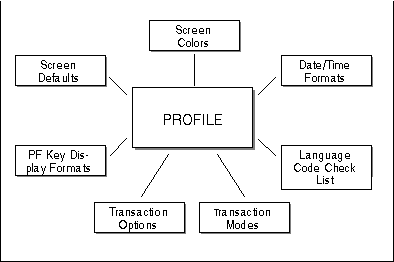
The following table gives a detailed list of the user profile defaults you can modify:
| Group | Settings |
|---|---|
| Screen Colors | The colors available and the field types and screen areas which can be colored individually |
| Screen Defaults | Message Line
Position Header Line Variables Hallo Screen ON/OFF Default Entry Menu |
| Date/Time Formats | Time Format and
Delimiter Date format |
| PF Key Display Formats | SAA ISA Cursor-Sensitive PF Key Bar |
| Language Code/ Checklist |
Language Code Automatic Checklist ON/OFF Checklist Level |
| Transaction Options | |
| Environment Options | Online screen
size Printer page size Logical printer number Work file number (for output and input) PC file number (for output and input) |
| Output Options | Suppress empty
lines Suppress identical values Suppress zero values Suppress numeric sign Heading width override Map filling character (for alphanumeric and numeric fields) |
| Processing Options | Processing
sequence Display occurrences (for multiple-value fields and periodic groups Flatten records Evaluate system functions (per outer or inner loop) |
| Transaction Modes | For information on transaction mode settings, see Defining Transaction Modes for Reporting and Defining Transaction Modes for Data Maintenance. |
 To modify your user profile
Select the User Profile option from the Menu.
Or:
Issue the PROFILE command where
appropriate.
The Modify Profile screen appears:
Note:
The modifications you make to your transaction mode and transaction
option settings are valid for all new transactions, but not for existing
ones.
 17:24                      ***** Super Natural *****                05.Jan.1993
 SNPROF                        - Modify Profile -                        Tuesday


              _  Screen Colors

              _  Screen Defaults

              _  Date/Time Formats

              _  PF Key Settings

              _  Language Code and Checklist

              _  Transaction Options

              _  Transaction Modes


 Mark items to modify or select with the cursor
 Command ===>
 Enter-PF1---PF2---PF3---PF4---PF5---PF6---PF7---PF8---PF9---PF10--PF11--PF12---
       Help        Exit              Flip                                Canc
|
The Modify Profile screen consists of a selection list of the seven groups of user profile settings.
To access a group of user profile settings
Select it.
A window or series of windows appears showing the current user profile settings.
To modify a user profile setting
Overtype it.
Press Enter.
To obtain a selection list of the options available
Enter a question mark (?).
The next sections describe the profile settings in detail.
On the left-hand side of the Screen Colors window there is a list of the field types and screen areas which can be colored individually. The current color settings are shown in highlighted text. The following colors are available:
Blue
Green
Neutral
Pink
Red
Turquoise
Yellow
If you mark the Mark for Default field and press Enter, you return to the default settings supplied by Software AG.
You can choose between three message line positions:
Above the command line
Top of the screen
Bottom of the screen.
You can change the position of the date, time, program name, object and day within the Super Natural header.
The Hello screen is the screen which welcomes you to Super Natural. You can choose to switch this screen off.
You can choose which of the following screens you see after the Hello screen when you enter Super Natural:
Main Menu
Transaction List
Prototype Program List
Application List
User File List
You can choose to display the time either in 24 hour format e.g. 17.30 or in am/pm format e.g. 5.30 pm.
The time delimiter is the character which comes between the hours and the minutes when a time is written. You can choose which character you want to use as the time delimiter.
You can choose to display the date in any format you wish.
The following are some examples of dates in different formats and with different delimiters:
| American | MM/DD/YY |
| European | DD/MM/YY |
| German | DD.MM.YY |
| International | YY-MM-DD |
| Other | YYYYMMDD |
You can choose to display the PF keys in ISA format, SAA format or as a cursor-sensitive bar.
The PF key allocation is shown underneath each PF key as in the following example:
 Command ===>
 Enter-PF1---PF2---PF3---PF4---PF5---PF6---PF7---PF8---PF9---PF10--PF11--PF12---
       Help        Exit              Flip                                Canc
|
If a PF key has no command allocated to it, it is displayed but not named.
The PF key allocation is shown next to each each PF key as in the following example:
 Command ===>
 F1=Help,F3=Exit,F6=Flip,F12=Canc,F15=Menu
|
If a PF key has no command allocated to it, it is not displayed.
The cursor-sensitive PF key bar is shown in reverse video at the top of the screen as in the following example:
Help Exit Flip Canc
|
You can change the language on the Super Natural screens.
You can decide whether you want to use the Checklist and at which level. For further information on the Checklist, see The Checklist in Using Super Natural.
There are three groups of transaction options; environment options, output options and processing options.
When you modify your transaction options in your user profile,
the new settings are valid for all new transactions but not for existing ones.
You can modify your transaction options for the transaction you are working on
only (modifying or adding) by issuing the OPTIONS
command from within the transaction - your modifications are only valid for the
transaction in which you issue the command.
You can choose how many rows (lines) and columns (characters per line) to use when producing reports in online run mode.
The minimum number of columns is 80, the maximum 250. The number of columns must exceed the display field length by at least 1. This means that a maximum of 249 characters can be displayed. If you specify an online screen size which is larger than the physical screen size, you can use the PF keys to page to the left and right to see the whole display.
The value specified for the number of rows must not exceed your terminal's physical screen size or a Natural error message is issued.
You can choose how many rows (lines) and columns (characters per line) to use when producing reports in batch run mode or with destination PRINTER.
The minimum number of columns is 80, the maximum 250. The number of columns must exceed the display field length by at least 1.This means that a maximum page width of 249 characters can be printed.
The value specified for the number of rows must not exceed the physical page size of the printer or a Natural error message is issued.
Enter the number of the printer to be used for transactions with report or log destination PRINTER. For further information contact your Super Natural administrator.
Enter the work file number to which data is to be sent for transactions with report destination WORK FILE.
Enter the work file number from which data is to be received for transactions in data selection mode DATA FROM WORK FILE.
For further information contact your Super Natural administrator.
Enter the PC file number to which data is to be sent for transactions with report destination PC FILE
Enter the PC file number from which data is to be received for transactions in data selection mode DATA FROM PC FILE.
For further information contact your Super Natural administrator.
If a line, value, or sign is suppressed, it means that it is not displayed as part of the transaction output.
The setting "Y" indicates that empty lines in a report are to be suppressed. "N" indicates that empty lines are not to be suppressed.
The setting "Y" indicates that identical values in a report are to be suppressed. "N" indicates that identical values are not to be suppressed.
The setting "Y" indicates that fields with the value zero in a report, are to be suppressed. "N" indicates that zero values are not to be suppressed.
The setting "Y" indicates that the signs of numeric fields in a report are to be suppressed. "N" indicates that the signs of numeric fields are not to be suppressed.
The setting "Y" indicates that headers in a report will be truncated (cut off) if they are too long.
If you specify the setting " N", theReport Line Length window appears if the headers alone exceed the specified online screen size.
The Report Line Length window is described in the section Reports Which are Too Wide in the section Reporting Transactions.
You can choose map filling characters to differentiate between
alphanumeric and numeric fields in data maintenance transactions and
transactions using the data change mode MAP. The recommended characters are the
underscore (_) for alphanumeric and the period
(.) for numeric fields.
This option controls the maximum number of records to be read when a transaction is run.
If you are modifying your profile (using
thePROFILE command), this field is not offered and
the maximum number of records read is controlled by the administrator.
If you are modifying your transaction options for the current
transaction (using the OPTIONS command), you can
reduce the maximum number of records to be read. This is intended for testing
transactions. You can reset the number of records to be read before you run the
transaction.
Note:
You cannot read more records than the maximum determined by the
administrator.
Use this option setting to determine the order in which the functions File Lookup (F), Calculations (C), Logical Conditions (L), Inter-field Arithmetic (A), External Sorting (S) and Updating Records (U) are processed when a transaction is run.
Use this option setting to determine the number of occurrences to be displayed for a field defined as a multiple value field. For further information on multiple- value fields, see Field Types in Defining Fields.
Use this option setting to determine the default number of occurrences which are to be displayed for a field contained with a periodic group. For further information on periodic groups, see Field Types in Defining Fields.
Use this option to specify whether the occurrences of multiple value fields or fields contained in a periodic group should be presented as individual records when changing data for a report, when creating a user file or when updating data.
"B" indicates flattening before processing. When you run a data maintenance or data change transaction using this option, Super Natural displays a flattened version of the selected data for editing. The occurrences of periodic groups are presented one at a time as individual records which you can update or change. Once you have updated or changed a record, you are shown how it will be output (still in flattened form) before moving on to the next record.
"A" indicates flattening after processing (only available for data change). When you run a data maintenance or data change transaction using this option, Super Natural displays a continuous list of the selected data for editing. All occurrences are numbered. Once you have updated or changed a record, you are shown how it will be output before moving on to the next record The data is flattened and each occurrence is displayed as a separate record.
"blank" indicates that no flattening is to be performed: when you run a data maintenance or data change transaction using this option, Super Natural displays a continuous list of the selected data for editing as for flattening after processing. Once you have updated or changed a record, you are shown how it will be output before moving on to the next record. The data is not flattened.
Use this option setting to define the evaluation of system functions used for control break processing when two files have been linked for the transaction.
"Y" indicates that system functions are to be evaluated for all records found in the primary file (outer loop).
"N" indicates that system functions are to be evaluated for all records found in the secondary file (inner loop). This setting is only relevant if two files are linked via the File Selection screen. If more than two files are linked via the Lookup function (1:n), system functions are processed per outer loop.
There are transaction modes for both reporting and data maintenance transactions.
Transaction modes are described in detail in the sectionsTransaction Modes for Reporting and Transaction Modes for Data Maintenance later in this documentation.
When you modify your transaction modes in your user profile, the new
settings are valid for all new transactions but not for existing ones. You can
modify your transaction modes for the transaction you are working on (adding or
modifying) from the Add Transaction window or by
issuing theMODEScommand from within the transaction
- your modifications are only valid for the transaction in which you issue the
command.