
The Natural system commands are used to create, maintain and execute
Natural objects. In Natural Studio, menu commands are provided for several
system commands. For example, the menu command
corresponds to the Natural system command CHECK.
All system commands, including those for which a menu command is provided, can be entered in the command line. See Issuing Commands in the Command Line for further information.
This document describes the system commands that can be chosen from a menu. The following topics are covered:
Natural system commands can be executed on all platforms on which Natural is available. For detailed information on the available system commands, see the System Commands documentation.
Note:
The system commands do not apply to resources. See
Managing
Resources.
An editor is invoked when you create a new Natural object or when you open an existing Natural object. Exception: an editor does not appear for classes (further information is provided in the topics below).
The following topics are provided:
The corresponding system command for creating and opening a Natural
object is EDIT.
For information on the programming language, see the Programming Guide and the Statements documentation.
See also Object Locking in the Remote Development Using SPoD documentation which contains information on the locking mechanism in the local and remote environment.
A Natural object is always created in the library and environment that is currently indicated in command line.
![]() To create a new Natural object
To create a new Natural object
Make sure that the library in which you want to store the new object is selected.
From the menu, choose . For a detailed description of each object type that is available with Natural, see Object Types in the Programming Guide.
Instead of an object type, you can also choose .
Or:
Invoke the context menu and choose .
Or:
When the Object toolbar is shown, choose the corresponding toolbar
button (toolbar buttons are only available for some of the object types).
Or:
If you want to create a program, press CTRL+N (shortcut
keys are not provided for creating other object types).
An empty editor window appears for the selected object type. Natural provides different editors for the different object types. For example, programs and subprogram are edited with the program editor, and the different types of data area (local, global and parameter data areas) are edited with the data area editor. See the Editors documentation for detailed information on how to use the different editors.
Exceptions:
When you have chosen the command, a wizard appears. See Dialog Wizard in the Dialog Editor section of the Editors documentation for further information.
When you create a DDM, a dialog appears first in which you have to select the database type. See Creating DDMs in the DDM Editor section of the Editors documentation for further information.
Classes can only be created in the logical view and in the flat view. When you create a class, a new class with the default name "NEWCLS" is immediately shown in the tree. An editor is not invoked. Instead, you select the class and then choose the command from the context menu to add further nodes (for example, an interface) to your class. As long as you do not save the class, it is not available in source format. See Class Builder in the Editors documentation for further information.
![]() To create a new Natural object by preselecting the object type
To create a new Natural object by preselecting the object type
Select a group node in the logical view of the library workspace or in a list view window (for example, the Programs node).
Invoke the context menu and choose .
Since the type of object has already been determined by the previous selection, an empty editor window appears for this object type.
Note:
When you select the Classes or
Resources node or any group node within this node,
and then choose from the context menu, a new
class or resource with a default name is added to the tree. An editor is not
invoked in this case.
When you open a Natural object, it is opened in the corresponding Natural editor.
Exceptions:
When you double-click a generated program or dialog for which a source does no longer exist, the program or dialog is executed. The command is not available in this case.
When you open the node for a class, a list view window appears. To view the content of a class, you simply expand the nodes in the tree (only possible in the logical view and flat view).
The following description applies to all Natural objects except classes. It applies only to the source of an object (and not to the generated program which is visible in the file view).
![]() To open existing Natural objects
To open existing Natural objects
Select the Natural object(s) that you want to open, invoke the context menu and choose .
Tip:
In a list view
window, it is possible to select more than one object.
Or:
Double-click the Natural object.
Or:
When the Object toolbar is shown, select the Natural object(s) and
choose the following toolbar button.
![]()
You can display the source code of an object in read-only mode. The object is displayed in the corresponding editor. "Object Listing" is shown in its title bar. You can copy its contents, but you cannot modify it. This is helpful, for example, if you want to view the content of an object in an inactive environment where it is not possible to open the object for editing.
Note:
When you list a class, its code is shown in an editor window.
See also the description of the system command
LIST.
![]() To list objects
To list objects
Select the Natural object(s) that you want to list.
Tip:
In a list view
window, it is possible to select more than one object.
From the menu, choose .
Or:
Invoke the context menu and choose .
Or:
When the Object toolbar is shown, choose the following toolbar
button.
![]()
You can check the source code of an object (except classes) for syntax errors.
Note:
Syntax checking is also performed when you
run or
stow an object, or when you
catalog all objects in a
library.
See also the description of the system command
CHECK.
![]() To check objects
To check objects
Activate the editor containing the object that you want to check.
Or:
Select the object in the library workspace or list view window. When
an editor window has not been opened, you can only use the toolbar button or
shortcut key (see below).
Tip:
In a list view
window, it is possible to select more than one object.
From the menu, choose .
Or:
When the Object toolbar is shown, choose the following toolbar
button.
![]()
Or:
Press CTRL+E.
If no errors are found, a message is shown indicating that the check was successful. The message is either shown in the status bar or in a dialog box. This depends on the setting for success messages in the workspace options.
If an error was found, a dialog box appears, providing information on the error. Example:
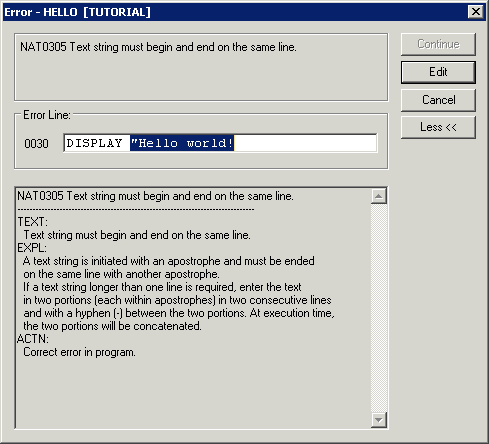
Correct the error in the dialog box.
Choose the button to find the next error.
When no more error is found, the dialog box is closed.
Note:
Instead of choosing the button, you
can also choose the button. The dialog box is then
closed and you can correct the error directly in the program editor.
You can save the source form of a Natural object. The syntax is not checked.
Note:
You can run a saved
object. As long as you do not stow
an object, you cannot execute
it.
Natural Studio offers different commands for saving. They are described in the topics below:
When you close Natural Studio and your recent changes have not yet been saved, you are asked whether you want to save these changes.
See also the description of the system command
SAVE.
You can save the source object in the active editor window.
Classes are handled differently since they are not edited in an editor window.
![]() To save an object (except class)
To save an object (except class)
Activate the editor containing the object that you want to save.
From the menu, choose .
Or:
When the Object toolbar is shown, choose the following toolbar
button.
![]()
Or:
Press CTRL+S.
Note:
When you save an object for the first time, the Save
As dialog box appears and you have to specify a name for the object.
See below.
![]() To save a class
To save a class
Select the top-level node of the class that want to save.
From the menu, choose .
Or:
Invoke the context menu and choose
.
Or:
When the Object toolbar is shown, choose the following toolbar
button.
![]()
Or:
Press CTRL+S.
Note:
When you save a class for the first time, the Save
As dialog box appears and you have to specify a module name. See
below.
You can create a new object by copying the current contents of the editor window to a new object. The editor window for the original object is automatically closed.
For several object types it is also possible to select a different code page for the object. See the Unicode and Code Page Support documentation for further information.
Caution:
If changes have been made since the last save, only the new
object contains the changes. The original object is closed without saving the
changes.
Classes are handled differently since they are not edited in an editor window. When a new class is created in the tree, it is not saved automatically. The class name which may be 32 characters long is shown in the logical view. The class module name, i.e. the name of the actual Natural object which may be up to 8 characters long, is assigned when the class is saved the first time; this name is not shown in the logical view. To find out the Natural object name for a class, you can display its properties or you can check it in the flat view or file view. See Class Builder in the Editors documentation for further information.
![]() To save an object (except class) with a different name
To save an object (except class) with a different name
Activate the editor containing the object that you want to save under a different name.
From the menu, choose .
The Save As dialog box appears. Example for a program.
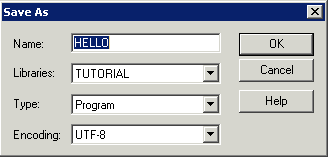
Specify a new name for the object.
See also Object Naming Conventions.
Optional. Define a different library by selecting it from the Library drop-down list box.
Optional (if available for the current object type). Define a different object type by selecting it from the Type drop-down list box.
The drop-down list box contains only those types that are allowed for the current object type. For example, you can change a program to a subprogram. See also Changing the Type of a Natural Object.
Note:
A type is not shown when you save a map, dialog or DDM.
Optional (if available for the current object type). Define a different code page by selecting it from the Encoding drop-down list box.
Choose the button.
The new object is created. The name, library and object type of the new object are now shown in the title bar of the editor window.
The new object is available in all views (sorted alphabetically). When a filter is currently active, it may happen that the new object is not shown since its name starts with different characters. See Filtering Libraries and Objects for further information.
![]() To save a class with a new module name
To save a class with a new module name
Select the top-level node of the class that you want to save under a different name.
From the menu, choose .
Or:
Invoke the context menu and choose .
The Save As dialog box appears.
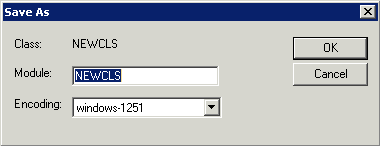
Specify the new module name.
The dialog box displays the current module name for existing classes and the default module name for new classes. The module name may be up to 8 characters long.
Optional. Define a different code page by selecting it from the Encoding drop-down list box.
Choose the button.
You can save all objects for which an editor window is open. You can also save all classes.
![]() To save all objects
To save all objects
From the menu, choose .
Or:
When the Object toolbar is shown, choose the following toolbar
button.
![]()
Or:
Press CTRL+SHIFT+A.
The objects are saved. When an object has not yet been saved previously, a Save As dialog box appears.
When you stow an object, it is checked and compiled. If no errors are found, the source form of the object is saved and the resulting generated program is stored (in addition to the source).
Note:
When you have stowed an object, you can
execute it.
See also the description of the system command
STOW.
![]() To stow objects
To stow objects
Activate the editor containing the object that you want to stow.
Or:
Select the object in the library workspace or list view window. When
an editor window has not been opened, you can only use the context menu,
toolbar button or shortcut key (see below).
Tip:
In a list view
window, it is possible to select more than one object.
From the menu, choose .
Or:
Invoke the context menu for the selected object and choose
.
Or:
When the Object toolbar is shown, choose the following toolbar
button.
![]()
Or:
Press CTRL+T.
When an object has not yet been saved previously, a Stow As dialog box appears. In this dialog box, you have to specify the same information as in the Save As dialog box.
When you catalog an object, it is checked and compiled. If no errors are found, the resulting generated program is stored.
In contrast to the command, the source code is not saved when you catalog an object, for example, when the editor is open and the latest changes have not yet been saved. However, the latest changes in the editor are always considered during the compilation process even if they have not yet been saved.
See also the description of the system command
CATALOG.
![]() To catalog objects
To catalog objects
Select the object in the library workspace or list view window.
Tip:
In a list view
window, it is possible to select more than one object.
Invoke the context menu and choose .
Or:
When the Object toolbar is shown, choose the following toolbar
button.
![]()
You can catalog all objects or selected objects in a library. Instead of cataloging, you can also use this function to check, save or stow objects.
![]() To catalog the objects in a library
To catalog the objects in a library
Select the library in which the objects are to be cataloged.
Tip:
In a list view
window, it is possible to select and catalog several libraries at
the same time.
From the menu, choose .
Or:
Invoke the context menu and choose .
Or:
When the Library toolbar is shown, choose the following toolbar
button.
![]()
The following dialog box appears:
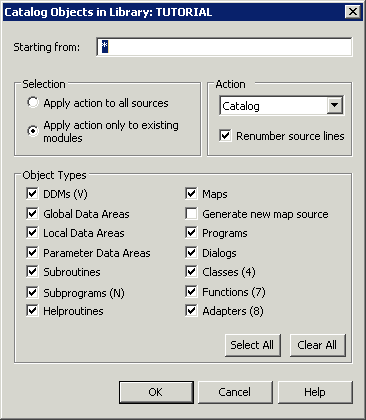
Note:
When you are working in a remote development environment using
SPoD, the options which cannot be used for this environment are dimmed.
Specify the types of objects and the action that is to be applied.
See the description of the system command
CATALL for
detailed information on the options in this dialog box.
Choose the button.
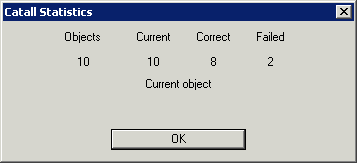
A dialog box appears providing statistics about the performed command. Example:
If an object could not be cataloged, it is listed in the results window. Example:

The objects are listed in the order in which they were processed. Associated with each object name is an error number (reason why the object could not be cataloged) and an error line (the line position in source code where the error can be found).
When you open an object from the results window, the line in which the error occurs is automatically selected in the editor.
Note:
By default, only errors are listed in the results window. It is
also possible to show information on all cataloged objects regardless if an
error occurred or not. See Workspace Options
for further information.
You can run programs and dialogs. When you run such an object, it is checked and compiled on the fly. If no errors are found, the object is executed. A generated program is not stored.
The latest changes in the editor are always considered during the compilation process even if they have not yet been saved.
See also the description of the system command
RUN.
![]() To run objects
To run objects
Activate the editor containing the object that you want to run.
From the menu, choose .
Or:
When the Object toolbar is shown, choose the following toolbar
button.
![]()
Or:
Press CTRL+R.
In the local environment, an output window appears when a Natural program writes output to the screen. See Output Window in the Operations documentation for further information.
In a remote development environment, either the Natural Web I/O Interface client or a terminal emulation window appears instead of an output window. See Natural Web I/O Interface Client and Terminal Emulation in the Remote Development Using SPoD documentation for further information.
You can execute programs and dialogs. When you execute such an object, it is checked and compiled. If no errors are found, the resulting generated program is stored and executed.
In contrast to the command which always uses your latest changes to the object, the command always uses the stowed version of your object. The latest changes in the editor are not considered during the compilation process.
See also the description of the system command
EXECUTE.
![]() To execute objects
To execute objects
Select the object in the library workspace or list view window.
Tip:
In a list view
window, it is possible to select more than one object. When you
select several objects in a list view window, they are executed one after the
other. The first object in the list view window is executed first.
From the menu, choose .
Or:
Invoke the context menu and choose
.
Or:
When the Object toolbar is shown, choose the following toolbar
button.
![]()
In the local environment, an output window appears when a Natural program writes output to the screen. See Output Window in the Operations documentation for further information.
In a remote development environment, either the Natural Web I/O Interface client or a terminal emulation window appears instead of an output window. See Natural Web I/O Interface Client and Terminal Emulation in the Remote Development Using SPoD documentation for further information.
When you clear an editor window, it is closed and a new empty editor window is opened at the same position. The title bar of the editor window shows that a name and library are not yet defined. The object type remains the same.
See also the description of the system command
CLEAR.
![]() To clear an editor window
To clear an editor window
Activate the editor window that you want to clear.
From the menu, choose .
Or:
When the Object toolbar is shown, choose the following toolbar
button.
![]()
Note:
When your latest changes have not yet been saved, a dialog box
appears asking whether you want to discard these changes. If you do not want to
discard the changes ( button), the clear process is
stopped. You can then save the object and issue the
command once more.