
This document provides information on the options that can be set in Natural Studio. It covers the following topics:
The settings in the Options dialog box control the behavior of certain features of Natural Studio.
![]() To invoke the Options dialog box
To invoke the Options dialog box
From the menu, choose .
The Options dialog box appears. Different pages are provided for setting different types of options.
Select one of the pages in this dialog box and set the required options as described below under the following headings.
Note:
Additional pages may appear in the Options
dialog box. For example, when XRef Evaluation is active, a page for setting the
options for this plug-in is also available. In such a case, you have to refer
to the corresponding product documentation for further information.
Choose the button to save your changes.
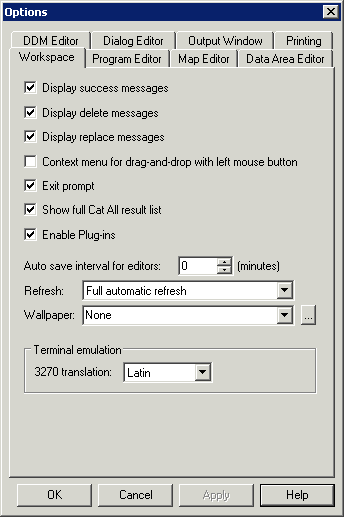
You can set the following options:
- Display success messages
When this check box is selected, a message box appears each time a command has been performed successfully. For example, you are informed when the stow operation was successful.
Note:
Error messages are not affected by the setting of this option. They appear each time an error occurs.- Display delete messages
When this check box is selected, a message box appears each time you are deleting an object. You are then asked whether you really want to delete the selected object(s).
- Display replace messages
When this check box is selected, a message box appears each time an object is about to be copied over an already existing object with the same name. You are then asked whether you really want to replace the object.
- Context menu for drag-and-drop with left mouse button
When this check box is selected, a context menu appears when you drag and drop objects with the left mouse button. The context menu appears when you release the mouse button at the end of the drag-and-drop operation. You can then choose whether to copy or move the objects.
When this check box is not selected (default), a context menu does not appear.
See also Copying Objects and Moving Objects.
- Exit prompt
When this check box is selected, a message box appears each time you are about to leave Natural Studio, informing you that this will end your session. The button in this message box can still be used to cancel the exit request.
- Show full Cat All result list
When this check box is selected, the Cat All tab of the results window displays all objects processed with the command, regardless if an error has occurred or not. See Cataloging the Objects in a Library.
- Enable plug-ins
When this check box is selected, the Plug-in Manager and all other plug-ins that are marked for automatic activation are activated when Natural Studio is started.
When this check box is not selected, neither the Plug-in Manager nor any other plug-in is activated when Natural Studio is started.
See also Plug-in Manager.
Note:
This option cannot be selected if the profile parameterUSEREPis set to "ON".- Autosave interval for editors
Use this spin box to specify a time interval in minutes after which the content of all open Natural editors is saved.
0 (zero) means that autosave does not take place.
- Refresh
Use this drop-down list box to specify how the display is to be refreshed. The following options are available:
Full automatic refresh
When this option is selected, the display is refreshed automatically for every change. This is the default setting. It is recommended to use this setting as long as it does not cause any performance problems.Optimized automatic refresh
When this option is selected, the display is refreshed automatically when a Natural object is changed. This refresh mode is performance-optimized for the case that only few objects of a huge library are changed. If a larger number of objects is changed, the behavior of Full automatic refresh is adopted and the increase of performance gained by Optimized automatic refresh is lost.It is recommended to use Optimized automatic refresh only if the performance of Full automatic refresh is not acceptable, especially when working in a remote development environment or when working with huge libraries.
Optimized automatic refresh cannot be used in the application workspace.
With Optimized automatic refresh the following differences apply, as compared to Full automatic refresh:
New library nodes or group nodes are not created. For example, if a library does not contain subprograms up to now, the group node Subprograms is not created when the user creates a new Natural subprogram.
Library nodes or group nodes are not deleted. For example, if all programs of a library are deleted, the Programs node is not deleted.
In a list view window, new objects are always inserted at the end of the list.
Changes from other users are not reflected in a library.
Classes and error messages are not refreshed at all.
No automatic refresh
When this option is selected, the display is not refreshed at all. You have to refresh the display manually. See Refreshing the Display.- Wallpaper
You can select an image to replace the default wallpaper in Natural Studio.
Choose the button with the three dots which is located next to this drop-down list box to select an image file from your file system. The supported image formats are indicated in the resulting dialog box.
When you choose None from this drop-down list box, a wallpaper is not used.
- 3270 translation
From this drop-down list box, you can select another character set to be used for terminal emulation.
Terminal emulation is used for remote development only. See Terminal Emulation and its subsection Translation Tables in the Remote Development Using SPoD documentation.
You can set preferences for various program editor options. These settings are taken as default values each time you start the program editor. See Program Editor in the Editors documentation for further information.
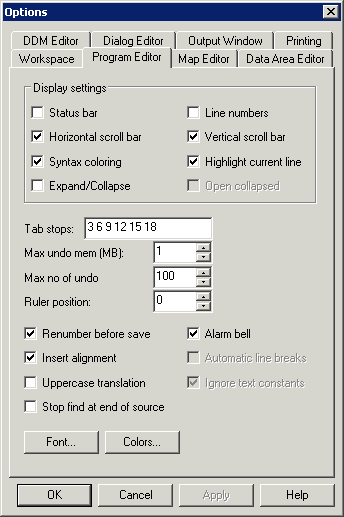
You can set the following options:
- Status bar
When this check box is selected, a status bar is displayed at the top of the program editor window. This status bar provides the same information as the status bar which can be displayed at the bottom of the Natural Studio window.
- Line numbers
When this check box is selected, line numbers are shown in the program editor.
- Horizontal scroll bar
When this check box is selected, a horizontal scroll bar is shown in the program editor window.
- Vertical scroll bar
When this check box is selected, a vertical scroll bar is shown in the program editor window.
- Syntax coloring
When this check box is selected, syntax coloring is used in the program editor. See also Defining Different Colors for the Syntax.
- Highlight current line
When this check box is selected, the program editor line in which the cursor is currently located is highlighted. See also Defining Different Colors for the Syntax.
- Expand/Collapse
When this check box is selected, the source code in the program editor is displayed in expandable/collapsible format. See Showing and Hiding Source Code in the Program Editor section of the Editors documentation for detailed information.
- Open collapsed
Only available when the check box Expand/Collapse is selected.
When this check box is selected, the source code is initially displayed in collapsed format.
When this check box is not selected, the source code is initially displayed in expanded (normal) format.
- Tab stops
This text box is used to specify the column numbers for tabulator stops in the program editor. You can add or modify existing tabulator stops in the text box. All tabulator stops must be separated by blanks.
- Max undo mem (MB)
Use this spin box to select the amount of buffer space available for storing text operations made in the program editor. You can specify a value between 0 and 64. Zero signifies the maximum space available.
- Max no of undo
Use this spin box to select the number of text operations which can be recalled/reinstated using the undo/redo functions. You can specify a value between 0 and 9999. Zero signifies the maximum limit dependent only on the specified maximum memory size (see above).
For more information on the undo/redo functions available in the program editor, see Undoing or Redoing Modifications in the Program Editor section of the Editors documentation.
- Ruler position
Use this spin box to select the column in which the ruler is to appear. You can specify a value between 0 and 245. 0 (zero) means that the ruler is not shown.
The ruler is a vertical bar which appears in the defined column. It is intended as a visual help when editing a program. For example, when a line of source code should not exceed 80 characters, you can define that the ruler is to appear in column 80.
A long line which extends beyond the ruler line is marked with a vertical bar that appears at the beginning of this line.
- Renumber before save
When this check box is selected, the lines in a program are renumbered and the line number references are updated before every save.
- Alarm bell
When this check box is selected, a beep sound is played each time an invalid key or key combination is pressed.
A prerequisites for this is that Natural is installed on your local PC. When you access Natural on a terminal server, you cannot hear the beep sound from your local PC.
- Insert alignment
When this check box is selected, the cursor is aligned with the first non-blank character of the previous line of text when you press ENTER or RETURN. If there are no non-blank characters before the inserted line, the cursor is aligned with column 1.
- Automatic line breaks
Only available if a ruler position has been specified (that is: if a value other than 0 is shown in the Ruler position spin box; see above).
When this check box is selected, the automatic line break feature is active. See Using Automatic Line Breaks in the Program Editor section of the Editors documentation for detailed information.
- Uppercase translation
When this check box is selected, the source code is translated to uppercase before it is saved, cataloged or stowed. This is convenient if working with a mainframe source in a SPoD environment, where the mainframe compiler expects Natural sources to be written in uppercase.
- Ignore text constants
Only available if the check box Uppercase translation is selected.
When this check box is selected, text constants placed in single quotation marks are not translated to uppercase. This option has no influence on text constants placed in double quotation marks.
- Stop find at end of source
When this check box is selected, the command stops searching at the end of the source code if the specified string is not found. The search is performed in the specified direction (either up or down).
When this check box is not selected and the string is not found, the command wraps around to the other end of the source code and continues the search.
- Font
When you choose this button, the Font dialog box appears. This is a standard Windows dialog in which you can define another font, font style and font size to be used in the program editor. Only monospaced fonts are available.
- Colors
When you choose this button, the Color Definition dialog box appears. See Defining Different Colors for the Syntax below.
You can define different colors to be used with the syntax coloring feature of the program editor. Colors are only used in the program editor, when the Syntax coloring check box is selected (see above).
![]() To define different colors for the syntax
To define different colors for the syntax
On the Program Editor page of the Options dialog box, choose the Colors button.
The Color Definition dialog box appears in which you can define different colors for the different text types.
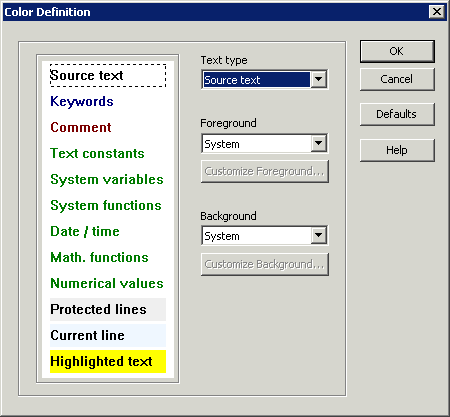
The current color for each text type is shown in the sample area at the left of the dialog box. The default foreground color assignments are:
| Default color | Used for the following text types |
|---|---|
| Blue | Natural keywords. |
| Red | Comments. |
| Green | Text constants, system variables, system functions, date/time, mathematical functions, and numerical values. |
| Black | User-defined variables, and all other remaining syntax elements. This color is defined in Windows (as defined for the item "Window"). |
For several text types (protected lines, current line, highlighted text), you can only define a different background color.
Notes:
TRUE and FALSE.
Select the text type for which you want to change the color from the Text Type drop-down list box.
Or:
Select the corresponding text type in the sample area.
Note:
To select the text type "edit window" from the
sample area, click any position that does not contain text. Only a background
color can be defined for the edit window.
The drop-down list boxes Foreground and Background show the currently defined colors for the selected text type. The color name System means that the color as defined in Windows in used.
From the Foreground drop-down list box, choose the color that is to be used for text.
When a color other than System is selected, you can also choose the button to invoke the standard Windows Color dialog box in which you can define your own custom colors. The custom color can then be selected by choosing the color name Custom from the drop-down list box. Note that this always uses the color which was last selected in the Color dialog box.
From the Background drop-down list box, choose the color that is to be used as the background color for text.
When a color other than System is selected, you can also choose the button to invoke the standard Windows Color dialog box in which you can define your own custom colors. The custom color can then be selected by choosing the color name Custom from the drop-down list box. Note that this always uses the color which was last selected in the Color dialog box.
Optional. If you want to return to the default syntax colors, choose the Default button.
Optional. To save your settings without closing the dialog box, choose the Apply button.
To save your changes and close the dialog box, choose the button.
You can set preferences for various map editor options. These settings are taken as default values each time you start the map editor. See Map Editor in the Editors documentation for further information.
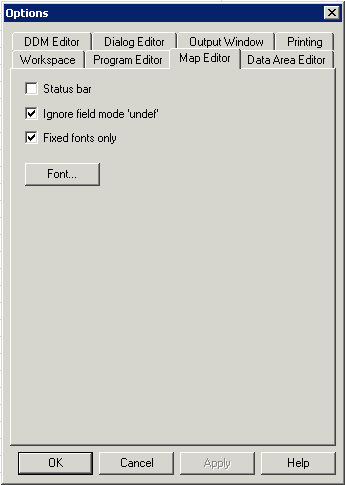
You can set the following options:
- Status bar
When this check box is selected, the status bar is displayed at the top of the map editor window. This status bar provides the same information as the status bar which can be displayed at the bottom of the Natural Studio window.
- Ignore field mode 'undef'
When this check box is selected, all fields that have been created on the map but have not yet been named or defined (that is, they have only the values generated by the map editor) are ignored when you check or stow the map.
- Fixed fonts only
When this check box is selected, only fixed-width fonts are shown in the Font dialog box (see below).
When this check box is not selected, you can select proportional-width fonts in the Font dialog box, in addition to the fixed-width fonts.
- Font
When you choose this button, the Font dialog box appears. This is a standard Windows dialog in which you can define another font, font style and font size to be used in the map editor.
Important:
The font that you define here is only used when you have defined the same font in the output window options. Otherwise the map is output with the default font.
You can set preferences for various data area editor options. These settings are taken as default values each time you start the data area editor. See Data Area Editor in the Editors documentation for further information.
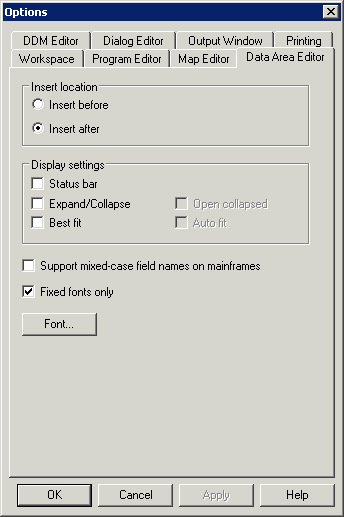
You can set the following options:
- Insert location
You can specify where fields are to be inserted. Select one of the following option buttons:
Insert before
When this option button is selected, a field is always inserted before the currently selected field.Insert after
When this option button is selected, a field is always inserted after the currently selected field.- Status bar
When this check box is selected, the status bar is displayed at the top of the data area editor window. This status bar provides the same information as the status bar which can be displayed at the bottom of the Natural Studio window.
- Expand/Collapse
When this check box is selected, the fields in the data area editor are displayed in expandable/collapsible format. See Showing or Hiding Fields in the Data Area Editor section of the Editors documentation for detailed information.
- Open collapsed
Only available when the check box Expand/Collapse is selected.
When this check box is selected, the fields are initially displayed in collapsed format.
When this check box is not selected, the fields are initially displayed in expanded (normal) format.
- Best fit
When this check box is selected, the width of each visible column is adjusted so that the column header and the content of a column are always completely visible. See Rearranging Columns in the Data Area Editor section of the Editors documentation for further information.
- Auto fit
Only available when the check box Best fit is selected.
When this check box is selected, each edited column is automatically readjusted to the optimum width (as described above) when you leave the column.
When this check box is not selected, the width of the edited column is not readjusted when you leave the column.
- Support mixed-case field names on mainframes
When this check box is not selected, the field names are translated to uppercase during editing.
When this check box is selected, the field names are not changed. This is convenient if working with a mainframe source in a SPoD environment where the names can be stored in a combination of uppercase and lowercase characters.
- Fixed fonts only
When this check box is selected, only fixed-width fonts are shown in the Font dialog box (see below).
When this check box is not selected, you can select proportional-width fonts in the Font dialog box, in addition to the fixed-width fonts.
- Font
When you choose this button, the Font dialog box appears. This is a standard Windows dialog in which you can define another font, font style and font size to be used for the edit area.
You can set preferences for various DDM editor options. These settings are taken as default values each time you start the DDM editor. See DDM Editor in the Editors documentation for further information.
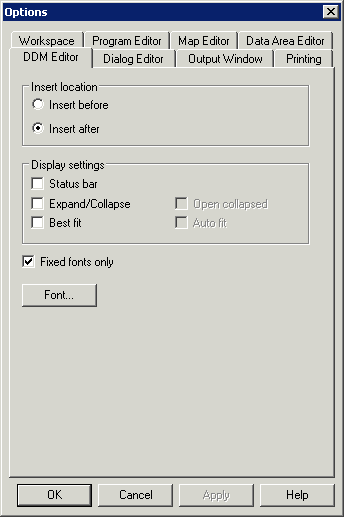
You can set the following options:
- Insert location
You can specify where fields are to be inserted. Select one of the following option buttons:
Insert before
When this option button is selected, a field is always inserted before the currently selected field.Insert after
When this option button is selected, a field is always inserted after the currently selected field.- Status bar
When this check box is selected, the status bar is displayed at the top of the DDM editor window. This status bar provides the same information as the status bar which can be displayed at the bottom of the Natural Studio window.
- Expand/Collapse
When this check box is selected, the fields in the DDM editor are displayed in expandable/collapsible format. See Showing or Hiding Fields in the DDM Editor section of the Editors documentation for detailed information.
- Open collapsed
Only available when the check box Expand/Collapse is selected.
When this check box is selected, the fields are initially displayed in collapsed format.
When this check box is not selected, the fields are initially displayed in expanded (normal) format.
- Best fit
When this check box is selected, the width of each visible column is adjusted so that the column header and the content of a column are always completely visible. See Rearranging Columns in the DDM Editor section of the Editors documentation for further information.
- Auto fit
Only available when the check box Best fit is selected.
When this check box is selected, each edited column is automatically readjusted to the optimum width (as described above) when you leave the column.
When this check box is not selected, the width of the edited column is not readjusted when you leave the column.
- Fixed fonts only
When this check box is selected, only fixed-width fonts are shown in the Font dialog box (see below).
When this check box is not selected, you can select proportional-width fonts in the Font dialog box, in addition to the fixed-width fonts.
- Font
When you choose this button, the Font dialog box appears. This is a standard Windows dialog in which you can define another font, font style and font size to be used for the DDM source code in the editing area.
You can set preferences for various dialog editor options. These settings are taken as default values each time you start the dialog editor. See Dialog Editor in the Editors documentation for further information.
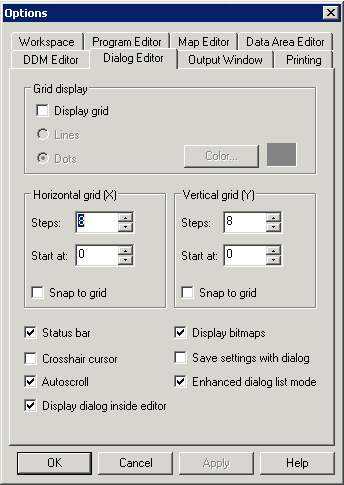
You can set the following options:
- Grid display
When the Display grid check box is selected, a grid is displayed in the edit area of the dialog editor. The grid is helpful when aligning dialog elements.
The following options are only available when the Display grid check box is selected:
Lines
When this option button is selected, a classical grid is shown.Dots
When this option button is selected, a dots pattern is used for the grid.Color
When you choose this button, the standard Windows Color dialog box appears in which you can select or define another color to be used for the grid. The currently selected color is then shown in the Options dialog box, next to the button.
- Horizontal grid (X) / Vertical grid (Y)
The following options are available in these two group boxes:
Steps
Use this spin box to select the number of pixels (steps) between two lines or dots.Start at
Use this spin box to select starting value for the grid. For example, when you specify the value "20" for the horizontal grid and "10" for the vertical grid, the grid is moved 20 pixels to the right and 10 pixels to the bottom.Snap to grid
When this check box is selected, the dialog elements snap to the grid.- Status bar
When this check box is selected, the status bar is displayed at the top of the dialog editor window. This status bar provides the same information as the status bar which can be displayed at the bottom of the Natural Studio window.
- Display bitmaps
When this check box is selected, the dialog editor loads and displays the bitmaps in the dialog elements to show how they appear at runtime.
When this check box is not selected, the dialog element displays the bitmap name only, which improves editing performance.
- Crosshair cursor
When this check box is selected, the crosshair cursor is used when you create or move dialog elements. The crosshair cursor consists of lines that extend horizontally and vertically to the windows borders.
When this check box is not selected, the system cursor is used.
- Save settings with dialog
When this check box is selected, the option settings are always saved with a dialog.
Dialogs saved while this option is disabled continue to use the current option settings.
- Autoscroll
When this check box is selected, the dialog editor window is automatically scrolled so that the dialog is always visible in the dialog editor window. This is also helpful when you move the dialog within the dialog editor window.
When this check box is not selected, and the dialog has been resized so that the defined dialog is currently not visible, you have to use the scroll bars to find the dialog in the dialog editor window.
It is recommended that you activate this option when the dialog is displayed inside the dialog editor window (see the corresponding option below).
- Enhanced dialog list mode
Starting with Natural for Windows Version 4.1, dialog sources are always saved in enhanced format. Therefore, the line number inconsistency mentioned below does no longer exist. The older (22C) format is only seen if old dialogs in this format are listed or printed outside of the dialog editor. Enabling this option is only meaningful if you list or print non-enhanced dialog sources; it does not apply to the new dialog source format.
When this check box is selected, the dialog source is shown in a format that is more readable than the source code of the old Natural versions. If you choose to display the code listing after receiving a compiler error, you will get the code generated for the compiler.
If you have saved your dialog sources in non-enhanced format and the enhanced listing option is enabled, any Natural runtime error message will contain an incorrect line number. To ensure that you get the correct line number, disable this option.
- Display dialog inside editor
When this check box is selected, the current dialog is displayed inside the dialog editor window.
When this check box is not selected, the current dialog is displayed outside the dialog editor window. This provides more space for editing. Be careful in this case. Your dialog may disappear from view if its
RECTANGLE-XandRECTANGLE-Yvalues denote a position outside the screen (see the Dialog Component Reference for further information on these values). Another consequence is that the dialog will overlap any code listing window that appears.
You can set preferences for various output window options. These settings are used each time a Natural program writes output to the screen. This output is shown in an output window. See Output Window in the Operations documentation for further information.

You can set the following options:
- Activate report page buffer
When this check box is selected, buffering is active. Buffering accommodates approximately 250 lines of Natural output. Input empties the report page buffer.
- Display input fields with frame
When this check box is selected, all input fields are shown with a border (frame).
- Display PF key buttons with number
When this check box is selected, the PF key buttons contain the numbers of the associated PF key. The name of each PF key is displayed below the corresponding PF key button.
When this check box is not selected, the PF key buttons contain the names of the PF keys (instead of the numbers).
- Display more prompt
When this check box is selected, the
MOREprompt is shown for output generated by the Natural statementsDISPLAY,WRITEor- Disable ESC key
When this check box is selected, the ESC key cannot be used to quit the current Natural program.
- Disable help menu
When this check box is selected, the Natural output window does not show a menu. When no other menus have been defined, the Natural output window does not show a menu bar.
- Disable profile dialog
When this check box is selected, the output window options can only be set in Natural Studio. In this case, the command is not available in the control menu of the output window. See also Changing the Output Window Profile in the Operations documentation.
- Fixed fonts only
When this check box is selected, only fixed-width fonts are shown in the Font dialog box (see below).
When this check box is not selected, you can select proportional-width fonts in the Font dialog box, in addition to the fixed-width fonts.
- Font
When you choose this button, the Font dialog box appears. This is a standard Windows dialog in which you can define another font, font style and font size to be used in the output window.
- Colors
When you choose this button, the Color Profiling dialog box appears. See Defining Different Colors for the Output below.
You can define different colors to be used for all Natural output in the output window.
![]() To define different colors for the output
To define different colors for the output
On the Output Window page of the Options dialog box, choose the Colors button.
The Color Profiling dialog box appears in which you can define different colors for the different color attributes.
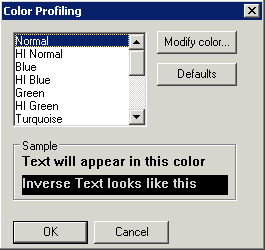
Select the attribute for which you want to change the color in the list box.
The current color for the selected attribute is shown in the sample area at the bottom of the dialog box.
Choose the button to invoke the standard Windows Color dialog box.
Select a color or define a custom color in the Color dialog box and choose the button to return to the Color Profiling dialog box.
Optional. If you want to return to the default colors, choose the Default button.
To save your changes and close the dialog box, choose the button.
You can set preferences for various printing options. These settings are used each time you print a Natural object or a list view. See Printing Objects and Views for further information.

You can set the following options:
- Margins
The values in these text boxes determine the margins, in millimeters, to be set on each side of the printed page. If any of these values is less than the minimum margin supported by the printer, this minimum value is used instead of the value entered.
- Page header
When this check box is selected, a header is printed at the top of each page, containing the date and time, and the relevant object identification information (such as object name, type and library).
- Page footer
When this check box is selected, a footer is printed at the bottom of each page containing the current page number.
- Use default font
When this check box is selected, the default font is used for printing.
The default font for a Natural object is defined on the corresponding page of the Options dialog box. For example, when you print an object (either from an editor window or list view window) which is handled by the program editor, the font which is currently defined for the program editor is used.
- Font
Only available when the Use default font check box is not selected.
You can define a font that is to be used instead of the default font. When you choose this button, the Font dialog box appears. This is a standard Windows dialog in which you can define the font, font style and font size to be used for printing. The font you define here is used whenever you print a Natural object or list view. Only monospaced fonts are available.