
The library workspace is used to administer the Natural system files in the current environment in a hierarchical manner as a tree view. In Natural terms, a system file is a collection of Natural libraries and a Natural library is a collection of Natural objects and resources.
This document covers the following topics:
All nodes below the node Local Environment belong to the local Windows environment which is normally your own PC. This node is available in all views described below. Example for the logical view:
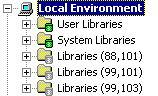
When the local environment is active, the node name Local Environment is shown in bold, and the Environment text box of the command line contains the string "Local".
Using the Configuration Utility, alias names can be defined for the system files. When an alias name has been defined, it is shown for the corresponding node in the library workspace. See System Files (global configuration file) in the Configuration Utility documentation.
A node for a remote environment can only be shown when you are using Natural Single Point of Development (SPoD) for remote development on a mainframe, UNIX, OpenVMS or Windows computer. See Accessing a Remote Development Environment in the Remote Development Using SPoD documentation for further information.
The node name is either a user-defined description, or (if a description has not been specified) the name of the server and the port number. This node is available in all views described below. Example for the logical view:
When the remote environment is active, the node name is shown in bold, and the Environment text box of the command line also contains the node name.
When the remote environment is currently not connected, the string "Disconnected" is shown to the right of the node name.
Alias names can also be shown for the system files in a remote UNIX, OpenVMS or Windows environment. The alias names are defined with the Configuration Utility which is available with Natural on these platforms.
In the logical view, different nodes are provided for user libraries and system libraries. The objects in a library are grouped into different nodes, according to their Natural object types.
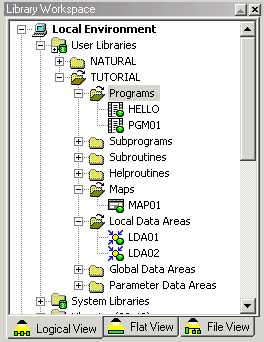
For example, all programs are shown in a group node called Programs. Thus, if you want to view the available programs in a library, you must expand the Programs node. This is not required in the flat view (see below).
For subroutines, functions, classes and DDMs, the long names can be shown in the logical view. The other views show the short names (max. 8 characters; see also Object Naming Conventions). For example, for a subroutine, the name that has been defined in the program is shown (which may exceed 8 characters). The flat view and file view show the name that has been defined when saving the subroutine.
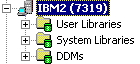
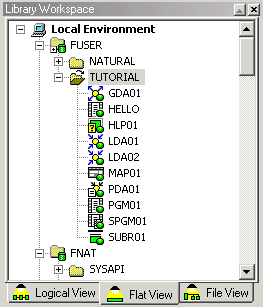
In the flat view, different group nodes are provided for system files
containing user-written programs (FUSER) and system programs
(FNAT).
The objects in a library are displayed without any grouping. The object type is always indicated by the icon next to an object. See Object Nodes.
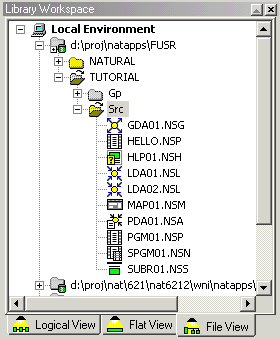
In the file view, the structure of the Natural environment is represented as available on the file system. A Natural system file is displayed as the path to the Src and Gp subdirectories.
The group node Src contains all Natural sources and the group node Gp contains all generated programs (Natural executables). Group nodes for other subdirectories (for example, Res for resources or Err for error codes) may also be available.
Note:
Generated programs are also referred to as "cataloged
objects". They are created when objects are
stowed or
cataloged.
The object type is always indicated by the icon next to an object. See Object Nodes.
The Natural objects are displayed with the corresponding file extensions (for example, ".NGP" for "Natural Generated Program" or ".NSP" for "Natural Source Program"). For further information on the possible file extensions, see System File Structure in the Operations documentation.
In a remote environment, the name of each mapped remote database is shown with database ID and file number. Example:
![]()
This section describes the icons that are used in the tree view windows and list view windows for the different types of nodes.
The following icons are used for the different group nodes:
|
|
Local environment. |
|
|
System file containing user libraries or system libraries. When working with SPoD in a remote environment, the system file also contains DDMs. See also Library Types. |
|
|
Inactive system file. See also Library Types. |
|
|
System file with an active filter. See Filtering Libraries and Objects for further information. |
|
|
Nodes for libraries or groups of Natural objects. The content of a group depends on the view (logical view, flat view or file view). |
|
|
Library with an active filter. See Filtering Libraries and Objects for further information. |
|
|
Library with suppressed line numbers in the source code. See Suppressing Line Numbers in the Source Code for further information. |
|
|
Library with an active filter and suppressed line numbers in the source code. |
|
|
Remote environment. |
For a detailed description of each object type that is available with Natural, see Object Types in the Programming Guide.
The following icons are used for the different object types:
|
|
Program |
|
|
Class (see also Class Builder Nodes in the Editors documentation) |
|
|
Subprogram |
|
|
Function |
|
|
Subroutine |
|
|
Copycode |
|
|
Helproutine |
|
|
Text |
|
|
Dialog |
|
|
Map |
|
|
Adapter |
|
|
Local data area (LDA) |
|
|
Global data area (GDA) |
|
|
Parameter data area (PDA) |
|
|
Data definition module (DDM) |
Natural objects can consist of the Natural source, the Natural generated object (for example, a generated program or a generated local data area) or both. The difference is reflected in the icon. The above icons can also be shown as follows (example for a program):
|
|
Without a green ball and not gray: only the source of the object is available. |
|
|
With a green ball and not gray: source and generated object are available. |
|
|
With a green ball and gray: only a generated object is available and no source. |
See Invoking Editors for information on how to create or open such an object. Or see the Editors documentation for detailed information on how to use the different editors.
Icons are also shown for resources. See Managing Resources for further information.
You can display the properties for each node shown in the library workspace or in a list view window. Different information is shown in the resulting Properties dialog box, depending on the selected item (see the examples below).
![]() To display the properties for a node
To display the properties for a node
Select the node for which you want to display the properties.
From the menu, choose .
Or:
Invoke the context menu and choose
.
Or:
Press ALT+ENTER.
The Properties dialog box appears.
Note:
You can also display the properties for the nodes in the application
workspace. Other than the Properties dialog boxes that are
shown for the nodes in the library workspace, the
Properties dialog boxes that can be invoked for the
application server and for an application provide more than one page. It is
possible to enter information on the additional pages. See
Managing
Applications in the Remote Development Using
SPoD documentation for further information.
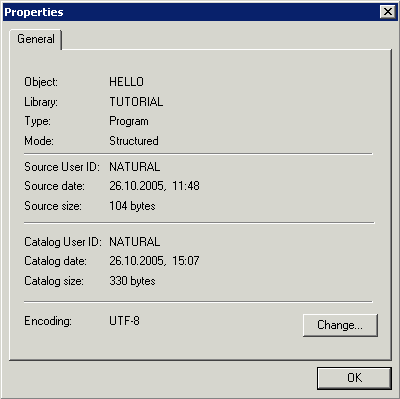
If available for the selected object type, the button is provided. When you choose this button, the Encoding dialog box appears in which you can select a different code page. See Changing the Code Page of a Natural Object for further information.

When you display the properties for a library, the Suppress line numbers check box is available. When this check box is selected, new sources in this library will be saved without line numbers in the file system. The line numbers in existing sources will be suppressed the next time these sources are saved. See Suppressing Line Numbers in the Source Code for further information.