
The following will guide you through the process of installing and starting the SOA Gateway server.
Once the SOA Gateway Control Centre has been installed, you are ready to download the SOA Gateway Server install files to your local machine.
Important:
If the version you are installing is not SOA Gateway v2.4.2,
then your installation may display a different version number from the
screenshots below. There is no functional installation difference between
versions, so this can be safely ignored.
The next step then is to install and start the SOA Gateway server. To do this, you may have to deploy files to a remote machine. For example, you want to run your SOA Gateway Control Centre on Windows, but your SOA Gateway server on z/OS. You can use the deployment wizard to deploy the required files to z/OS and start your server.
If this is the first time you've started the Control Centre, the SOA Gateway Perspective will be activated automatically.
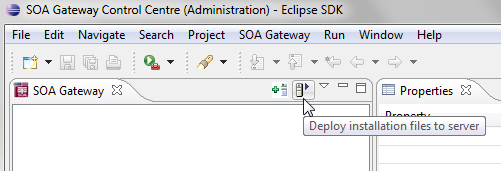
If, for some reason, the SOA Gateway Control Centre perspective has not started, click and choose SOA Gateway Control Center (Admin) from the list. Click
You will be asked to specify a project name or accept the default. Usually you will now simply click the 'Continue' button, which will then start the 'Deployment Wizard' to guide you through the process of defining your server within the SOA Gateway Control Center and transfer (FTP) the installation files to the SOA Gateway Server target machine.
If you, for whatever reason, opt to NOT run the Deployment Wizard at that time, you can start the wizard anytime later on by clicking the Deployment action button in the title bar of the 'SOA Gateway' or 'SOA Gateway (legacy) Servers' view
The Deployment Wizard will now start
Select your SOA Gateway license file.
From the list of licensed kits, select the z/OS kit.
Click
The following screen allows you to either select an existing SOA Gateway server to deploy to, or to define a new SOA Gateway server to the Control Centre. This server definition will be used for both the deployment process as well for (remote) server administration later on.
To define a new server:
Enter a 'friendly name'. This name will be used to refer to a SOA Gateway Server without needing to enter the hostname (or IP) later on.
Enter the hostname or IP of the machine on which the SOA Gateway server will run. This host/IP will be used to send the install files ( via FTP ) and will become the host/IP that you use when issusing requests to SOA Gateway.
Enter the port which you would like SOA Gateway to listen for connections on.
A new Apache web server will be installed, you must ensure that the port choosen here is available for use on the server machine.
The port entered here will utimately be the port that SOA Gateway uses to service requests.
Important:
Once you have filled in all of the above, click
The server will now be added to your SOA Gateway Control Centre 'Servers View' for later use.
Alternatively, if an already defined server is to be used (i.e. installation files deployed to it), check 'Deploy to existing SOA Gateway Server' and select a server from the list in the 'Existing Server Information' section.
Click
The next screen is used to deploy the installation files to the target machine, i.e. the machine is where the SOA Gateway server will run.
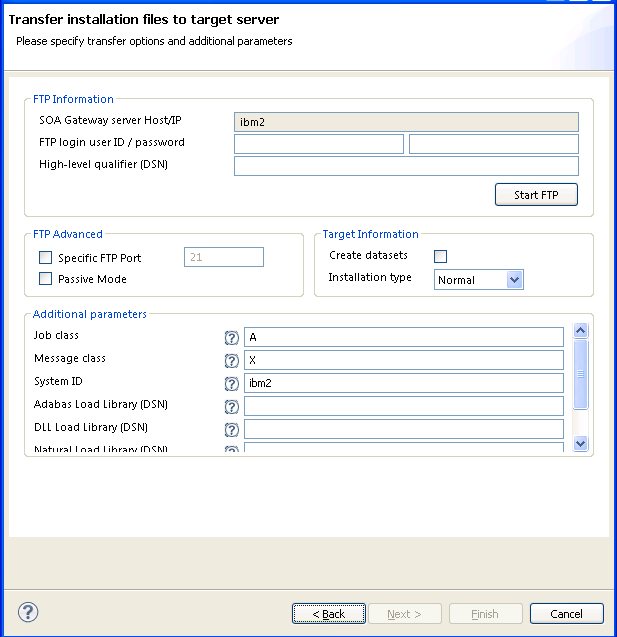
The hostname / IP will have already been filled by what has been specified on the previous page.
Enter the username which is used to login (via FTP) to the server machine (if required)
Enter the password (if required)
Enter a high-level qualifier to send the installation files to.
Important:
Check the Create datasets box (in the target information group) if you want the wizard to create the necessary datasets (recommended). Otherwise, these must be already allocated. For more information, see here
Installation type. In most cases, this should be left as Normal . If the datasets that are being sent are patch datasets, you should select Patch from the drop-down menu.
The Additional parameters group will allow you to enter the DSN(s) required for the operation of the driver(s) to be installed. Parameters related to all licensed drivers are queried here, you may omit those for all drivers you do not intend to use.
Note:
Click the Help button(s) next to the DSN name input fields to view
information about each datasets purpose.
If your FTP server requires a port other than 21, you can specify that by selecting Specfic FTP Port and entering the FTP port number.
If your FTP server requires passive mode transfers, you can enable this by selecting the Passive Mode checkbox
Important:
Click the button to begin the
FTP.
Once the FTP has completed, you need to logon to the target machine, and run the server-specific installation steps.
Now that the server has been installed, you can query the server status from the deployment wizard.
You can choose to view this status information in the Deployment Wizard, in a browser, or both.
Click the or the buttons to return the status of the server.
You should now click to create SOA Gateway drivers that are enabled in your license. If you choose to not add drivers now, they can also be created at a later stage, more information about defining drivers can be found in the Servers View section of this documentation.
The "Driver Wizard" will present a list of licensed drivers, and come up with all drivers selected and ready to be defined. You may now just click the button to define all of them, or deselect those you do not need or want to set up at that stage.
Click "Configure".
In case the driver does not require any additional parameters to be set, it will be defined now, otherwise the Driver Definition Dialog will ask for the additional parameter(s) to be set. e.g. we set the "ListMaxRecords" parameter to a value of "0" (zero) for an Adabas driver. Click the button.
Click to close the Deployment Wizard
Configure SOA Gateway using the SOA Gateway (Eclipse) Control Centre
This section outlines machine specific installation steps.
Important:
This step can be ignored if you chose the in the Deployment Wizard. If so, continue to
here
The SOA Gateway Installation on z/OS uses 4 datasets, which must be created in advance. The datasets can be any name you wish, so long as they each use the same high-level qualifier. This allows the user to specify one dataset name prefix in the Java wizard, and the installation is based upon this qualifier.
The 4 datasets to create are RECV, JCL, CONF, and ZIP.
For example, if the high-level qualifier is SAG.ASG.INST001, then the following would be the datasets that need to be created.
SAG.ASG.INST001.RECV
SAG.ASG.INST001.JCL
SAG.ASG.INST001.CONF
SAG.ASG.INST001.ZIP
The dataset attributes needed are as follows:
| Name | Type | RECFM | LRECL | BLKSIZE | SIZE |
|---|---|---|---|---|---|
| RECV | Sequential | FB | 80 | 3120 | see below |
| JCL | PDS | FB | 80 | 3120 | |
| CONF | PDS | VB | 508 | 512 | |
| ZIP | Sequential | VB | 16380 | 16384 | see below |
These local files will be located in the directory where the wizard was started.
XMIT File: AdabasSOAGateway/zOS/ASG.XMIT
ZIP File:
AdabasSOAGateway/zOS/asg.zip
The size attribute for the RECV and ZIP datasets to be created on the zOS should be calculated as follows:
RECV File: Divide the size of ASG.XMIT in bytes by 3120. Round the resultant size upwards to the nearest integer to obtain the file size in blocks. We recommend a size of 9700 blocks.
ZIP File: Divide the size of asg.zip in bytes by 16380. Round the resultant size upwards to the nearest integer to obtain the file size in blocks. We recommend a size of 700 blocks.
Enter the hostname or IP address of the z/OS system.
Select z/OS as the "Host type"
Enter the user ID
Enter the password
Enter the high-level qualifier used to create the datasets created earlier in the process.
If you wish to use a non-standard FTP port, click the "Specific FTP Port" checkbox and enter the port to be used.
| RECV | Sequential file containing the SOA Gateway load modules. This will be TSO RECEIVEd as part of the installation process. | |
| JCL | SOAGINS1 | A job to perform a TSO receive. |
| SOAGINS2 | A job which deletes, creates, initializes, and unzips the SOA Gateway file system into the file system available to Apache in this environment. The DEL step of this job will finish with CC=8 if the PFS dataset does not exist. Likewise, if the PFS dataset does exist, it will be deleted by this job. | |
| SOAGINS3 | A job which copies a Apache's configuration file from a PDS member to the SOA Gateway Environment. | |
| SOAGINS4 | A job which copies the license file the SOA Gateway Environment. | |
| SOAGINS5 | A job which copies an Apache's SSLCONF configuration file from a PDS member to the SOA Gateway Environment. | |
| SOAGINS6 | A job which copies SSL Certificate and SSL Key files from the CONF PDS to the SOA Gateway Environment. | |
| SOAGCOPY | A job which copies a file out of the SOA Gateway Environment to a dataset on zOS. Use only at the request of Tech Support | |
| SOAGPROC | PROC to be used for running all other jobs. | |
| SOAGSTRT | Job which starts the SOA Gateway Server. | |
| PFSPROC | PROC to be used for various utilities. | |
| CPLOGS | A job which copies Apache's error_log to an OUTPUT DDCARD if a failure occurs during SOA Gateway initialization. Once the SOA Gateway server is initialized, this log will be written to the JES Spool. | |
| PFSLS | A job which lists the contents of the SOA Gateway file system. | |
| CLIINI | A DB2 CLI Initialization File. If using DB2 Driver this will need to be modified to reflect the Sub-System ID and location name. Your DBA can provide this information. | |
| CONF | CONFIG | File used by SOA Gateway to declare environment variables |
| HTCONF | A copy of the SOA Gateway's Apache configuration file. This can be edited and copied into the SOA Gateway file system using SOAGINS3. | |
| GROUP | Run-time configuration file | |
| HOSTS | Run-time configuration file | |
| PASSWD | Run-time configuration file | |
| DXRTRACE | Run-time parameters for debugging. Only to be used at the direction of support | |
| DDCARD | Adabas Run parameters | |
| SYSPARM | Run-time parameters. | |
| ASGLIC | License File. | |
| ZIP | A Sequential zip-file containing the SOA Gateway file system. |
If you do not wish to install the SOA Gateway (Eclipse) Control Centre, proceed to z/OS Server Setup
You can either, logon to the z/OS host and setup the SOA Gateway Server, or install the client pieces now (if selected) and run the server setup at a later time.
Review and modify the following jobs prior to submitting them to reflect your installation standards and the names of the datasets created during your installation.
Review and submit SOAGINS1 to TSO RECEIVE the SOA Gateway load library.
Review and submit SOAGINS2 to create, init, and populate the SOA Gateway file system.
Review and submit SOAGINS3 to copy the Apache configuration file into the SOA Gateway filesystem.
Review and submit SOAGINS4 to copy the SOA Gateway license into the SOA Gateway filesystem.
If using the Adabas Driver review the DDCARD member and specify the correct Adabas SVC number. Under certain circumstances, the Adabas link routines may not pick up the SVC and DBID values specified via DDCARD. In this case the SVC number and Database Id must be zapped into ADALNKR, as described in the Adabas installation documentation, and the modified ADALNKR made available in a STEPLIB library ahead of the one containing the original, unzapped version.
If using the DB2/ODBC Driver review the CLIINI member and specify the correct MVSDEFAULTSSID and Location name.
Refer to you DBA for this information.
Submit SOAGSTRT to bring up the SOA Gateway (Apache) server. The server is ready to be used when you see the "XMiddLe ... is ready for requests" message in the XMIDCARD DD.
Important:
Restarting and stopping SOA Gateway: Due to the nature of
the z/OS Apache configuration it is not possible to restart the server with a
single command. The server must be stopped with "/p jobName" and started by
submitting SOAGSTRT again. In this scenario, Apache may issue a warning about
the httpd.pid being overwritten. This warning can safely be
ignored.
If the SOA Gateway Server is to be run as a started task (STC), copy SOAGSTRT to a procedure library.
To enable HTTPS connections, a sample SSL certificate and SSL sample key have been provided. These are for development only, and should not be used in a production environment.
If you wish the server to listen on a non-default HTTPS port, review ...CONF(SSLCONF) and change all instances of 443 to the port you wish to listen for HTTPS connections.
Edit the ...CONF(HTCONF) member and uncomment the directive
Ensure the server has been stopped
Review and submit SOAGINS5 to copy SSLCONF into the SOA Gateway file system.
Review and submit SOAGINS3 to copy HTCONF into the SOA Gateway file system.
Edit SOAGPROC and change the server parameters to -X -DSSL
E.g.
Submit SOAGSTRT to bring up the SOA Gateway (Apache) server. The server is ready to be used when you see the "XMiddLe ... is ready for requests" message in the XMIDCARD DD.
HTTPS access can be tested by checking (change host and the HTTPS port to suit your system)
For more information on configuring Apache for HTTPS see here