This section describes the procedures to administer business services. The following topics are covered:
Before using the Natural Business Services Eclipse plug-in for the first time, you must set up appropriate domain and step library chains. During installation, some domains and steplib chains are automatically installed (for example, the DEMO domain and the DEMO steplib chain). We recommend that you also set up a project domain and steplib chain.
This section covers the following topics:
This section describes how to create a new step library configuration (steplib chain) and edit an existing steplib chain. A steplib chain identifies where your business service libraries reside on the server. To locate and execute business service modules, you must set up a steplib chain and link it to your business service domain. For more information on steplibs, see Step 1: Define the Steplib Chain.
The following topics are covered:
![]() To create a new steplib configuration:
To create a new steplib configuration:
Select the connection for the steplib configuration in the NBS Repositories view.
If required, enter the user ID and password for the connection.
Expand the Configuration node.
Open the context menu for Steplibs.
Select .
The New Steplibrary window is displayed. For example:
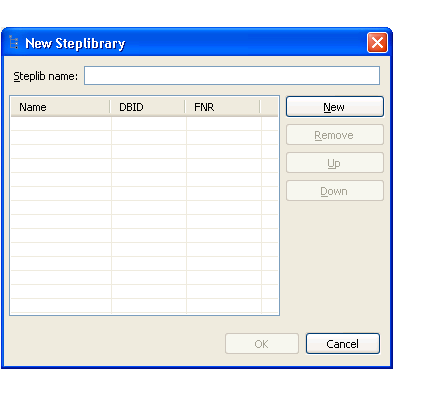
Type the name of the steplib chain in Steplib name.
Select .
Type the names of each library in your steplib chain in the space provided.
Optionally, you can type the database ID (DBID) and file number (FNR) for each library. Your steplib chain can contain up to eight libraries. By default, the FNAT SYSTEM library will be added to the list of libraries in the new steplib chain. If the DBID and FNR are blank, the default FUSER (or FNAT if a SYS* library is specified) will be used.
Select to add the new steplib configuration.
![]() To modify an existing steplib configuration:
To modify an existing steplib configuration:
Select the connection for the steplib configuration in the NBS Repositories view.
If required, enter the user ID and password for the connection.
Expand the Configuration node.
Expand the Steplibs node.
Open the context menu for the steplib configuration you want to edit.
Select .
The Edit Steplibrary window is displayed. For example:
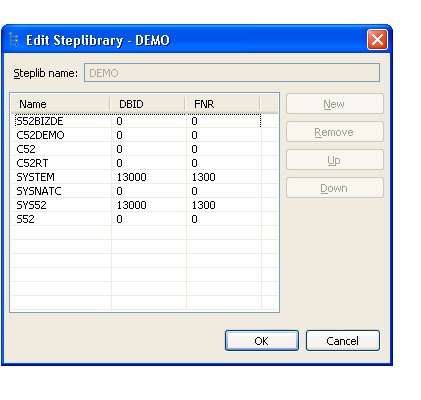
Use this window to:
| Task | Procedure |
|---|---|
| Remove a library from the steplib configuration | Select the library and select . |
| Add a library to the steplib configuration | Select and type
the library name and, optionally, DBID and FNR values.
Note: |
| Change the order of libraries in the steplib configuration | Select the library and either or . |
Select to save changes to the steplib configuration.
This section describes how to create a new domain and edit an existing domain. Domains are used to group related business services. For more information on domains, see Step 2: Define the Domain.
The following topics are covered:
![]() To create a new domain:
To create a new domain:
Select the connection for the domain in the NBS Repositories view.
If required, enter the user ID and password for the connection.
Open the context menu for Domains.
Select .
The New Domain window is displayed. For example:
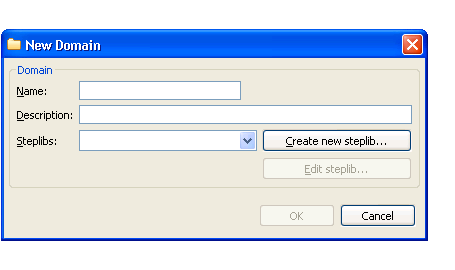
Type the name of the domain in Name.
Type a brief description of the domain in Description.
Select at least one step library chain from Steplibs.
Optionally, you can select to create a new step library definition or select to edit an existing steplib configuration.
Note:
For more information, see
Create a New Steplib
Configuration and Modify an Existing Steplib
Configuration.
Select to add the new domain.
![]() To modify an existing domain definition:
To modify an existing domain definition:
Select the connection for the domain in the NBS Repositories view.
If required, enter the user ID and password for the connection.
Open the context menu for the domain you want to edit.
Select .
The Edit Domain window is displayed. For example:
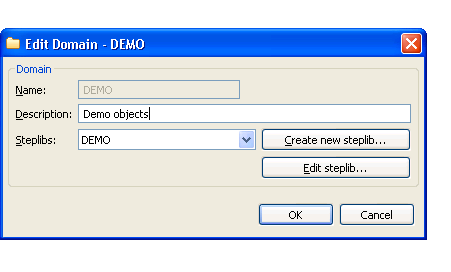
Use this window to:
| Task | Procedure |
|---|---|
| Change the description of the domain | Type a new description in Description. |
| Select another steplib configuration to use for this domain | Select the configuration from Steplibs. |
| Create a new steplib configuration | Select . The New Steplibrary window is displayed. For information, see Create a New Steplib Configuration. |
| Modify an existing steplib configuration | Select . The Edit Steplibrary window is displayed. For information, see Modify an Existing Steplib Configuration. |
Select to save changes to the domain definition.
Security is applied to a domain by associating the domain with a group. Access can then be granted or revoked at a domain, business service, and/or method level. In addition, the Disable option can be used to temporarily disable access to a business service without permanently affecting the security settings.
Note:
For more information on defining security, see
Server
Security Overview.
![]() To define security for a domain:
To define security for a domain:
Select the connection for the domain in the NBS Repositories view.
If required, enter the user ID and password for the connection.
Expand the Domains node.
The list of available domains is displayed.
Open the context menu for the domain you want to secure.
Select .
The NBS Security view is displayed. For example:
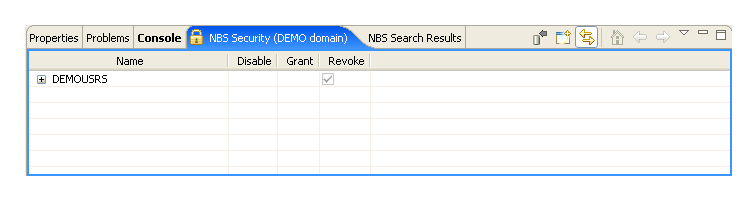
This view displays the security groups for the selected domain in Name. You can expand the group node to display the business services in the group and then expand the business service node to display the methods for the service.
Select Disable, Grant, or Revoke at the group, service, and/or method level for the selected domain.
Note:
The Disable option temporarily revokes access
to a method. When the method is enabled, the previous settings are
restored.
Open the context menu for the group, service, and/or method.
Select to save the changes.
You can also use the NBS Security view to add a security group to the domain.
![]() To add a security group to the domain:
To add a security group to the domain:
Open the context menu for one of the groups listed in the NBS Security view.
You can also select the toolbar option in the NBS Security view.
Select .
The Security Groups window is displayed. For example:
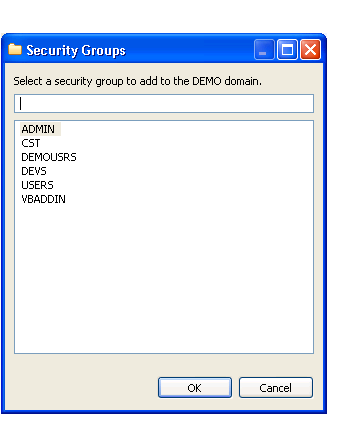
Select the security group you want to add.
Select .
The security group is added to the domain.
You can also use the NBS Security view to remove a security group from a domain.
![]() To delete (remove) a security group from a domain:
To delete (remove) a security group from a domain:
Open the context menu for the group in the NBS Security view.
Select .
The security group is removed from the domain.
You can display information on security exceptions for a connection.
![]() To audit security exceptions for a connection:
To audit security exceptions for a connection:
Open the context menu for the SPoD connection in the NBS Repositories view.
For an example of this menu, see Access Connection Options.
Select Connect.
The Enter User’s Credentials window is displayed.
Type the user ID and password for the connection.
Select OK.
Open the context menu for the connection.
Select .
The Security Audit window is displayed. For example:
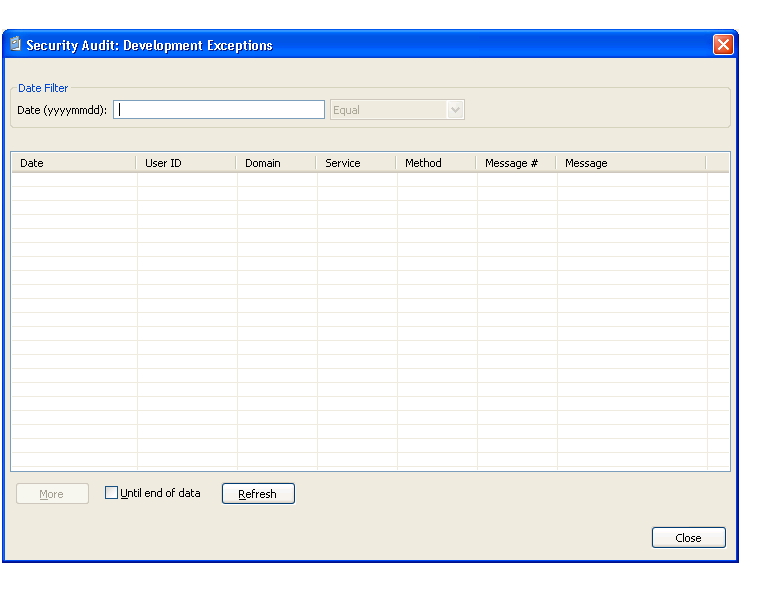
This window displays the date of each audit activity, the user ID of the user who performed the action, and the domain, service, and method names. It also displays the message number and text for each exception. Optionally, you can filter the information based on a date. For example, to display all activity on a particular date, enter that date in Date and select .
After entering the date, you can further refine the information by selecting one of the following options from the drop-down list before selecting :
Less than
Less than or equal
Equal
Greater than
Greater than or equal
Note:
If there is more information than can be displayed on one panel,
select to display the additional activities.
Select to close the Security Audit window.
Use this option to display activities within a domain.
![]() To audit a domain:
To audit a domain:
Select the connection for the domain in the NBS Repositories view.
If required, enter the user ID and password for the connection.
Expand the Domains node.
Open the context menu for the domain you want to audit.
Select .
The Domain Audit window is displayed. For example:
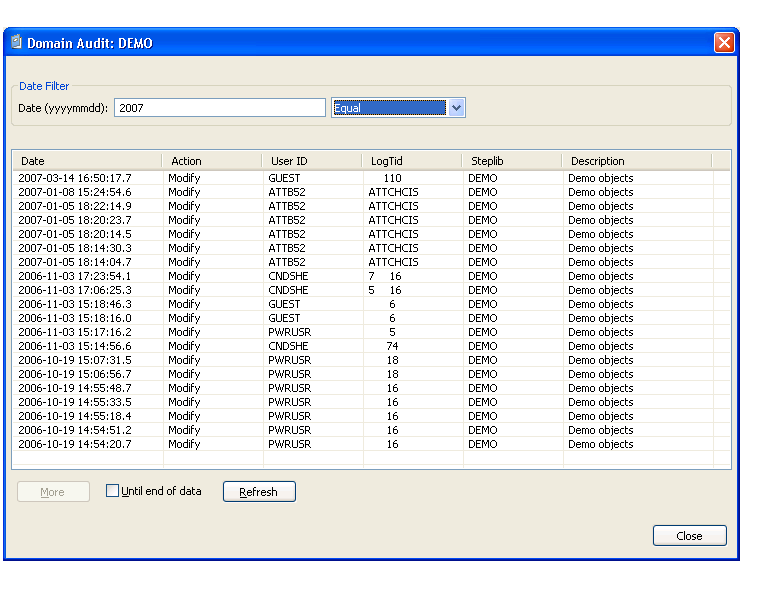
This window displays the date of each audit activity, the action performed, and the user ID of the user who performed the action. It also displays the terminal ID for the log file, the names of the steplibs, and a brief description of the domain. Optionally, you can filter the information based on a date. For example, to display all activity on a particular date, enter that date in Date and select .
After entering the date, you can further refine the information by selecting one of the following options from the drop-down list before selecting :
Less than
Less than or equal
Equal
Greater than
Greater than or equal
Note:
If there is more information than can be displayed on one panel,
select to display the additional activities.
Select to close the Domain Audit window.
Use this option to determine which users have been adding new business services or modifying existing business services.
![]() To audit a business service:
To audit a business service:
Open the context menu for the business service in the NBS Repositories view.
Select .
The Service Audit window is displayed. For example:

This window displays the date of each audit activity, the action performed, and the user ID of the user who performed the action. It also displays the terminal ID for the log file, the names of the subprogram proxies and steplibs, and a brief description of the domain. Optionally, you can filter the information based on a date. For example, to display all activity on a particular date, enter that date in Date and select .
After entering the date, you can further refine the information by selecting one of the following options from the drop-down list before selecting :
Less than
Less than or equal
Equal
Greater than
Greater than or equal
Note:
If there is more information than can be displayed on one panel,
select to display the additional activities.
Select to close the Service Audit window.
You can deploy a business service domain to another repository or environment.
Note:
You can only deploy the subprograms from the Business
Services node, not from the Domains
node (i.e., you can deploy all the services in a domain, but not the
subprograms; you can only deploy subprograms for a specific service).
![]() To deploy a domain:
To deploy a domain:
Select the connection for the domain in the NBS Repositories view.
If required, enter the user ID and password for the connection.
Expand the Domains node.
Open the context menu for the domain you want to deploy.
Select .
The Enter Deployment Details window is displayed. For example:
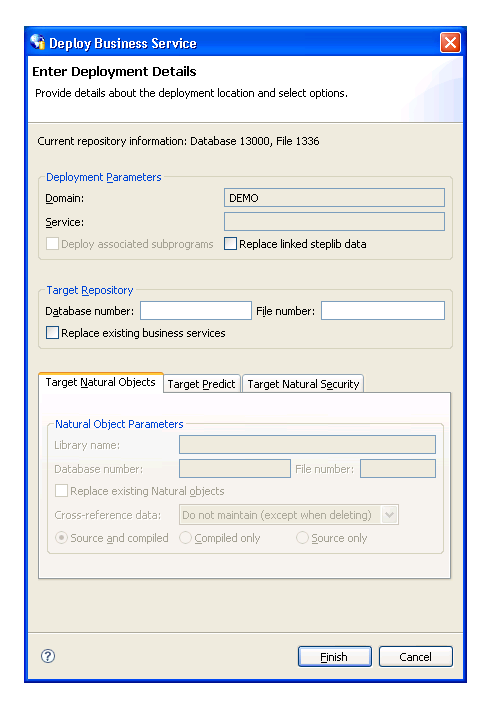
This window displays information about the current repository, as well as the name of the domain you selected.
Note:
If an option is left blank in this window, it is assumed that the
option is the same in both the source and target environment. For example, if
the Library name is blank, the Natural modules in
the source library will be deployed to the same library in the target FUSER
file.
Optionally, you can use this window to:
| Task | Procedure |
|---|---|
| Update steplib data for the business service domain | Select Replace linked steplib data and type the database and file numbers for the target repository in Target Repository |
| Replace the current business services in the domain with updated services | Select Replace existing business
services and type the database and file numbers for the target
repository in the appropriate fields.
Note: |
Type the database and file numbers for LFILE 136 in Target Repository.
Select to deploy the domain.
You can deploy the information in the business service repository for a single business service or, optionally, deploy the subprograms associated with the service. The subprograms are Natural objects that were created by Natural Construct models.
Notes:
If a business service uses two subprograms, for example, the business service wizard generates the following subprograms:
The two subprograms (selected on the wizard panel)
The “wrapper” subprogram
The subprogram proxy for the business service
![]() To deploy a business service:
To deploy a business service:
Open the context menu for the business service in the NBS Repositories view.
Select .
The Enter Deployment Details window is displayed. For example:
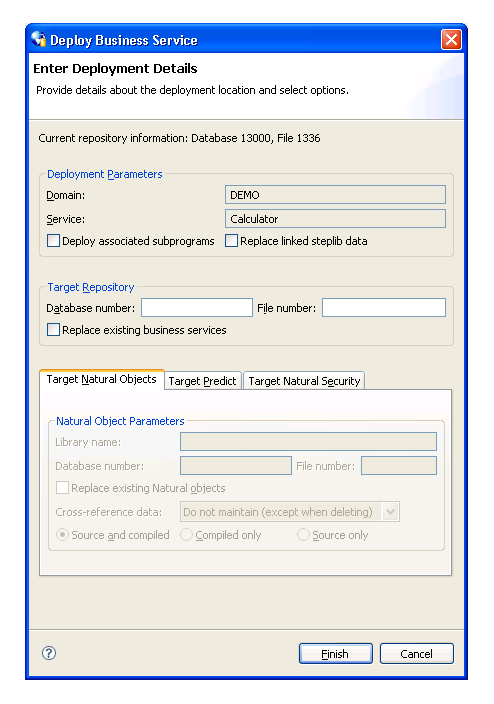
This window displays information about the current repository, as well as the name of the domain and business service you selected.
Note:
If an option is left blank in this window, it is assumed that the
option is the same in both the source and target environment. For example, if
the Library name is blank, the Natural modules in
the source library will be deployed to the same library in the target FUSER
file.
Optionally, you can use this window to do the following tasks:
| Task | Procedure |
|---|---|
| Deploy the subprograms associated with the business service | Select Deploy associated subprograms and specify the target settings. For information, see Deploy Associated Subprograms. |
| Update steplib data | Select Replace linked steplib data and type the database and file numbers for LFILE 136 in Target Repository. |
| Replace the business service definition in the target repository (LFILE 136) | Select Replace existing business
services and type the database and file numbers for LFILE 136 in the
appropriate fields.
Note: |
Type the database and file numbers for the LFILE 136 system file in Target Repository.
The target system file will store the business service definition.
Select to deploy the business service.
You can deploy all subprograms associated with a business service to another environment.
Basically, a business service is defined by the methods it provides to users, the subprogram proxies that expose each of the methods, and the logical organization of libraries (steplibs) that host the Natural objects that implement the methods. This definition is stored in the NBS repository represented by LFILE 136. The repository also contains details about the name, version, and domain that uniquely identify each service, as well as a description of each method exposed by the service. Although the repository contains the service definitions, the Natural objects that implement the functionality are stored in steplibs within the FUSER or FNAT file.
In addition to the service definition, a service deployment may need to copy XREF information for each Natural object associated with the service. The XREF information is stored in the Predict FDIC file and the requirement to include the XREF information in the deployment is defined in the Natural Security FSEC file used in the target environment. Additionally, since the deployment function invokes the Natural SYSMAIN utility to copy the data to the target environment, the Password and Cipher options (for Target Predict and Target Natural Security information) were included to maintain consistency.
When you select Deploy associated subprograms in the Enter Deployment Details window, the target setting tabs become active. For example:
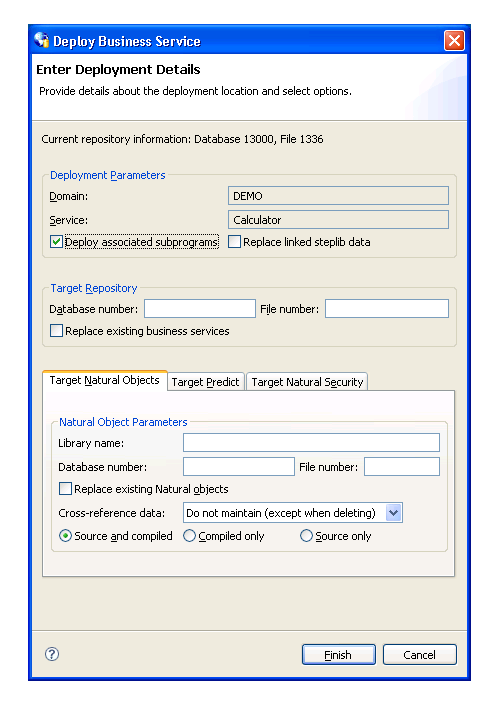
The tabs for the target settings are:
Specify the following target settings for the Natural objects:
| Target Setting | Description |
|---|---|
| Library name | Name of the Natural library in which to copy all Natural objects that implement the business service being deployed. |
| Database number | Database ID for the FUSER (or FNAT) file that will store the Natural objects (subprograms, data areas, etc). |
| File number | File number for the FUSER (or FNAT) file that will store the Natural objects. |
Optionally, you can use the Target Natural Objects tab to:
| Task | Procedure |
|---|---|
| Replace the existing Natural code (subprograms, data areas, etc.) in the target FUSER (or FNAT) | Select Replace existing Natural objects. |
| Maintain cross-reference data using an alternate method | Select another setting in
Cross-reference data. Cross-reference settings are:
|
| Only deploy the object code for Natural objects | Select Compiled only. |
| Only deploy the source code for Natural objects | Select Source only. |
The following example shows the settings on the Target Predict tab:

Specify the following target settings for Predict:
| Target Setting | Description |
|---|---|
| Database number | Database ID for the FDIC file that will store the XREF data. |
| File number | File number for the FDIC file. |
| Password | Password for the FDIC file. |
| Cipher | Cipher key for the FDIC file. |
The following example shows the settings on the Target Natural Security tab:
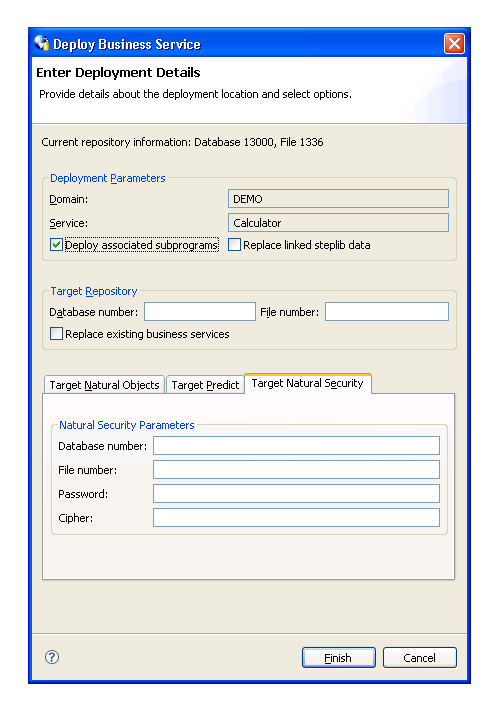
Specify the following target settings for Natural Security:
| Target Setting | Description |
|---|---|
| Database number | Database ID for the FSEC file that contains the XREF requirements. |
| File number | File number for the FSEC file. |
| Password | Password for the FSEC file. |
| Cipher | Cipher key for the FSEC file. |
A connection may experience problems communicating with the server. If so, you can access the Communication Log report and view the status and error messages for the connection.
![]() To access the Communication Log report:
To access the Communication Log report:
Open the context menu for the connection in the NBS Repositories view.
For an example of this menu, see Access Connection Options.
Select .
The Communication Log Report window is displayed. For example:
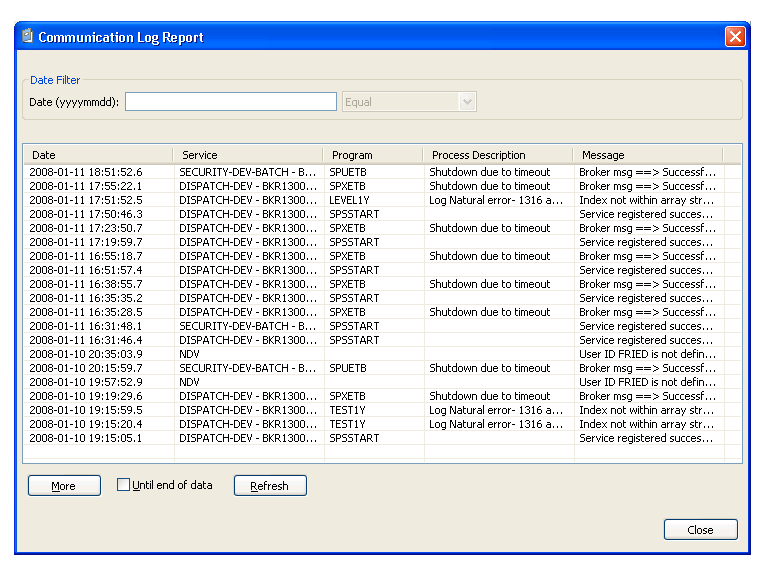
This window shows the first 20 communication status and error messages in descending order by date (the default). To sort by another column, select that column heading.
Note:
All services that do not use the NDV (Natural Development Server)
use the EXX (EntireX) middleware.
Optionally, you can use this window to:
Restrict the list of messages by entering a date and specifying selection criteria. For example, to display messages for January 11, 2008, enter "20080111" in Date, select Equal, and then select .
Display the next 20 messages by selecting . A scroll bar is displayed to scroll through the additional messages.
Display all messages by selecting Until end of data and then selecting . A scroll bar is displayed to scroll through the messages.
Select to close the window.
Note:
This log is available on the server by logging onto SYSBIZ, entering
"MENU SA MS" on the command line, and then pressing
PF4.
You can generate a Natural client for a business service. A Natural client is a subprogram proxy that allows a business service to be consumed in a Natural environment.
![]() To generate a Natural client:
To generate a Natural client:
Open the context menu for the business service in the NBS Repositories view.
Select .
The Eclipse Console view shows the name of the subprogram proxy generated for the Natural client.