Use the Natural Business Services Eclipse plug-in to perform the following tasks:
Before you can use the Natural Business Services Eclipse plug-in, you must configure connections to a remote repository. Since the Natural code (subprograms) used during development may be located in a different Natural environment than what is used during production (runtime), you will define more than one connection. The location of the Natural code is determined by the configuration settings for the connection.
Tip:
To make future Eclipse plug-in upgrades easier, create your
configuration file in a neutral location. To do this, select Create
new configuration in the Preferences window.
For information, see Set Natural
Business Service Preferences.
![]() To create a new connection:
To create a new connection:
Open the context menu for Connections in the NBS Repositories view.
Select .
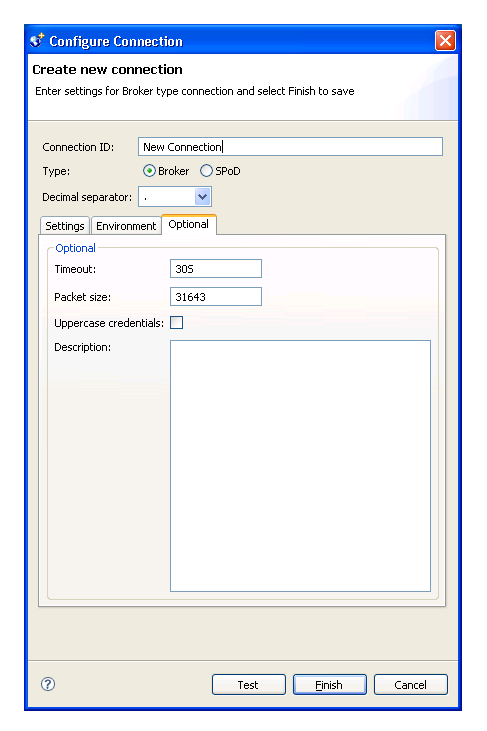
The Create new connection panel is displayed. For example:
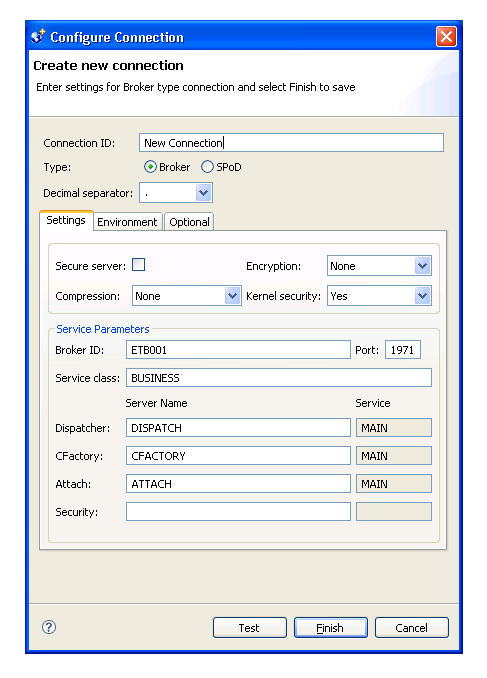
Use this panel to configure connections to the remote repository containing your business services. You can create a new Broker or SPoD connection, as well as specify the separator to use for decimal numbers. This example shows a Broker connection.
This section covers the following topics:
A Broker connection uses the EntireX communication protocol to connect to Natural Business Services servers running in Natural. This type of connection is suitable for administering and running business service applications.
Note:
You must use a SPoD connection to create, test, or deploy business
services.
Tip:
If you have an existing connection that is similar to the one you
want to add, you can copy the connection and then modify it to suit your
requirements. For information, see
Copy an Existing
Connection.
![]() To add a Broker connection:
To add a Broker connection:
Open the context menu for Connections in the NBS Repositories view.
Select .
The Create new connection panel is displayed. For example:
The Create new connection panel for a Broker connection contains the following tabs:
| Panel Tab | Description |
|---|---|
| Settings | Defines connections to remote repositories (via the EntireX Communicator or Natural for Windows protocols). Use the Settings tab to view, edit, delete, or add connections. These connections define communication paths and options to remote business service repositories running on a Natural server. |
| Environment | Defines configuration settings for the environment. This tab is only available for a Broker connection. For information, see Environment Tab. |
| Optional | Defines optional configuration settings. This tab is only available for a Broker connection. For information, see Optional Tab. |
Type the name of the connection in Connection ID.
This name will be listed in the NBS Repositories view and used in code when creating connections to the business services.
Select Broker in Type.
Type the broker ID in Broker ID.
Type the TCP/IP port number the EntireX broker is running on in Port.
Note:
If you intend to define the port in your Windows services file,
leave this option blank.
Optionally, you can specify the following information:
| Option | Description |
|---|---|
| Secure server | Select this option if the server is running
Natural or Natural Business
Services security and a password must be transported in the
communication buffer.
Note: |
| Encryption | Select this option to encrypt messages transported to and from the server. This value is based on the EntireX ACI settings for encryption. |
| Compression | Select this option to compress messages at a
specified level. This value is based on the EntireX
ACI settings for compression.
Note: |
| Kernel security | Select this option to use Broker security for the EntireX server. If you are not sure which security is used, you can leave this setting on Auto. To achieve the best network performance, however, you should select Yes or No. |
| Server class | EntireX server class defined for your business services. If you do not know this value, ask your Natural Business Services administrator. |
| Dispatcher, CFactory, Attach, and Security | Timestamp server names of the four
Natural Business Services runtime servers. Leave
these values as the defaults; only your Natural Business
Services administrator should change these values.
Note: |
You can also define settings on the Environment and Optional tabs. For information, see Environment Tab and Optional Tab.
Note:
To test the new connection, select .
For more information, see Test a
Connection.
Select to create the new Broker connection.
The new connection is displayed in the
This tab contains the System Files and Step Libraries tables. For example:
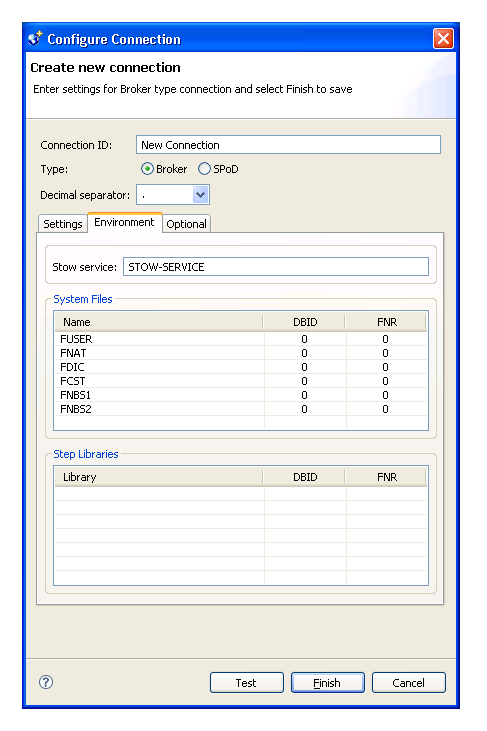
To override the current defaults used in the Natural Business Services server environment, supply the connection values in the appropriate table.
Note:
Unless you have a compelling reason to override the defaults, we
recommend that you do not change these settings.
This tab contains optional settings for a Broker connection. For example:
The optional settings for a Broker connection are:
| Option | Description |
|---|---|
| Timeout | Timeout value used by the Natural Business Services dispatcher when making remote service calls. The default is "30S" (30 seconds). |
| Packet size | Default packet size for communication messages.
If you have many business services using interfaces larger than the default
(31643 bytes), increase the size of this field.
Note: |
| Uppercase credentials | Select this option if the user ID and password
must be sent in upper case.
Note: |
| Description | Brief description of the connection. |
A SPoD connection uses the Natural Single Point of Development (SPoD) protocol to communicate with the Natural Development Server (NDV) running in a Natural environment that contains Natural Business Services. This type of connection is only suitable for developing and testing Natural Business Services applications.
Tip:
If you have an existing connection that is similar to the one you
want to add, you can copy the connection and then modify it to suit your
requirements. For information, see
Copy an Existing
Connection.
![]() To add a SPoD connection:
To add a SPoD connection:
Open the context menu for Connections in the NBS Repositories view.
Select .
Type the name of the connection in Connection ID.
The connection ID identifies the server component that provides communications between the client and server. This name is listed in the NBS Repositories view and used in code when creating connections to business services. All communications are done by connection ID.
Select SPoD in Type.
The Settings tab for a SPoD connection is displayed. For example:
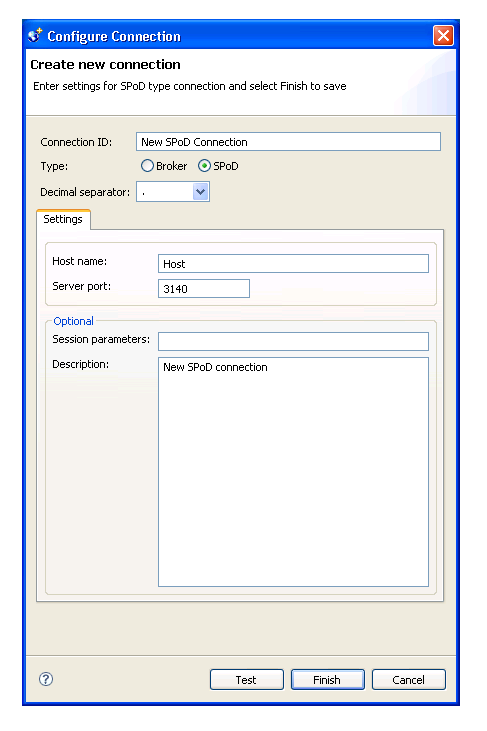
Specify the following information:
| Option | Description |
|---|---|
| Host name | Name of the server running Natural Development Server (NDV). You may also enter a TCP/IP address. |
| Server port | TCP/IP port for the NDV server. This value
is required.
Note: |
| Session parameters | Any session parameters required to connect
to your environment. This can be a profile setting, such as
PROFILE=NBS52.
|
| Description | Brief description of the connection. |
Note:
To test the new connection, select .
For more information, see Test a
Connection.
Select to create the new SPoD connection.
The connection is added to the list of available connections.
To save time and effort, you can copy an existing connection (Broker or SPoD) and then modify the settings for your requirements.
![]() To copy an existing connection:
To copy an existing connection:
Open the context menu for an existing connection in the NBS Repositories view.
Select .
The settings for the existing connection are displayed. For example:
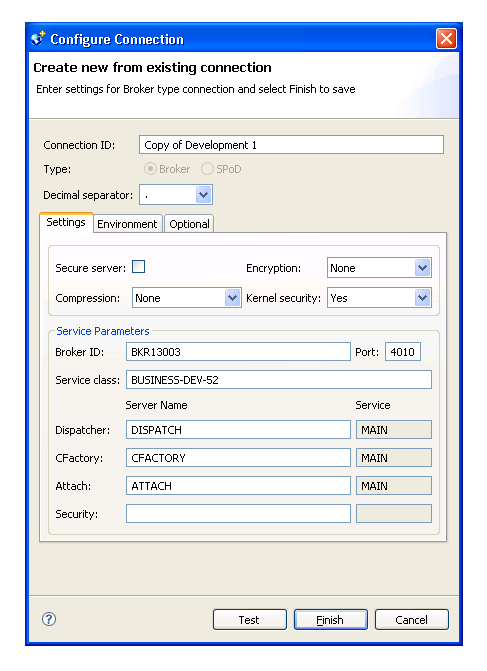
Change the settings as required.
For example, change the connection name from Copy of ConnectionName to another name.
Note:
To test the new connection, select .
For more information, see Test a
Connection.
Select to save the new connection.
The connection is added to the list of available connections in the NBS Repositories view.
![]() To modify a connection:
To modify a connection:
Open the context menu for the connection in the NBS Repositories view.
Select .
Tip:
If is not available on the
context menu, select . You cannot modify
the settings for a connection that is currently connected.
The Modify connection panel is displayed. For example:
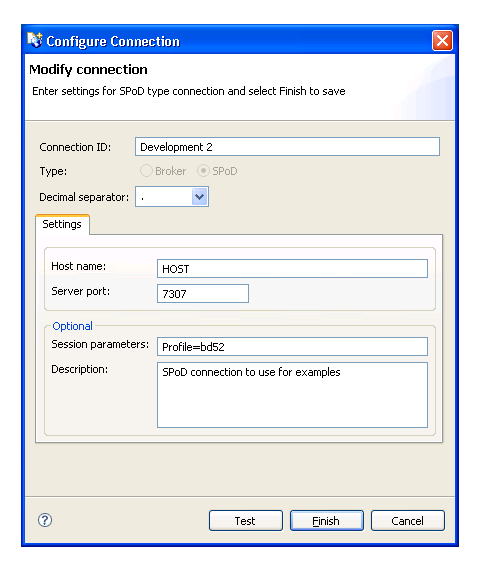
This example shows the settings for a SPoD connection.
Modify the settings as desired.
For information on the configuration settings, see:
Note:
To test the modified connection, select
. For more information, see
Test a Connection.
Select to save the new settings.
![]() To test a connection:
To test a connection:
Select on any Connection wizard panel.
The Test connection window is displayed for the selected connection. For example:
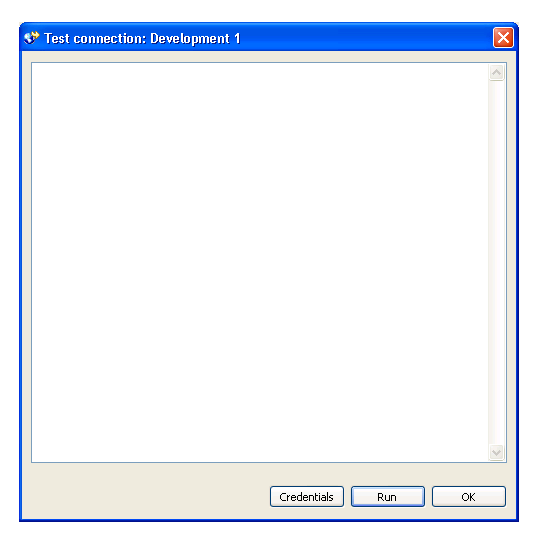
Select to test the connection.
The Enter User’s Credentials window is displayed.
For a description of this window, see Access Business Services.
Type the user ID and password for the connection.
Select .
The results of the test are displayed. For example:
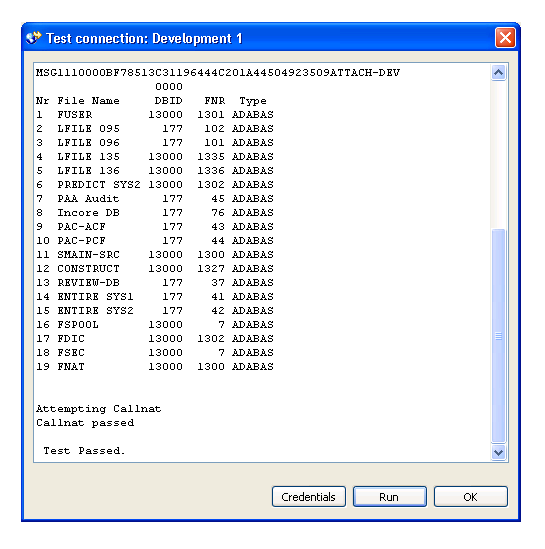
Select to close the test window.
![]() To delete a connection:
To delete a connection:
Open the context menu for the connection in the NBS Repositories view.
Select .
A confirmation window is displayed.
Select to delete the connection.
The connection is removed from the list of available connections.
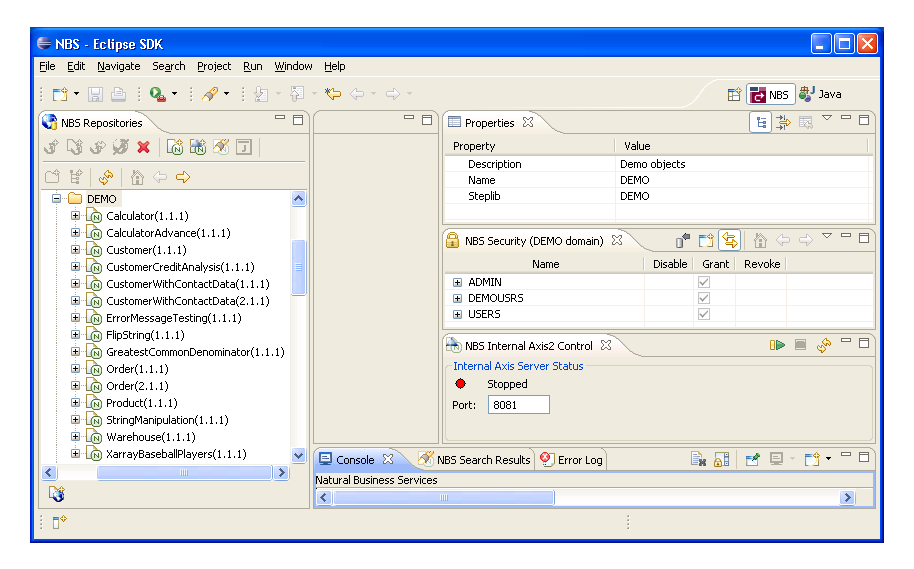
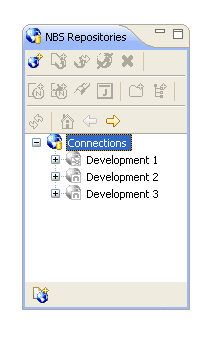
The NBS Repositories view lists all defined business service connections in a tree view. You can expand each connection node to display information about each connection. If the Eclipse plug-in has been activated, the NBS Repositories view is displayed when you start Eclipse.
Note:
For information on activating the plug-in, see
Activate the Eclipse
Plug-in.
Use the NBS Repositories view to:
![]() To access the business services:
To access the business services:
Open the context menu for the connection in the NBS Repositories view.
Select .
The Enter User’s Credentials window is displayed. For example:
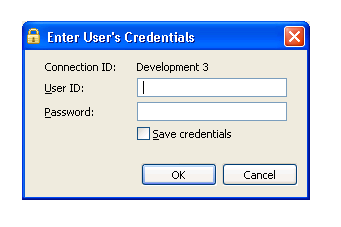
Optionally, you can select Save credentials to save your user ID and password for this connection. To remove saved credentials from the security cache when Eclipse shuts down, select one of the following options:
To clear logon credentials for this connection from the security cache, open the context menu for the connection in the NBS Repositories view and select .
To clear logon credentials for all connections, open the context menu for the Connections node and select .
Enter the user ID and password for the connection.
The Natural Business Services server retrieves information for the specified connection.
Expand the Domains node.
The list of available domains is displayed.
Expand the domain containing the business services.
The list of available services is displayed. For example:
You can also use this window to set trace and log options. For information, see Set Trace and Log Options.
![]() To search for all business services within a domain:
To search for all business services within a domain:
Open the context menu for the domain in the NBS Repositories view.
Select .
The Search window is displayed for the specified connection and domain. For example:
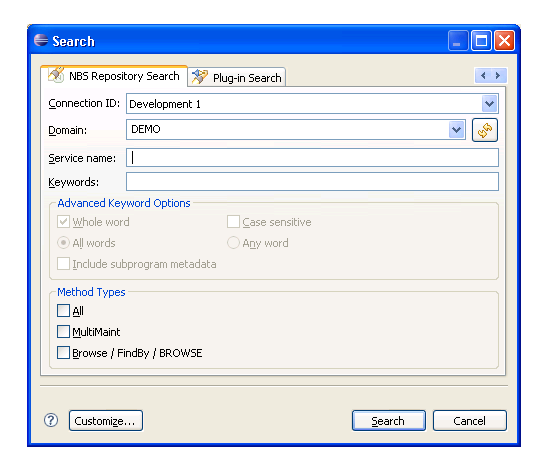
Select .
Natural Business Services displays the business services in the NBS Search Results view. For example:
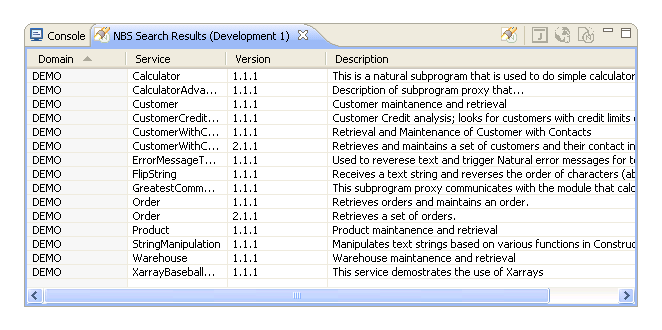
The NBS Search Results view displays the domain and service names, as well as the service version number and description for each service. To change the sort order for Domain, Service, Version, or Description in this view, select the corresponding heading. For example, when you select the Service heading in the example above, the services are redisplayed in ascending order. The arrow in each heading indicates the sort order:
![]() indicates ascending order (A to Z)
indicates ascending order (A to Z)
![]() indicates descending order (Z to A)
indicates descending order (Z to A)
You can refine the search results by limiting the search in several ways, such as:
![]() To search for all business services for a connection:
To search for all business services for a connection:
Open the context menu for the connection in the NBS Repositories view.
Select .
The Search window is displayed for the specified connection. For example:
Select .
All business services for the specified connection are displayed in the NBS Search Results view.
![]() To search for specific business services within all domains:
To search for specific business services within all domains:
Open the context menu for the connection in the NBS Repositories view.
Select .
The Search window is displayed.
Do one of the following:
Type the name of the business service in Service name to return a list of all services with that name in all domains
Note:
Ensure you use the correct case for the service name. For
example, use “Calculator”, not “calculator”, to search for the Calculator
service.
Type a keyword in Keywords to return a list of all services with that name in their descriptions
Note:
You can also use Advanced Keyword Options
and Method Types to limit the search. For information, see
Use Advanced
Criteria.
Select .
The specified business services are displayed in the NBS Search Results view.
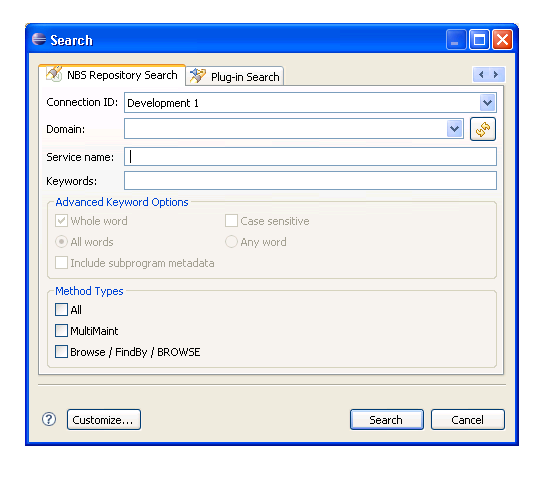
![]() To search for specific business services within a domain:
To search for specific business services within a domain:
Open the context menu for the domain in the NBS Repositories view.
Select the name of the domain from Domain.
Select .
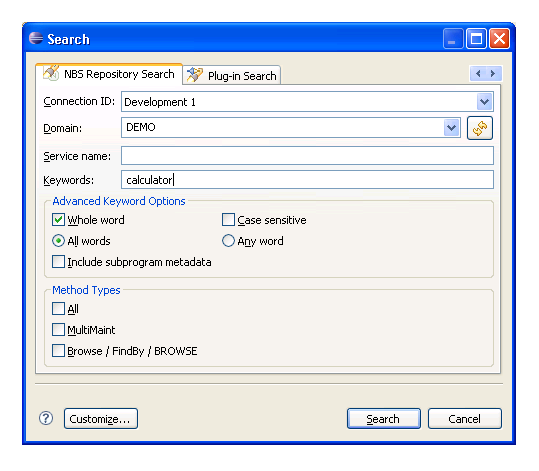
The Search window is displayed.
Do one of the following:
Type the name of a business service in Service name to return a list of all services with that name in the specified domain
Type a keyword in Keywords to return a list of all services with that name in their descriptions
Note:
You can also use Advanced Keyword Options
and Method Types to limit the search. For information, see
Use Advanced
Criteria.
Select .
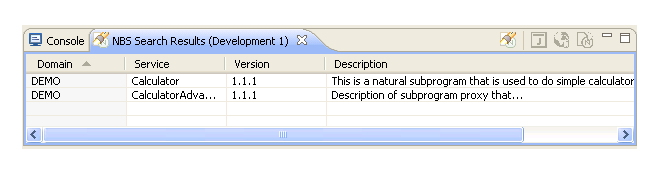
The specified business services are displayed in the NBS Search Results view. For example, if you enter "Calculator" in Service name, the following results are displayed:
You can further limit the search of business services by using advanced keyword options or specific method types.
![]() To limit the search to business services that match the advanced
keyword options:
To limit the search to business services that match the advanced
keyword options:
Type one or more keywords in Keywords in the Search window.
For example:
Select from the following advanced keyword options:
| Keyword Option | Description |
|---|---|
| Whole word | Search for whole words only (for example, if you type "Customers" in Keywords, business services containing "Customer" will not be returned). |
| All words | Search for all words specified in Keywords (for example, if you type "Customer record" in Keywords and select All words, only business services containing both "Customer" and "record" will be returned). |
| Include subprogram metadata | Search business services and their subprogram metadata for services containing the keyword specified in Keywords. |
| Case sensitive | Search for words using a particular case (for example, if you type "Customer" in Keywords and select Case sensitive, business services containing "customer" will not be returned). |
| Any word | Search for either word specified in Keywords (for example, if you type "Customer record" in Keywords and select All words, business services containing either "Customer" or "record" will be returned). |
Select .
All business services that match the specified options are displayed in the NBS Search Results view.
You can limit the search to business services containing one of the method types listed. For example, you can search for business services containing:
All method types
MultiMaint method types
Browse or FindBy method types
You can customize the Search window.
![]() To customize the Search window:
To customize the Search window:
Select .
The Search Page Selection window is displayed. For example:
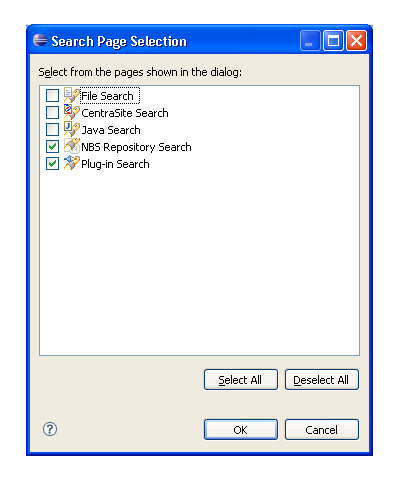
Select or de-select the pages you want to include in your customized Search window.
To display all views, select .
To remove all views and then select one, select , select the view, and then select . At least one view must be selected in this window.
Select to confirm the changes.
Trace and log functions in the Eclipse plug-in are handled through the log4j.properties file using log4j technology. An icon at the bottom of the NBS Repositories view allows you to display this file for editing. For example:
![]() To set trace and log options:
To set trace and log options:
Select the icon at the bottom of the NBS Repositories view.
The log4j.properties file is displayed. For example:
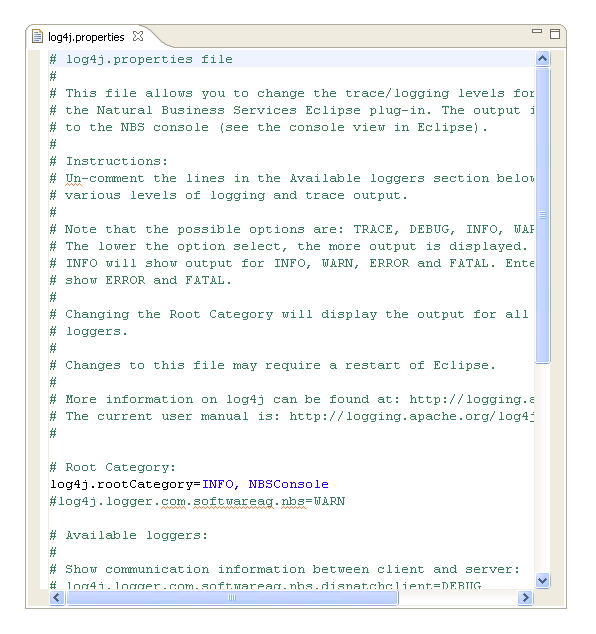
Change the trace and log output as desired.
The file contains editing instructions.
Select to save your changes.
Note:
You can use the Preferences window to format
the trace and log output. For information, see
Preferences for
Trace and Log Functions.
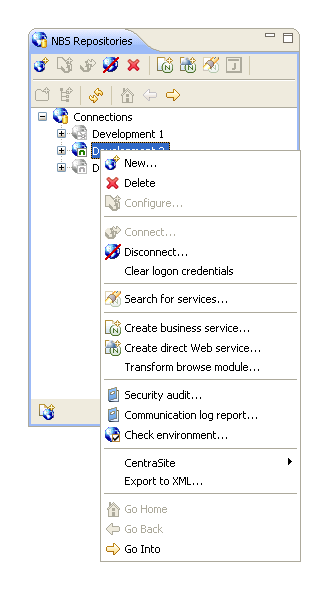
Many options are available for connections listed in the NBS Repositories view, based on the type of connection (Broker or SPoD).
![]() To access the connection options:
To access the connection options:
Open the context menu for a connection in the NBS Repositories view.
The following example shows the options for a SPoD connection:
This option creates a single Web service from a selected Natural subprogram. The wizard generates a directly enabled business service, a Java class, and a Web service class, and then deploys the service to the server of your choice.
Notes:
![]() To create a directly enabled Web service:
To create a directly enabled Web service:
Open the context menu for the SPoD connection in the NBS Repositories view.
For an example of this menu, see Access Connection Options.
Select .
The Select Subprogram to Directly Enable panel is displayed. For example:
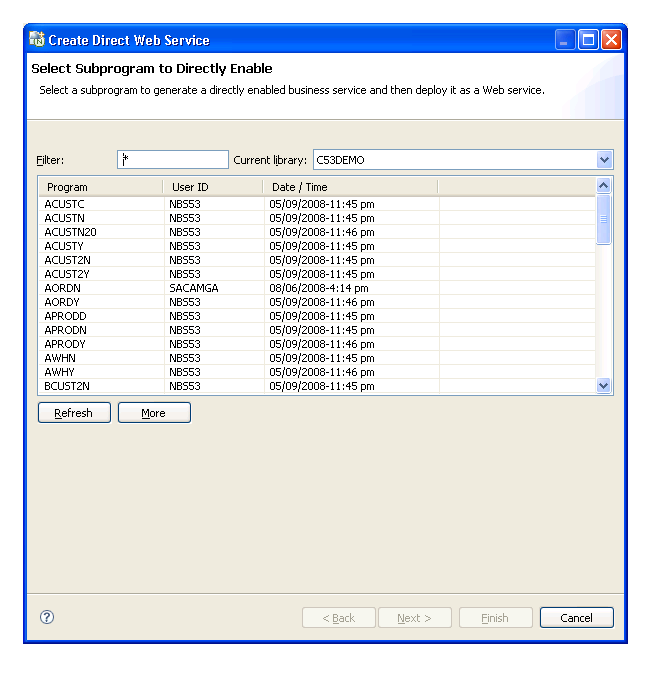
This panel displays the list of subprograms in the current library. Optionally, you can:
| Task | Procedure |
|---|---|
| Display the additional subprograms | If all subprograms cannot be displayed in the space provided, use the scroll bar to display the additional subprograms. |
| Limit the list of subprograms displayed | Enter a starting value and/or wildcard characters in Filter. In the example above, all subprograms in C53DEMO are displayed. |
| Change the name of the library | Select a different library from Current library. |
Select the Natural subprogram you want to use for the service.
Select .
The Enter Web Service Details panel is displayed. For example:
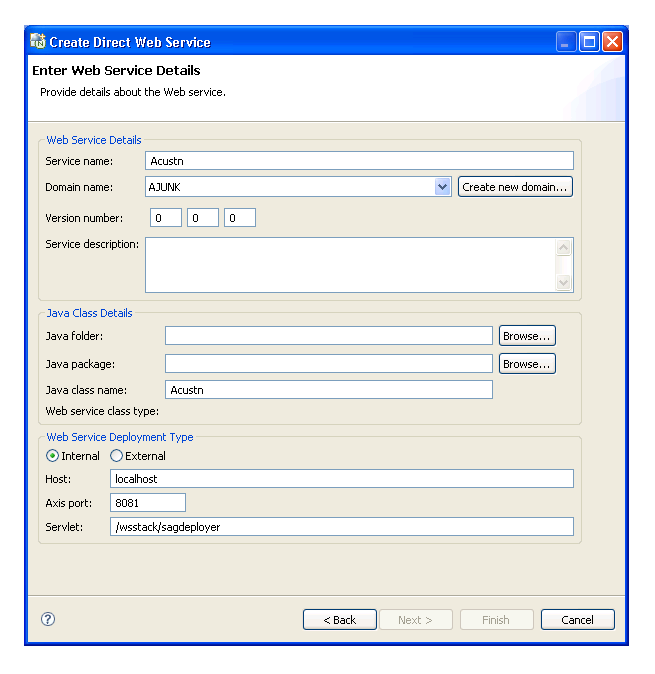
To determine default values for several of the input fields on this panel, the wizard uses the serviceDefaults.xml file. This file is installed in the configuration folder.
Optionally, you can use this panel to:
| Task | Procedure |
|---|---|
| Change the name of the service | Type a new name in Service name. |
| Change the name of the domain | Type a new name in Domain name. |
| Create a new domain | Select (if one does not currently exist). For information, see Create a New Domain. |
| Provide the location of the Java folder | Select a Java folder from Java folder. |
| Provide the name of the Java package | Select a Java project from Java project. |
| Change the name of the Java class for the service | Type a new name in Java class name. |
| Use an external Web service deployment type | Select External and
specify the Axis port number and Servlet address.
Note: |
Enter the following information for the Web service:
| Option | Description |
|---|---|
| Version number | Number for this version of the Web service. For example, enter "1 1 1" for the first version. |
| Service description | Brief description of the service. |
| Java folder | Name of the Java folder for the service. |
| Internal Axis port | ID for the internal Axis port. |
Select to generate the Web service.
This option generates a subprogram that allows Natural to call an external Web service. The generated Natural subprogram uses REQUEST DOCUMENT and PARSE XML statements to call the service and interpret the response.
Notes:
The generated subprogram contains parameter data areas (PDAs) that map to the request and response portions of a Web service method (operation). The subprogram then maps the input parameters to an XML document, which is sent to the Web service via the REQUEST DOCUMENT statement. The response is verified and parsed in the response PDA and the parameters are generated as #INPUT and #OUTPUT level 1 structures. In addition, the generated subprogram contains an error PDA that informs users of any errors.
![]() To create a REQUEST DOCUMENT client:
To create a REQUEST DOCUMENT client:
Select on the menu.
The Select WSDL window is displayed. For example:
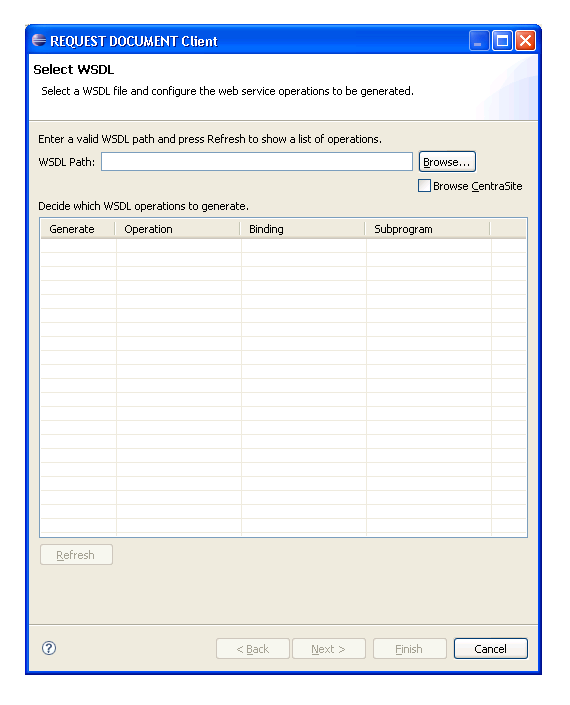
Select a WSDL path in WSDL Path.
You can browse for a WSDL path in the file system (select ) or from CentraSite (select Browse CentraSite). You can also type a valid WSDL path using an HTTP location.
Select .
The wizard scans the selected WSDL file for each Web service method (operation), generates a separate subprogram for each operation, and displays them in the grid. For example:
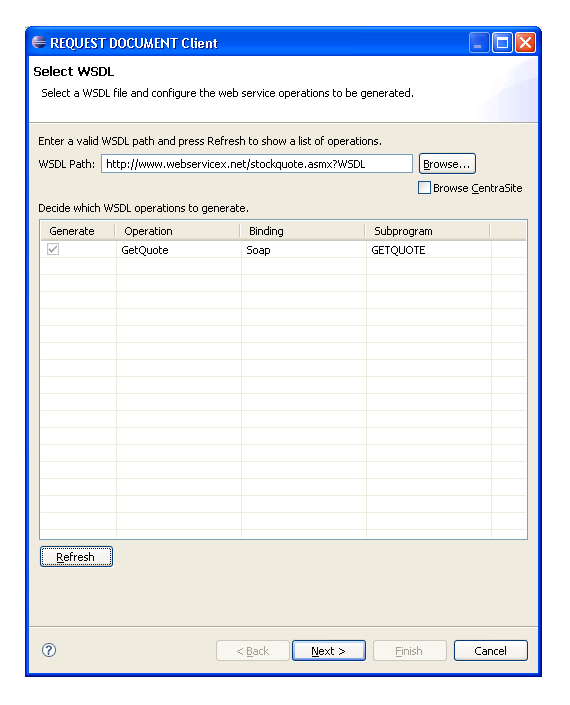
This window indicates the following for each operation:
Whether a subprogram is generated
Which operation is generated
Which binding is used
What the generated subprogram is named
If desired, you can change the generated subprogram name in this window.
Select .
The Select Natural Library window is displayed. For example:
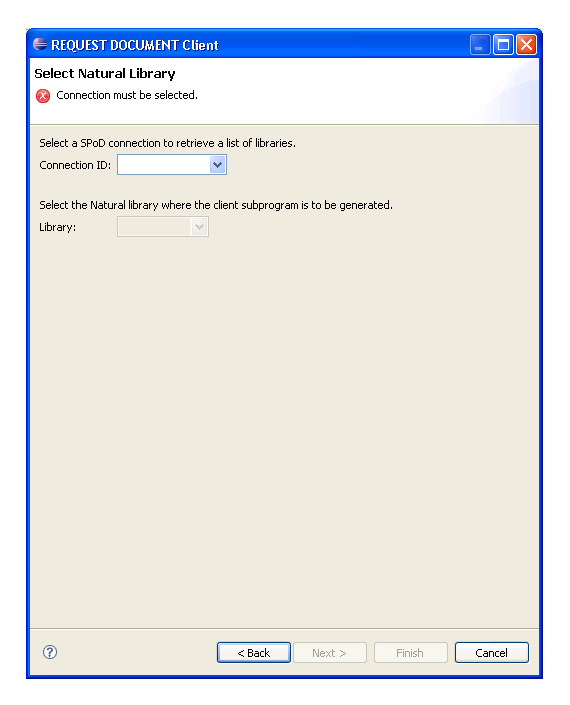
Select a SPoD connection in Connection ID.
The wizard retrieves a list of libraries for that connection.
Select the library in which to generate the subprogram in Library.
Select to generate the subprogram.
![]() To test the generated subprogram:
To test the generated subprogram:
Create a program that will pass the parameters to the generated subprogram.
Supply the requested input.
Verify the output after the CALLNAT has been issued.
This option transforms a Natural Construct-generated browse module into object browse modules for use in a client/server environment.
Note:
This option is only available for SPoD connections.
![]() To access the Transform Browse wizard:
To access the Transform Browse wizard:
Open the context menu for the SPoD connection in the NBS Repositories view.
For information, see Access Connection Options.
Select .
The Select Browse Module panel is displayed. For more information, see Eclipse Plug-in in Verify Transformation Specifications Panel.
![]() To display the environment information:
To display the environment information:
Open the context menu for the connection in the NBS Repositories view.
For an example of this menu, see Access Connection Options.
Select .
The Environment Check window is displayed. For example:

This window displays information about the environment for the current connection.
Select .
This option adds Natural Business Services repository metadata to CentraSite. The information includes business services, subprograms, proxies, and Natural Construct model, file, and field names, as well as information on relationships (for example, a business service belongs to a domain, a subprogram uses a certain file, etc.). You can also remove the repository metadata from CentraSite. For information, see Remove Concepts.
Before you can add concepts to CentraSite, custom concept archive files must be imported into the CentraSite server. These files are located in the CentrasiteImports folder within the NBS install folder (for example, C:\Program Files\Software AG\Natural Business Services\V5.3\CentrasiteImports\Concept-*.zip).
![]() To import custom concepts to the CentraSite server:
To import custom concepts to the CentraSite server:
Open CentraSite Control and log on.
Select .
Select in Import type.
Select the custom concept archive file.
Select .
Repeat steps 2 to 5 for each custom archive file.
![]() To add repository metadata to CentraSite:
To add repository metadata to CentraSite:
Open the context menu for the connection in the NBS Repositories view.
For an example of this menu, see Access Connection Options.
Select .
The CentraSite options are displayed.
Select .
The Select CentraSite Concepts window is displayed. For example:

Tip:
You can also access this window from the context menu for a
domain. If you do, the domain will be selected automatically in
Select domain to add.
Type the user ID for CentraSite in User ID.
Type the password for CentraSite in Password.
Verify the location of the server port for CentraSite in Server.
Verify which nodes in the repository tree you want to add to CentraSite.
By default, the information for all domains, business services, proxies, libraries, and subprograms is added to CentraSite. You can select other nodes in the repository tree (listed in Concept Selection) or de-select any nodes you do not want to add.
To add one domain only, select the domain in Select domain to add.
To include details about the step library chains, select Steplibs in the repository tree.
Select to add the selected nodes to CentraSite.
This action will remove ALL repository metadata entries (i.e., any registry object that has one of the Natural Business Services custom concepts as its object type).
![]() To remove repository metadata from CentraSite:
To remove repository metadata from CentraSite:
Open the context menu for the connection in the NBS Repositories view.
For an example of this menu, see Access Connection Options.
Select .
The CentraSite options are displayed.
Select .
The Select CentraSite Concepts window is displayed. For example:
Type the user ID for the CentraSite concepts you want to remove in User ID.
Type the password for the CentraSite concepts in Password.
Verify the location of the server port for CentraSite in Server.
Select .
![]() To export repository metadata to XML:
To export repository metadata to XML:
Select on the menu.
The Export window is displayed. For example:
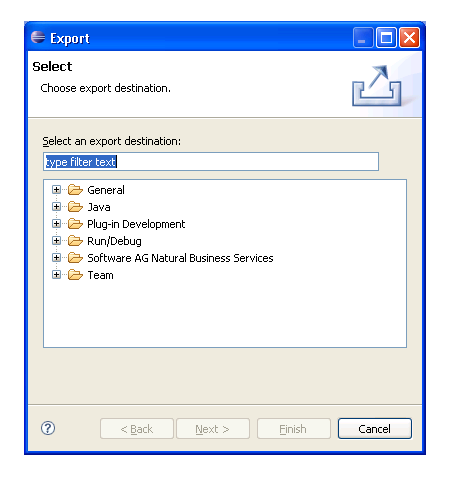
Expand the Software AG Natural Business Services node.
Select .
Select .
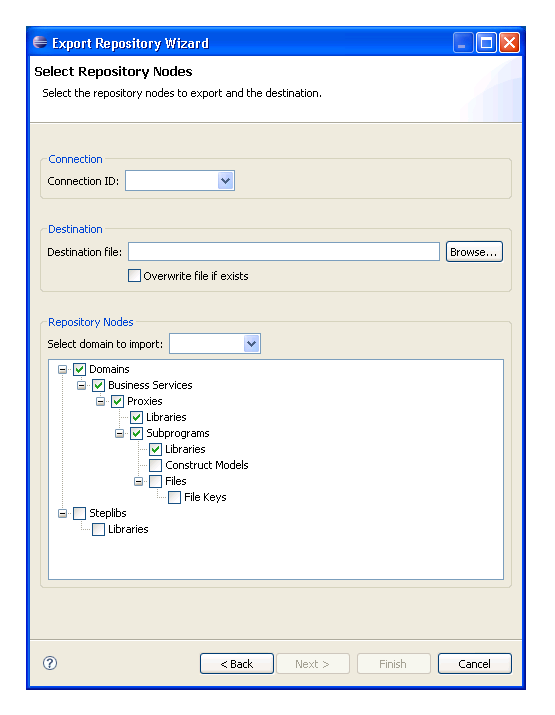
The Select Repository Nodes window is displayed. For example:
Tip:
You can also access this window using the context menu for an open
connection or for a domain listed in the NBS Repositories
view.
Select the Connection ID for the repository metadata you want to export.
Select an output file name in Destination file.
To overwrite the existing file, select .
Tip:
If you type the file name, ensure the name includes the .xml
extension.
Select the domain containing the repository metadata you want to export.
To export the metadata for all domains, select .
Select the repository metadata you want to include in the exported file.
Select to export the selected repository metadata.
This section describes how to set preferences for Natural Business Services (NBS).
![]() To set preferences for NBS:
To set preferences for NBS:
Select on the menu.
The Preferences window for Natural Business Services is displayed. For example:
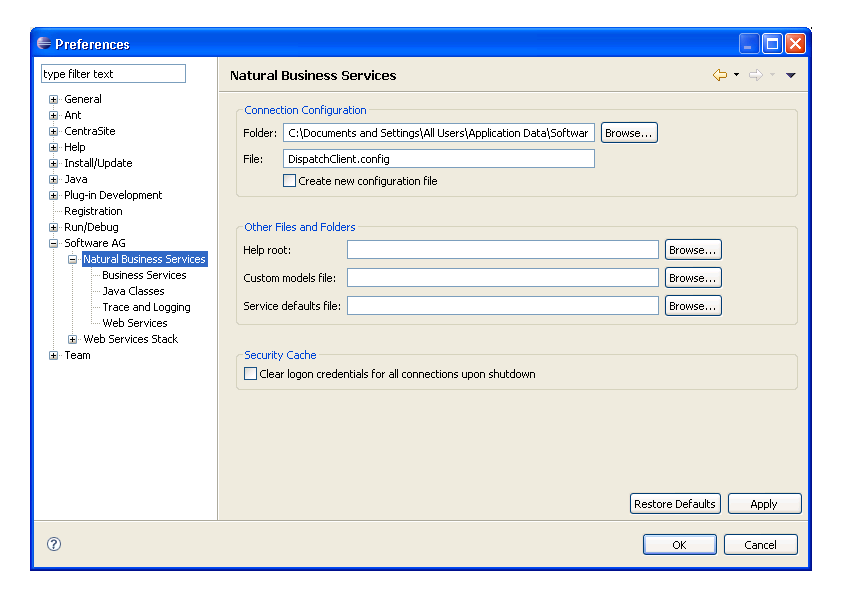
Using this window, you can:
| Task | Procedure |
|---|---|
| Change the configuration folder used | Select another folder from Folder. |
| Create a new configuration file | Select Create new configuration and enter the name of the new file in File. |
| Specify the folder containing the help file | Select the folder from Help root. |
| Specify the file containing custom models | Select the file from Custom models file. |
| Specify the file containing default values for business services | Select the file from Service defaults file. |
| Remove saved credentials from the security cache | Select Clear logon credentials for
all connections upon shutdown to remove the saved credentials from
the security cache for all connections when Eclipse shuts down.
Tip: |
| Restore all default values for the configuration file | Select . |
Select OK to apply the changes and close the Preferences window.
Note:
To apply the changes without closing the window, select
.
In addition to these preferences, you can also set the following:
Use this setting to have NBS create the interface for all new services using Unicode field formats (U data type).
Note:
Services that use a Unicode interface require a special
EntireX runtime server definition. For information,
see Use
Unicode Parameters for Your Business Service.
![]() To set the business service preferences:
To set the business service preferences:
Select the Business Services node.
The Business Services information is displayed. For example:
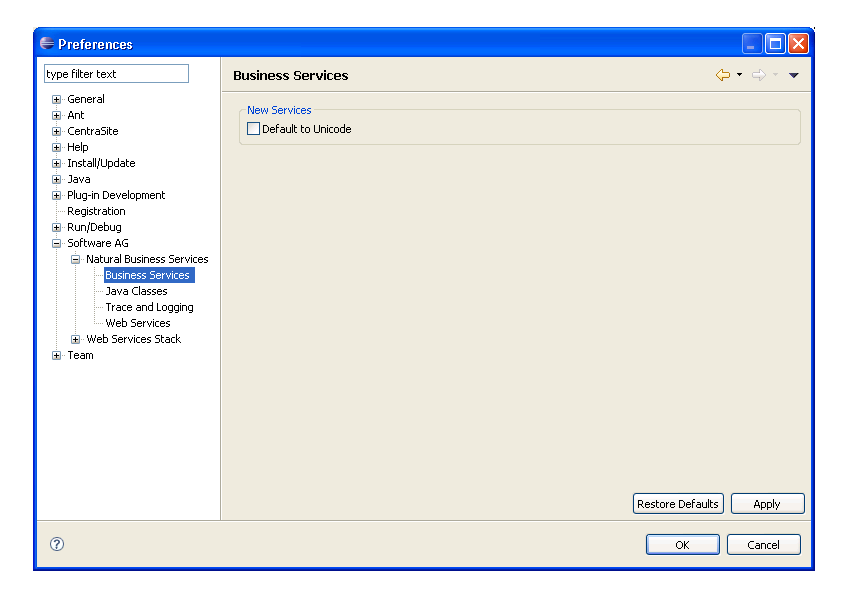
The only option available in this window is Default to Unicode, which allows all new services to be Unicode enabled.
Select Default to Unicode.
Select OK to apply the changes and close the Preferences window.
Note:
To apply the changes without closing the window, select
.
Use this setting to define preferences for creating new Java classes.
![]() To set the Java class preferences:
To set the Java class preferences:
Select the Java Classes node.
The Java Classes information is displayed. For example:
Type a class suffix in Class suffix.
Select the target Java Virtual Machine (VM) version in Class style.
The class styles are:
Original (Java VM 1.4)
Enhanced (Java VM 5)
Select one of the Java perspective options.
These options are:
Always (open the Java perspective when creating Java classes)
Never (do not open the Java perspective)
Prompt (allow the user to select the option)
Select OK to apply the changes and close the Preferences window.
Note:
To apply the changes without closing the window, select
.
Use this setting to format the trace and log output.
Note:
For information on setting trace and log options, see
Set Trace and Log
Options.
![]() To format the trace and log output:
To format the trace and log output:
Select the Trace and Logging node.
The Trace and Logging information is displayed. For example:
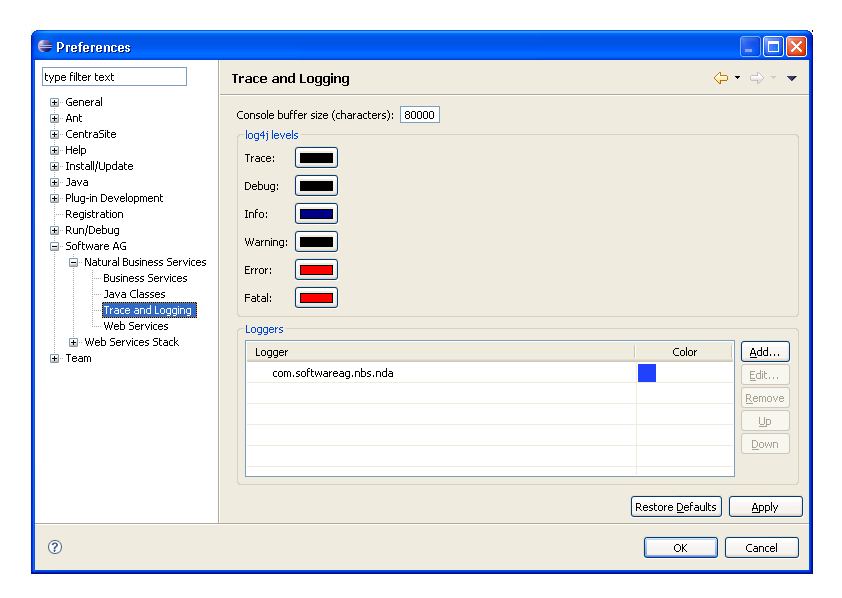
This window displays the default buffer size reserved for the NBS Console in the Eclipse plug-in, the current colors for different log4j levels, and a list of the overridden logger files and corresponding colors.
Note:
Color settings specified in the Loggers section take precedence
over color settings specified in the log4j levels section.
Accept or change the default buffer size reserved for the NBS Console.
Accept or change the current color for each log4j level.
When you select a color, the Color window is displayed. Use this window to select the new color.
Accept or change the current logger files and colors.
Note:
The logger names listed in this window are derived from the
log4j.properties file.
You can use the buttons in the Loggers section of this window to:
| Task | Procedure |
|---|---|
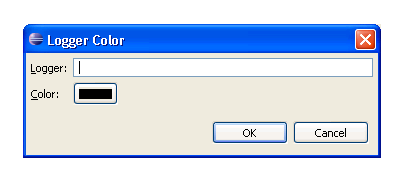
| Add a new logger file | Select . The
Logger Color window is displayed. For example:
Type the name of the logger file in Logger and select Color. The Color window is displayed to select a color to identify the file in the NBS Console view. |
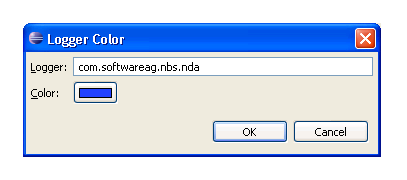
| Change an existing logger file | Select the file you want to change and select
. The Logger Color window is
displayed, showing information for the file you selected. For example:
Change the name of the logger file in Logger and/or select Color. The Color window is displayed to select a new color. |
| Remove a logger file | Select the file you want to delete and select . The selected logger file is removed from the Loggers section. |
| Move a logger file up or down in the list | Select the file you want to move and select or . This changes the order of precedence for the files. If one logger file overlaps another, the highest one in the list will be used. |
Select OK to apply the changes and close the Preferences window.
Note:
To apply the changes without closing the window, select
.
Use this setting to define the internal port for Axis2 and CentraSite details.
![]() To set the Web service preferences:
To set the Web service preferences:
Select the Web Services node.
The Web Services information is displayed. For example:
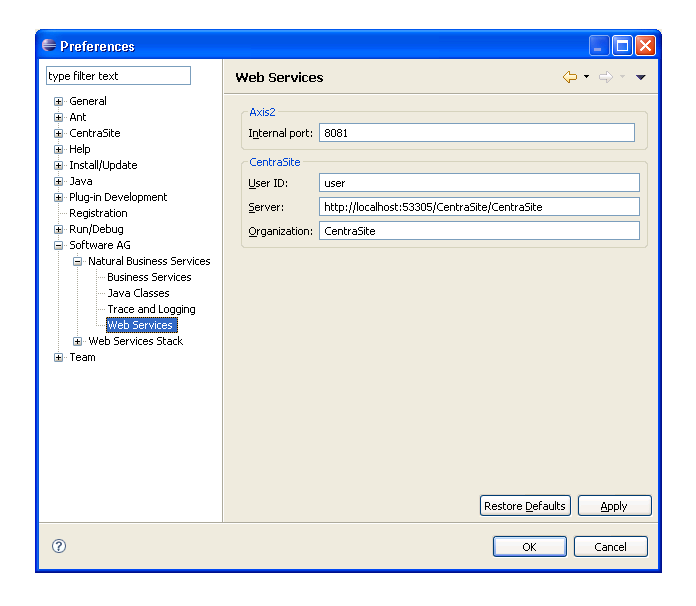
The current Axis2 internal port number is displayed, as well as information on CentraSite.
Accept or change the Axis2 internal port number.
Accept or change the CentraSite user ID, server location, and organization name.
Select OK to apply the changes and close the Preferences window.
Note:
To apply the changes without closing the window, select
.
This section describes how to set Web service stack preferences for the WS-Stack plug-in.
![]() To set Web service preferences for the WS-Stack plug-in:
To set Web service preferences for the WS-Stack plug-in:
Select on the menu.
The Preferences window for Web Services Stack is displayed. For example:
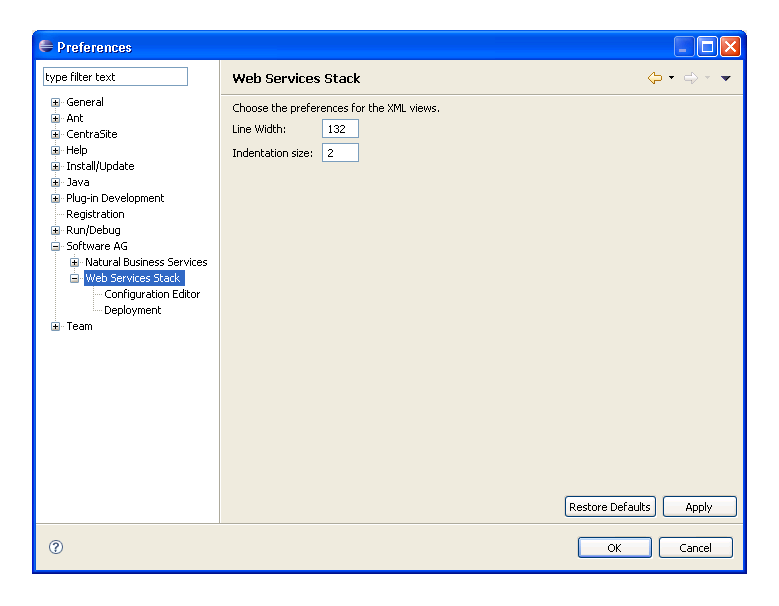
Use this window to:
| Task | Procedure |
|---|---|
| Change the line width used for XML views | Enter another value in Line width. |
| Change the size of the indentation used for XML views | Enter another value in Indentation size. |
Select OK to apply the changes and close the Preferences window.
Note:
To apply the changes without closing the window, select
.
In addition to these preferences, you can also set the following:
Use this setting to define preferences for the Web services Configuration editor.
![]() To set preferences for the Configuration editor:
To set preferences for the Configuration editor:
Select the Configuration Editor node.
The Configuration Editor information is displayed for message exchange patterns and message receivers. For example:
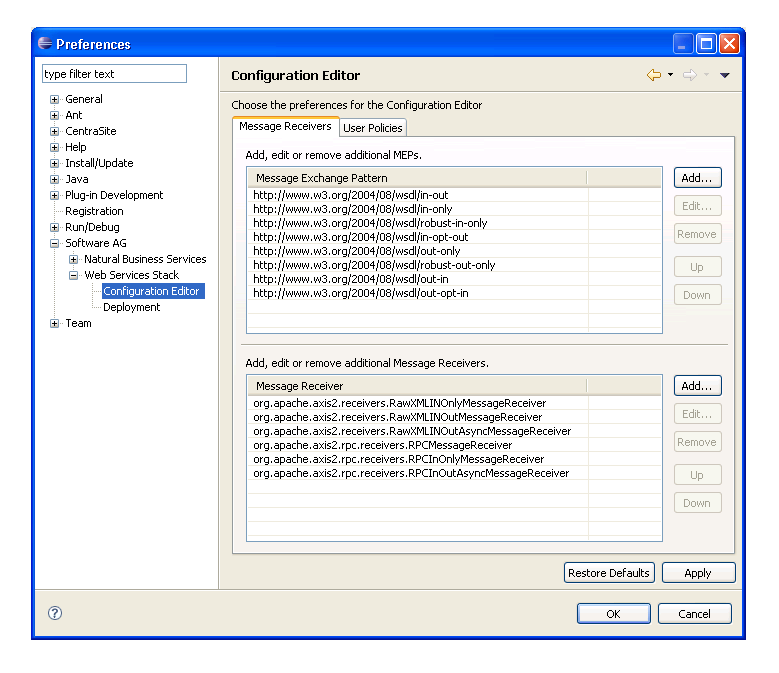
The current message exchange patterns and message receivers are displayed. Use this window to:
| Task | Procedure |
|---|---|
| Add a new message exchange pattern | Select in Message
Exchange Pattern. The Add a new MEP window is displayed. For example:
Enter the name of the message exchange pattern and select . The pattern is added to the list. |
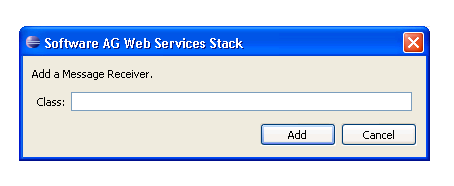
| Add a new message receiver | Select in Message
Receiver. The Add a Message Receiver window is displayed. For example:
Enter the name of the message receiver and select . The receiver is added to the list. |
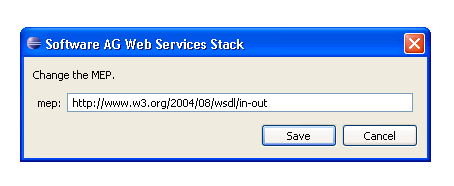
| Edit a message exchange pattern or message receiver | Select the pattern or receiver in the list
and select . The pattern or receiver is displayed
for editing. For example:
Change the pattern (or receiver) information and select to save the changes. |
| Remove a message exchange pattern or message receiver | Select the pattern or receiver in the list and select . |
| Change the sequence in which the message exchange patterns or message receivers are listed | Select the pattern or receiver in the list and select or . |
| Set user policies | Select the User Policies tab. For information, see User Policies Tab. |
Accept or change the message exchange patterns, message receivers, and/or user policies for Web services.
Select OK to apply the changes and close the Preferences window.
Note:
To apply the changes without closing the window, select
.
![]() To set user policies for Web services:
To set user policies for Web services:
Select the User Policies tab in the Configuration Editor node.
The Configuration Editor information is displayed for user policies. For example:

Use this window to:
| Task | Procedure |
|---|---|
| Add a new user policy | Select and browse for the XML file containing the user policy you want to add. |
| Remove an existing user policy | Select the user policy in the list and select . |
| Change the sequence in which the user policies are listed | Select the user policy and select or . |
Use this setting to define preferences for the deployment of Web services.
![]() To set preferences for Web service deployment:
To set preferences for Web service deployment:
Select the Deployment node.
The Deployment information for Web services is displayed. For example:
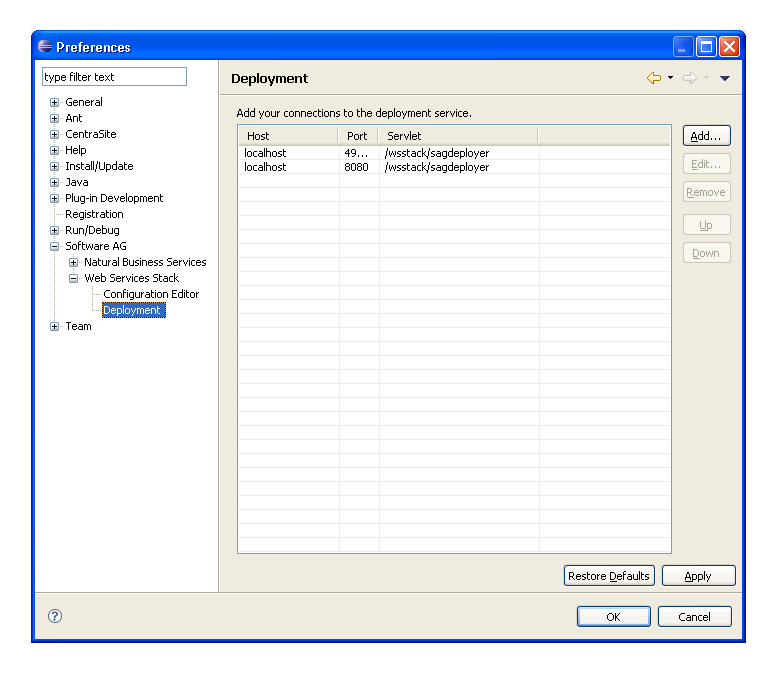
The current connections for deployment services are displayed. Use this window to:
| Task | Procedure |
|---|---|
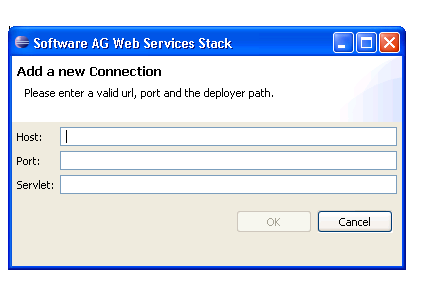
| Add a new deployment connection | Select . The
Add a New Connection window is displayed. For example:
Enter the host name, port number, and servlet address for the new connection and select . The connection is added to the list. |
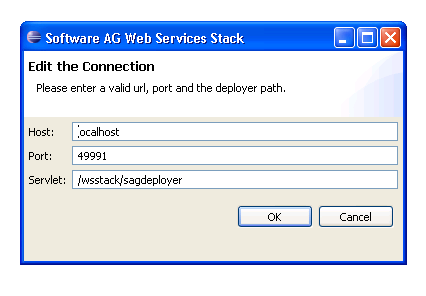
| Edit a deployment connection | Select the connection in the list and select
. The connection is displayed for editing. For
example:
Change the connection information and select to save the changes. |
| Remove a deployment connection | Select the connection in the list and select . |
| Change the sequence in which the connections are listed | Select the connection in the list and select or . |
Accept or change the deployment connections for Web services.
Select OK to apply the changes and close the Preferences window.
Note:
To apply the changes without closing the window, select
.