This section describes how to set Natural Business Services security options for business services. These options control access at the domain, service, and method level. When the client requests access to data on the server, the dispatch server invokes the security server, which executes a Natural routine in the security exit. The routine analyzes the security settings to determine whether the user is allowed to access the data.
If the user has permission, the call proceeds.
If the user does not have permission, a message is returned to the client and the call ends.
This section describes how to define the security settings and how to use the supplied security exits to interpret the security settings. The following topics are covered:
Natural Business Services security allows you to define a group’s access privileges at multiple levels: domain, business service, and method. However, you do not have to define security settings for every service and method. By default, security privileges set at one level will automatically apply to all lower levels in the hierarchy. In addition, you can define different settings for individual items at a lower level. As well, Natural Business Services provides security exit modules (BS_USEC*) you can modify to evaluate the security settings as needed. Security privileges can be as general or as specific as needed.
At any time, you can disable current access privileges. This allows you to perform maintenance without changing the security settings. The disabled status is removed by applying the enabled status, which returns settings to their prior state.
The version number in a business service definition is ignored in security definitions. When adding a new version of a service that is already defined to security, the new version is automatically assigned the same privileges as older versions.
When using Natural Business Services (NBS), it is important to understand how information on the server is secured. For example, when working in Natural for Windows, SPoD is the only middleware option and all security checking is performed through the Natural Development Server (NDV). EntireX is not used, not even by the NBS attach, dispatch, and security servers. The Business Service repository, however, handles user authorization.
The following diagram illustrates the different security options on the server:
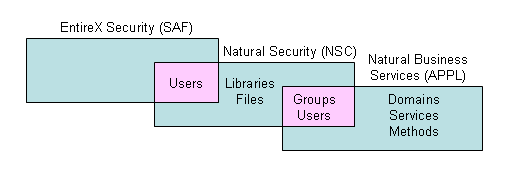
The pink areas indicate overlapping options. For example, users can be authenticated in EntireX, Natural Security, or Natural Business Services, but groups can only be authenticated in Natural Security or Natural Business Services security.
Security options on the server are:
NONE
No security; program names and libraries are checked.
APPL
Natural Business Services authenticates users and checks authorizations and application-level security.
NSC
Natural Security authenticates users and checks authorizations.
SAF
EntireX authenticates users and checks authorizations.
SAF-APPL or SAF-NSC
Hybrid security server is used (for information, see Use a Hybrid Security Server with Natural Business Services).
With the appropriate security permissions, you can monitor breaches of security using the logs stored in the repository.
Note:
For information on monitoring security exceptions in
the Natural Business Services plug-in for Eclipse,
see
Audit
Security Exceptions for a Connection. For information on monitoring
security exceptions in the Natural Business Services
plug-in for Natural, see
Audit
Security Exceptions for a Connection.
This section covers the following topics:
The Natural for Windows development environment is always secured and authorization privileges are based on the settings defined in the Business Service repository. It is important to understand the domain/service/method security hierarchy and how the interpretation of this hierarchy can change based on settings in the security exit modules.
Because of the various ways to interpret the security privileges, and for better performance when determining the authorization of a particular request, Natural Business Services uses a security cache system. Once a user has been authorized for a particular request, the permission is placed in the security cache.
Note:
For information on this process, see
Use the Cache
Synchronization Exit Module.
To maintain users, groups, and libraries, the Business Service Administration subsystem provides a user interface into Natural Security. Alternately, you can maintain this information in Natural Security.
Notes:
This connectivity option is required for Natural for Windows and is an option for the Visual Studio add-in. (It is not currently available for the Ellipse plug-in). In Natural for Windows, security authentication for Natural Business Services uses the data in either the Business Service repository or in Natural for Windows, depending on the settings on the business service control record.
Note:
For information on the control record, see
Using the Business
Service Control Record.
This connectivity option is required for the Ellipse plug-in and is an option for the Visual Studio add-in. (It is not available in Natural for Windows.) EntireX balances loads, which makes it an ideal choice for production (runtime) applications. For Natural Business Services, this option includes attach, dispatch, and security servers and an Attach Manager. In addition, the EntireX compression, encryption, and security options are available.
You do not have to use EntireX security when using the EntireX middleware. The security option is determined by the dispatch server definition (not the business service control record). For example, to use Natural Security with EntireX connectivity, the security mode setting for the dispatcher must be NSC. Depending on the security mode setting for the dispatch server, a user can be authenticated using EntireX, Natural Security, and/or Natural Business Services security.
Notes:
When setting up a new environment, it is sometimes difficult to define and manage the EntireX servers. Natural Business Services provides the CSRLOAD utility in the SYSBIZ library to simplify this process. Use this utility to load the business services and security settings, as well as the customized servers (attach, dispatch, and security). Since the settings get more complicated for a secure environment, we recommend that you use CSRLOAD to load servers that will be using Natural Security.
![]() To load the secure servers:
To load the secure servers:
Invoke the CSRLOAD utility from the SYSBIZ library.
Type the broker ID in Broker ID.
Type a prefix or suffix in the Server qualifiers fields.
This value will identify the secure servers within Natural Business Services. If you type "NSC" in the Prefix field, for example, the server names will be NSC-Attach, NSC-Dispatch, and NSC-Security.
Type the server class in Server Class.
This value is found in the EntireX Broker attribute file.
Type the name of the JCL text member in JCL Text Member.
The JCL text member must be modified to handle Natural Security. For instructions on modifying the text member, create your own copy of BATCHJCL in the SYSBIZ library and read the comments.
For production environments, type "Y" in Subtask Support.
If subtask support is specified, the dispatch and security servers run under the attach server in Natural. This is less resource-intensive, but makes it more difficult to find problems. If subtask support is not specified, all servers are set up as independent batch jobs.
Tip:
Tip: For debugging purposes, it may be easier to not use this
option (i.e., type "N" in Subtask
Support).
Ensure that the database ID and file number for the batch Natural profile are specified in Profile FNAT DBID and Profile FNAT FNR.
The Natural profile is used to start the servers.
De-select all other options in the Mark default records to be loaded section.
For example:
This process will load the current Business Files. Make sure your LFILES
are set correctly. This program also clears the source area and generates
entries required for the BROKER Attribute File. These must be copied manually.

Enter default values to be used to establish server records...
  Broker ID ........ BKRnnn__________________________
  Server qualifiers Prefix: __________ Suffix: __________
  Server Class ..... BUSINESS________________________ Unicode (Y/N): N
  JCL Text Member .. BATCHTXT
  Transaction ...... NATBAT__
  Subtask Support .. Y
  Profile FNAT DBID  _13000
  Profile FNAT FNR . __1300
  Profile .......... SYSBIZ__

Natural Security Settings...
  Servers under NSC  _
  User id .......... ________________________________
  Password .........

Mark default records to be loaded...
  _ Users             _ Groups            _ Domains            _ Steplibs
  X Servers           _ Business Services _ Security Links
|
Press Enter.
Note:
If you select Servers under NSC, the additional parameters for
Natural will correctly set up the stack on the
assumption that the specified user ID and password are also in
Natural Security.
To verify what was loaded, access the Manage Servers panel. For information on accessing this panel, see Manage Servers.
Web applications that were generated from the Visual Studio add-in use Microsoft’s IIS technology and the Web Service Engine (WSE) to provide application security and use EntireX as the middleware component. The combination of these components provides the following security modes for passing a password across the network: None, Token, or Password.
Note:
For information, see
Build
a Web Application.
This section contains tips and techniques you can use to help troubleshoot security problems. The following topics are covered:
You can use the Manage Servers panel in the Business Service Administration subsystem to initiate and ping each server. This is highly recommended when setting up the servers for the first time. For information, see Manage Servers.
Note:
You can also use a GUI application called the Server
Monitor to manage servers. For information on using the Server Monitor, see
NBS Server
Monitor.
When an attach server is initiated from the Manage Servers panel, a batch job is started and the name of the batch job is displayed in a message on the panel. If you encounter a problem, view the batch job (and/or the batch jobs for the dispatch and security servers, if they are running as batch jobs).
If the servers do not respond, confirm that the JCL and startup parameters are correct. The startup parameters in the JCL template should look like the following example:
SYSBIZ,&USER-ID,&PASSWORD
SPSSTART
The startup parameters should not look like the following example:
LOGON SYSBIZ
SPSSTART
Next, confirm that the server start parameters in the Natural Business Services server definitions are correct for a secure environment. For example:
NATPARM='FNAT=(1,1),PROFILE=SYSBIZ
AUTO=OFF STACK=(LOGON SYSBIZ,*USER-ID,*PASSWORD;START)'
Note:
If you use *USER-ID and *PASSWORD, the user ID and password
associated with the server definition should be the same as those associated
with the operating system. They should also be defined in Natural
Security. In addition, the user ID associated with the security
server must have access to the SYSSEC library.
Once the attach, dispatch, and security servers can be successfully pinged, test the client configuration from the Natural Business Services plug-in or add-in. Once a configuration has been set up, you can use the Test button on the Configuration Utility panel to test the connection.
Note:
If a dispatch server is not required, it shuts down and is only
initiated for a request. This may cause the dispatch server to fail the test.
If this happens, either initiate the dispatcher from the server or invoke one
of the wizards (which will force a request to the dispatcher and initiate the
dispatch server).
An invalid user ID or password error can be the result of many things. Use the checklist in one of the following sections to determine the problem.
If the problem occurs from a SPoD (Natural for Windows) connection:
Verify that the user ID and password were entered correctly.
The most common reason for this error is that the wrong user ID or password was entered or that the wrong case was used (for example, mixed case when it should be upper case).
Verify that the user ID and password entered are the same as those used to map to the Natural remote environment.
Determine where on the server the user ID and password are being checked.
From a SPoD connection, there are two options: Natural Security or the Business Service repository. Confirm that the control record in the Business Service Administration subsystem specifies the correct security option (direct command: "MENU SA MM SC"). For example:
If the business service control record has the Use Natural Security option marked, Natural Business Services will verify the user ID in Natural Security. Confirm that the user ID and password entered are the same as those defined in Natural Security.
If the Use Natural Security option is not marked, Natural Business Services will verify the user ID and password in the Business Service repository. This security information is maintained in the Business Service Administration subsystem on the server (direct command: "MENU SA MM US").
If the problem still exists, confirm that the files you are using in Natural for Windows are the same as the files on the server. For example:
If Natural Security is being used, confirm that the FSEC file in SPoD is the same as the FSEC file on the server (you can use SYSPROF to do this).
If Natural Security is not being used, confirm that LFILE 135 and 136 in SPoD are the same as those on the server.
If the problem occurs from an EntireX connection:
Determine which user ID and password are being used and where the security information is verified.
From the Visual Studio add-in or the Eclipse plug-in, the user is prompted to logon when a connection is made. Note the logon connection, which is determined by the default Natural connection.
Confirm that the secure server is marked in the EntireX configuration. (If you do not do this, the password is never sent to the server.)
Confirm that the attach, dispatch, and security servers can be initiated and pinged from the Manage Servers panel.
Tip:
Although you do not have to initiate the dispatch or security
servers, doing so will verify that the user IDs are working for the appropriate
Natural batch job. For example, if the user ID
associated with the batch job does not have access to the SYSSEC library, the
security server will not be initiated.
Determine whether the LFILE (for APPL security) or FSEC (for Natural Security) files are appropriate.
To do this, access the Manage Servers panel and enter "SY" in the Action field for each server. If the files are not correct, define the correct location in the Natural profiles or JCL member and then initiate and shutdown the servers.
If the servers can be pinged and the user ID is still invalid from the client, determine which SECURITY-MODE option is defined on the second Maintain Servers panel for the dispatch server. Regardless of which setting is defined on the business service control record, the dispatch server will verify the information based on the security mode specified on this panel. Different security options can be defined for a dispatch server, since there can be more than one (for example, one dispatch server may be secured and one may not be secured). For example:
If SECURITY-MODE=NONE or SECURITY-MODE=APPL, the user ID is defined in the Business Service Administration subsystem.
If SECURITY-MODE=SAF, the user ID is defined in SAF (for example, your server operating system).
If SECURITY-MODE=NSC, the user ID is defined in Natural Security.
Notes:
To define security settings, use the Business Service repository in Natural for Windows. For information, see Define Security for Domains. Although you can define the security settings on the server, it is simpler to use the Natural Business Services plug-in in Natural for Windows.
This section describes how to define security settings on the server. The following topics are covered:
You can view security information in alphanumerical order either by group or by domain. The following steps describe how to access both options.
![]() To access the Maintain Service Security panels:
To access the Maintain Service Security panels:
Enter "AA" in Function on the Business Service Administration Subsystem main menu.
The Application Administration main menu is displayed.
Enter "MM" in Function.
The Application Administration Maintenance menu is displayed.
Enter the code for the panel you want to display.
Valid codes are:
| Code | Panel | Description |
|---|---|---|
| OG | Maintain Service Security by Group panel | Displays groups in alphanumeric order. |
| OD | Maintain Service Security by Domain panel | Displays domains in alphanumeric order. |
When you add a new group in the Business Service Administration subsystem, the group does not automatically appear on the Maintain Service Security panel. You must first add a domain/group combination on either the Maintain Service Security by Group or Maintain Service Security by Domain panel. The following steps describe how to add a combination on the Maintain Service by Group panel, but the procedure is the same on the Maintain Service by Domain panel.
![]() To add a group and domain combination:
To add a group and domain combination:
Type the name of the group in Group on the Maintain Service by Group panel.
Type the name of the domain in Domain.
Press PF4 (Add).
The new domain/group combination is added to the list on the panel.
Adding a domain/group combination does not automatically give the group access to the domain. You must explicitly set privileges using one of the actions available on the panel.
Notes:
The Purge action is only available at the domain/group level. It removes all security statuses for the domain/group combination and its associated services and methods. While deleting the security definitions, it also deletes all related entries from the security cache. Once all security definitions have been removed, the Purge action also removes the domain/group combination.
This section describes how to set security options at the domain/group, service, and method levels. Although the panels shown are the Maintain Service Security by Group panels, the descriptions also apply to the Maintain Service Security by Domain panels.
Note:
For information on the security statuses you can assign to
domain/group combinations, services, and methods (such as grant or disable),
see Security
Statuses.
You can define settings for any combination of domain and group. If a setting is defined only at the domain/group level, the group has the same privilege for all services and methods within the domain.
![]() To set security options for a domain/group combination:
To set security options for a domain/group combination:
Enter the appropriate code in Act for the group.
The Maintain Service Security by Group panel is displayed.
Press Enter to display the available groups.
For example:
 BSOSG_MP   ***** Business Service Administration Subsystem *****      BSOSG_11
 Feb 15,06           - Maintain Service Security by Group -           10:29 PM

                                                   Current  Previous
 Act                Group                  Domain   Access   Access
 ---  ----------------------------------- -------- -------- --------
  _   ADMIN                               ADMIN    Revoked
  _   ADMIN                               CST      Granted
  _   ADMIN                               DEMO     Revoked
  _   CST                                 ADMIN    Granted
  _   CST                                 CST      Granted
  _   CST                                 DREW     Granted
  _   DEMO                                ADMIN    Granted
  _   DEMO                                TEST1    Granted
  _   DEMO                                BUSINESS Granted
  _   DEMO                                DEMO     Granted
  _   DEMO                                TEST2    Granted
  _   DEMO                                TEST3
  _   TESTGROUP                           ADMIN
 Group: ________________________________ *  Domain: ________ *
 Direct command...: ____________________________________________________________
 (PF4=Add)        Clear      Disable    Enable     Grant      Purge      Service
 (PF5=flip)
|
Tip:
Use the Clear action to remove security settings for a
domain/group combination. This action also clears the domain/group’s settings
from the security cache.
Note:
For more information on setting security options for a
domain/group, see Add a
Domain/Group Combination.
Use the second level in the security hierarchy to allow the group access to specific services within a domain or to override settings defined at the domain/group level.
![]() To set security options at the service level:
To set security options at the service level:
Enter "O" in Act for the domain/group combination.
The Maintain Service Security by Domain window is displayed.
Press Enter to display the available groups and domains:
For example:
 BSOSD_MP   ***** Business Service Administration Subsystem *****      BSOSD_11
 Feb 15,06           - Maintain Service Security by Domain -          10:27 PM

                                                          Current  Previous
 Act      Domain                  Group                    Access   Access
 ---     -------- --------------------------------------- -------- --------
  _      ADMIN        ADMIN                                Revoked
  _      ADMIN        CST                                  Granted
  _      ADMIN        DEMO                                 Granted
  _      ADMIN        TESTGROUP
  _      ADMIN2       DEMO                                 Granted
  _      BUSINESS     DEMO                                 Granted
  _      BUSINESS     RESTRICT
  _      CST          ADMIN                                Granted
  _      CST          CST                                  Granted
  _      DEMO         ADMIN                                Revoked
  _      DEMO         DEMO                                 Granted
  _      DEMO         RESTRICT                             Granted
  _      DEMO         CST                                  Granted
 Domain: ________ * Group: ________________________________ *
 Direct command...: ____________________________________________________________
 (PF4=Add)        Clear      Disable    Enable     Grant      Purge      Revoke
 Service    (PF5=flip)
|
The security status for the domain/group combination is displayed in the second header. The security status applied to the combination is not shown for each of the domain’s services in Current Access. However, a status defined for the domain/group combination applies to associated services by default. Only statuses explicitly defined for individual services are displayed in Current Access.
Enter the appropriate code in Act for the service.
Use the Clear action to remove security settings for a service. This action also clears the service’s settings from the security cache.
Use the third level in the security hierarchy to allow the group access to specific methods of a service or to override settings defined at the service or domain/group level.
![]() To set security options at the method level:
To set security options at the method level:
Enter "S" in Act for the service in the Maintain Service Security by Domain window.
The Security for Domain window is displayed. For example:
 BSOSO_MN  ***** Business Service Administration Subsystem *****
 Mar  1,06       Security for Domain ADMIN/Group ADMIN: Revoked   11:29 PM

                                      Current  Previous
 Act             Service               Access   Access
 --- -------------------------------- -------- --------

  _  BusinessServicesAuditTrail
  _  BusinessServicesMethodAuditTrail
  _  Deployment
  _  Domain
  _  DomainAuditTrail
  _  Group
  _  GroupLevelSecurity
 Object: ________________________________
 Direct command...: ______________________________________________________
 Clear      Disable    Enable     Grant      Methods    Revoke
(PF5=flip) |
The security status for the service is displayed in the second header (Revoked in the example above). The security status applied to the service is not shown for each of its methods in Current Access, since a status defined for a service applies to associated methods by default. Only a status defined for an individual method is displayed in Current Access.
Enter the appropriate code in Act for the method.
Use the Clear action to remove security settings for a method. This action also clears the method’s settings from the security cache.
How security statuses are interpreted when a client request is made to the dispatch server depends on the security exit you are using.
Note:
For more information, see
Use the Security Exit
Modules.
This section covers the following topics:
When a domain/group combination has no security option set, no privileges have been assigned to the combination. This is the status in effect after you add a new domain/group combination. You can set privileges for the domain’s services and methods at this point. Or you can set a security option for the combination that will apply to all services and methods in the domain.
This scenario has a different meaning when it belongs to a service or method. When you set a domain/group combination’s security status, all of its services and their methods “inherit” that status. However, their current security setting remains blank unless you assign statuses to them individually. When you explicitly set a service’s security status, that status applies to its methods as well.
The granted status allows the group access to the domain, service, or method to which the status is assigned. The revoked status prevents users from accessing the domain/group combination, service, or method to which the status is assigned.
There are different ways to interpret the granted and revoked settings, depending on the security exit you are using. For example, the default security exit (BS_USEC2) checks access privileges from the lowest level up (from method to domain/group combination) for each group to which a user belongs. A user can access a method that has the granted status, although the service to which the method belongs has the revoked status.
On the other hand, if you are using the BS_USEC1 security exit, the revoked status always takes precedence over the granted status. If the domain/group’s status is granted, and the service’s status is revoked, the service and its methods are inaccessible. Even if one of the methods of the service has access explicitly granted, the revoked status at the service level disallows access to any of the methods.
Disabling privileges at any level does not change the current security settings. Rather, it is a temporary override, usually for maintenance purposes. When you apply the disabled status to a domain/group combination, service, or method, the Previous Access field is populated with the value that was in the Current Access field. Once the override is no longer necessary, use the enable action to return the setting to the value in place when the disable status was applied. At any time, you can change the disable status to grant, revoke, or no privileges.
Natural Business Services provides exit modules (BS_USEC*) you can exchange or modify to interpret the security settings differently. These exits receive information from the Natural Business Services security server when a request is made to the server. The information includes the name of the user, the request being made, the user’s groups, and the security settings for the appropriate domain. BS_USEC2 is the default security exit.
The security exit interprets the security settings and returns a flag indicating whether or not to grant access to the user for the request. If the request is not granted, a message number and three substitution values may be returned. (The text associated with the message number is defined in the SYSERR library.) The message data is returned to the client, written to the security log, and placed in the security cache for quicker access on subsequent calls.
The information supplied to the exit is defined in a PDA member called BS_USECA. This member is supplied in source format to provide context and additional documentation. It should not be changed or recompiled.
Tip:
To switch security exits, access the Maintain Control Record window
and replace the current exit. Then restart all security servers. For more
information, see Using
the Business Service Control Record.
This section covers the following topics:
This module is a template containing a data section that defines the required parameter data for the security exit. You can insert all the code required to implement security at the business service level into this template.
This module implements “pessimistic” security checking. It disallows the user access if any restrictions are found. The algorithm is:
If no privileges are defined at any level (domain, service, or method) then
  Set the access flag to ‘No Privileges’
  Exit the routine
End If
If privileges are disabled at any level then
  Set the access flag to ‘Disabled’
  Exit the routine
End If
If privileges are revoked at any level then
  Set the access flag to ‘Revoked’
  Exit the routine
End If
If privileges are granted at any level then
  Set the access flag to ‘Granted’
  Exit the routine
End If
Evaluate the access flag setting and set the SEC_GRANTED flag accordingly
This module is the default security exit. It implements “optimistic” security checking. It allows the user access if any grant status is found for any group at the lowest level in the security hierarchy. The algorithm is:
If no privileges are defined (all matrix entries are 0) then
  Set the access flag to ‘No Privileges’
  Exit the routine
Else
  For each group do
    If any level (domain, service, or method) is disabled then
      Set the access flag to ‘Disabled’
      Go to the next group
    Else
      For each level from 3 to 1 (method to domain) do
        If the current level is revoked
          Set the access flag to ‘Revoked’
          Go to the next group
        Else
          Set the access flag to ‘Granted’
          Exit the routine
        End If
      End For
    End If
  End For
End If

Evaluate the access flag setting and set the SEC_GRANTED flag accordingly
Whenever security data is updated in the Administration subsystem, the affected data in the security cache is cleared. The next request from the client causes the security cache to be populated with up-to-date information.
Whenever service- or method-level security is updated, the cache synchronization exit module (BS_SYNCN) is called to clear the data from the cache. You can modify this module to override the level at which cache cleanup is performed. The source for the exit contains extensive comments to help you modify the routine to your requirements.
Note:
You cannot override levels if a change is made to security for a
domain/group combination. All entries in the cache for the domain, regardless
of group, are deleted.
By default, if a change is made to security at the service level, all entries for the domain/service combination are deleted from the cache. You can modify the exit to specify that all entries for the domain are to be deleted, regardless of service.
By default, if a change is made to security at the method level, all entries for the domain/service/method combination are deleted from the cache. You can modify the exit to specify that all entries for the domain or domain/service are deleted.
Tip:
Do not specify that deletion begin at a lower level than that being
updated. For example, if a service’s security is updated, do not specify
deletion to occur at the method level. If you do so, or if no synchronization
level is specified, the system defaults to the security level being
updated.
Note:
For information on security cache synchronization, see
Synchronize the Security Cache
and Cleanup Queue.