This section describes how to develop client proxy classes and Web services. The following topics are covered:
You can use the Natural Business Services Eclipse plug-in to create proxy classes in Java. Client proxy classes provide access to business services running in Natural. The generated classes are plain Java classes. Typically, proxy classes have properties and methods that map to their Natural counterparts.
Note:
This procedure differs, based on whether the target Java Virtual
Machine (VM) is original or enhanced.
During generation, the wizard creates a folder called .nbsMetadata containing the specifications for the Java class. This allows the specifications to be associated with a project rather than a workspace. The metadata can be stored in CVS, as well as exported with the project.
Note:
A Java project must currently exist. For information, refer to the
Eclipse documentation.
This section covers the following topics:
This section describes how to generate a client proxy class for Java Virtual Machine (VM) version 1.4.
Note:
For information on setting the VM version, see
Preferences for Java
Classes.
![]() To generate a client proxy class for Java original:
To generate a client proxy class for Java original:
Open the context menu for a business service in the NBS Repositories view.
Select .
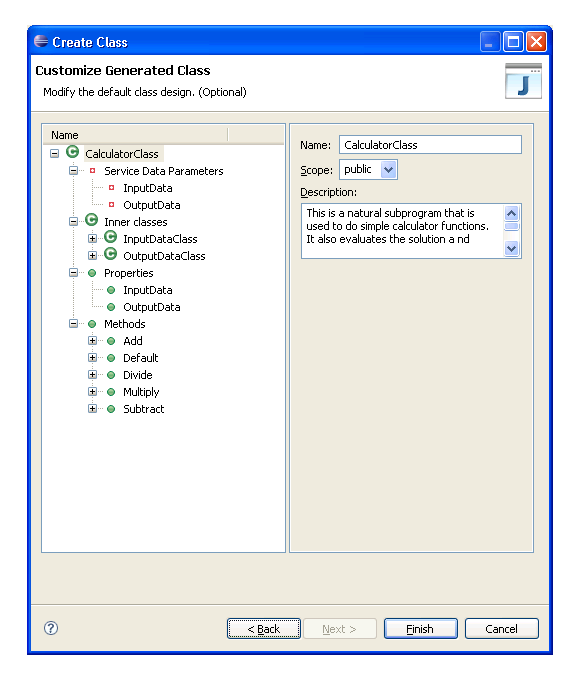
The Configure generated class panel is displayed. For example:
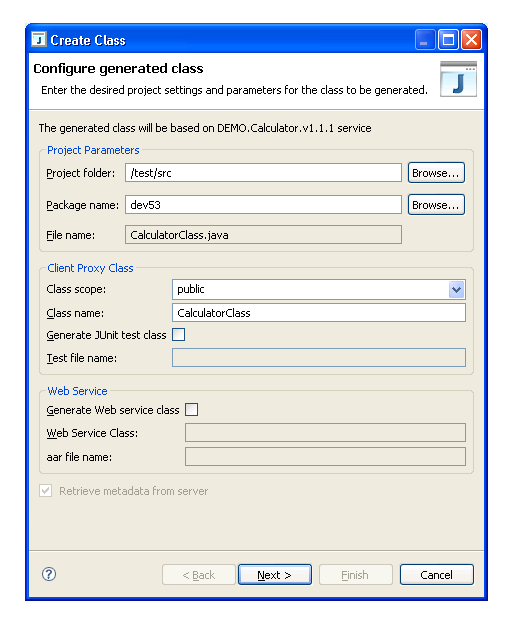
This panel displays the default configuration settings for the class to be generated. Optionally, you can:
| Task | Procedure |
|---|---|
| Change the project folder | Select a new root source folder in Project folder. |
| Change the package name | Select a new package in Package name. |
| Change the scope of the class | Select the class scope from Class scope. By default, public is the class scope. |
| Rename the class | Enter a new name in Class name. |
| Create a class that can be run in the JUnit testing framework | Select Generate JUnit test class. This test class will contain default tests for each method used by your business service. The name of the file used to store the test is displayed in Test file name. |
| Create additional Web service deployment files and classes | Select Generate Web service class and enter the Web service class name and .aar file name. For more information, see Deploy the Client Proxy Class as a Web Service Class. |
| Rename the Web service | Enter a new name in Web service name. |
| Refresh metadata from the server | Select Retrieve metadata from server. |
Select .
The wizard downloads metadata from the service repository on the server and displays the Ready to generate panel. For example:
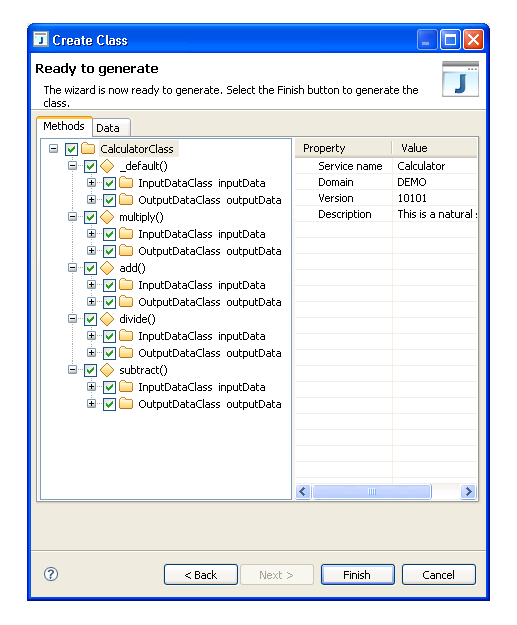
Use this panel to customize the methods and data parameters your class will support. The Methods tab allows you to customize how class methods will be generated based on your existing business service methods.
Select the Data tab.
For example:
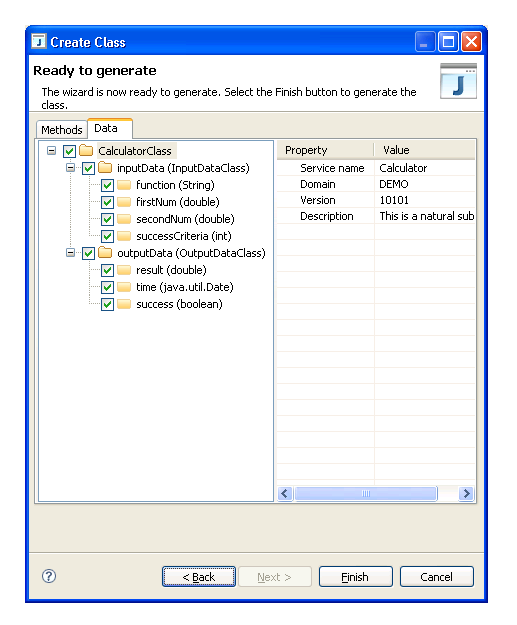
The Data tab allows you to customize how Get and Set methods for your business service properties will be generated.
Select to generate the client proxy class.
This section describes how to generate a client proxy class that takes advantage the enhanced features of Java Virtual Machine (VM) version 5. These features include:
Try/Catch statements that throw exceptions for server errors when calling business service methods for a class
Method definitions that include the correct input/output parameters based on the style of business service
Note:
For information on setting the VM version, see
Preferences for Java
Classes.
![]() To generate a client proxy class for Java enhanced:
To generate a client proxy class for Java enhanced:
Open the context menu for a business service in the NBS Repositories view.
Select .
The Configure generated class panel is displayed. For example:
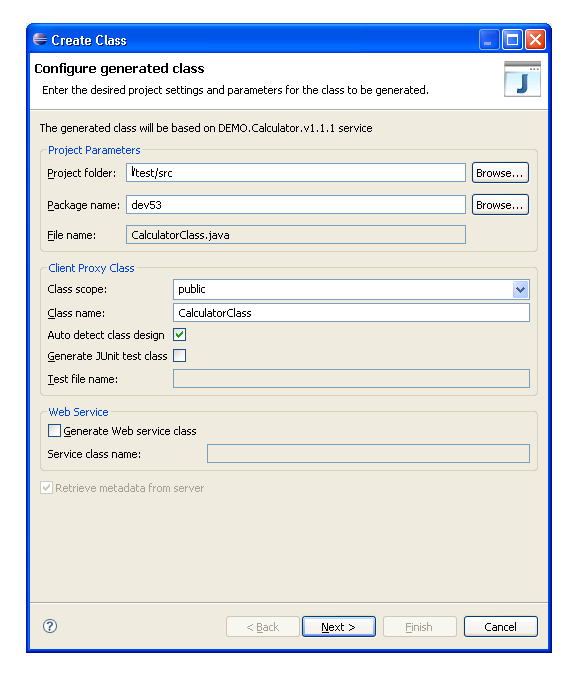
This panel displays the default configuration settings for the class to be generated. Optionally, you can:
| Task | Procedure |
|---|---|
| Change the project folder | Select a new root source folder in Project folder. |
| Change the package name | Select a new package in Package name. |
| Change the scope of the class | Select the class scope from Class scope. By default, public is the class scope. |
| Rename the class | Enter a new name in Class name. |
| Copy the field structure as defined in the PDAs generated for the business service subprograms | De-select Auto detect class
design. If this option is selected, the wizard will determine which
model to use when generating the subprograms on the server and design an object
class hierarchy that is appropriate for the model. For example, the generated
Get method will accept the primary key as input and return an object that
includes all fields.
The wizard recognizes subprograms generated by the Object-Maint-Subp, Object-Browse-Subp, and Object-Browse-Select-Subp models. |
| Create a class that can be run in the JUnit testing framework | Select Generate JUnit test class. This test class will contain default tests for each method used by your business service. The name of the file used to store the test is displayed in Test file name. |
| Create additional Web service deployment files and classes | Select Generate Web service class and enter the Web service class name in Service class name. For more information, see Deploy the Client Proxy Class as a Web Service Class. |
| Rename the Web service | Enter a new name in Web service name. |
| Refresh metadata from server | Select Retrieve metadata from server. |
Select .
The wizard downloads metadata from the service repository on the server and displays the Customize Generated Class panel. For example:
Use this panel to design how each method will work when generating Java classes for services that were not generated by Natural Construct models.
Expand a method listed in Methods.
Open the context menu for Parameters.
For example:
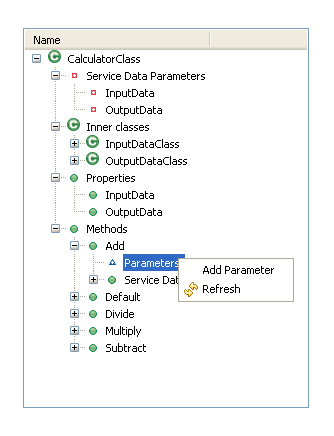
Select .
The parameter settings are displayed. For example:
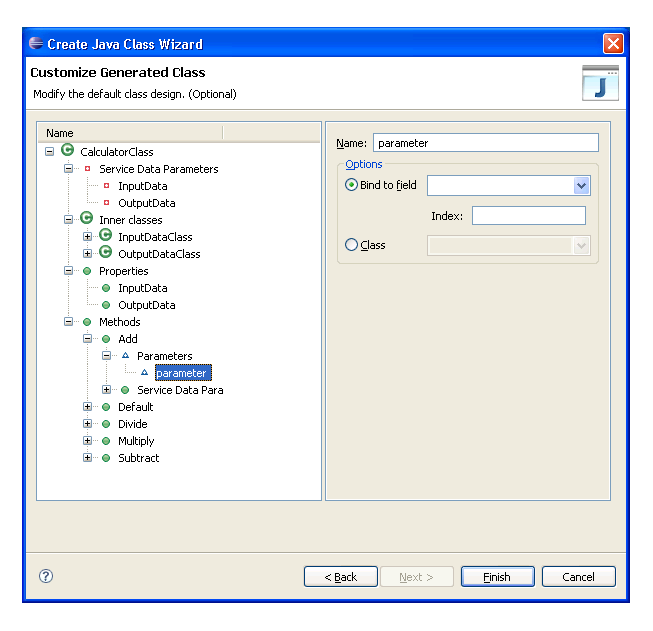
Use this panel to add a parameter to the method and bind it to an existing field in the service. Optionally, you can:
| Task | Procedure |
|---|---|
| Provide an index value for the Natural field | Type the value in Index. |
| Bind the parameter to an inner class | Select Class and specify the class. |
| Select the return value for a method | Select the method (for example, Add) and specify the return settings. For information, see Select Return Value for a Method. |
Type the name of the parameter in Name.
Select the Natural field in Bind to field.
Select to generate your classes and files.
The new class is displayed in the program editor view.
![]() To select the return value for a method:
To select the return value for a method:
Select a method listed in Methods.
Information about the method is displayed. For example:
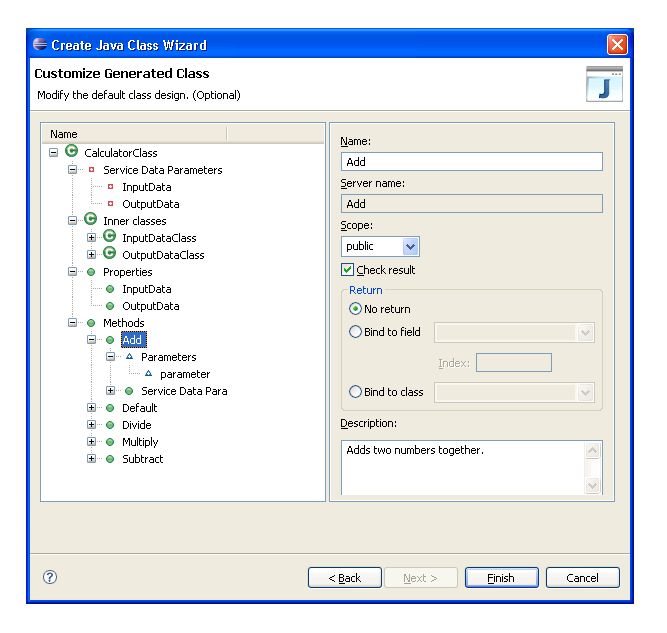
This panel displays the name of the method on the client and on the server, as well as the scope (public or private) and description of the method. Optionally, you can:
| Task | Procedure |
|---|---|
| Change the name of the method | Type a new name in Name. |
| Change the scope of the method | Select the new scope in Scope. |
| Remove the option to verify the result | De-select Check result. |
| Change the description of the method | Type a new description in Description. |
Select one of the following binding options for the return value:
Bind to field
To bind the return value to a field, select the field and, optionally, provide an index value.
Bind to class
To bind the return value to an inner class, select the class.
For example, if you select Bind to field and OUTPUT-DATA.#RESULT, the Add method changes from:
public void Add() throws BusinessServiceException
to:
public double Add(double firstNum,
                  double secondNum)
       throws BusinessServiceException
When generating a client proxy class, one of the wizard options generates a class and descriptor files to deploy the client proxy class as a Web service class. Web service deployment is handled by the WS-Stack plug-in. For information about this plug-in, refer to http://rndcvweb.eur.ad.sag/Projects/WSS/Kits/.
Note:
To deploy the client proxy class as a Web service class,
Generate Web service class must be selected on the
Configure Generated Class panel.
This section covers the following topics:
The WS-Stack plug-in will not add an association between a Web service being added to CentraSite and the NBS repository metadata in CentraSite. You must add each association manually.
![]() To add associations to CentraSite:
To add associations to CentraSite:
Open the context menu for the .aar file in the Package Explorer view.
Select .
The CentraSite Connection window is displayed. For example:

Use this window to add up to two associations between a Web service and the NBS repository metadata to CentraSite. These associations are:
| Association | Description |
|---|---|
| Service uses business service | Association between the Web service and its corresponding NBS business service metadata (for example, CalculatorClassWS Uses DEMO.Calculator.v1.1.1). |
| Business service has parent domain | Association between the NBS business service metadata and its corresponding NBS domain metadata (for example, DEMO.Calculator.v1.1.1 HasParent DEMO). |
Confirm the connection details.
Type the CentraSite password in Password.
Select the associations you want to add.
Select .
The selected associations are added to CentraSite.
The Web service can be deployed to an internal Axis server. The internal server will use your PC name as the web server name.
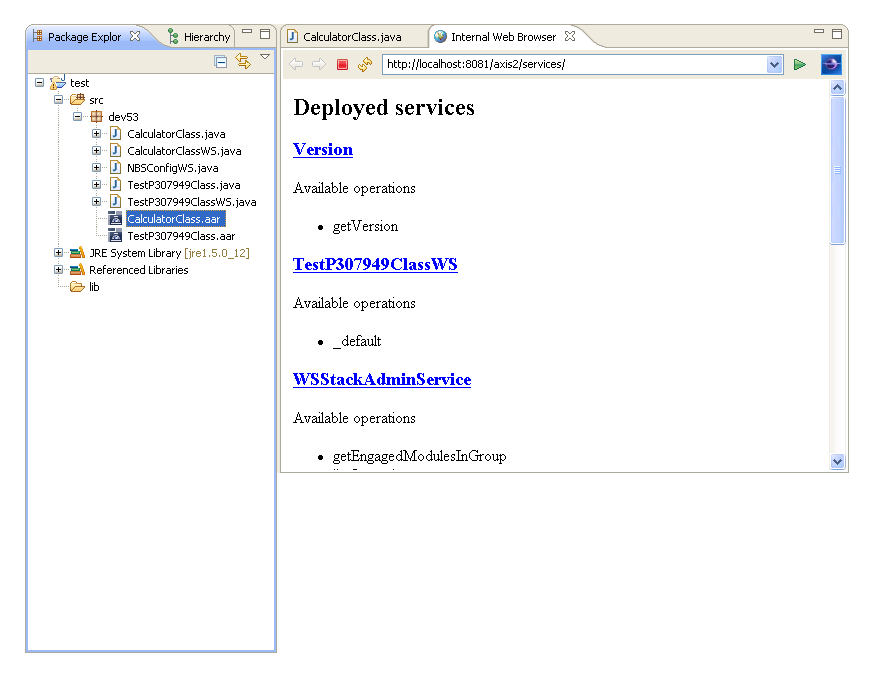
![]() To deploy to an internal Axis server:
To deploy to an internal Axis server:
Open the context menu for the .aar file in the Package Explorer view.
Select .
The deployed service is displayed in the Internal Web Browser view. For example:
The Web service can be deployed to an external application server. This functionality is handled by the WS-Stack plug-in. For information, refer to http://rndcvweb.eur.ad.sag/Projects/WSS/Kits/.
Before you can deploy the Web service, you must prepare the application server.
![]() To prepare the application server for Web service deployment:
To prepare the application server for Web service deployment:
Copy the NBSAxis2.war file to the ..\tomcat\webapps\Axis2 Install folder.
Note:
While deploying a Web service, the wizard can generate debug log
statements. For information, see
Generate log4J Log
Statements.
Tip:
After making changes (such as changing the Java runtime version used
by your classes and then redeploying the class), you may have to restart the
application server.
Tip:
If an error occurs while deploying a service to an external
application server, ensure that the Java version running on the server is
correct. To determine which version is running, open the context menu for your
Java project and select . View the Java
Build Path and verify the JRE system library setting.
When deploying a client proxy class as a Web service class, the Java Class wizard creates two files: the .aar file and the NBSConfigWS class. This class is responsible for creating the dispatcher and setting the credentials used to communicate with the server. If desired, you can override the connection settings generated into the NBSConfigWS class by overwriting the settings in the NBSAxis.properties file (located in C:\Documents and Settings\All Users\Application Data\Software AG\Natural Business Services\Configuration).
After generating a client proxy class, you can customize the code that was generated for a method or field used by the class. However, regeneration will overwrite your changes unless you place the following annotation immediately preceding the customized code:
@NBSPreserve("")
The annotation preserves the code for that method or field only.
Note:
Although providing a comment about the customization is optional, you
must include the comment indicators (i.e., the brackets and quotation
marks).
This section describes the contents of the generated client proxy classes, how to execute the methods of a client proxy, and how to use the Natural Business Services runtime client dispatcher. The following topics are covered:
Generated client proxy classes have the following contents:
This method contains a parameter called IRemoteCaller, which communicates with the server (it is also called a client dispatcher). You must create an instance of a class that supports the IRemoteCaller interface. Use the NBS runtime and ServiceFactory contained in the dispatchclient package to do this. For example:
import com.softwareag.nbs.bshelper.*;
import com.softwareag.nbs.dispatchclient.*;

Config.getDispatchClientConfig("c:/eclipse/plugins/com.softwareag.nbs.ui_5.3.1/DispatchClient.config");
IRemoteCaller dispatcher = ServiceFactory.createDispatcher("Default Broker");
dispatcher.setUserID("GUEST");
dispatcher.setPassword("");
dispatcher.logon();

CalculatorClass bs = new CalculatorClass();
bs.init(dispatcher);
Note:
Although calling the dispatcher.logoff()
method is not mandatory, it is recommended. Calling the logoff method is
important, especially with SPoD connections, as it releases server connections
sooner rather than waiting for them to be released during garbage collection.
Calling the logon method is mandatory.
When using the ServiceFactory to create an instance of IRemoteCaller, you must pass in the name of a connection ID. For example:
IRemoteCaller dispatcher = ServiceFactory.createDispatcher("My Connection");
This is the name you specified when creating new connections in the NBS Repositories view. You must also load the configuration file using the getDispatchClientConfig method of the Config object. For example:
Config.getDispatchClientConfig("c:/My NBS Files/DispatchClient.config");
Each method in the class corresponds to a method in the business service.
Each level 1 field from a PDA used in a business service becomes a Get/Set function of the class. Each group within a PDA becomes a subclass. For example, if the following definition is specified:
01 Group1
  02 Group2
    03 Field1 (A10)
The following is generated in the client proxy class:
public class Group1 {

  public class Group2 {

     public String getField1() {
       return pda_inputData.getString("Field1",_ax);
     }
  }
}
When executing a method of a client proxy class, use the BusinessServiceResult return value to check for communication and/or runtime errors. For example:
BusinessServiceResult bsr = businessSerivce.add(); // Invoke the add method.
if (bsr.isSuccess())
{
   // Success
}
else
{
   String s = bsr.getDispatchResult().toString();
}
If your business service was generated using code generation patterns, or it uses a standard error message parameter group, verify whether business service errors or warnings are present. The msg field will also contain status messages. For example:
if (bs.getMessage().getReturnCode() == "E")
{
  String s = bs.getMessage().getMsg(); // Error, warning or status message
  Int I = bs.getMessage().getMsgNr(); // Error number
}
The runtime client dispatcher that uses the IRemoteCaller interface has properties and methods you can use to provide additional functionality.
When creating dispatcher objects, you must set the correct user ID and password to be used for remote calls. For example:
dispatcher.setUserID("GUEST");
dispatcher.setPassword("secret");
You can invoke business services in a transactional context by using
the startTransaction, commit,
and abort methods. For example:
Service1 sv1 = new Service1Class();
Service2 sv2 = new Service2Class();

IRemoteCaller dispatcher = ServiceFactory.createDispatcher("Default Broker");
sv1.init(dispatcher);
sv2.init(dispatcher);

dispatcher.startTransaction();
// Call methods of sv1 and sv2.
...
// If successful calls
dispatcher.commit();
...
// If an error in a method
dispatcher.abort();
Note:
To control transactions, the same dispatcher object must be used
for each business service. For more information, see the Java transaction
example in the Samples folder. You can copy the Samples folder from the
installation CD.
While creating a Java class and deploying a Web service to an external application server (for example, Apache Tomcat), the wizard can generate debug log statements into each Web service method that corresponds to a business service method.
Each Web service request is recorded in a log file with the following information:
Name of the Web service (unique identifier)
User ID (found in DispatchClient.config)
Timestamp indicating when the application server retrieves the Web service (Start of Request)
Timestamp indication when the Web service leaves the application server (End of Request)
Calculated time difference between the two timestamps (Request Elapsed Time)
![]() To enable logging:
To enable logging:
Edit the log4j.properties file.
This file is located in a subfolder in the \NBSAxis2\WEB-INF\classes folder where your application server is running.
Add the following line:
log4j.logger.[package]=DEBUG, CONSOLE
where [package] is the Java package for your project
containing the generated Java and Web service classes. This will log all Web
services in this package to the log file.
Tip:
You can also include the class name after the package name, for
example [package].[classnameWS], which will enable logging for
that class only.
Restart your application server.
Entries will be written to log files for standard output.
The log files use the following naming convention:
stdout_[date].log
These files are stored in different locations, depending on the application server you are using. (For Apache Tomcat, they are stored in the Logs subfolder in which Tomcat is installed.)
For more information, see:
Log4J manual: http://logging.apache.org/log4j/1.2/manual.html
Using Log4J from Tomcat: http://tomcat.apache.org/tomcat-5.5-doc/logging.html