This section describes how to use the Natural Business Services Visual Studio add-in to generate a Web service that invokes a Natural subprogram (business service) over the inter/intranet via the W3C SOAP standard.
This section does not provide information about the following topics. We assume that you are either familiar with the topics or have access to other sources of information about them:
Microsoft Visual Studio
Natural programming language and environment
EntireX Communicator
XML, XSL
Web service technologies
HTML, JavaScript
Note:
If you are using Natural Construct and
Predict and will be generating Web services for
Natural Construct-generated subprograms, you should also be familiar with these
Software AG products.
![]() To create a Web service:
To create a Web service:
Create the Web service project (see Step 1: Create a Web Service Project).
Use the Business Service Explorer to locate the business service (see Use the Business Service Explorer).
Use the Web Service wizard to generate the service (see Generate a Web Service).
Edit the configuration files (see Modify Web.config Files).
Test the service (see Test a Web Service).
This section covers the following topics:
Natural Business Services creates Web services that invoke Natural objects from a Windows platform via standard XML conventions (SOAP, WSDL, XSD, etc.). These XML-based Web services provide a standard way to call and integrate existing or new Natural objects into other platforms and systems.
Natural Business Services simplifies the creation of Web service components; you do not have to write, develop, code, or compile in any language other than Natural. This SDK supports and utilizes the newest features of Visual Basic .NET, part of Microsoft’s Visual Studio .NET. Those who want to continue using Visual Basic can do so. Others can use the new framework that does not require Visual Basic coding, but takes advantage of the .NET platform. For advanced customizations, you can code in your choice of .NET languages, including Visual Basic, C#, J#, and JavaScript.NET.
Using the .NET technology, you can test existing Web service runtime and generation components that were written in Visual Basic and compiled as ActiveX/COM components. Or you can migrate these components to .NET and its common language runtime.
Note:
If you currently only use the runtime components to code custom
applications, you can continue to do so after migrating to Visual
Studio.NET.
Natural Business Services performs two functions:
Generates Web services for Natural objects
Integrates the Web services into application frameworks that support web (HTML) interfaces, based on .NET technology.
To create a Web service, you can use an existing Natural Construct-generated object browse or object maintenance subprogram on the server or any Natural subprogram that does not have a user interface. Natural Construct-generated objects include various methods, standards, and security integration that make generating a complete application time efficient and standardized. However, the ability to access any Natural subprogram provides the practical flexibility required in a production shop.
Natural Construct-generated objects interface with the middleware and client environments through the supplied middleware. Server application code is then ready to be accessed by any of the following:
Web service
HTML page
Visual Basic application
ActiveX component
This section describes how to use the Web Service wizard to generate a new Web service. The following topics are covered:
Notes:
Before you can create a Web service, you must first create a project into which you can generate the service.
![]() To create a new Web service project:
To create a new Web service project:
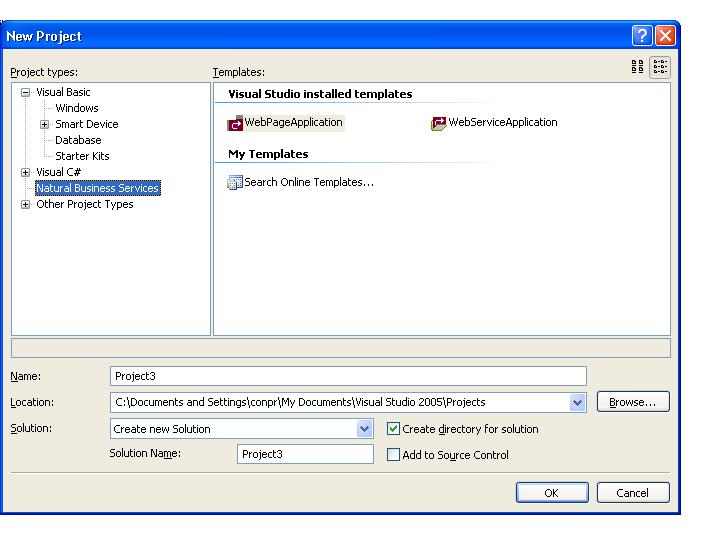
Select on the menu.
The New Project window is displayed.
Select Natural Business Services from the Project types list.
The list of available templates is displayed on the right. For example:
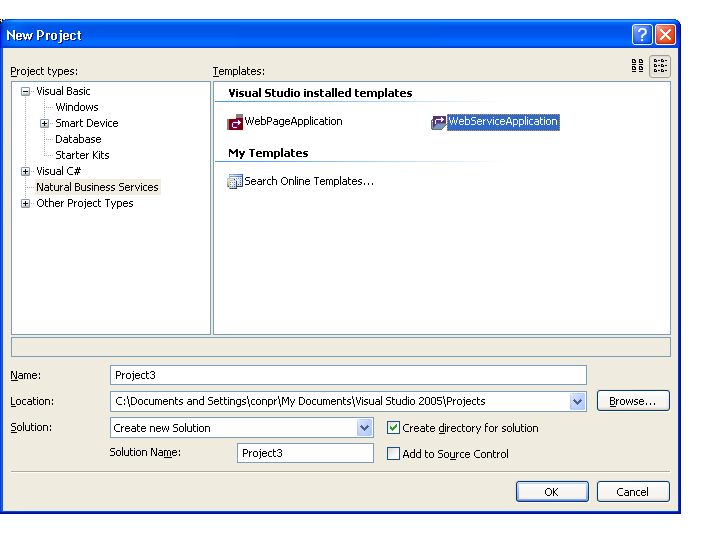
Select WebServiceApplication from Templates.
Provide the following information about the new project:
| Setting | Description |
|---|---|
| Name | Name of the new project. When naming
projects, the following restrictions apply to the name:
|
| Location | Location of the new project. |
| Solution name | Name of this solution. |
| Create directory for solution | If this option is selected, a directory is created for the solution. |
| Add to Source Control | If this option is selected, the project will be added to Source Control. |
Select to create the project.
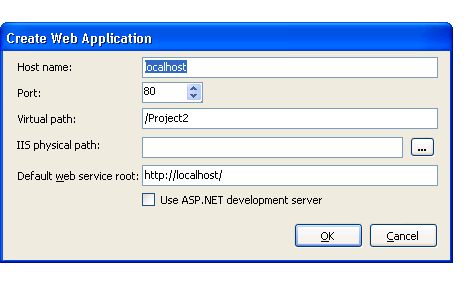
The Create IIS Application window for your project is displayed. For example:
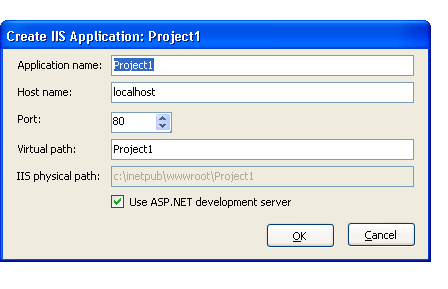
Provide the following configuration values for your new Web service project:
| Setting | Description |
|---|---|
| Application name | Descriptive name of the project. |
| Host name | Host name your services will run under. This name will be resolved by your DNS to a physical network address. |
| Port | TCP/IP port number your web server will run
on. This is either the port your existing IIS server is running on or the port
you want the ASP.NET server to run on.
Tip: |
| Virtual path | Path name or root name for the web server
used to access your Web service. The URL format is:
http://hostname:port#/virtual_path/service For example: http://myserver:8080/myservices/customerservice |
| IIS physical path | Location where your IIS server stores web
pages. The default location is:
c:\inetpub\wwwroot |
| Use ASP.NET development server | If this option is selected, your services will only run inside Visual Studio .NET using the ASP.NET development server. This option starts a small web server for use while you are running or testing your project. When your project is not running and Visual Studio is not open, the services will not be available. If you use the ASP.NET development server, you can later move your application to an IIS server by creating a virtual root in IIS and pointing to the physical location where you saved your project. For more information, see Use the ASP.NET Development Server. |
Select .
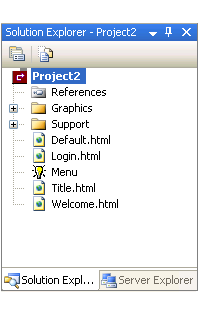
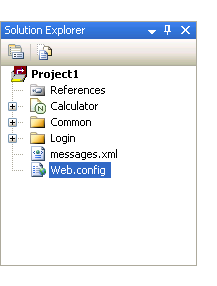
Natural Business Services adds the following items to the Visual Studio Solution Explorer. For example:
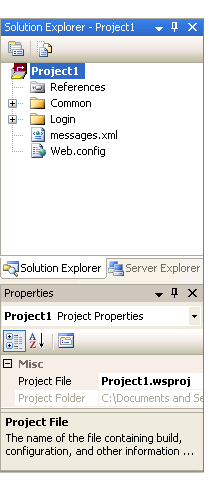
These items are common to all Web service projects. For example, you can use the Web.config node in the Solution Explorer to edit the Web.config file in Visual Studio and change the connection used by your Web services. For information, see Modify Web.config Files.
![]() To invoke the Web Service wizard:
To invoke the Web Service wizard:
Ensure the appropriate Web service project is active.
Locate the business service in the Business Service Explorer.
For information, see Use the Business Service Explorer.
Open the context menu for the service.
Select on the submenu.
The Start panel for the Web Service wizard is displayed.
Select to proceed.
Note:
If you do not want the Start panel displayed
when you use the wizard in the future, select Do not show this panel
again.
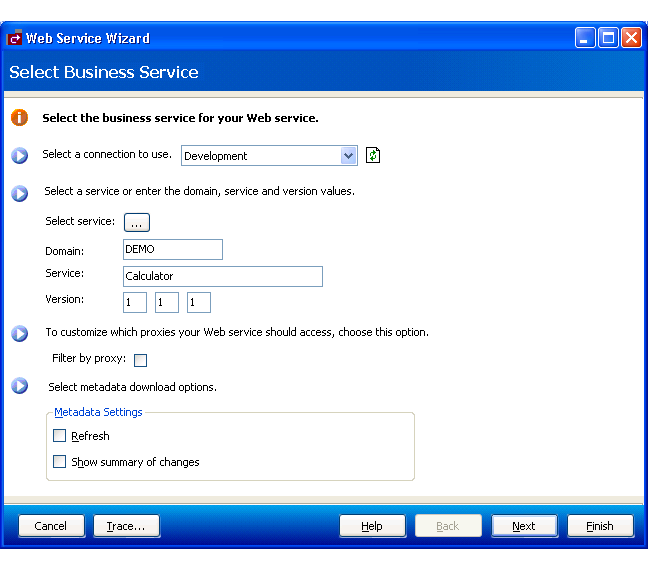
The Select Business Service panel is displayed.
![]() To select a service:
To select a service:
Ensure the appropriate connection is selected.
If the default is not appropriate, use the drop-down list to select the correct connection.
Select the business service for which you are generating this Web service.
To select the service, do one of the following:
Select the browse button (...). A window is displayed, showing the available business services.
Type the following:
The name of the domain in Domain.
The name of the business service in Service.
Optionally, type a version number in Version.
Optionally, select Filter by proxy to limit the number of subprogram proxies used for the Web service.
If you select this option, the Select Service Proxies panel is displayed. For information, see Filter by Proxy.
Optionally, select metadata options.
You can specify the following metadata options:
Refresh
Retrieves metadata from the server before configuring the methods, PDAs, and Web service.
Show summary of changes
Displays a summary report of any metadata changes.
Select to proceed.
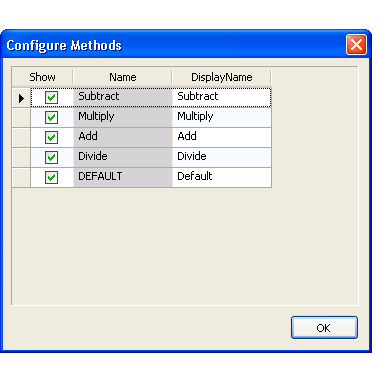
The Configure Methods panel is displayed.
If you select Filter by proxy on the Select Business Service panel, the Select Service Proxies panel is displayed. For example:
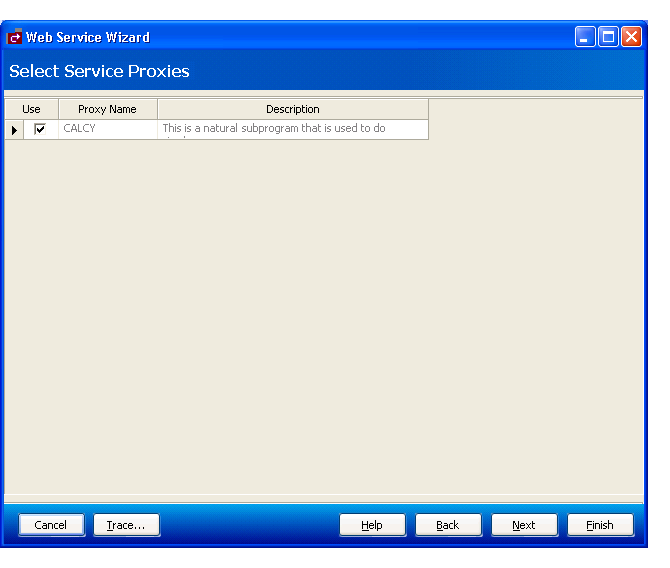
Use this panel to indicate which subprogram proxies to use for your Web service. After selecting or de-selecting the proxies, select to proceed.
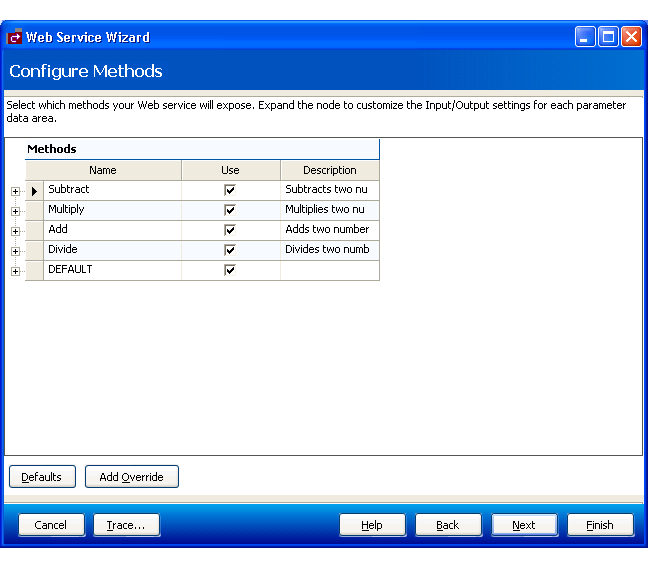
When you generate a Web service for a
Natural subprogram, you must decide which methods
(actions) will be permitted on the client. For example, most subprograms
support the DEFAULT method, browse subprograms also
support the BROWSE method, and maintenance subprograms
support the methods shown above.
Typically, the wizard-generated defaults are sufficient. However, you can use this panel to customize the methods and Input/Output settings your Web service will expose to the user, as well as any field overrides for server data.
Note:
The buttons displayed for methods on maintenance pages and pages
generated for non-Natural Construct-generated subprograms are generated
generically at runtime using XSL and the method names selected for the Web
service.
![]() To configure the methods:
To configure the methods:
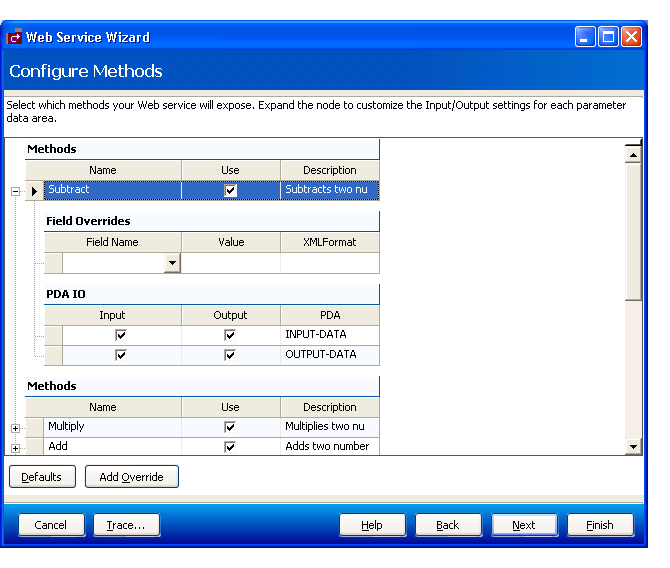
Open the node for each method.
Define any field overrides for the method.
For information, see Add Override.
Verify the Input/Output settings for each PDA used by the method.
To re-display all default values, select .
If you intend to use the Web Application wizards, select the appropriate BDTs and levels of redefinition within the data PDAs (maintenance PDA for the maintenance module and row PDA for the browse module). As state must be maintained, do not eliminate any fields from a Natural Construct-generated maintenance module (although the fields can be hidden using the Web Page wizard). Accept the defaults for any other Natural Construct-supplied PDA.
Select to proceed.
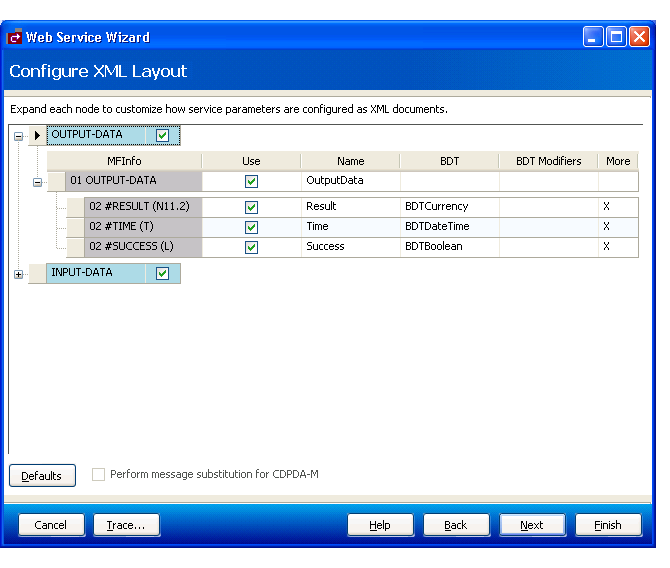
The Configure XML Layout panel is displayed.
A field override initializes custom data in the PDA before sending the
data to the server. The data does not have to be public to the client. An
example of this functionality is overriding an input value. For example,
CITY='TORONTO' forces the CITY value to be Toronto, even if
another value was passed to the website.
The Web Service wizard assigns the appropriate value to CDAOBJ2.#FUNCTION, which determines the default action applied to a Natural Construct-generated maintenance object. For an example of this, open the NEXT method and look at the override for CDAOBJ2.#FUNCTION. If you know the intended values for a field, you can apply similar techniques to modules that were not generated by Natural Construct.
You can also use the override option for security purposes. For example, if the Web service is intended for a specific city, you can set the override for the City field to that city only. Any other value in the City field is ignored and the user only receives data for the specified city — even if other data exists.
![]() To add a field override:
To add a field override:
Select on the Configure Methods panel.
The Field Overrides fields are displayed. For example:
Select the field name from Field Name.
Specify the override value.
Specify the XML format or tag name.
![]() To remove a field override:
To remove a field override:
Select the field name.
Press Delete.
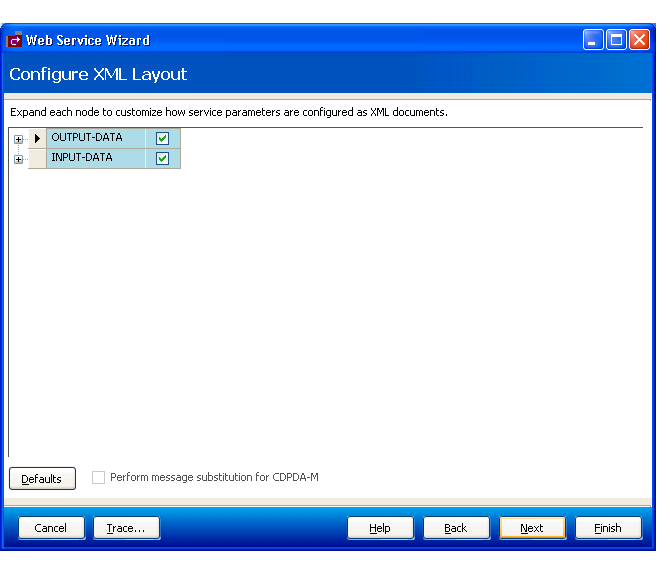
Use this panel to indicate which server fields the Web service will make public to the client.
The following example shows the expanded OUTPUT-DATA node:
You can also use this panel to do the following:
Override global configuration settings.
To override the global Web.config file settings, use BDT modifiers. For more information, see Modify Web.config Files and BDT Modifiers.
Configure array fields.
You can eliminate unnecessary XML nodes that appear in array fields. For more information, see Modify Array Fields.
Create multilingual Web services.
If you are using message numbers in CDPDA-M for your Web service (because the subprogram was generated with the message number option), select Perform message substitution for CDPDA-M. At runtime, Natural Business Services scans for the :1::2::3: place holders and retrieves the appropriate message. This option is selected by default if CDPDA-M is available for this Web service.
Tip:
If you are not using message numbers, de-select this option to
eliminate unnecessary CPU usage.
Note:
To re-display all default values, select
.
![]() To configure the XML layout:
To configure the XML layout:
Select each node.
The MFInfo read-only settings show the level and Natural name and format for each field in the PDA. The modifiable settings show the client name for the field, the business data type (BDT), and the BDT modifiers. BDTs provide a way to present data to the user in a format that is consistent and based on business conventions, rather than on programming language conventions. For example, a BDT can format a phone number with dashes (-) so it is easily recognized as a phone number. For more information, see Use Business Data Types (BDTs).
Optionally, select the More field to define the number of occurrences of an array returned from Natural.
For information, see Modify Array Fields.
Select or de-select fields in each PDA used by your Web service.
Important:
If a field is not selected and an update is performed, the
data in the non-selected field is blanked out at runtime. De-selection of a
field implies that the field value is blank when it reaches the server, unless
a value is assigned by a field override.
Define the XML tag name or format for each selected field, if required.
Select to proceed.
The Name Web Service panel is displayed.
This section describes how to modify the number of occurrences of an array field.
![]() To modify the number of occurrences of an array field:
To modify the number of occurrences of an array field:
Select More for an array field on the Configure XML Layout panel.
The Advanced PDA Configuration window is displayed. Use this window to specify one of the following options:
| Option | Description |
|---|---|
| None | All occurrences of the array are represented by XML nodes. |
| Stop blank field | All occurrences of the array are represented as XML nodes until the first blank node is encountered. |
| Control field | Use a control ©#) field to indicate the number of occurrences returned from Natural. |
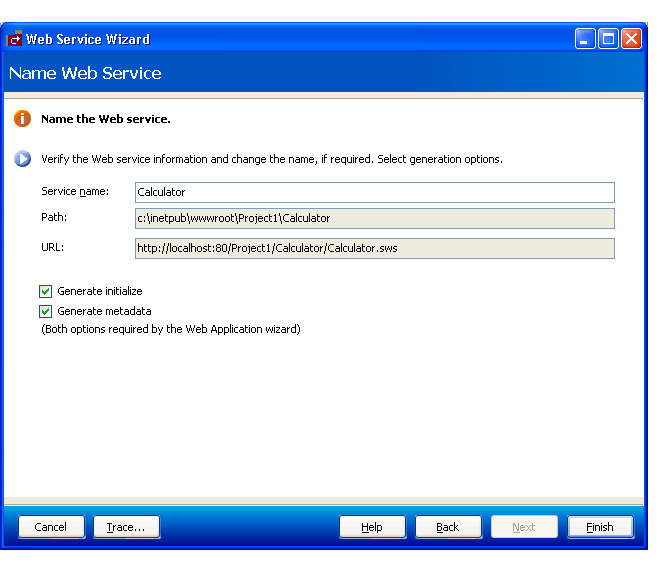
Use this panel to verify the service information, such as the name of the service, the path, and the URL to invoke the service.
You can also select Generate initialize to generate local initialization data (for example, create WSE_Initialize) or select Generate metadata to create an xml file containing metadata for the Web Application wizard (metadata.xml), such as the name of the primary key and the hold field, the types of PDAs used by the service, a description of the object, and the Predict data. These options are required when using the Web Application wizard to build your web application.
![]() To name the Web service:
To name the Web service:
Type a name of your Web service in Service name.
Verify the following settings:
| Setting | Description |
|---|---|
| Path | Path to the local folder containing the Web
service.
Note: |
| URL | URL used to invoke the Web service. |
Important:
If you intend to use the Web Application wizard to build
your web application, do not de-select Generate initialize
or Generate metadata.
Select to generate the Web service.
The Generate Status window is displayed, showing the progress of the generation. When generation is completed, the window shows the names of the files generated for the Web service. For example:
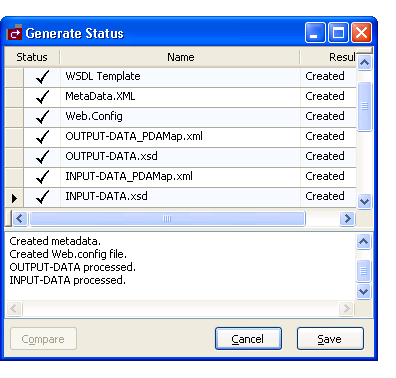
The Results column indicates that the generated files have been generated for the first time (New).
Note:
To return to the wizard without saving the files, select
.
Select to save the files.
The Web service is now displayed in the Solution Explorer. For example:

You have successfully generated and saved a new Web service.
For information on testing the Web service, see Test a Web Service.
For information on creating a web application for your Web service, including web pages and menus, see Build a Web Application.
In addition to creating new Web services, you can use the Web Service wizard to retrieve and regenerate the specifications for an existing Web service.
| Warning: Regeneration may affect the code generated by the Web Application wizards. |
![]() To regenerate an existing Web service:
To regenerate an existing Web service:
Open the context menu for the Web service root node in the Solution Explorer.
Select one of the following options on the submenu:
| Option | Description |
|---|---|
| Show Wizard | The Start panel for the
Web Service wizard is displayed. Edit the panels as desired and select
on the last panel. The Generate
Status window is displayed. The Results column indicates whether a
file is the same as the previous generation or different from the previous
generation. If a file is different, select the file and select
to invoke your code comparison tool.
Important: |
| Regenerate | The Web service is regenerated without displaying the wizard panels. |
If you make changes to a generated Web service and do not change the Web.config file, the updates will not be accessible to users invoking your service. To make the changes accessible, do one of the following:
Recycle IIS (Internet Information Server)
Unload the Root application
Save the Web.config file
Business data types (BDTs) help ensure that information is displayed in a way that is consistent and easy to understand. BDTs convert Natural data types into values displayed to the user in a browse or maintenance window. For example, a BDT can reformat a telephone number that was entered without dashes. Using BDTs offers three primary benefits:
Consistency
BDTs ensure that each data type is displayed to the user in a consistent format.
Flexibility
BDTs recognize a variety of input formats, which makes using the Web service easier.
Accuracy
BDTs centralize the validation code for a data type and provide a consistent mechanism for returning validation error messages.
Natural Business Services supplies a number of predefined BDTs you can use — or you can create your own. If there is a piece of information whose format you are constantly validating, consider creating a BDT to handle it. Once a BDT has been created, you can use it in other Web services. For more information, see Create a Custom BDT.
This section covers the following topics:
Some of the BDTs include modifiers, additional parameters you can use to further refine the display of data. For example, you can use BDTAlpha with a modifier of CASE=U to convert the contents of a field into upper case.
You can also specify more than one BDT modifier for a field. For example, you can use BDTNumeric with modifiers of ROUND=1 | GS=ON to round the field value to one decimal and display the group separator (separator for numeric values in the thousands).
Note:
Use the "|" character to separate multiple BDT
modifiers.
Natural Business Services supplies several BDTs you can use to format input data. The following table lists the supplied BDTs, as well as the Web service and Predict keywords:
| BDT Name | Type | Applied to | Predict Keyword |
|---|---|---|---|
| BDTAlpha | Alpha | Alphanumeric data | BDT_Alpha |
| BDTBoolean | Boolean | Data that can have a value of either true or false | BDT_Boolean |
| BDTCurrency | Currency | Currency data | BDT_Currency |
| BDTDateTime | Date/Time | Date and time data | BDT_Date/BDT_Time |
| BDTHexByte | Hex byte | Hex data in a string format | BDT_HexByte |
| BDTNumeric | Numeric | Numeric data | BDT_Numeric |
| BDTPhone | Phone | Data that represents a phone number | BDT_Phone |
| BDTPostalCode | Postal code | Data that represents a postal code | BDT_PostalCode |
The following sections describe the supplied BDTs and the modifiers each supports.
Note:
BDTPhone and BDTPostalCode do not support
modifiers.
BDTAlpha is applied to alphanumeric data.
| Modifier | Description |
|---|---|
| CASE=U|L | Forces the text into upper case (U) or lower case (L). If you do not specify this modifier, the default is to not change the case. This modifier affects ConvertToDisplay and ConvertFromDisplay behavior. |
| HEXString=True | Formats output into a string of hex numbers and
vice versa. For example:
                 Server (ASCII)       Client
                 06  31  95  49                 “06  1F  5F  31”
_ 1 (printable characters) |
| NullString=custom text | Replaces null characters with custom text. By default, EBCDIC “OO” on the server becomes “{~NULL~}” (NullChar) in the Web service. |
| TRIM=L|T|LT | Trims leading spaces (L), trailing spaces (T), or leading and trailing spaces (LT). If you do not specify this modifier, the default is no trimming. This affects ConvertToDisplay and ConvertFromDisplay behavior. |
BDTBoolean is applied to data that can have a value of either False or True.
| Modifier | Description | ||
|---|---|---|---|
| O/I=<False>|<True> | Displays Output (False) or Input (True) settings. The default is False. | ||
| EM=<False>|<True> | Displays the <False> string
for False and the <True> string for True. The default is EM=False|True.
ConvertFromDisplay compares the formatted data to the <False> and
<True> strings and recognizes a match if the value unambiguously matches
the beginning of either string. The modifier syntax is not case-sensitive.
Note: The following examples show various types of edit mask values, user input, and results: |
||
|
EM Value
|
User Input
|
Formatted Value
|
|
| EM=False|True | T, t, tr, TRU, F, false, yes, <blank> | True, True, True, True, False, False, Error: Invalid, Error: Invalid | |
| EM=True|False | true, F | False, True | |
| EM=Off|On | off, on, o | False, True, Error: Ambiguous | |
| EM=|X | x, <blank>, xx | True, False, Error: Invalid | |
Note:
If you are using the Web Page wizard and have set non-standard
BDTBoolean values, modify the evaluateBoolean function in the
NBSShared.js file.
BDTCurrency is applied to any currency values.
| Modifier | Description |
|---|---|
| BRACKETS=OFF/ON | Displays negative numbers within brackets. For example, if "BRACKETS=ON", -124.22 is displayed as (124.22). |
| ZERO=OFF|ON | Suppresses (OFF) or displays (ON) zero values. The default is ON. |
BDTDateTime is applied to any date or time value.
| Modifier | Description |
|---|---|
| DisplayDateFormat, DisplayTimeFormat | ConvertToDisplay formats the Date (DisplayDateFormat) or Time (DisplayTimeFormat). For the syntax for the format string, see MSDN. |
| ISDate=<True>|<False> | Converts Date (True) or Time (False). |
| XML=<True>|<False> | Converts to or from an XML compliant string. |
Note:
If the date field does not contain a date (is null) in
Natural, the BDTDateTime outputs an empty string in
XML.
BDTHexByte is applied to hex data in a string format.
| Modifier | Description |
|---|---|
| HexPrefix, HexSuffix | Indicates the string used at the beginning
(HexPrefix) or end (HexSuffix) of hex data.
Note: |
BDTNumeric is applied to any numeric data.
| Modifier | Description |
|---|---|
| DEC=n | Forces the display of n decimal places. The
default is to display as many decimal places as there are significant decimal
digits when the Natural format is not provided, or
to use a fixed number of decimal places if the
Natural format is provided. In this latter case, use
DEC=-1 to ignore the Natural format and
display significant decimal digits only.
|
| BRACKETS=OFF/ON | Displays negative numbers within brackets. For
example, if BRACKETS=ON, -12.5 is displayed as (12.5).
|
| EM=xxx | Formats any format string understood by the Visual Basic Format function. ConvertToDisplay uses the Format function to format the value according to that format string. |
| GS=OFF|ON | Used to suppress (OFF) or display (ON) group separators (thousands separators). The default is OFF. |
| ROUND=n | Rounds the value to n decimal places. If n is negative, it rounds to the left of the decimal. The default is no rounding. |
| SCIENTIFIC=OFF|ON | Displays the value in normal (OFF) or scientific notation (ON). The default is OFF. |
| SIGN=OFF|ON | Suppresses (OFF) or displays (ON) the sign for positive numbers. The default is OFF. |
| ZERO=OFF|ON | Suppresses (OFF) or displays (ON) zero values (for output only). The default is OFF. |
If an error occurs on any wizard panel, Natural Business Services displays an error window pointing to the field in error. The following example shows the Select Business Service panel with an error in the Domain field:
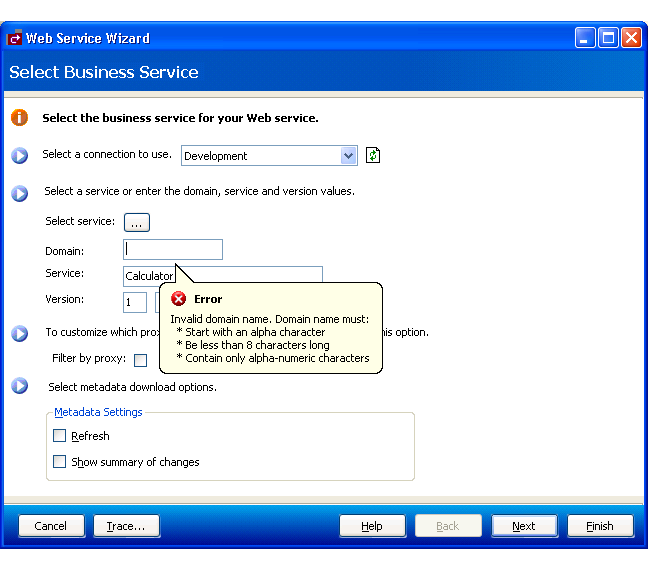
The Error window describes the error. In this example, the domain name for the Web service was not supplied. To continue creating the Web service, you must enter the name of a domain.
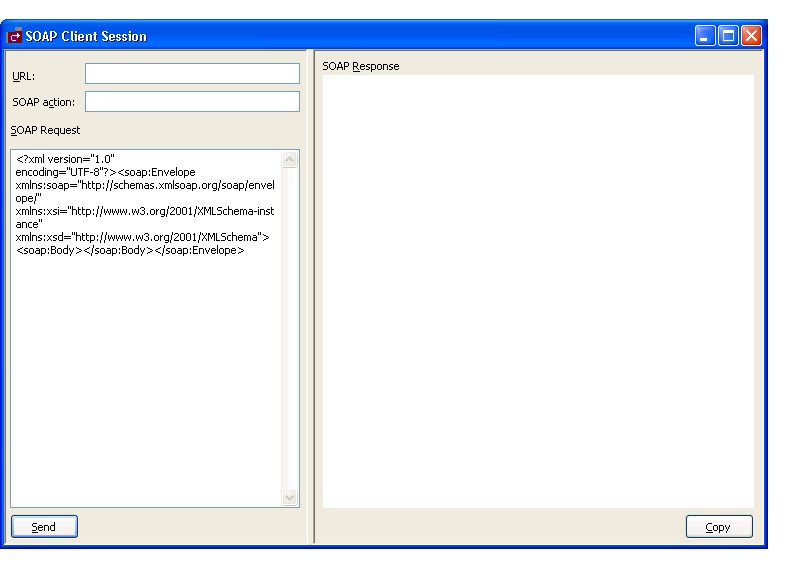
Use the SOAP Client testing tool to test your generated Web service. SOAP (Simple Object Access Protocol) is part of the Web service definition and contains the XML message sent via HTTP. A Web service sends PDA data in the form of an XML document inside a SOAP document. The SOAP document contains the format of the message used on the wire to receive and respond to Web service requests, including information that indicates which method is being invoked. The response is returned via a SOAP document. Standard SOAP technologies, such as the SOAP:Fault section, are used to transmit error and status information.
Tip:
You can use the SOAP Client to test any Web service, not just a
Natural Business Services-generated Web service.
In the SOAP Client, which is case-sensitive, the SOAP actions correspond to the methods defined for the subprogram. The URL is the URL set up in the configuration file. For example:
http://localhost/NBSDemos/WebServices/Calculator/Calculator.sws
For examples of input to the SOAP Client, see the Samples directory.
Note:
To view the incoming and outgoing data while your Web service is
running, use the Trace utility in the Microsoft SOAP toolkit.
![]() To test your generated Web service:
To test your generated Web service:
Open the context menu for the Web service in the Solution Explorer.
Select on the submenu.
Do one of the following:
Press PF5.
Select the menu in Visual Studio.
This will start the ASP.NET server and display the SOAP Client Session window, if necessary. For example:
The results of the test are displayed in the Output window.
Tip:
If the server does not start, check the project properties in the
Properties pane and ensure the correct port number is being used and/or check
the status of your IIS server.
Tip:
Save time by using the menu to save and load
previously issued requests.
Tip:
Use the WSE_INITIALIZE method to retrieve
sample values.
You can change the default connection ID used for SOAP requests by modifying the global Web.config file and the SOAP header. For information, see Modify Web.config Files and ConnectionID.
After generating and testing your Web service, you can create a web application for your service. A web application consists of a menu and a collection of related web pages.
Applications built using the Visual Studio add-in have a unique architecture that runs completely in the browser and submits Web service requests to previously generated services. The builder creates an HTML page containing JavaScript that uses Microsoft XML ActiveX components to directly parse and submit XML SOAP documents to the IIS (Internet Information Server) hosting your generated Web services. The JavaScript then receives the XML SOAP response and applies a generated XSL template to transform the data into an HTML user interface. This architecture has numerous advantages, including a better separation of business and presentation logic and increased network performance. Network performance is increased because the browser only sends and receives the data (in XML format) — not the entire HTML presentation.
Note:
Applications built using the Visual Studio add-in only run in
Internet Explorer 5.0 or higher and require the ActiveX scripting security
settings in Internet Explorer to be enabled.
To build a web application:
Before creating a web application, you must create a web application project and/or have one or more Natural Business Services-generated Web services running on an IIS web server with the Download metadata option enabled.
![]() To create a web application project:
To create a web application project:
Select on the menu.
The New Project window is displayed.
Select Natural Business Services from the Project types list.
The list of available templates is displayed. For example:
Select WebPageApplication from Templates.
Provide the following information about the new project:
| Setting | Description |
|---|---|
| Name | Name of the new project. When naming
projects, the following restrictions apply to the name:
|
| Location | Location of the new project. |
| Solution name | Name of this solution. |
| Create directory for solution | If this option is selected, a directory is created for the solution. |
| Add to Source Control | If this option is selected, the project will be added to Source Control. |
Select to create the project.
The Create Web Application window is displayed. For example:
Provide the following configuration values for your new web application project:
| Setting | Description |
|---|---|
| Host name | Name of the host your web application will run under. This name will be resolved by your DNS to a physical network address. |
| Port | TCP/IP port number your web application will
run on. This is either the port your existing IIS server is running on or the
port you want the ASP.NET server to run on.
Tip: |
| Virtual path | Path name or root name for the web server
used to access your Web services. The URL format for the web application is:
http://hostname:port#/virtual_path/page.html For example: http://myserver:8081/myservices/mainpage.html |
| IIS physical path | Location where your IIS server stores web
pages. The default location is:
c:\inetpub\wwwroot |
| Default web service root | Default location of the Web service directory. |
| Use ASP.NET development server | If this option is selected, your web application will only run inside Visual Studio .NET using the ASP.NET development server. This option starts a small web server for use while you are running or testing your project. When your project is not running and Visual Studio is not open, the services will not be available. If you use the ASP.NET development server, you can later move your web application to an IIS server by creating a virtual root in IIS and pointing to the physical location where you saved your project. For more information, see Use the ASP.NET Development Server. |
Select .
Natural Business Services adds the following items to the Visual Studio Solution Explorer:
These items are common to all web application projects.
You can now invoke wizards to generate a web page and menu for your new web application.
For information on creating a web page, see Step 2: Generate a Web Page.
For information on creating a menu, see Step 3: Generate the Menu.
![]() To use the ASP.NET development server:
To use the ASP.NET development server:
Display both projects (Web service and web application) in the Solution Explorer.
Define both projects as startup projects (open the context menu for the solutions and select ).
Set the Use SoapClient option to False for the Web service project (open the context menu for the Web service project and select ).
Ensure both projects use a separate port number (open the context menu for each project and select ).
Run the solution.
Press F5 or select on .
Next, use the Web Page wizard to generate a maintenance or browse page for your web application. The following example generates a maintenance web page for the Web service generated in Generate a Web Service.
![]() To generate a web page for your web application:
To generate a web page for your web application:
Open the context menu for the web application project in the Solution Explorer.
Select on the submenu.
The Add New Item window is displayed. For example:
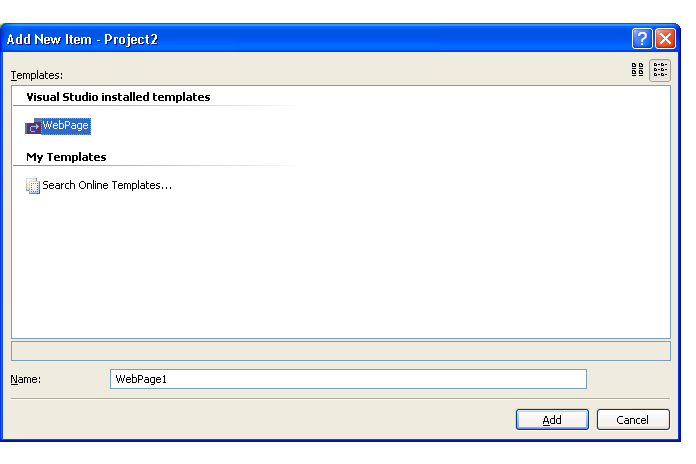
Select WebPage.
Type a name for your web page in Name.
Select .
The Start panel for the Web Page wizard is displayed. This panel is similar for most wizards.
Select to proceed.
The Select Web Service panel is displayed. For example:
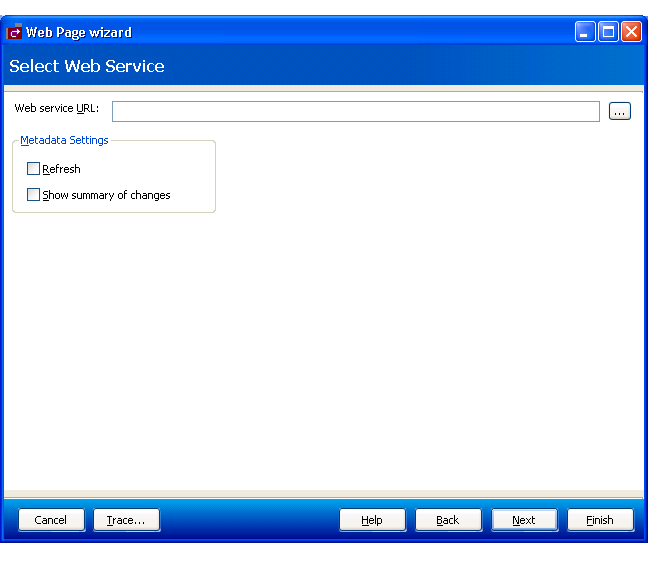
Use this panel to identify the location of the Web service for your web page. You can also use this panel to indicate the following metadata options:
| Option | Description |
|---|---|
| Refresh | Retrieves metadata from the server before configuring the page. |
| Show summary of changes | Displays a summary report of any metadata changes. |
Type the location of the Web service (from an existing project or from a service that is running under IIS) in Web service URL.
Select the browse button (...).
Select the Web service.
For example:
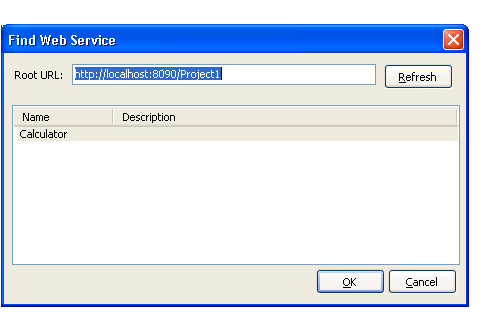
Select .
The URL for the service is displayed. For example:
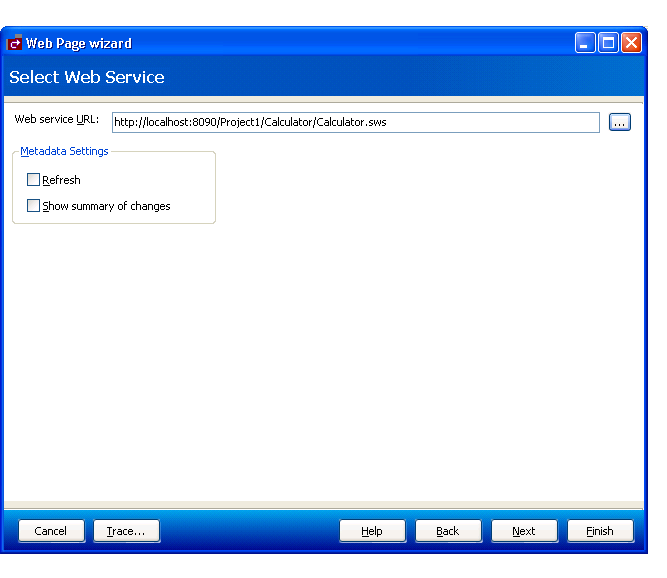
Select to proceed.
The Configure Page panel is displayed. For example:
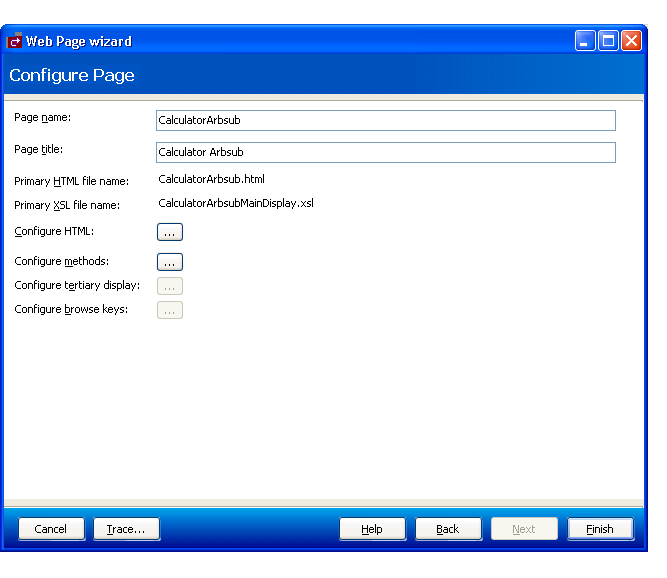
This panel shows the default name of the web page, page title, and the primary HTML and XSL file names. Optionally, you can use this panel to access the following options:
| Option | Description |
|---|---|
| Configure HTML | Tailor the HTML for your web page. It includes advanced options, such as linking web pages or defining the value list. For information, see Configure HTML Option. |
| Configure methods | Indicate which methods are available on your web page. For information, see Configure Methods Option. |
| Configure tertiary display | Define the headings for tertiary data displayed on your web page. For information, see Configure Tertiary Display Option. |
| Configure browse keys | Define which fields are available to browse on your web page. For information, see Configure Browse Keys Option. |
Select .
The Generate Status window is displayed.
Select to save the web page files.
Your web page is added to your web application. Next, you can generate a menu for your web application. For information, see Step 3: Generate the Menu.
This section describes how to configure the HTML for your web page.
![]() To configure the HTML for your web page:
To configure the HTML for your web page:
Select on the Configure Page panel.
The Configure HTML window is displayed. For example:
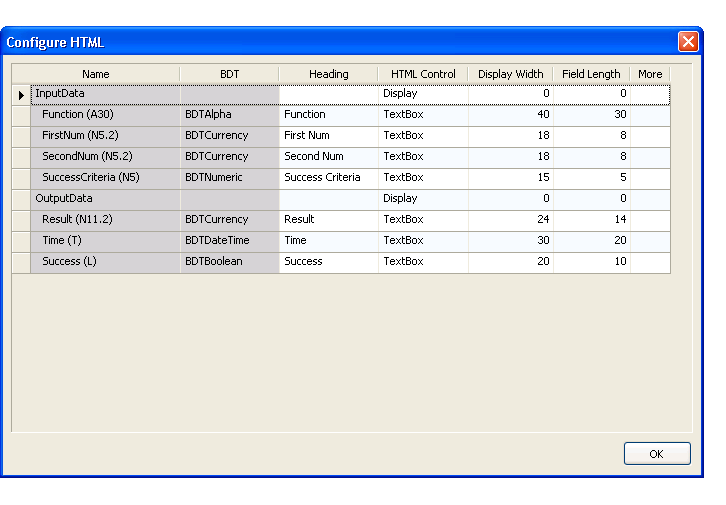
Use this window to indicate how information is displayed on your web page.
Specify the following options to perform the associated tasks:
| Option | Task |
|---|---|
| Heading | Change the prompt displayed for the field. |
| HTML Control | Change the HTML control for the field (for example, changes a text box to a combo box). For a description of the HTML controls, see HTML Controls. |
| Display Width | Change the display size (width) of the field. |
| Field Length | Change the length of data that can be entered in the field. |
| More | Set advanced HTML options, such as linking your web page to other web pages or specifying the value list. For information, see Set Advanced HTML Options. |
The following table describes each HTML control, as well as any requirements for the control and the values to which the control applies:
| HTML Control | Description | Requirements | Applies to |
|---|---|---|---|
| CheckBox | Check box | Boolean | Boolean values |
| Combo Box | Drop-down selection box | Values provided by the Value list (see Define or Edit Values for the Value List) | Elementary values |
| Display | Read only | None | All variables |
| Hidden | Invisible | None | All variables |
| RadioButton | Selection buttons | Values provided by the Value list (see Define or Edit Values for the Value List) | Elementary values |
| TextArea | Multi-line text box | One-dimensional array | One-dimensional arrays |
| TextBox | Standard input | None | All variables |
Note:
If you select a display option of Hidden at a group level for an
HTML control, no field is displayed in the group — regardless of the display
options selected at the field level.
You can set advanced HTML options if desired. For example, you can link multiple web pages and/or provide a list of valid values for a field.
![]() To set advanced HTML options:
To set advanced HTML options:
Select More for a field on the Configure HTML panel.
The browse button (...) is displayed.
Select the browse button.
The Advanced Options window is displayed, showing the options on the Linking tab:
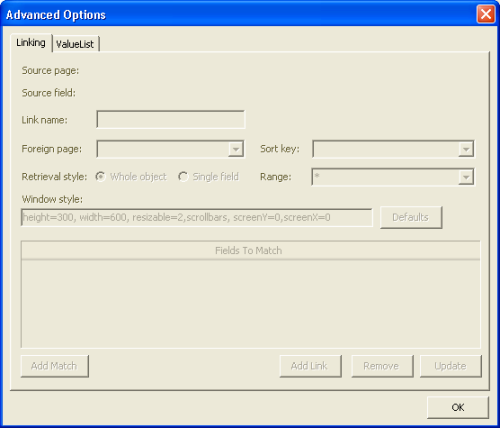
The Linking tab allows you to specify links between web pages, update links between pages, or remove links between pages. For example, you can link a customer browse page to an order browse page. When users select a customer number on the customer page, they can drill-down to details about all orders for that customer. Or you can link an order browse page to an order maintenance page. When users select an order on the order browse page, they can drill-down to the order maintenance page.
You can also use the ValueList tab in this window to define or edit the list of valid values for a combo box or radio button.
![]() To add a link between web pages:
To add a link between web pages:
Select .
The names of the source page and source field are displayed and other fields in the window become active.
Type a name for this link in Link Name.
Select the page you want to link your web page to from Foreign page.
When linking a maintenance page to a browse page, the code is generated as follows:
| A lookup for a whole object | For example, you can browse the Customer file and select a customer for maintenance activities. All the data for the Customer object is then displayed on the maintenance page for that customer. |
| A lookup for a single field | For example, if you do not know the warehouse ID, but you know the name of the warehouse, you can browse the Warehouse file until you find the one you want, select the warehouse, and the warehouse ID field is populated. |
Select the matching field from Fields to Match.
This option differs, depending on the retrieval style:
| A lookup for a whole object | For this option, provide the matching fields for this object. If the object was Order line, for example, users can provide an order and line number and then information for the whole object is returned, such as the quantity, unit price, line total, etc. |
| A lookup for a single field | For this option, the matching fields are similar to a look up. For example, you can attach a browse page to the warehouse ID field so users can browse through the Warehouse file by name. After they select a warehouse, however, only the warehouse ID field is populated on the maintenance page. |
Select .
Note:
Typically, linked web pages show up as windows. To change the
size or display characteristics of the windows, select
and specify the style using the parameters
provided in Window style.
If the Linking option is defined, an L is displayed in the corresponding More column on the Configure HTML panel.
![]() To define or edit values for the Value list:
To define or edit values for the Value list:
Select the ValueList tab in the Advanced Options window.
The following example shows the values for the Province field:
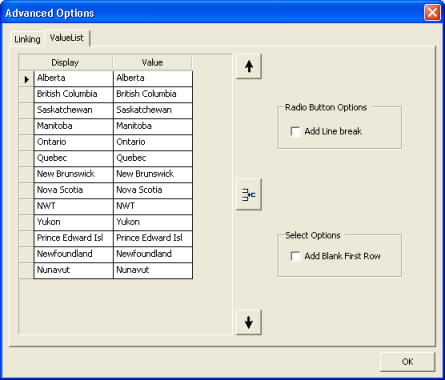
The list is populated from table verification rules attached to fields in Predict.
Note:
: Predict only populates the list if
values are defined for the field. If there are no values in
Predict, you can add your own values to the
list.
Use the ValueList tab to:
Add, remove, or update the list of valid values for a combo box or radio button.
Use the arrow and insert keys to position values on the list.
Add a line break after each radio button.
To add <BR> to the HTML after each radio button, select Add line break.
Display a blank if the value is blank.
To display a blank, instead of the first value for a field, select Add blank first row. This option is useful if you do not want data displayed on the screen.
If the ValueList option is defined, a V is displayed in the corresponding More column on the Configure HTML panel.
This section describes how to configure the methods available for your web page.
![]() To configure the methods for your web page:
To configure the methods for your web page:
Select on the Configure Page panel.
The Configure Methods window is displayed. For example
This example shows the methods available for a maintenance web page.
Tip:
To initialize the page locally, select
WSE_INITIALIZE.
Indicate which methods are available on your web page or change the name displayed on the web page for that method (for example, change “Store” to “Add”).
This section describes how to configure the display of a tertiary group.
![]() To configure the tertiary display for your web page:
To configure the tertiary display for your web page:
Select on the Configure Page panel.
The Tertiary Display window is displayed. For example:
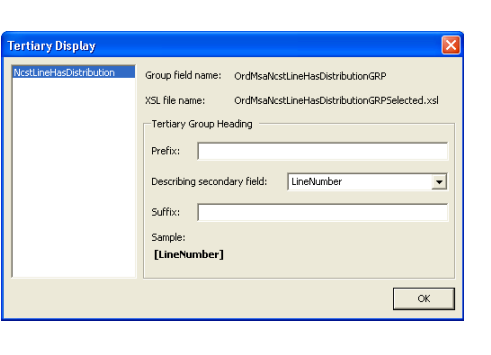
When displaying a tertiary group, a two-dimensional array must be presented in a one-dimensional window. To handle this complexity, only one occurrence of one of the dimensions is displayed at one time. For example, each order line is associated with one or more distributions. Only the distributions associated with the current order line are displayed at one time. To distinguish between lines, a field on the secondary file (for example, line number) can be displayed as part of the header, along with a prefix and/or suffix.
Define the headings displayed in the tertiary grid.
In this example, you can use Prefix to define the beginning of the heading for LineNumber and use Suffix to define the ending. For example, if the:
Line number is “111”
Prefix is “Product”
Suffix is “Row”
The tertiary group heading is:
“Product 111 Row”
This section describes how to configure the browse keys for a browse web page.
![]() To configure the browse keys for a browse web page:
To configure the browse keys for a browse web page:
Select on the Configure Page panel.
The Configure Browse Keys window is displayed. For example:
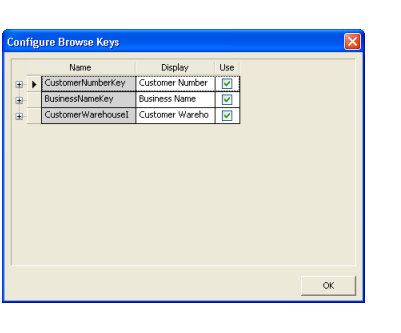
Select which fields will be available to browse on your web page.
The Web Page wizard supports user exits for generated JavaScript in the HTML files. The syntax is:
//<nbs:exit Name="Exit Name">
//</nbs:exit>
You can place custom code between the start and end nbs:exit XML tags contained in JavaScript comments (//). Exits are placed at strategic locations within the code, but you can also modify the code frames to add your own exits. For more information, see the code frames folder.
The Web Page wizard supports regeneration.
![]() To regenerate a web page:
To regenerate a web page:
Open the context menu for the web page in the Solution Explorer.
Select one of the following options on the submenu:
| Option | Description |
|---|---|
| Show Wizard | Displays the Start panel for the Web Page wizard. Edit the panels as desired and select on the last panel. The Generate Status window is displayed, showing which files were changed during regeneration. Select to save the changes. |
| Regenerate | Regenerates the web page without displaying the wizard panels. |
For your web application to run, you must create the main menu. The following example generates a menu for the web page generated in Step 2: Generate a Web Page.
![]() To generate a menu for one or more web pages:
To generate a menu for one or more web pages:
Open the context menu for Menu in the Solution Explorer.
Select on the submenu.
The Start panel for the Menu wizard is displayed.
Select to proceed.
The Configure Menu panel is displayed, showing all pages created for the selected application. For example:
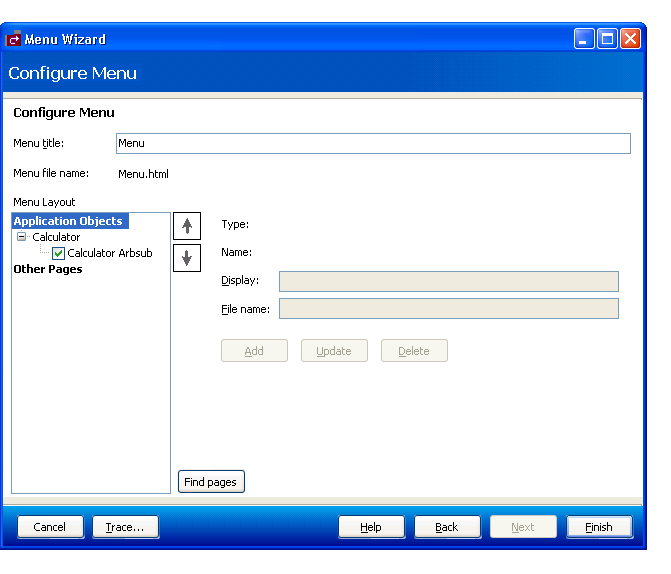
Use this panel to load application objects and to add, update, or delete web pages. To position menu items, use drag and drop functionality in the Menu Layout area or the up and down arrows. You can change the page names as desired by selecting the name in Menu Layout and changing the name in Display.
Note:
To include web pages that were not generated by the Web Page
wizard, select Other Pages in Menu Layout and type
the page names in Display and the full URLs in File
name.
Enter a name for the menu in Menu title.
Select .
The Generate Status window is displayed.
Select to save your menu.
You have successfully generated a new web application, page, and menu.
The Menu wizard supports regeneration.
![]() To regenerate a menu:
To regenerate a menu:
Open the context menu for the menu in the Solution Explorer.
Select on the submenu.
The Menu wizard is displayed, showing the information specified for the selected menu.
Modify the specifications as desired and select .
The Generate Status window is displayed, showing which files were changed during regeneration.
Select to save the files.
To run your web application project, you must ensure that it is selected as the start up project in Visual Studio.
Important:
If you are using the ASP.NET development server for both Web
services and web applications, you will have to toggle between each project to
set the start up project. In addition, ensure that each of your projects uses a
different port number (per machine or host). For example, if your Web services
use port 8085, your web application must use a different port number (for
example, 8086). For more information, see
Use the ASP.NET Development
Server.
![]() To run your web application project:
To run your web application project:
Open the context menu for the project in the Solution Explorer.
Select from the submenu.
Press F5 or select on .
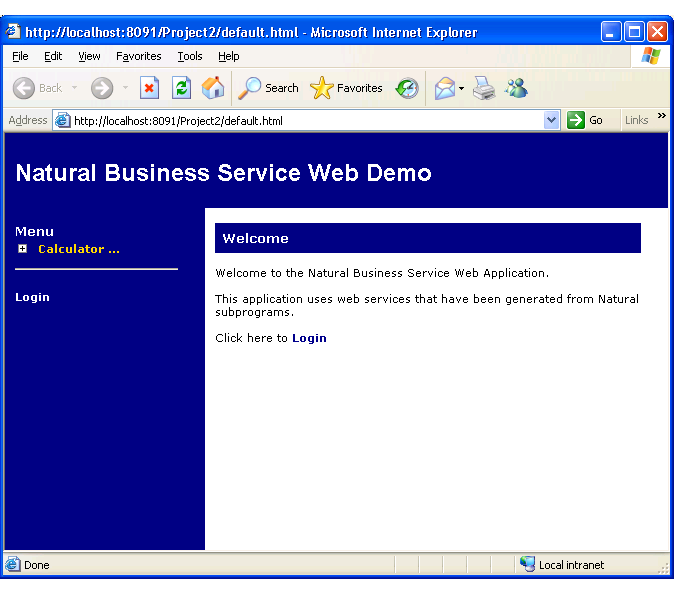
Debugging the project will launch your web browser and display the application. For example:
This section describes the cache engine supplied for Natural Business Services. It describes how the cache engine works and how to configure the cache service. It also contains examples of client input and lists the XSL and browse considerations.
The following topics are covered:
It is not uncommon for a Web service to have non-volatile data that is accessed frequently, such as sales taxes based on a particular region. The cache engine allows Web services to store data in memory for a specified period of time. The cache engine re-populates the data in memory as required and retrieves the data from memory. While the cache engine can handle any SOAP request, it has a special feature that allows it to retrieve and cache all data from a Natural Construct-generated browse object.
The cache engine is implemented as an XML Web service. To make a
request to the service, the client passes the ID and Key field values. The ID
field value represents a cache setting defined in the configuration file for
the cache engine. The Key field values define how data is retrieved by the
target Web service to be cached (for example, <Key
Name="CustomerNumber">10003</Key>). The combination of these
fields becomes the unique key for the cached item.
After making a request, the following processing is performed:
If the unique key is found in the cache, the cached response is returned.
If the unique key is not found in the cache, the target Web service is called. The response from the Web service is transformed using an XSL style sheet and the results are returned to client and cached for future requests.
The cache engine requires its own Web.config file. This file is similar to the Web.config files found in the Web Services directories, except it has additional cache-specific nodes. These nodes define cache information such as:
the type of data stored in the cache
how the data is accessed
how the data is transformed when it is passed out of the cache
how long the data stays in the cache
If you use the cache engine with a Natural Construct-generated browse object, you can take advantage of several generated features. Typically, a Natural Construct-generated browse object retrieves n rows of data at a time, where n is specified when generating the service. When using the cache engine with the isBrowse configuration flag set to true, the cache engine continues to retrieve n rows until the end of data is reached. Although this can make the first access of the data more time intensive, all other requests will retrieve the data from memory — even from multiple users. To populate the cache in this scenario, multiple SOAP requests must be made. These requests will vary (starting value, for example).
Since the cache engine knows the attributes of a Natural Construct-generated browse object, only the TemplateRequest setting is required. All additional SOAP requests are determined by the cache engine. Ensure that the input values for the CDBRPDA parameter data area, such as the number of rows requested and the range option, are specified in TemplateRequest. (For more information on these options, see Using the Object-Browse Models).
Substitution can take place in TemplateRequest at runtime using the
<nbs:KeyField> tag. For example, if the SOAP request from
the client has the following nodes:
<cache ID="Order-Browse"> <Key Name="CustomerNumber">10003</Key> and the TemplateRequest in the </cache ID>
And the configuration file has the following nodes:
<cache ID="Order-Browse"> <nbs:KeyField Name="CustomerNumber" /> </cache ID>
At runtime, <nbs:KeyField Name="CustomerNumber" />
is replaced with 10003.
If you are not using a Natural Construct-generated browse object, only one SOAP request can be made. The cache engine only issues one SOAP request if the isBrowse flag is set to false.
Data is stored internally in XML format, which is the built-in format
provided by the specified XSL. There is a close relationship between the SOAP
TemplateRequest setting in the Web.config file and the XSL
in the file/URL specified in the Web.config
<OutputXSL> tag. For a Natural Construct-generated browse
object, the output XSL should contain the ActualRowsReturned and the processing
for the row PDA (see the examples in XSL Considerations).
On web pages, this data can be accessed by issuing a SOAP request. For an example of this functionality, see the demo application for OrderMaint.html. The list of warehouses on this page is retrieved from the cache.
To configure the cache engine, modify the settings in the Web.config file for the cache engine. This file is located in the following directories:
http://localhost/NBS/CacheService
C:\Inetpub\wwwroot\NBS\CacheService
This section describes the settings in the default cache Web.config file. The following topics are covered:
The global settings in the cache Web.config file are:
| Setting | Description |
|---|---|
| AllowRemoveAll | Boolean value that enables the Remove All functionality in the cache engine. The default is false. For more information on the Remove All functionality, see SOAP Action. |
The cache item settings in the cache Web.config file are:
| Setting | Description | |
|---|---|---|
| Expiration Type | Expiration policy that determines when data in the cache has expired and a new Web service request must be made. The following options are available: | |
| timeOfDay | The cached item expires at a specified time on
a daily basis. The format for this setting is:
HH:MM:SSwhere the valid duration is 24 hours and 00 indicates midnight. For example: <Expiration Type="timeOfDay" Value="11:44:30"/> |
|
| lastAccess | The cached item expires after not being
accessed for the specified period of time. The format for this setting is:
DD:HH:MM:SSwhere the valid duration is greater than 0 and less than 1 year. For example: <Expiration Type="lastAccess" Value="00:00:00:30"/> |
|
| IsBrowse | Boolean value that indicates whether the target Web service is a Natural Construct-generated browse object. If it is, the service will continue browsing until the end of data condition. | |
| BrowseNamespace | Namespace for the application browse object.
For example:
PDA:WH--BSP.CDBRPDA |
|
| OutputXSL | Location of the XSL file used to transform the response(s) from the Web service. | |
| URL | URL of the Web service for which you want to cache data. | |
| TemplateRequest | Template for the SOAP message sent to the Web service specified in URL above. The sample message in this file has nbs:KeyField nodes that are replaced by values passed in by the client invoking the cache engine. | |
To view an example of the configuration settings for the cache engine, see the Samples directory.
Tip:
For Natural Construct-generated browse objects, incorporate CDBRPDA
and the Object Key PDA into TemplateRequest. To determine the SOAP message
layout, use the SOAP client and the WSE_INITIALIZE action for the required
browse Web service. (Although the layouts for the private, row, and message
PDAs are also returned, these are not required for the TemplateRequest
setting.)
This section describes the sample input for SOAP requests on the client. The following topics are covered:
Use one of the following actions in the SoapAction http header:
| Action | Description |
|---|---|
| Retrieve | Retrieves the specified cached item. |
| Remove | Removes the specified cached item from cache. |
| RemoveAll | Removes all items from the cache. |
The SOAP body consists of an XML node containing the Cache ID and any
key substitution. Key substitution is done by replacing the
nbs:KeyField nodes in the sample request with the actual value in
the Key Name field from the client. The substitution value is based on the Key
Name attribute. The following example shows the SOAP body for
CustomerNumber:
<?xml version="1.0" encoding="UTF-8"?>
<soap:Envelope xmlns:soap="http://schemas.xmlsoap.org/soap/envelope/" >
<soap:Body>
<Cache ID="Order-Browse">
<Key
            Name="CustomerNumber">10003</Key>
</Cache>
</soap:Body>
</soap:Envelope>
The Key Name field above matches the nbs:KeyField Name in the sample request. For example:
<nbs:KeyField Name="CustomerNumber"/>
When multiple calls are made to a target Web service, the cache engine appends each response to a “Cache” XML node. Typically, multiple calls are made when the target Web service is used for a Natural Construct-generated browse object and the IsBrowse setting in the cache Web.config file is set to true. This allows the XSL to treat each response individually.
The following example shows the sample Cache node sent to
the XSL:
<Cache>
    <!-- First response -->
    <soap:Envelope xmlns:soap="http://schemas.xmlsoap.org/soap/ envelope/">
        <soap:Body>
            <!-- Web Service Body ... -->
        </soap:Body>
    </soap:Envelope>

    <!-- Second response -->
    <soap:Envelope xmlns:soap="http://schemas.xmlsoap.org/soap/ envelope/">
        <soap:Body>
            <!--Web Service body ...-->
        </soap:Body>
    </soap:Envelope>
</Cache>
The following example shows the XSL for a browse Web service. Notice
the input used for the ActualRowsReturned node:
<xsl:stylesheet version="1.0" xmlns:xsl="http://www.w3.org/1999/XSL/ Transform" xmlns:fo="http://www.w3.org/1999/XSL/Format" xmlns:row="PDA:ORD-BSP.ORD-BROW" xmlns:soap="http:// schemas.xmlsoap.org/soap/envelope/">
<xsl:output method="xml"/>
<xsl:template match="/">
<soap:Envelope xmlns:soap="http://schemas.xmlsoap.org/soap/ envelope/">
<soap:Body>
<!-- Process Each Soap response individually -->
<xsl:apply-templates select="//soap:Envelope/soap:Body"/>
</soap:Body>
</soap:Envelope>
</xsl:template>
<xsl:template match="soap:Envelope/soap:Body" xmlns:cd="PDA:ORD- BSP.CDBRPDA">
<!-- Get the Actual rows returned -->
<xsl:variable name="ActualRowsReturned" select="./cd:CDBRPDA/ cd:Cdbrpda/cd:Outputs/cd:ActualRowsReturned"/>
<!-- Process row nodes whose position is less than or equal to ActualRowsReturned -->
<xsl:apply-templates select="./row:ORD-BROW/row:OrdBrow/ row:Row[position() <= $ActualRowsReturned]"/>
</xsl:template>
<!-- Process Row for output -->
<xsl:template match="row:Row">
<OrderNumber>
<xsl:value-of select="./row:OrderNumber"/>
</OrderNumber>
</xsl:template>
</xsl:stylesheet>
When caching the Web service data for a Natural Construct-generated browse subprogram, the ActualRowsReturned and EndofData fields must be exposed in the following manner:
Both fields must be part of the browse output for the Web service.
The actual rows returned must be in the XSL (see the example in the
previous section). Note that the “cd” alias namespace in
cd:ActualRowsReturned must match the BrowseNamespace value in the
cache Web.config file. It is important that the XSL
matches the output data. To use the sample in the previous section, change the
row and CDBRPDA information to reflect your browse Web service.
Note:
The locations and names in the example are the defaults used by the
Web Service wizard.
When using the cache engine to cache data for a Web service, you must modify several files. These include the following:
Web.config
XSL for the cache engine
HTML/Javascript for the page the cache engine is used on
XSL for the application that the cache information is required for
To help you define these files for your Web services, Natural Business Services supplies the cache engine demo containing the files for a sample cache service. Refer to these files for examples of settings for the cache engine. The files are located in the following directories:
http://localhost/NBS/ExampleCacheService
C:\Inetpub\wwwroot\NBS\ExampleCacheService
To view an example of the cache service, see the Samples directory.
Refer to the CacheItem ID entries, Warehouse-Browse
and Order-Browse, and note the following settings:
The setting for IsBrowse is true for both entries,
implying that a Natural Construct-generated browse object is being used.
The BrowseNamespace values match the namespace
associated with CDBRPDA.
CDBRPDA occurs in both CacheItem ID
entries, but the namespaces are different.
The TemplateRequest nodes look similar to SOAP input
messages.
The "ExampleCacheService" folder also contains two xsl files: Order.xsl and Warehouse.xsl. Look at these files to get an idea of how to create xsl files for your browse services. The xsl files must be setup correctly for the output from the cache to be correct.
To use the cache functionality, call the Web service from within HTML or Javascript. View the OrderMaint.html file and scan for the "GetWarehouseCache" function. All the data comes from the cache, but the cache determines when to refresh the data ("CacheLocation" indicates where the Web.config file is located).
Once the data is returned, it is transformed into a selection box by passing the warehouse cache to the XSL and then transforming the XSL. Note that "xslProc" populates the inner HTML, as opposed to the usual Transform node. This is because a parameter is passed to the XSL. Refer to the following customizations in C:\Inetpub\wwwroot\Examples\Application\Order Entry System\OrderMaintMainDisplay:
The code to receive the passed parameter
The code to call the XSL template to populate the combo box
The code to create code for the dynamic combo box
This section describes how to modify Web.config files, create a request for a Natural Business Services security token, and add custom code for your Web service. It also describes how to create a custom BDT, change the names of action buttons, and add a new Web services root directory.
This section covers the following topics:
Natural Business Services includes three web configuration files you can use to set options for your Web services. Although all three files are named Web.config, each file is located in a different directory and contains different settings. These files are:
| File | Location |
|---|---|
| Global Web.config file | Web services root directory |
| Local Web.config file | Private directory in the local directory after generating a Web service |
| Cache Web.config file | CacheService directory in the Web services root directory |
The following sections describe the settings in the global and local Web.config files.
Note:
For information on the cache Web.config file,
see Use the Cache
Engine.
During the installation of Natural Business Services, the Web services root directory is created:
C:\inetpub\wwwroot\[NBS\NBSWebServices]
This directory contains the "Cache", "Common", and "Login" directories, as well as the following public files:
| File | Description |
|---|---|
| .xsd files | Contain XML data used by each Web service. |
| .wsdl (Web Service Definition Language) file | Contains information specific to the SOAP Client. This file describes each Web service and its methods. It also imports the .xsd files. |
| Web.config file | Contains information common to all Web services, such as the trace and message options, security settings, and error and language options. |
If you make changes to a generated Web service, you can refresh IIS (Internet Information Server) by modifying the global Web.config file. This allows the updates to be accessible to users invoking your service. IIS is refreshed automatically after you modify and save the file.
Note:
Alternately, you can enter "IISReset" on the
command line to refresh IIS.
Note:
Before making any changes to the Web.config
file, make a backup copy of the file.
![]() To modify the global Web.config file for your environment:
To modify the global Web.config file for your environment:
Open the project containing your Web service.
For example:
Open the context menu for the global Web.config file in the Solution Explorer.
Select on the submenu.
The Web.config file is displayed. For example:

Scroll to the "NBS" node.
Modify the settings.
For a description of these settings, see the following section.
Important:
Some settings in the Web.config file
are required by the Web Service wizard and should not be modified. For example,
"configSections" contains the IIS settings that
associate the .sws files to the Natural Business
Services Web Services Engine.
Make the changes accessible to users.
To make changes accessible to users, do one of the following:
Recycle IIS (Internet Information Server)
Unload the root application
Re-save the Web.config file
This section describes the Web service settings in the global Web.config file.
The Web Service Engine (WSE) takes advantage of ASPX technology to provide trace options for a Web service. Within ASPX, trace statements are sent to a special web site, trace.axd, for each web application. For example, the URL to tracing information for the demo web application is: Web services URL/trace.axd. This is the main trace page. By default, the last 10 requests are shown.
| Warning: If tracing is enabled, sensitive data may be viewed. It is highly recommended that you only use the Trace option in development environments and disable the option in runtime (production) environments. |
Natural Business Services allows you to customize the Microsoft defaults for ASPX. Use the following settings to specify Trace options:
<Trace Option="DataIn" ErrorOption="FormatError" Level="0" CaptureAppTrace="true"/>
where:
| Setting | Description |
|---|---|
| Trace Option | Indicates when tracing occurs. Possible
settings are:
|
| ErrorOption | Indicates which errors to trace. Possible
settings are:
|
| Level | Indicates which level of detail to trace. The higher the number, the more detail will be produced. The default is 0. |
| CaptureAppTrace | Indicates which trace statements to capture.
Possible settings are:
The default is false. |
Use this setting to indicate where messages are located. You can either supply the file location for your own messages (for example, mymessages.xml) or you can modify messages in the supplied messages.xml file (message numbers 5700–5799). You can also add the text for other languages to the message file.
Note:
We recommend that you only append information to this file,
although you can make minor text changes, such as changing the language number
or value.
Use this setting to indicate whether to retrieve metadata for use with the Web Application wizards. For example:
<RetrieveMetadata Enabled="true">
If you are not using these wizards, set this option to False.
Important:
If you set this option to True to retrieve the metadata for
security purposes, ensure that you switch it to False before going into
production.
Use the following settings to specify NBSSecurity options for Web services:
| Setting | Description |
|---|---|
| Token | Sends a token with the SOAP message. For
example:
NBSSecurity Mode="Token" A token is a unique, system-generated, identification number that allows users to logon the first time with a user ID and password and then request a token for subsequent calls to the server. For more information, see Create a Request for a Security Token. If you set this option, you can also set the timeout limit for the cache. For example: TokenCacheTimeout="25" |
| Password | Sends the specified UserID and Password with the SOAP message. |
| None | Indicates no Natural Business Services security. |
| HardCoded | Indicates security on the server, but you do not want to send the token or password with the SOAP message. |
Use the following settings to specify parameter saving options for debugging purposes:
| Setting | Description |
|---|---|
| Enabled | Indicates whether to save input and output from
a CallNat to the server and then view the data in the PDA Viewer. For example:
SavePDA Enabled="true" |
| Input Timestamp | Adds a date and time to the specified input PDA. |
| Output Timestamp | Adds a date and time to the specified output
PDA.
Note: |
For more information, see Save the State of Natural PDAs.
Use this setting to cache server requests in the Web Service Engine (WSE). For example:
TestMode Enabled="true"
One request is sent to the server and then cached in the WSE. You can also specify the following settings:
| Setting | Description |
|---|---|
| Cache | Sets the following options for the cache:
|
| Delay | Sets the following options for the cache:
|
Use this setting to define error options. You can also specify the following settings:
| Setting | Description |
|---|---|
| Log | To log errors to the Windows Event log under
the NBS category, set this option to true. For example:
log="true" |
| StackTrace | To output the call stack, set this option to
true. For example:
stackTrace="true" |
To send errors by email, set this option to
true and then specify all email nodes except CC (optional). For example:
email="true" |
Note:
You can also use this option to override all error messages to one
generic message (for example, NBS error).
Use this setting to indicate the default language used for Web services. If the language code is not specified in the Business Service Administration subsystem for a user, the language code specified here is used. For more information about language codes, refer to the Natural documentation.
Use this setting to identify the type and location of custom event handlers. The FileName setting is optional, but you must specify the Type setting to identify the DLL files. For an example of an event handler, see "[NBS install directory]\Sample Event".
Note:
Event handlers execute customized code based on a Web service
runtime event. For information on how to load the assembly containing your
event handlers, see Modify the Web.config File for
Custom Code. For information on creating event handlers, see
Create a Custom Event
Handler Class.
Use this setting to indicate which connection ID (dispatcher) to use for SOAP requests. You can also:
Specify a connection ID to use for all SOAP requests. For example:
<ConnectionID AllowDynamic="false">DISPATCH</ConnectionID>
Allow users to specify a connection ID for each request. For example:
<ConnectionID AllowDynamic="true">Some Other Connection</ConnectionID>
To allow users to specify the connection ID, you must also add the following in the SOAP header:
<ConnectionID>Some Other Connection</ConnectionID>
If there are no overrides in the private folder (local Web.config file) for a Web service, this setting specifies the BDT defaults. For example, you may want "BDTNumeric" to suppress zeros for most Web services, but display zeros for one.
After generating a Web service, a private directory is created in the local directory. For example:
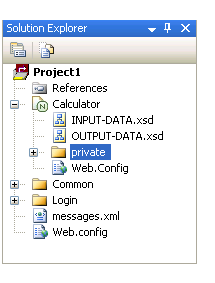
This directory contains the following files:
| File | Description |
|---|---|
| One .xml file for each PDA used by the Web service | Contains the mapping between
Natural and XML. File names are derived from the PDA
name. For example:
CDAOBJ2_PDAMap.xml |
| .xml file | Contains metadata for the Web Application wizards (if selected on the wizard panels). |
| .swsd file | Contains the Web Service wizard specifications. |
| Web.config file | Contains information specific to this Web service, such as the names of the PDAs and methods used by the service, as well as any overrides. |
You can copy any global Web.config file setting into the local Web.config file to create an override, but changes will be lost if you regenerate the service. While the global Web.config file remains unchanged during generation, the local Web.config files are recreated each time a service is regenerated. Use the local file for overrides only (for example, for BDT modifiers).
With the exception of events, which are processed in both files, the settings in the local Web.config files override the settings in the global Web.config file.
The Web.config file settings are used by the Web Service Engine (WSE). Settings specified in the global Web.config file in a parent directory are inherited into the local Web.config files within the .NET framework. For example, the connection ID used for all Web services is defined in the global Web.config file in the Web services root directory (NBS/WebServices). Every child directory (directory containing one Web service) in the root directory inherits the global ConnectionID setting. If the connection ID is specified in a local directory, as well as the NBS/WebServices directory, the setting in the local directory is used.
Events from the WSE are handled in a slightly different manner. Rather that overwriting the event settings in the global Web.config file, the events specified in the global file are appended to those in the local Web.config file. For example, if an assembly is specified in the global Web.config file to handle the onException event and an assembly is also specified in a local Web.config file, both event handlers are invoked if an exception is raised in the child.
For the Web Service Engine (WSE) to process *.sws requests from the internet, both IIS (Internet Information Server) and the .NET framework must be configured:
Within IIS, the *.sws files must be mapped to the .NET framework. (aspnet_isapi.dll). When a .sws request comes to IIS, IIS calls .NET to handle the request. This configuration is done automatically during installation of the SDK.
Within .NET, .sws requests must be mapped to the WSE.
The following example illustrates this mapping:
*.sws Request -> IIS -> .NET framework (aspnet_isapi.dll) -> WSE
You must create a request for a token if the NBSSecurity node in the Web.config file is set to Token. A token is a unique, system-generated identification number that allows users to logon to a Web service using their user ID and password and then request a token for subsequent calls.
Use the SOAP Client testing tool to create the request for a security token. For information on using this tool, see Test a Web Service.
The following example shows input for the SOAP Client to create the request:
URL: http://localhost/NBS/WebServices/login.sws
SOAP action: "Login"
Parameters: "UserID" and "Password"
XMLInput:
<?xml version="1.0" encoding="UTF-8"?><soap:Envelope xmlns:soap="http:/ /schemas.xmlsoap.org/soap/envelope/" xmlns:nbs="http://SoftwareAG.com/NaturalBusinessServices/2006">
<soap:Body>
  <nbs:User>
        <nbs:UserID>Drew</nbs:UserID>
        <nbs:Password>My Password</nbs:Password>
</nbs:User>
</soap:Body></soap:Envelope>
XMLOutput:
<?xml version="1.0" encoding="utf-8"?>
<soap:Envelope xmlns:soap="http://schemas.xmlsoap.org/soap/envelope/" xmlns:xsi="http://www.w3.org/2001/XMLSchema-instance" xmlns:xsd="http://www.w3.org/2001/XMLSchema">
  <soap:Body>
      <nbs:Token xmlns:nbs="http://SoftwareAG.com/NaturalBusinessServices/2006">f7e759ae-9e00-4097-b04a-aa0726f7ff42</nbs:Token>
  </soap:Body>
</soap:Envelope>
For more information, refer to the login.wsdl file in the Web services root directory (NBS/WebServices).
You can write custom code, called an event handler, to react to events raised within the Web Service Engine (WSE). If an event handler “subscribes” to an event, the custom code will be invoked whenever that event is raised within the WSE. The following topics are covered:
The following table describes the WSE events:
| Event | Description | Argument | Usage |
|---|---|---|---|
| ValidateUser | Allows you to add custom validation routines to
validate a user ID. If a validation is successful, set the
UserArgs.UserValidated property to True (default
is False). Unless the UserValidated property is
manually set to True, this event will fail and an exception will be thrown by
the WSE.
|
ValidateUserEventArgs | To authenticate a user against an external source. |
| BeforeCallnat | Is raised after a SOAP message is read into BeforeCallnatEventArgs.Fields and before Natural is called. The XML document exposed in this event is included for your information only. If you modify this document, the changes will not be sent to the server. To send data to the server, modify the "NatFields" object. | BeforeCallnatEventArgs | To look up data in an external source and then save it in Natural or to “massage” data going to the server. For example, you can access an external source for additional information and then modify the SOAP message accordingly. |
| AfterCallnat | Is raised after the call to
Natural is returned and the SOAP response has been
built and is ready to be sent to the client. As with the BeforeCallnat event,
the InputXML and
Fields properties are provided for your
information only. To send data back to the client, modify the
OutPutSOAPNode property.
|
AfterCallnatEventArgs | To look up data in an external source based on data returned from a Natural subprogram. The data is then sent to the client. |
| ExceptionThrown | Is raised when the WSE encounters an exception. Subscribing to this event does not stop the exception from being thrown nor allow you to “fix” the exception. | ExceptionThrownEventArgs | To log an exception to an external source. |
The following sections describe the arguments provided for the WSE events.
Note:
All of the Event arguments have a
Handled property (Boolean), which indicates how
the event is handled. If this property is set to True, other subscribers to
that event will not be invoked.
The supplied Natural Business Services events support the following arguments:
| Argument | Type | Information only | Description |
|---|---|---|---|
| InputXML | XMLNode | yes | Contains the SOAP message. |
| InputXMLName SpaceManager | XMLNameSpace Manager | yes | Contains the namespace manager for InputXML. |
| WebServiceName | String | yes | Contains the name of the Web service. |
| Timestamp | DateTime | yes | Contains the date and time from the IIS (Internet Information Server) machine that the event was raised. |
Inherits the NBSEventArgs arguments; supports the following arguments:
| Argument | Type | Information only | Description |
|---|---|---|---|
| User | UserCredentials | no | Contains user information. |
| UserValidated | Boolean | no | Indicates whether the user ID is validated. |
| HTTPContext | Contains application, system, and request information from ASP.Net. |
Inherits the NBSEventArgs arguments; supports the following arguments:
| Argument | Type | Information only | Description |
|---|---|---|---|
| Fields | NatFields | no | Contains the collection of fields passed to the Natural subprogram. |
| HTTPContext | Contains application, system, and request information from ASP.Net. |
Inherits the NBSEventArgs arguments; supports the following arguments:
| Argument | Type | Information only | Description |
|---|---|---|---|
| OutPutSOAPNode | XMLNode | no | Contains the XML node sent to the client. |
| Fields | NatFields | Contains the collection of fields passed to the Natural subprogram. | |
| HTTPContext | Contains application, system, and request information from ASP.Net. |
Supports the following arguments:
| Argument | Type | Information only | Description |
|---|---|---|---|
| Exception | Exception | yes | Contains the exception that was thrown. |
| Handled | Boolean | no | Indicates how the event is handled. See note in Event Arguments. |
| ServiceName | String | yes | Contains the name of the Web service being invoked. |
If desired, you can create a custom event handler class.
Note:
The SampleEvent project in your install directory contains a sample
event handler.
![]() To create a custom event handler class:
To create a custom event handler class:
Create a new class library in Visual Studio.net.
Within this library, add a reference to the following dll file (located in your Natural Business Services install directory):
SoftwareAG.NBS.WebServiceEngine.dll
Create a class that implements ISpeEventHandler.
Create the desired event handler methods.
Subscribe the methods in the
ISpeEventHandler.WireUp method to their corresponding
events.
Modify the Web.config file and add the appropriate "EventHandler" node. For information, see Modify the Web.config File for Custom Code.
To execute your customized code, the WSE must know how to load the assembly containing your event handlers. To do this, you must make an entry in the "EventHandler" node in the appropriate Web.config file. The following sections contain two methods of doing this.
Note:
The Type attribute format is the same format used to load a custom
HTTP handler in Asp.net. For more information, refer to the Microsoft
documentation.
This method loads the assembly based on the file name specified:
<EventHandler FileName="" Type=""/>
For example:
<EventHandler FileName="C:\[Path to DLL]\SoftwareAG.NBS.TestEvent.dll" Type="SoftwareAG.NBS.TestEvent.Sample"/>
This method loads the assembly based on the type specified:
<EventHandler Type=""/>
This method is more secure than method 1, because the assembly is digitally signed and registered into the GAC. This minimizes the risk of unauthorized users inserting their own assembly or tampering with the original assembly.
For example:
<EventHandler Type="SoftwareAG.NBS.TestEvent.Sample, SoftwareAG.NBS.TestEvent, Version=1.0.1.1, Culture=neutral, PublicKeyToken=30e0547b9a8498ae"/>
Note:
If users are using the GAC, they must generate their own
tokens.
Creating a custom BDT for a Web service is different from creating a custom BDT for a web application. Once created, you can use your custom BDT with any Web service.
![]() To create a custom BDT:
To create a custom BDT:
Create a .NET class library project.
Add a reference to SoftwareAG.NBS.BusinessDataTypes.dll in this project.
Create a new class that inherits from the BDT (for example, BDT class).
Call the BDT constructor with the following parameters:
| Parameter | Comments |
|---|---|
| Name of the BDT | Ensure that the name easily identifies this BDT. |
| Character array of Natural types this BDT will support | The characters correspond to those used in Natural (A for Alpha, for example). |
In Visual Basic .NET, for example:
Mybase.new("ExternalBDT", new Char() {"A"c, "N"c})
Override the "ConvertFromDisplay" and "ConvertToDisplay" functions and add your custom code.
Compile the class library.
After creating the custom BDT, you can use it during generation.
![]() To use the BDT during generation:
To use the BDT during generation:
Add an entry in the BDTs.xml file in your install directory.
For a description of this file, see BDTs.xml File.
Add an entry for your BDT in the "BDTs" node in the Web.config file.
For example:
<BDTFile FileName="[ExternalBDT.dll]">
   <BDT Type="[ClassName]" SetDefault="true">
      <Modifier Name="[ModName]">[Value]</Modifier>
   </BDT>
</ BDTFile >
The user provides substitution values for ClassName, ModName, and Value.
There are two types of XML nodes in the BDTs.xml file:
"BDT" declares a BDT for use within the Web Service wizard.
"DataType" matches a Natural data type to a BDT.
The following sections describe each of these nodes.
The following table describes the settings for the "BDT" node in the BDTs.xml file:
| Node Name | Attributes | Parent | Description |
|---|---|---|---|
| BDT | N/A | Parent node used to declare a BDT. | |
| XSDTypes | BDT | Container for Type nodes. | |
| Type | true|false (default) | XSDTypes | XSD types used with Web services. |
| PredictMap | Corresponding Predict keyword. |
The following example shows the BDT node settings:
<BDT Name="BDTNumeric">
		                <XSDTypes>
			                    <Type>xsd:string</Type>
		                    	<Type>xsd:decimal</Type>
		                    	<Type Default="true">xsd:double</Type>
		                    	<Type>xsd:float</Type>
			                    <Type >xsd:int</Type>
	                    		<Type>xsd:short</Type>
	                    		<Type>xsd:long</Type>
	               	</XSDTypes>
		               <PredictMap>BDT_NUMERIC</PredictMap>
</BDT>
When using the Web Service wizard, the wizard tries to determine which BDT to use for a field based on the Natural format for the field. The "DataType" node determines the search criteria. The Type attribute contains a regular expression that is compared to the Natural format. If the regular expression matches, then that BDT is chosen.
The following table describes the settings for the "DataType" node in the BDTs.xml file:
| Node Name | Attributes | Parent | Description |
|---|---|---|---|
| DataType | Type is the regular expression to be compared to the Natural format. | N/A | |
| BDT | true|false (default)
If this BDT is chosen, use it as the default. |
Name of a BDT. |
The following example shows the DataType node settings:
<DataType Type="[ANP]10$">
   <BDT>BDTPhone</BDT>
</DataType>
If the Natural format is A10, N10, or P10, BDTPhone is used because the “A10”, “N10”, or “P10” string matches the “[ANP]10$” regular expression.
You can change the default names displayed on maintenance pages by modifying the MethodMap.xml file. This file is located in the install directory.
Natural Business Services supplies a default Web services root directory during installation. If desired, you can add your own Web services root directory.
![]() To add an additional Web services root directory:
To add an additional Web services root directory:
Select .
Scroll to the directory you want to add and open the directory.
Select .
Select Edit.
Copy the name displayed in the "Executable" field to the clipboard.
The executable name is used to associate .sws with the .NET runtime environment.
Select to close .sws.
Select Add to add another mapping.
Paste the executable name in the "Executable" field.
Type ".sws" in the "Extension" field.
Select three times to close the Internet Services Manager.
The code for the Web Service Engine (WSE) contains debug statements you can use to test the performance of the WSE. For example:
Context.Trace.Write("Retrieve", "Start")
where:
Retrieve is the name of the chunk of code being timed
Start indicates the beginning of the chunk of code
This code is completed with a closing statement. For example:
Context.Trace.Write("Retrieve", "Stop")
where:
Stop indicates the end of the chunk of code being timed
To retrieve the actual timings, run a Web service and then look at the Trace.axd file from the Web service location. For example, run the following Web service:
http://localhost/NBS/WebServices/ord-bsp/ord-bsp.sws
Next, open Internet Explorer and look at the following Trace file:
http://localhost/NBS/WebServices/ord-bsp/Trace.axd
This section contains tips and techniques you can consult when using Natural Business Services to create Web services. It also contains troubleshooting information for common errors you may encounter while using the SDK.
The following topics are covered:
This section contains helpful tips and techniques when using the UPDATE action.
The following topics are covered:
If data is not returned in your input tags, verify that the namespace name is correct. For example:
xmlns="PDA:SIMPLEP.SIMPMSR"
The following table lists some of the common namespaces used:
| Namespace | Description |
|---|---|
| http://SoftwareAG.com/NaturalBusinessServices/2006 | Used in Natural Business Services. |
| http://SoftwareAG.com/NaturalBusinessServices/2006/Security | Used for security information. |
| http://SoftwareAG.com/NaturalBusinessServices/2006/Info | Used for general information. |
| http://SoftwareAG.com/NaturalBusinessServices/2006/Fault | Used for Natural Business Services faults. |
If attributes are excluded during an update, data may be inadvertently deleted. For example, if delivery lines are not included in the Order object XML, it is assumed that the delivery lines are blank. It is also extremely important that the values in the restricted PDA remain unchanged when the object file is read. If not, data may be duplicated or a modification may not take place.
The following example shows the structure of the CDAOBJ2 parameter data area when all fields are requested at the lowest level of definition:
<CDAOBJ2 xmlns:nbs="http://SoftwareAG.com/NaturalBusinessServices/2006" xmlns="PDA:SIMPLEP.CDAOBJ2">
- <Cdaobj2>
- <Inputs>
  <Function>EXISTS</Function>
  <ClearAfterUpdate>false</ClearAfterUpdate>
  <ReturnObject>false</ReturnObject>
  <EtIfSuccessful>false</EtIfSuccessful>
  </Inputs>
- <Outputs>
  <ObjectContainsDerivedData>false</ObjectContainsDerivedData>
  <Exists>true</Exists>
  </Outputs>
  </Cdaobj2>
  </CDAOBJ2>
If the outer node (<CDAOBJ2> </CDAOBJ2>) is
not defined in the input XML, everything inside the node is ignored as
irrelevant data. For example, the following is ignored because it is not within
the context of CDAOBJ2:
<Cdaobj2>
- <Inputs>
  <Function>EXISTS</Function>
  <ClearAfterUpdate>false</ClearAfterUpdate>
  <ReturnObject>false</ReturnObject>
  <EtIfSuccessful>false</EtIfSuccessful>
  </Inputs>
</Cdaobj2>
If you set ReturnObject in
"Inputs" to true, the calculated values from the
server are passed back to the client. This option is set in the Web Service
wizard by default.
For a Natural Construct-generated maintenance object to perform maintenance functions, you must include #FUNCTION. The Web service defaults the appropriate #FUNCTION value for the object.
This section describes the security options available when using generated Web services, as well as information about possible errors in the Visual Studio add-in, server, or web. The following topics are covered:
This section does not provide complete details about the various security options available within IIS. For more information about these options, see http://technet.microsoft.com/en-us/security/default.aspx.
We recommend that you use the standard DMZ architecture — an IIS box between two firewalls. The firewall exposed to the public (Internet) only allows HTTP/HTTPS (ports 80 and 443) requests through. For the firewall that links IIS to the corporation, only allow the ports required by EntireX and Natural Business Services to be used. By placing the IIS machine in the DMZ, any EntireX requests coming from the Internet are blocked by the first firewall because it only allows HTTP/HTTPS requests.
To secure the communication between the client and IIS, we highly recommend that you use HTTPS. HTTPS does two things:
Eliminates the potential of a third party entity impersonating either the client or the host.
Encrypts communication between the client and the host.
To use HTTPS, you must first obtain a public certificate from a Certificate Authority, such as VeriSign. To setup HTTPS, refer to the documentation from VeriSign and Microsoft.
If desired, you can provide your own user authentication within the Web Service Engine (WSE). Before the WSE calls the Natural subprogram, the "ValidateUser" event is thrown. When this event is thrown, the user’s credentials are passed. This allows you to verify, and potentially modify, the user name and password used to invoke the service.
Note:
To provide custom authentication, also set the
UserArgs.UserValidated property to True.
A Natural Business Services-generated Web service has four different security settings available, which you can define in the "NBSSecurity XML" node for the Web.config file used by the associated web application. These settings are described in the following sections:
A security token is a unique string used to identify a user. Rather than passing a user’s credentials every time a request is made, the credentials are only passed once when the token is created.
To use a token, a request with the user’s credentials is made to the security service built into the Web Service Engine (WSE). The credentials are then stored in IIS (Internet Information Server) and a token is returned to the client. When the client makes subsequent requests, the token is supplied rather than the credentials. When the WSE receives the request, the user’s credentials are retrieved from IIS using the token as the unique key.
For further security, the client’s IP address is also stored when a token is created. When subsequent requests are made, the WSE verifies that the request came from the same IP address that created the token. If the IP addresses do not match, an exception is thrown.
The user’s credentials are passed in the SOAP header.
No authentication occurs. The default Natural Business Services user, GUEST, is used.
The user is specified within the "NBSSecurity XML" node in the Web.config file.
NBS5120 error: The dispatcher received an NA2NRES 1150 NAT0920 error while calling the Security server. This error occurs when the Security routine linked to Natural cannot be found. Ensure that the Natural batch job incorporates the Security routine.
At runtime, the security mode for the WebApplication option in the application support directory\AppSettings.XML file must match the security mode for the WebApplication option in the Web.config file. When running with token security, the cookies are unreliable if the URL contains a hard-coded file name. To be reliable, it must use the http://localhost format.
If a web page is accessed by selecting the page name in the Business Service Explorer, the file name is hard coded.
If a web page is accessed by highlighting the application name on the menu and selecting the button, the http://localhost format is used.
Tip:
The login.html is generated because it contains the address of the
Web service; if you are using token security and copy this file from another
application, you may lose the tokens. To solve this problem, ensure that the
hard-coded reference in this file contains the correct directory.
When running with a non-trusted user, the user ID and password assigned to the Web service are used for commands.
To test whether your batch job is running with Natural/SAF and NSC, set up a Natural profile that uses NSC and execute the following code:
//CMSYNIN   DD *
SYSSAF,USERID,PASSWORD
NA2PRES6
FIN
If the job is running correctly, you should receive a message similar to the following:
#RES-RETC    #RES-SERR     #RES-ATTR
--------- ---------------- ---------

    16    0444040000000000 02
If you receive an NA2NRES 1150 NAT0920 Program NA2PNA cannot be
loaded (80600004) error, there is a problem with the
Natural setup.
This section describes miscellaneous tips and techniques when using Natural Business Services.
The following topics are covered:
BDTs are used to do simple data validation. Based on the formats and lengths of the fields being used, the Web Service wizard (WSW) “guesses” which BDT to use. For example, if a field is A6, it assigns a default BDT postal code check.
![]() To override the Web Service wizard BDT defaults:
To override the Web Service wizard BDT defaults:
Create a backup of the following file:
Program Files\Software AG\NBS\WebService\BDTs.xml
Modify the original BDTs.xml file.
For example, to remove the default BDT postal code check, comment out the following:
<DataType Type="A6$">
<BDT>BDTPostalCode</BDT>
</DataType>
This section describes how to change the connection ID in a development and runtime (production) environment.
To change the connection ID in a development environment, modify the configuration settings (select on the menu). This environment is used for generation activities, such as generating Web services.
To change the connection ID in a runtime (production) environment, modify the ConnectionID setting in the Web.config file. This environment is used to run an application from a web page or execute SOAP messages, for example. For information, see Modify Web.config Files.
If the Web Service wizard (WSW) does not list the correct methods, ensure that your service has the same domain and service name as indicated in the Business Service Administration subsystem. If they differ, confirm that the correct LFILE locations are listed in the client configuration (for example, determine where 136 is pointing). If the configuration is correct, regenerate the service and then ensure that the cache is cleared in the WSW.
Tip:
Shutting down the WSW does not clear the cache; you must manually
clear it. To clear the cache, select the Cache icon in the window, select the
cache to be cleared, and select .
If an arbsub uses the "CDAOBJ2" PDA and "MSA-ID", customize the client as follows:
Ensure that "CDAOBJ2.#FUNCTION" in the Web service has an appropriate METHOD override.
Change the XSL in the GUI to ensure that the ID data is correctly populated. In the XPATH, reference the two different nodes from the same Value tab. For example:
xpath="soap:Envelope/soap:Body/BSIF___A/Bsif___a/
                  O_domain~soap:Envelope/soap:Body/BSIF___A/Structure/O_domain"
Note:
The ~ character allows two fields to retrieve the same
value.
Change the mode in the XSL field to reflect something besides the default action value (for example, change 56 to 127).
Natural Business Services supplies samples you can refer to when developing Web services.
Web service samples are loaded into the NBSExamples\WebServices directory
Web application samples are loaded into the NBSExamples\WebApplications directory
To view examples of input for each SOAP action, see the Samples directory.
This section describes some of the errors you may encounter and what you can do to resolve them. The following topics are covered:
At runtime, you may get an error converting a BDT default value. For example:
<BDTName>BDTCurrency</BDTName>
  <FieldName>ORD-MSA.UNIT-COST(2)</FieldName>
  <Message>Error converting value: .</Message>
This error occurs when the runtime BDT default does not accept zeros as input. To allow zeros, add (or modify) the BDTCurrency line to the Web.config file. Name must be ZERO and the setting must be ON. For example:
<BDTs>
<Modifier BDTName="BDTCurrency" Name="ZERO">ON</Modifier>
</BDTs>
Note:
If BDTCurrency is ZERO=ON, null values are not
converted to zeros.
While performing the UPDATE action, you may receive the following message:
Attempted to update/delete:1:that was not in hold status
Intervening modification, please try again
This message indicates that the MSA-ID did not match the HELD-ID. The timestamp on the database differs from the timestamp in XML. Ensure the Web.config file includes the following:
<Modifier BDTName="BDTDateTime" Name="XML">true</Modifier>
Note the format of the date/time modifier. In addition, retrieve the date from the database to confirm that the timestamp in the XML document is the same as the database. (If there is a date in the XML document, it is assumed that it is the current date.)
Important:
If input parameters are not specified for an update, they are
assumed to be blank.
This section describes some of the debugging options available with Natural Business Services. The following topics are covered:
For debugging purposes, the Web service can save the state of the Natural parameter data areas (PDAs) before and after a CallNat to a subprogram on the server. You can then use the supplied PDA Viewer utility to view the contents of the PDAs.
The PDAViewer.exe file is installed in the install folder. When you invoke the utility, you are prompted to enter the name of the debugging file.
Note:
To have a Web service save PDA debugging information, you must
first define the SavePDA setting in the Web.config file.
For information, see SavePDA.