Adding an App
An app can be published into the enterprise app store via a variety of means. For example, you can use Mobile Administrator to upload it directly from a binary, or you can have it uploaded automatically from webMethods Mobile Designer. Mobile Designer can control build nodes in order to manage the building of projects directly.
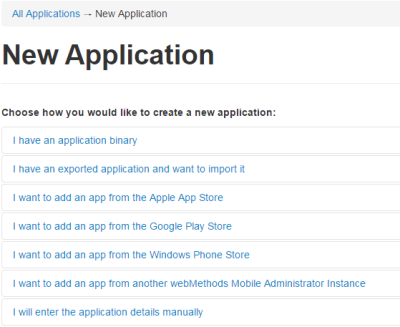
When you add an app with Mobile Administrator, you first have to decide how you would like to create the new app. You can add application binaries that have been developed, for example, with Mobile Designer. Or you can add apps from an existing app store. You can also just create a shell for an app that is yet to be developed.
Depending on your selection, different options are shown that you have to specify. For detailed information, see the appropriate section later in this documentation.
Each app that you add will immediately be visible in Mobile Administrator. In the app store client, however, an app will only be visible if there is a stable version for this app.
The sections below describe typical scenarios for adding an app to your app store.
Scenario 1: You already have an application binary
You have developed your app (for example, with Mobile Designer) and you have the ready-to-upload binaries for all platforms on which the app can be used (for example, an iOS .ipa file and and Android .apk file). A build configuration is not required in this case.
Proceed as follows:
Using this option, you can only upload a single binary (for example, the above-mentioned .ipa file). Additional binaries can be uploaded from the Versions page of the app as described below.
2. Edit the app details. For example, specify the final app name, provide a description, an icon, screenshots, and assign the app to an existing category. See
Editing an App.
3. Go to the Versions page of the app and do the following:
a. Upload the binaries for all other platforms (for example, the above-mentioned .apk file).
b. Make sure that the product stage is stable.
Depending on the platform, some policies are already predefined. For example, for Android it is predefined that the app usage is to be logged and that app crashes are to be reported.
4. Go to the
Permissions page of the app. Make sure that your users will be able to download your app. In most cases, you will allow them to view and download stable versions. See
Managing the Permissions of an App.
5. If you have selected a stable product stage, the new app is now visible in your app store and can be installed on the mobile devices of your users. See
Using the App Store on a Mobile Device.
Scenario 2: You do not yet have ready-to-upload binaries
You want to upload a Mobile Designer project and let Mobile Administrator build the binaries for you (for example, for Android and iOS). In this case, a build configuration is required. This scenario assumes that your source code is not stored in a source code repository. It assumes instead that all required source code files are stored locally on your machine.
Proceed as follows:
1. Add an app with the option
I will enter the application details manually. Specify all required options such as the app name, description, category and icon. Specify the bundle ID for each platform on which you want to make the app available. This must be the same bundle ID as defined in the source. Otherwise, the build will fail. See
Specifying the Details for the New App Manually.
2. If you want to add screenshots, edit the app after it has been created. See
Editing an App.
3. Go to the
Permissions page of the app. Make sure that your users will be able to download your app. In most cases, you will allow them to view and download stable versions. See
Managing the Permissions of an App.
4. As no binaries have been uploaded yet, the app is not yet installable. Therefore, go to the
Build page of the app. On the
Build Configurations tab, add a new build configuration for each platform (for example, one for iOS and another for Android). See
Adding a Build Configuration. Make sure to specify the following in each build configuration:
a. Select the platform for which you want to create the build configuration.
b. Select a build node.
c. Select the product stage (stable or unstable).
d. Specify platform-specific information such as the iOS provisioning profile or Android developer certificate.
e. Select Build using webMethods Mobile Designer and enter a target name, that is, the "target device" as defined in Mobile Designer.
f. Define the app policies. For example, you can define that the app usage is to be logged and that app crashes are to be reported.
6. Do the following on the Build Configurations tab:
a. Specify a version number.
b. If you want, you can also specify a build number. If you do not specify a build number, is automatically increased when you launch the build configuration.
c. Click Browse and upload the zip file containing the source code.
d. Click Launch Selected Build Configurations.
7. Go to the
Build Jobs tab and view the job output. Make sure that the build jobs for the different platforms have been run successfully. See
Managing the Build Jobs of an App.
9. If you have selected a stable product stage, the new app is now visible in your app store and can be installed on the mobile devices of your users. See
Using the App Store on a Mobile Device.
 Contact Support
|
Community
|
Feedback
Contact Support
|
Community
|
Feedback