
When you start the Tamino X-Plorer, its main application window appears.
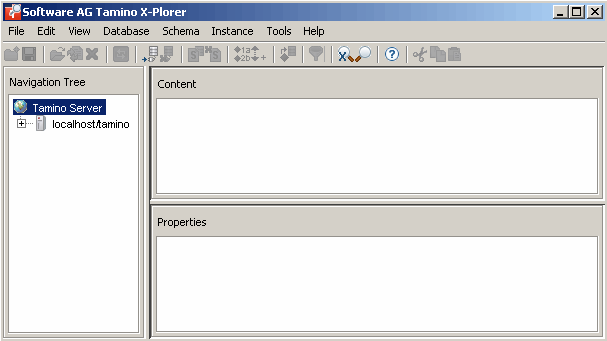
The main application window contains several panes: the navigation tree, the Content pane and the Properties pane. To modify the size of a pane, move the mouse pointer over the border separating the panes until the pointer changes, showing two arrows pointing in opposite directions. Then drag the border using the mouse until the panes have the desired size.
For details on keyboard access not mentioned in this documentation, consult the documentation of the individual operating system or software product.
The following topics are covered below:
The following menus are available:
| Menu | Using the commands in this menu, you can ... |
|---|---|
| File | Create a new collection or open, update, delete and save objects. Or exit the Tamino X-Plorer. |
| View | Switch on and off different elements of the main application window or refresh the display. |
| Database | Connect/disconnect to/from a database, or remove a database from the tree. |
| Schema | Define and undefine a schema, specify an instance descriptor or the instance fetch options. |
| Instance | Insert instances and apply a display filter. |
| Tools | Perform queries, invoke external tools, define additional external tools or define the options. |
| Help |
Invoke the online documentation. |
For reference information on each menu command, see Menu Commands in the Main Application Window.
You can execute the most important functions using the toolbar.
The following toolbar buttons are available:
 To switch the toolbar display on and off
From the menu, choose .
When the toolbar is displayed in the main application window, a check mark is shown next to this menu command.
The navigation tree on the left side of the main application window shows databases of Tamino XML Servers to which you have previously connected. When you invoke the Tamino X-Plorer for the first time, the list is empty. See Connecting to a Tamino Database for further information.
Note:
If you have removed all previously connected databases, no database
is shown at all.
You can expand or collapse the tree structure by clicking the plus or minus sign in front of an object. When using the keyboard, select the object and press RIGHT-ARROW or LEFT-ARROW.
When you select an object, details about this object are displayed in the Content pane and in the Properties pane, but the tree is not expanded.
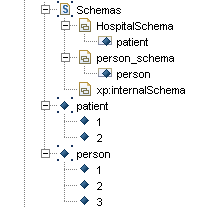
A database contains collections (the largest units of information within a database). A collection contains one group of schemas. For each schema containing a doctype, the collection contains one group of instances of that doctype. The following example shows different doctypes of schemas and the corresponding groups of instances.
The object types are indicated by the following icons:
|
|
Server |
|
|
Connected database |
|
|
Disconnected database |
|
|
TSD3 or TSD4 collection |
|
|
TSD2 collection |
|
|
WebDAV-enabled collection |
|
|
Group of schemas |
|
|
TSD3 or TSD4 schema |
|
|
TSD2 schema |
|
|
Doctype of XML schema |
|
|
Doctype of non-XML schema |
|
|
Group of XML instances |
|
|
Group of non-XML instances |
|
|
Group of XML instances without doctype (grouped by root element name) |
|
|
Group of non-XML instances without doctype (grouped by root element name) |
|
|
Group of instances with active filter |
|
|
XML instance |
|
|
Non-XML instance |
|
|
XML instance without doctype |
|
|
Non-XML instance without doctype |
For information on TSD4, TSD3 and TSD2, see Collections.
Arrows for browsing the instances may appear in the tree. See Handling Very Large Amounts of Data.
Note:
Problems within the navigation
tree may occur if more than one X-Plorer modifies the same data in the database
(for example, X-Plorer 1 scrolls through an instance group which is modified or
deleted by X-Plorer 2).
Context menus are available for the entries in the navigation tree. For example, the following context menu is available for a group of instances:
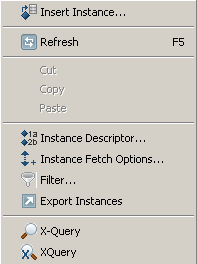
Additionally, two commands ( and ) appear when the selected node is expanded so that instances are shown and not all instances can be shown at the same time. Depending on the pack of instances that is currently shown (see Handling Very Large Amounts of Data), you can either display the next or last pack or the previous or first pack.
To invoke a context menu
Select the object for which you want to invoke a context menu.
Click the right mouse button.
Or:
Press SHIFT+F10.
The context menu appears and you can now choose the required command.
The Content pane at the top right of the main application window shows the content of the XML object that is currently selected in the navigation tree.
Non-XML instances in the following formats can also be shown in the Content pane: GIF, JPG, HTML, SVG and ASCII text.
Restrictions:
Objects in the HTML format
Under certain circumstances, the Content pane remains empty in HTML view (for example,
HTML pages based on frames or documents that contain external references such
as images).
Right-to-left orientation
Documents with right-to-left orientation or mixed orientation may not
be displayed in the correct sequence.
SVG Includes
In case an SVG document internally refers to another content, which
is not accessible in URL form. Displaying such a document would not be possible
for the SVG view.
SVG DTD Reference
Should an SVG document refer to a DTD or include entity declarations,
such a document cannot be added to Tamino as an XML object (as Tamino does not
support DTDs). However, it is possible to add this document as a non-XML
document.
SVG External Links and References
If an SVG document (that has been added to Tamino as a non-XML
object) has DTD or link references to an external URL, and this URL is not
accessible or is beyond proxy, the SVG content is rendered under default
environment settings. However, this may cause the SVG not to be rendered at
all, or to be rendered with an incorrect dimension (size).
Help:
SVG Context Help
Right-clicking on the SVG Image view opens a context help that can be
referred to while working with the content.
When information cannot be displayed in the Content pane or when no information is available, a hint is provided. For example, for a group of instances, no content information is available. In this case, the Content pane informs you to check the Properties pane.
Depending on the type of object, one or more views are available. When different views are available, they can be activated using the following buttons in the top right corner of the Content pane:
| Button | Keyboard | Description |
|---|---|---|
|
|
CTRL+SHIFT+T | Tree view for XML objects. Not available for non-XML instances. Whether lines are wrapped in tree view depends on the corresponding setting in the Options dialog box. See Setting the Tamino X-Plorer and X-Query Options for further information. |
|
|
CTRL+SHIFT+P | Plain view providing the XML code of an XML object. Or plain view providing the HTML code of an HTML document |
|
|
CTRL+SHIFT+H | Browser-like view for HTML documents with the restrictions described above. |
|
|
CTRL+SHIFT+I | Image view for non-XML objects (for example, GIF). |
|
|
CTRL+SHIFT+X | Hexadecimal view for non-XML objects of media type "text/plain". |
|
|
CTRL+SHIFT+S | SVG image view for Scalable Vector Graphics |
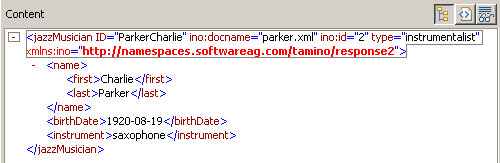
The following example shows the tree view for an XML instance:
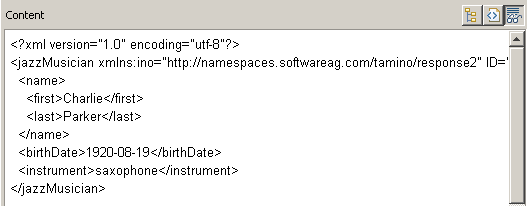
The following example shows the plain view for the same instance:
See Instances for further information.
To switch the Content pane display
on and off
From the menu, choose .
When the Content pane is displayed in the main application window, a check mark is shown next to this menu command.
The Properties pane at the bottom right of the main application window shows properties (metadata) for the object that is currently selected in the navigation tree. There are two types of information:
Schemas, Doctypes and Instance Nodes
For a schema, the schema type (for example, TSD4) and the media type
(for example, text/xml) are shown.
For a doctype, the doctype name is shown and whether this is a non-XML doctype or not.
For an instance (XML or non-XML), date and time of the last modification are shown as well as the media type (for example, text/xml or image/gif).
Other Nodes
Other nodes are the nodes for servers, databases, collections, groups
of schemas and groups of instances. The information shown in the
Properties pane depends on the type of node
which is currently selected in the navigation tree. It may include the names of
the doctype, schema, collection, database and server (URL and version). It may
also include the state of the database (connected or not), the type of
collection (user collection or system collection) and whether the collection is
WebDAV-enabled. For a group of schemas, the schema version (for example, TSD4)
is shown. For a group of instances, information about the instance descriptor
(if defined) and the instance fetch options is shown.
Depending on the type of object, one or more views are available. When different views are available, they can be activated using the following buttons in the top right corner of the Properties pane:
| Button | Keyboard | Description |
|---|---|---|
|
|
CTRL+SHIFT+T | Tree view. Whether lines are wrapped in tree view depends on the corresponding setting in the Options dialog box. See Setting the Tamino X-Plorer and X-Query Options for further information. |
|
|
CTRL+SHIFT+P | Plain view providing the properties of a schema, doctype or instance node as name/value pairs in a table. Not available for other nodes. |
The following example shows the properties for an XML instance in tree view:

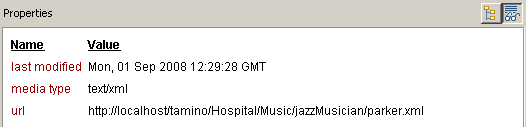
The following example shows the plain view for the same instance:
To switch the Properties pane
display on and off
From the menu, choose .
When the Properties pane is displayed in the main application window, a check mark is shown next to this menu command.
Most Tamino X-Plorer dialog boxes can be resized. This is indicated by the following symbol in the lower right corner of a dialog box:
![]()
Resizing a dialog box is helpful if a string is so long that it is not fully shown.
Keyboard users should additionally note the use of the following keys:
| Key | Function |
|---|---|
| ENTER | Activate the default button. |
| ESCAPE | Cancel the current operation and close the dialog box. |
You can navigate in the Tamino X-Plorer using the standard mouse and/or keyboard techniques for navigating through the menus and selecting items.
Keyboard users should additionally note the use of the following keys:
| Key | Function |
|---|---|
| F2 | Activate the selected input field for editing (edit mode). |
| ALT+DOWN-ARROW and ALT+UP-ARROW | Open and close a drop-down list box in a dialog
box. To open and close a drop-down list box in a table, invoke edit mode (F2) first. |
| TAB | Select the next control, or select the next item in a table. |
| CTRL+TAB | If a control uses TAB for its own purposes (for example, a table), you have to use CTRL+TAB to leave the context of current control. |