
You can connect to several servers and Tamino databases at the same time.
This document provides the following information:
You can connect to any Tamino database which has been previously activated using the Tamino Manager.
The navigation tree shows all servers and databases to which you have previously connected. The icon next to the database name indicates one of the following states:
|
|
A connection to the database has not yet been established. |
|
|
A connection to the database has already been established. |
 To connect to a Tamino database
From the menu, choose .
Or:
Choose the following toolbar button:
![]()
The Connect dialog box appears.
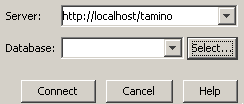
If this is the first time you are connecting to a server, the drop-down list boxes are empty and you have to type in the required information. The next time you access this dialog box, this information is available and can be selected from the drop-down list boxes.
Note:
All information entered in the Connect dialog box is reflected in the navigation tree.
If you accidentally mistyped, for example, the name of a database and thus
tried to connect to a non-existing database, you should remove this entry from
the tree. See Removing a Server or
Database from the Navigation Tree.
Tip:
The Connect dialog box appears
automatically when you try to expand the node for a database which has not yet
been connected.
Enter the path to the required server in the following format:
http://host/tamino
where host is the name of the computer on which the Tamino Server resides. You can specify "localhost" for your local computer, or a path such as "yourpc.ourcompany.com" for a remote computer.
Or:
Select the required server from the corresponding drop-down list
box.
Enter the name of the database to which you want to connect.
Or:
Select the required database from the corresponding drop-down list
box.
Or:
Choose the button to display all
databases on the specified server in an additional dialog box. You can then
choose the desired database. This feature works only with databases that have
been created starting with version 4.2.1. In all other cases, a message appears
saying that a list of databases is not available.
Choose the button.
When a password is required for the database, a login dialog box appears.
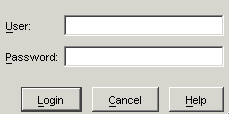
Specify the user ID and password with which you are defined to Tamino security and/or the authentication file of your web server (if authentication is active), and then choose the button.
If you have to specify a domain name with your user ID, specify it in the following way:
domain-name/user-ID
If the authentication of your web server is not active (which is the default setting) and you have no explicit user ID/password entry in the Tamino security file, you can enter any combination here. You are then assigned default access rights in Tamino.
The last user ID you entered in this text box is automatically remembered.
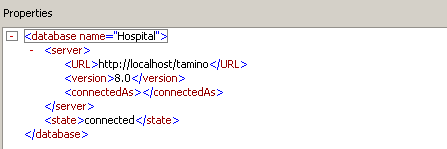
When you select a Tamino database in the navigation tree, the Properties pane shows the current Tamino version. For example:
When you disconnect from a database, an expanded node is collapsed and the icon in front of the database name indicates that this database is not connected.
Note:
When you leave the Tamino X-Plorer, all open connections to
databases are disconnected automatically.
To disconnect from a database
In the navigation tree, select the database to be disconnected.
From the menu, choose .
Or:
Choose the following toolbar button:
![]()
All servers and databases that you have previously accessed are automatically remembered. They are shown in the navigation tree each time you start the Tamino X-Plorer. When you do not need access to a specific server or database any longer, you can remove its entry from the tree.
Removed servers and databases are no longer available from the drop-down list boxes of the Connect dialog box.
To remove a server or database from the navigation tree
In the navigation tree, select the server or database to be removed.
From the menu, choose .
A dialog box appears asking whether you really want to remove the selected object.
To remove the object, choose the button.