
This document covers the following topics:
See General Commands for Managing Different Types of Objects for information on how to open, update and save schemas.
A schema is created outside the Tamino X-Plorer, using an external tool such as the Tamino Schema Editor. After a schema has been created, you can use the file containing the schema to define the schema in the Tamino database. You can also define a schema by copying an existing schema from another database.
A schema is always defined in the collection that is currently selected.
For non-XML objects, you only need to define a simple doctype in a schema. For example:
<?xml version="1.0" encoding="UTF-8"?>
<tsd:nonXML name="gif-file"/>
 To define a schema
In the navigation tree, select the collection that is to contain the schema.
From the menu, choose .
Or:
Choose the following toolbar button:
![]()
Or:
From the context menu, select .
The Define Schema dialog box appears.
Using the different pages, you can define a schema in one of the following ways:
Select the desired page and specify all required information as described below under the corresponding heading.
Choose the button.
Caution:
Do not specify information on different pages. When you choose
the button, only the information on the currently
shown page is used.
This page is used to specify the name of a file containing a schema.

Either specify the path and file name in the text box or choose the button to select the file from a dialog box.
This page is used to copy an existing schema from another database.
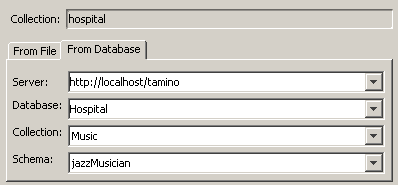
When you have previously connected to a server and database, you can select their names from the corresponding drop-down list boxes. If you want to connect to another server and database, enter the required names in the drop-down list boxes.
When the specified database is currently not connected, a dialog box appears asking whether you want to connect. Choose the button to invoke the Connect dialog box. See Connecting to a Tamino Database.
When a database has been specified and is connected, the names of all of its collections are available in the Collection drop-down list box. Select the collection containing the desired schema.
When a collection has been selected, the names of all of its schemas are available in the Schema drop-down list box. Select the schema to be copied.
When you undefine a schema, it is deleted permanently from a collection in the database.
| Warning: All instances of all doctypes belonging to this schema will also be deleted. |
Note:
If you want to undefine a schema
or delete a collection, you need exclusive access to the collection. Otherwise,
these commands result in an error. The error message indicates that the
documents could not be locked. No user is allowed to access this collection
while an "undefine schema" or "delete
collection" is about to be executed. This error will also occur
if you are the user who is accessing a group of instances of that collection,
for example, in an XQuery result. If this error occurs, the problem will
persist until the database is disconnected and connected once again.
Workaround: Disconnect the database, connect it once again and then execute the
command without previously accessing instances of this collection.
To undefine a schema
In the navigation tree, select the schema you want to undefine.
From the menu, choose .
Or:
Choose the following toolbar button:
![]()
An instance descriptor can be defined for each doctype which defines XML instances. It defines the information, including the sorting sequence, that is to be shown for the corresponding instances in the navigation tree. This information may be, for example, a surname, city and phone number.
An instance descriptor consists of one or more items. Each item is an X-Query expression. See X-Query User Guide and X-Query Reference Guide in the Tamino XML Server documentation for detailed information on X-Query expressions.
For non-XML instances only the ino:docname is shown in the
navigation tree. If the ino:docname is not defined, the
ino:id is shown instead.
Note:
The instance descriptor applies to both the main application window
and the X-Query windows (it does not apply to the XQuery tool). The sorting
sequence, however, is only applied in the main application window. In an
X-Query window, you can specify your own sorting sequence in the query
expression (for example, with the sortby clause).
The following instance descriptor has been defined:
/patient/name/firstname
/patient/name/surname
/patient/therapy/medication/type/@brand
This displays the following instances in the navigation tree:
First name and surname have been found for both instances.
A medication was only found for one instance containing the following information:
<therapy>
  <medication>
     <type brand="Gallopamil" form="tablet">Beta-blocker</type>
       <dosage>Twice daily</dosage>
  </medication>
</therapy>
When an instance does not contain a value for an item defined in the instance descriptor, "<not_defined>" is shown in the navigation tree. In the above example, "<not_defined>" is shown because an "other" therapy has been used instead of a "medication" therapy:
<therapy>
  <other>
    <description>Decompression chamber</description>
    <amount>18 hrs</amount>
  </other>
</therapy>
To specify an instance descriptor
In the navigation tree, select the desired doctype.
From the menu, choose .
Or:
Choose the following toolbar button:
![]()
Or:
Choose from the
context menu of the instance group.
The Specify Instance Descriptor dialog box appears, which includes the following panel:
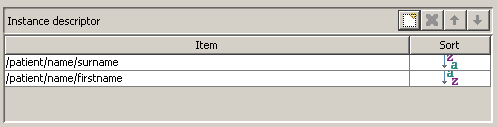
When you are modifying an existing instance descriptor, the dialog box shows the X-Query expressions that are currently defined. The sequence of the X-Query expressions determines the sequence in which the information for an instance is shown.
Edit the existing X-Query expressions or use the following buttons:
|
|
Add a new item. You can then specify an X-Query expression (case-sensitive) in a new line. |
|
|
Delete the selected X-Query expression. |
|
|
Move the selected X-Query expression up one position. |
|
|
Move the selected X-Query expression down one position. |
Optionally: select a cell in the Sort column
and from the resulting drop-down list box, choose either ascending
(![]() ) or descending
(
) or descending
(![]() ) sorting sequence
for the corresponding item.
) sorting sequence
for the corresponding item.
Choose the button to save the instance descriptor.
The instance fetch options limit the number of instances that can be shown in a specific group of instances at the same time. They are always defined for a doctype.
When you expand the node for a group of instances in the navigation tree, the first pack of instances in this group is shown. You can define the number of instances that are to be fetched with each pack.
Each pack that you fetch (see Handling Very Large Amounts of Data) remains visible in the navigation tree until the maximum number of kept instances is reached. You can also define this number.
Example: when the number of instances per pack is 50 and the maximum number of kept instances is 4000, you can fetch 80 packs where each pack has 50 instances. All of these instances will be shown in the navigation tree. However, when you fetch the 81st pack, the first pack is removed from the tree to make room for the new pack.
The default values are defined in the Options dialog box. See Setting the Tamino X-Plorer and X-Query Options for further information.
To specify the instance fetch options
In the navigation tree, select the group of instances for the desired doctype.
From the menu, choose .
Or:
Choose the following toolbar button:
![]()
Or:
In the context menu of the doctype, choose .
The Specify Instance Fetch Options dialog box appears showing the values for the currently defined fetch options.
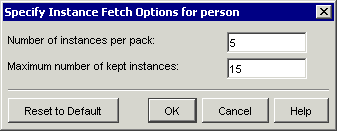
Specify the following information:
- Number of instances per pack
The number of instances that are to be fetched with each pack.
- Maximum number of kept instances
The maximum number of instances that can be shown in a group of instances at the same time.
Optionally: if you want to reset the values that are currently defined in this dialog box to the default values, choose the button.
Choose the button to save the new instance fetch options.