
Using ApplinX Repository Folders' Structure to Organize Web Pages
Natural UNIX: Integrating a Login Page in the Web Application
Implementing & Controlling JavaScript Events using the gx_event Object
Retrieving Data from Fields Outside the Modal Window Currently Displayed
Customizing the Application to Pass Natural Parameters Dynamically
Every ApplinX Web application contains a template file which is used by all the pages. It is possible to override parts of the default template by using placeholders. These placeholders are defined in the template and can be overridden with customized content on generated pages and generate screen groups. Using placeholders in the template provides flexibility on the overall look and feel of individual pages. For example, if the template supplies the users with links on the left side of the page and on a specific page, it is required that these links be removed, the template's default content can be overridden for that page section, with customized content for that particular page. Refer to the Composite demo, template.jsp/template.master and login.jsp/aspx.
 To create a custom template for a screen/screen group (JSP):
Generate a Web page for the screen/screen group (refer to Generating a Framework Page for a Screen/Screen Group).
For each template part that you would like to design for this
screen/screen group, ensure that the area that is to be overridden is enclosed
by a gx:placeholder tag. For example, if you would like to change
the page header, implement the following in the
template.jsp file.
<gx:placeholder id="<TemplatePlaceHolderID>">
     .
     .
        <your page header JSP code>
     .
     .
</gx:placeholder>
Server side functions referred by the template.jsp file will have to be placed in the GXBasicContext.java file.
In the jsp file that was generated for the screen/screen group
(generatedpage.jsp), override a template placeholder by
adding your content and enclosing it within a gx:content tag, setting the
attribute ContentPlaceHolderID with the ID of the template place
holder previously defined.
<gx:content ContentPlaceHolderID="<TemplatePlaceHolderID>">
     .
     .
                  <YOUR CONTENT HERE>
     .
     .
</gx:content>
To create a custom template for a screen/screen group (.NET):
Generate a Web page for the screen/screen group (refer to Generating a Framework Page for a Screen/Screen Group).
For each template part that you would like to design for this
screen/screen group, ensure that the area that is to be overridden is enclosed
by a asp:contentplaceholder tag. For example, if you would like to
change the page header, implement the following in the
template.master file.
<asp:contentplaceholder id="<TemplatePlaceHolderID>" runat="server" >
     .
     .
        Links section
     .
     .
</asp:contentplaceholder>
Server side functions referred by the template.master file will have to be placed in the template.master.cs/vb file.
In the aspx file that was generated for the screen/screen group
(generatedpage.aspx), override a template placeholder by
adding your content and enclosing it within a asp:Content tag, setting the
attribute ContentPlaceHolderID with the ID of the template place
holder previously defined.
<asp:Content ID="<tagID>" ContentPlaceHolderID="<TemplatePlaceHolderID>" runat="server">
     .
     .
                  <YOUR CONTENT HERE>
     .
     .
</asp:Content>
During the process of creating a new Web application, you are requested to select a template. By default, these templates are ready to use Web site designs. You can create a template and add it to the list of available templates.
Before making changes in the css files, it is highly recommended to backup these files.
Changing colors in the css files can effect the entire look and feel of the application, therefore it is recommended to test the changes on a few different screens.
Rather than changing existing classes to meet the template requirements, try adding new classes of your own.
Instant pages rely on absolute positioning defined in the styles_Instant.css. Do not change position style attributes in the css files.
Pages generated with absolute positioning: changing position attributes in the style_generated.css file may cause them not to display properly (this can be overcome in design time).
Remember that changes made to one css file will usually need to be implemented to all three css files, if both generated pages and instant pages are to have the same look and feel.
To create a new template:
Create a new Web application using one of the built-in templates.
Design the template.jsp/template.master file as desired.
Ensure that the template includes:
JSP: <gx:placeholder id="PagePlaceHolder"/> tag.
.NET: <asp:ContentPlaceHolder ID="GXPagePlaceHolder" runat="server"/> tag.
This tag's position on the screen can vary and can be placed wherever you wish. Removing this tag means that screen content for generated and instant pages will not be displayed.
Package the template and place it in the installation directory, so that it will be displayed when using the Create new Web Application wizard:
Create a new directory in the Templates directory in the ApplinX installation folder. The name of the directory will be the name of the template displayed in the New Web Application wizard.
Within this directory create a common directory and a java/dotnet (according to the template you created) directory. Within the common directory, create a css and images directory:
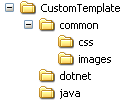
In the css folder place all the css files that you modified/created.
In the images folder place all the image files that you modified/created in the template file or in the css files.
In the common folder place the image that the wizard will display as a preview of this template. The image size should be 630x400pixels and the name of the image file must be thumbnail.jpg.
Place the template file in the relevant java/dotnet folder.
Navigation menus, are very common in Web applications. They provide a direct, quick navigation to any page in the application. In ApplinX Web applications, navigation menus can be used to directly access any available screen in the host application, thus eliminating the need of using the original menu screens in the host while fully preserving their functionality. This is achieved using the application map. Each menu option will be an accessible host screen, and clicking it will invoke the ApplinX application's map with the screen's name as its parameter.
Refer to the Composite demo, template.jsp/template.master.cs in which
the proposals/customers links set a hidden field with the desired screen name
and invoke a server side function (beforePaneMenuBtn_Click) that
performs the navigation to the desired screen (refer to
/GXBasicContext.jsp/template.master.cs).
ApplinX Web application's Web pages can be hierarchically organized according to the folder structure of the screens they represent. For example, if the screen MainMenu resides in the folder general\menu_screens in the ApplinX repository, it can reside under the directory \root folder\general\menu_screens in the Web application.
To use ApplinX repository folder structure to organize Web pages:
Refer to Configuring your Framework and access the Framework Configuration Editor.
Ensure that the Use Folders check box in the General node is selected. The field Virtual directory is displayed.
Enter the name of the virtual directory of the Web application. For example: CompositeDemo.
To generate a Web page into a specific folder:
Create a directory structure under the root folder of the Web application that corresponds to the folder structure of the ApplinX repository.
You can either select the directory within the generation wizard (JSP only), or you can move the generated pages to the relevant directory (JSP and .Net).
ApplinX allows passing various connection parameters from the code in order to control the configuration of the application.
For example: Controlling from the code if the application will work against a trace file.
Refer to the Composite demo (with/without a trace file).
.NET:
gx_appConfig.SessionConfig.addVariable(GXBaseObjectConstants.GX_VAR_REPLAY_FILE,null);
	  // to cancel the replay file configured
JSP:
 getGXAppConfig().getSessionConfig().addVariable(GXBaseObjectConstants.GX_VAR_REPLAY_FILE,null);
	  // to cancel the replay file configured
For a list of possible connection variables, see GXBaseObjectConstant class.
For code sample, see Composite Demo Application: "Login" path procedure - ApplinX repository Login.aspx / Login.aspx.cs - .NET Login.jsp / WEB-INF/classes/contexts/Login.java - JSP
It is necessary to use the Flickering of Host Sessions feature when one of the following happens:
In the browser, a blank screen (empty screen) is displayed when navigating between two host screens.
In the browser you are required to submit the [ENTER] key (or any other key) twice in order to navigate to the next host screen.
The initial need for Flicker arises when specific host screens are received 'split' between several buffers of data. Thus ApplinX Server needs to be informed to wait an additional amount of time for the complete screen to arrive. This additional amount of time is defined (in milliseconds) in the Flicker parameter in the Application Configuration dialog box.
The flicker setting applies to the entire ApplinX application, meaning that if the flicker is set to 500ms, after each host transaction the flicker time will be added to the communication time. In other words, the entire application will be 'slowed down' by the flicker time. Therefore this value should only be set for the entire application according to the guidelines detailed in Handling Flickering of Screens. Also refer to Waiting for Screens using Wait Conditions and to the Perform background check for host screen changes parameter in the Configuration Editor for further details.
Wait conditions are used to handle specific 'problematic' screens that require waiting an additional amount of time for the complete screen to arrive. Refer to Handling Flickering of Screens for further details regarding using the wait conditions.
In GXBasicContext.java, in the method
gx_postSendKey, add the following code:
GXGetScreenRequest sr = new GXGetScreenRequest();
//An example of adding a wait condition in a page that waits for specific screens according to the key sent.
if(gx_context.getGXForm().get_HostKeys().equalsIgnoreCase("[PF3]")
&& gx_context.getGXSession().getScreen().getName().equalsIgnoreCase("CustomerDetails"))
{
    sr.addWaitCondition(new GXWaitForScreen("MainMenu",50000,0));
    gx_context.getGXSession().getScreen(sr);
}
In GXBasicWebForm.cs, in the method
user_postSendKeys, add the following code:
GXGetScreenRequest sr = new GXGetScreenRequest();
//An example of adding a wait condition in a page that waits for specific screens according to the key sent.
if(gx_form.HostKeys.Equals("[PF3]")
&&  gx_session.getScreen().getName()=="CustomerDetails")
{
    sr.addWaitCondition(new GXWaitForScreen("MainMenu",50000,0));
    gx_session.getScreen(sr);
}
In GXBasicContext.java, in the method
gx_postSendKey, add the following code:
GXGetScreenRequest sr = new GXGetScreenRequest();
if(gx_context.getGXForm().get_HostKeys().equalsIgnoreCase("[enter]")
&& gx_context.getGXSession().getScreen().getName().equalsIgnoreCase("CustomerDetails"))
{
    long lTimeout = 50000;//millisecond
    long lFlicker = 750;//millisecond
    sr.addWaitCondition(new GXWaitHostQuiet(lTimeout,lFlicker));
    gx_context.getGXSession().getScreen(sr);
}
In GXBasicWebForm.cs, in the method
user_postSendKeys, add the following code:
GXGetScreenRequest sr = new GXGetScreenRequest();
if(gx_form.HostKeys.Equals("[enter]")
&&  gx_session.getScreen().getName()=="CustomerDetails1")
{
    long lTimeout = 50000;//millisecond
    long lFlicker = 750;//millisecond
    sr.addWaitCondition(new GXWaitHostQuiet(lTimeout,lFlicker));
    gx_session.getScreen(sr);
}
It is possible to display the host keys for the current host screen (analyzed by ApplinX Server according to the defined host keys patterns) as Web buttons, hyperlinks or in other advanced formats (images, etc.). In addition, it is possible to fully customize the host keys using the GXIHostKeysTagUserExit interface (adding buttons, removing links, changing captions and more). To make complex changes to the control, such as adding a row/column, implement the interface GXIHostKeysTagUserExit as necessary.
Refer to Host Keys for configuring a host key pattern.
To display and customize the host keys:
By default, after defining a host key pattern, the analyzed keys are displayed as hyperlinks in the Web application.
To display the keys as buttons, refer to Configuring your Framework and access the Framework Configuration Editor. Select Buttons in the Host keys field in the Instant node.
Customization of the host keys' appearance (colors, fonts etc.) is done in the style sheets (css\styles_instant.css and css\styles_generated.css), in the gx_hky class.
For advanced customization, it is possible to use the Host Keys' control. By using the template option of the control, it is possible to write a custom template for displaying the host keys. The following code is usually placed in one of the template jsp/aspx files and displays a different image for each host key; the image name is determined according to its caption. In addition, the keys are positioned vertically:
<gx:hostKeys vertical="true" border="0" keyType="template">
        <a href="#" onclick="gx_SubmitKey('$(ACTION)')" title="$(ACTION)-$(CAPTION)">
        <img src="images/keybuttons/btn$(CAPTION).gif" border="0"/>
        </a>
</gx:hostKeys>
<gx:GXHostKeysControl runat="server" vertical="true" border="0" KeyType="Template">
	        <a href="#" onclick="gx_SubmitKey('$(ACTION)')" title="$(ACTION)-$(CAPTION)">
	        <img src="images/keybuttons/btn$(CAPTION).gif" border="0"/>
	        </a>
</gx:GXHostKeysControl>
In addition, add the following import statement to the file
containing the control: <%@ Register TagPrefix="gx"
Namespace="com.sabratec.dotnet.framework.web.controls" Assembly="GXDotnet"
%>
To fully customize the host keys control:
. In the GXBasicContent.java file, the
gx_onInit method, add the following line:
getGXAppConfig().setHostKeysTagUserExit(new transforms.UserHostKeysTagTransform());
: In the GXBasicWebForm file, the OnInit
method, add the following line:
gx_appConfig.setHostKeysTagUserExit(new transforms.UserHostKeysTagTransform());
In your Web application, transforms directory, open the
userHostKeysTagTransform file (when upgrading your
application, copy the file from the relevant framework type new application)
and implement the onHostKeysComplete interface.
public void onHostKeysComplete(GXITableTag hostKeysTableTag, GXIScreen screen) {

            super.onHostKeysComplete(hostKeysTableTag, screen);

            /*
            // add link
            addLink("Host help","gx_SubmitKey('[pf1]')");

            //get all tags
            GXITag[] tags = getHostKeysTags();

            for (int index=0; index<tags.length; index++){
                  //get tag
                  GXITag tag = tags[index];

                  if (tag instanceof GXILinkTag){ // or GXIButtonTag or GXHtmlString (for type="template")
                        GXILinkTag link = (GXILinkTag) tag;

                        // change tag text
                        if (link.getText().indexOf("Prev") >= 0){
                              link.setText("Previous");
                        }

                        //remove tag
                        if (link.getText().indexOf("Pagedn") >= 0){
                              removeTag(link);
                        }
                  }
            }
            */

      }
public override void onHostKeysComplete(GXITableTag hostKeysTableTag, GXIScreen screen)
    {
        /*
        base.onHostKeysComplete(hostKeysTableTag, screen);

        //add link
        addLink("Host help", "gx_SubmitKey('[pf1]')");

        //get all tags
        GXITag[] tags = getHostKeysTags();

        //loop on controls in hostKeys array
        foreach (GXITag tag in tags)
        {
            if (tag is GXILinkTag)  // or GXIButtonTag or GXHtmlString (for type="template")
            {
                //get link
                GXILinkTag link = (GXILinkTag)tag;

                // change control text
                if (link.getText().IndexOf("Prev") >= 0)
                {
                    link.setText("Previous");
                }

                //remove control
                if (link.getText().IndexOf("Pagedn") >= 0)
                {
                    removeTag(link);
                }
            }
        }
        */
    }
For complete description of the Host Keys control properties, see Host Keys Component.
Sample code can be found in the Instant Demo application. Template.jsp , template.master (.NET) - contains an example for using the Host Keys control.
The ApplinX Framework contains a built-in feature of a screen locker. The purpose of a screen locker is to indicate to the user by means of a message, that the application is processing his request, and blocks him from interfering with the current process by repressing a button/link or keyboard PF/ENTER.
To activate the screen locker:
Refer to Configuring your Web Application and access the Framework Configuration Editor. In the General node, select Use screen locker.
Use the width/height percentages in the file template/screenLocker.htm to control the location of the message.
Replace the text "Please wait" with an alternative text/image as required.
Note:
When adding a link in the page that performs a JavaScript action it
is highly recommended to use onclick event and not the href
attribute. Using the href attribute will cause the screen locker to be
activated.
It is also possible to control the screen locker on the Web page level (refer to Handling the Screen Locker on the Page Level).
When the Natural UNIX host requires separate connection for each individual user together with support of password changing/expiring, the ApplinX Framework provides a suitable Login Page to be used in your Web application. The Login page should be displayed before attempting to connect to the host. In this page the user is required to enter the user name and password. Only after the user name and password are authenticated by the host, the connection to the host is made. The look and feel of the Login page can be edited and changed to suit your Web application. The login page logic is implemented within the ApplinX Framework.
Note:
The hostLogin page is provided with your Web application but can also
be created using the Base Object. Refer to the Start>Programs>Software AG
ApplinX>Documentation>ApplinX Development API for further information.
To use the Login page:
Edit the index.jsp/index.aspx file and instead of
gxfirstpage.jsp/gxfirstpage.aspx, enter
hostLogin.jsp/hostLogin.aspx, or refer your end users to this
page.
The ApplinX JavaScript engine provides a cross browser event object that enables creating dynamic web pages. The gx_event object is created within the Javascript engine. Whenever an event is triggered it is passed to the user Exit functions (/js/userExits.js) and from there to the page-level function (if one exists).
gx_event enables handling browser events such as OnKeyDown. The
following example will cancel the OnKeyDown event whenever the
[Enter] key is pressed on a certain text area ("myTextArea"), prevent the page
from being submitted and manually add a newline character to the text area
value:
Assume your JSP/ASPX page has the following input:
<textarea row="5" id="myTextArea" ></textarea>
Add the following pageOnKeyDown function to your generated
page
function pageOnKeyDown(gx_event){
	...
	var win = gx_event.window;
	if (gx_event.keyCode==13 && gx_event.element.id=="myTextArea"){
		gx_event.cancel();
		GXBrowserUtil.getElement("myTextArea").value += "\r\n"
	}
...
}
Relevant data, such as host messages or errors, may sometimes appear in the area outside the currently displayed modal window frame. To retrieve these messages/errors it is necessary to retrieve the entire screen content rather than just the modal window content. This can be achieved by writing the following method:
private String getMessgeOutsideWindow(int MessageRow, int MessageCol){
     try {
             // Create a Screen Request the would ignore modal window definition
             GXGetScreenRequest gsr = new GXGetScreenRequest();
             gsr.addVariable(GXBaseObjectConstants.GX_VAR_HOST_WINDOW_ENABLED,"false");

             // Get the current screen from ApplinX server using the Screen request
             GXIScreen screen = getGXSession().getScreen(gsr);

             // Return Field content according to the specified position
             GXPosition pos = new GXPosition(MessageRow, MessageCol);
             return screen.getFields().getFieldByPosition(pos).getContent();

     } catch (GXGeneralException e) {
             return null;
     }
}
private string getMessgeOutsideWindow(int MessageRow, int MessageCol)
{

      // Create a Screen Request the would ignore modal window definition
      GXGetScreenRequest gsr = new GXGetScreenRequest();
      gsr.addVariable( GXBaseObjectConstants.GX_VAR_HOST_WINDOW_ENABLED,  "false");

      // Get the current screen from ApplinX server using the Screen request
      GXIScreen screen = gx_session.getScreen(gsr);

      // Return Field content according to the specified position
      GXPosition pos = new GXPosition(MessageRow, MessageCol);
      return screen.getFields().getFieldByPosition(pos).getContent();
}
Note:
This method can be added to GXBasicContext or to a
generated page's code class.
By default, modal windows are disabled for mobile devices such as iPad and iPhone (see Window > Enable modal windows under Web Application Configuration Parameters). This behavior can be overridden with the user exit within the userExit.js file. See code snippet below:
// sample code of to check if modal window is supported.

function gx_IsSupportingModalWindow(){
var ua = navigator.userAgent;
if (ua){
return !(( ua.indexOf("iPad")>-1)
|| (ua.indexOf("iPhone")>-1)
|| (ua.indexOf("Mobile")>-1)
|| (ua.indexOf("Android")>-1));
}
return true;
}
Connecting to a host printer queue requires users to supply a device name. The device provides the host information as to which printer queue to associate each user. Usually, each user or IP address has a pre-defined device name. This data can be stored in a database and retrieved before creating the printer session in the ApplinX web application.
The default behavior of the ApplinX Framework when it encounters an ApplinX session error is to redirect the user to the error.jsp page. This page will specify the error code and will also provide a description of the error. For example: If, for some reason, the ApplinX session has been disconnected, pressing a PF key in the web application will result in the following error:
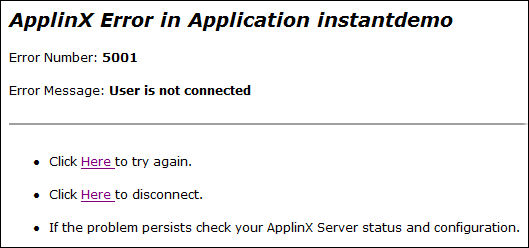
However, in some cases you may want to capture these errors and perform a different action. The following example will demonstrate how the default ApplinX method can be overridden with new functionality.
For example, upon receiving a 5001 error, you may want the web application to automatically try to re-establish a connection to the host.
To do this, add the following code to the GXBasicContext
class:
// Override the gx_handleSessionError with additional functionality
public void gx_handleSessionError(GXGeneralException ex){
	try{
		// Is the error code 5001?
		if (ex.getErrorCode()== 5001){
			// Try to re-establish a connection to the host
			getResponse().sendRedirect("gxfirstpage.jsp");
		}
		else{	// Otherwise, perform the default behavior
			super.gx_handleSessionError(ex);
		}
	}
	catch (IOException e){
		// TODO : Handle Failed page redirection
	}
}
To do this, add the following code to the GXBasicContext
class:
public override void gx_handleSessionError(com.sabratec.applinx.baseobject.GXGeneralException err)
{
   if (err.getErrorCode() == 5001)
   {
      // Try to re-establish a connection to the host
      Response.Redirect("gxfirstpage.aspx");
   }
   else
   {	// Otherwise, perform the default behavior
      base.gx_handleSessionError(err);
   }
}
One may want to customize the Web application's error page for any number of reasons. These reasons may include providing the error page in non-English languages, or to change the look and feel of the page or add additional messages.
The look and feel of the page can easily be customized by changing the layout of the error.jsp page. Changing the page's dynamic content can be achieved by editing the error.java file.
The error.java/Error.apsx.cs/vb file contains an
example for translating a specific error message to another language, according
to the user's locale setting. In order to activate this functionality
un-comment the CustomizeErrorHandling method and un-comment the call to
CustomizeErrorHandling in gx_onLoad in the error.java
file (JSP) or Page_Load in the error.aspx.cs file
(.Net).
ApplinX supports a single sign-on using a Kerberos ticket on the platform AS/400. A corresponding start-up response code is given. This section covers the following topics:
See also Start-up Response Record in the Reference Guide.
The following variables are provided:
| Variable Name | Description | Value Type |
|---|---|---|
(VAR) USER |
User profile name | us-ascii char(x) |
(USERVAR) IBMSUBSPW |
Password in clear text | binary(10) |
(USERVAR) IBMCURLIB |
Current library | us-ascii char(x) |
(USERVAR) IBMIMENU |
Initial menu | us-ascii char(x) |
(USERVAR) IBMPROGRAM |
Program to call | us-ascii char(x) |
(USERVAR) IBMTICKET |
Kerberos services token | binary(16384) converted to String in UTF-8 encoding
|
(USERVAR) IBMSENDCONFREC |
YES | NO | us-ascii char(3) |
The following parameters have been added to class GXBaseObjectConstants.
These are described in more detail in the corresponding Javadoc.
GXBaseObjectConstants.GX_VAR_AS400_USERNAMEGXBaseObjectConstants.GX_VAR_AS400_PASSWORDGXBaseObjectConstants.GX_VAR_AS400_LIBRARYGXBaseObjectConstants.GX_VAR_AS400_MENUGXBaseObjectConstants.GX_VAR_AS400_PROGRAMGXBaseObjectConstants.GX_VAR_AS400_KERBEROS_SERVICES_TICKETGXBaseObjectConstants.GX_VAR_AS400_KERBEROS_ENCODING (1)GXBaseObjectConstants.GX_VAR_AS400_STARTUP_RESPONSE (2,3)Notes:
public void gx_initSessionConfig(){
    GXWebAppConfig gx_appConfig = getGXAppConfig();
    // Optional variables for all the project pages, list of variables can be found in the documentation
    // for device name
    gx_appConfig.getSessionConfig().addVariable(GXBaseObjectConstants.GX_VAR_AS400_USERNAME, "username");
    gx_appConfig.getSessionConfig().addVariable(GXBaseObjectConstants.GX_VAR_AS400_PASSWORD, "password");
    gx_appConfig.getSessionConfig().addVariable(GXBaseObjectConstants.GX_VAR_AS400_LIBRARY, "libraryName");
    gx_appConfig.getSessionConfig().addVariable(GXBaseObjectConstants.GX_VAR_AS400_MENU, "menuName");
    gx_appConfig.getSessionConfig().addVariable(GXBaseObjectConstants.GX_VAR_AS400_PROGRAM, "programName");
    gx_appConfig.getSessionConfig().addVariable(GXBaseObjectConstants.GX_VAR_AS400_KERBEROS_SERVICES_TICKET, "KerberosServicesTokenAsString");
    gx_appConfig.getSessionConfig().addVariable(GXBaseObjectConstants.GX_VAR_AS400_KERBEROS_ENCODING, "encodingName");


    gx_appConfig.getSessionConfig().addVariable(GXBaseObjectConstants.GX_VAR_AS400_STARTUP_RESPONSE, "YES");

    //For ApplinX session ID
    gx_appConfig.getSessionConfig().setSessionId("yourSessionId");
}
public override void gx_initSessionConfig()
{
    gx_appConfig.SessionConfig.addVariable(GXBaseObjectConstants.GX_VAR_AS400_KERBEROS_SERVICES_TICKET, getToken());
    gx_appConfig.SessionConfig.addVariable(GXBaseObjectConstants.GX_VAR_AS400_KERBEROS_ENCODING, "encodingName");
}


public string getToken()
 {
    string spn = "your_spn";
    KerberosSecurityTokenProvider k1 = new KerberosSecurityTokenProvider(spn, System.Security.Principal.TokenImpersonationLevel.Impersonation, CredentialCache.DefaultNetworkCredentials);
    KerberosRequestorSecurityToken T1 = k1.GetToken (TimeSpan.FromHours(1)) as KerberosRequestorSecurityToken;
    string value = System.Text.Encoding.GetEncoding("encodingName").GetString(T1.GetRequest());
    return value;
 }
You can specify different parameters at runtime (for example NATPARM) depending on the business rule you choose. This section consists of two parts:
Important:
This should be done after upgrading the web application (JSP or .NET):
Upgrade the web application using the ApplinX Web Application Manager in the Designer
(refer to Framework Management in the Web Application Development documentation).
To customize the ApplinX part
Go to the ApplinX web application folder.
Edit the GXBasicContext.java file.
In the gx_initSessionConfig method add the following line:
gx_appConfig.getSessionConfig().addVariable(GXBaseObjectConstants.GX_VAR_NATUX_OPTIONAL_CUSTOM_INFO, "PARM=<yourParmFile>");
Change the <yourParmFile> with the parameter file you want to use and, if necessary, add some logic to choose the right one.
Use the build script (make.sh etc) to recompile this class.
To customize the Natural part
Go to $NATDIR/$APXNODE directory.
Edit the apx.sh file and add "$CUSTOM" to the natapx line.
Note:
If you want to pass the natural parameter file in the "$CUSTOM" parameter, remove the PARM=$PARAMETER from the natapx line.