
Creating a Button / Hyperlink for Executing a Path Procedure
Binding Procedure Outputs to an ApplinX Framework Based Web Page
Handling Web Application Windows using the gx_windows Object
Replacing Static Host Confirmation Message with JavaScript Confirmation Pop-up Box
Opening an Independent Pop-up Box that doesn't have a Corresponding Host Screen
Refer to:
The ApplinX Framework for JSP provides an easy and simple way to develop a Web page based on host screen(s). This method is especially advantageous when the design of the pages is performed by a third party and all you have to do is just "bind" the HTML to ApplinX.
 To create a new JSP page:
Create a new JSP page and name it <SCREEN_NAME>.jsp. You can copy its content from template.jsp.
Import the tag library. The line can be copied from template.jsp.
Create a new java context class under classes\contexts and name it <SCREEN_NAME>.java. Copy the file content from template.java. Ensure that you change the class name to <SCREEN_NAME>.
Set the inheritance to GXDefaultLogicContext/GXBasicContext
according to the development method.
Design the JSP page any way you like, or by pasting the third party HTML.
Declare <gx:form> opener and closer tags as the
form tags.
If you require to bind an AppField to a dynamic tag:
Add a prefix of gx: to the closer and end of the tag, or "/" closer for example, <gx:span id="span1"></gx:span> or <gx:input id="input1"/>
Add an ID attribute: id="<APPFIELD_NAME>" to the tag which equals the AppField name you want the field to bind to.
Make sure all the attributes are with "".
The "class" attribute on the tag should be replaced with cssClass (reserved word in Java).
Any Java IDE that supports Web applications should auto-complete for the tag attributes. For any missing attributes or tags, you can expand the HTML tags library. The Tags library list can be viewed in the classes\tags folder, or GXTags.tld file under WEB-INF folder.
Note:
A gx tag should be well formed just like an XML node.
In order to work with ApplinX Framework the new page context class
should extend from GXDefaultLogicContext or
GXBasicContext.
If you are using a context class for the JSP page, change the
inheritance of the new context class, to GXDefaultLogicContext or
GXBasicContext.
If you are not using a context class for the JSP page, set the context
to GXDefaultLogicContext or GXBasicContext, by
setting it in the gx:html : <gx:html
gx_context="contexts.GXDefaultLogicContext"
The filling-in of fields is performed at run time since each tag can get its content dynamically, which allows the ApplinX Framework engine to set content for the tags, without writing any code in them. The tag library allows you to view the JSP page on any other HTML editor, and redesign the page without worrying about the host logic.
If you decided to use GXBasicContext, change each
link/button that performs any logic to "<gx:input ... " or
"<g:a ..." and add an onserverclick attribute, with a function
name (without "()" ) in the context class of the JSP page. The context class
should contain a public function with this name without any parameters.
Note:
When inheriting from GXBasicContext, you should call the method
gx_attach() in the load event of your code class.
For example: In <myPage>.JSP:
<gx:html gx_context="contexts.myPage">
...
<gx:input id="myBtn" onserverclick="myBtn_click"/>
In classes\contexts/<myPage>.java
Public void myBtn_click(){
}
You can use ApplinX Framework "building blocks" gx functions in the
triggered function. For example: gx_doSubmitKeyLogic("[enter]"),
to send the field with an ENTER and jump to the next page.
If you decide to use GXDefaultLogic, and the designed
page buttons/links should be PF keys, add
javascript:gx_SubmitKey('[<HOST_KEY>]') for each
button/link. Combining new server-side buttons along with
GXDefaultLogicWebForm is also possible. When adding a new
server-side button, ApplinX .NET does not interfere in the new event and it can
be used for other purposes, or with paths/building blocks to perform any logic.
Similar to the ASP/JSP Framework, ApplinX can generate for every screen a Web page in the .NET environment. You can implement this by employing the ApplinX Designer.
To add a file to the project (after generating it):
Click on the project explorer top bar, click show all files.
Select the new generated file, right-click and select include in project.
You can choose to add a code behind file to the generated page if you select Yes for the prompt of the VS.NET.
After the new file is added to your project, change the inheritance
of the code behind class to GXDefaultLogicWebForm.
Unlike what occurs in the ASP/JSP framework, ApplinX uses the HTML
control feature of ASP.NET, and generates an aspx page with standard HTML tags
without any <%%> calls. The filling-in of fields is performed at run time
since each generated tag is generated with the attribute runat =
"server", which allows the ApplinX Framework engine to access the tags,
without writing any code inside them. The generated HTML controls allow you to
view the Web page on the .NET designer or any other HTML editor, and redesign
the page without worrying about the host logic.
The ApplinX ASP.NET framework provides another simple and easy way to develop a Web page based on host screen(s). This method is especially advantageous when the design of the pages is performed by a third party and all you have to do is just "bind" the HTML to ApplinX.
To create a new designed Web form using VS.NET:
Create a new Web form and name it <SCREEN_NAME>.aspx.
Design it any way you like, or by pasting the third party HTML.
Declare <form id="GX_form" runat = "server" > as the main form, only if you would like to inherit from GXDeafultLogicWebForm.
Right-click on the VS.NET designer or add the attribute "Runat = "server"" to the tag for every HTML field you want to bind to ApplinX. Add an id attribute: "id="<APPFIELD_NAME>"" to the tag which equals the AppField name you want the field to bind to.
In order to work with ApplinX Framework the new Web page should
inherit from GXDefaultLogicWebForm or GXBasicWebForm.
If you are using a code behind for the Web page, change the
inheritance of the new Web form, from System.Web.UI.Page to
GXDefaultLogicWebForm or GXBasicWebForm.
If you are not using a code behind for the Web page, the inheritance
is declared in the first line <%@ Page ... Inherits="GX..." %>.
You need to change the inheritance to GXDefaultLogicWebForm or
GXBasicWebForm.
If you decide to use GXBasicWebForm, change each
link/button that performs any logic to runat = "server", and use
the .NET designer to create a function behind the button, by double-clicking on
it. You can use ApplinX Framework "building blocks" gx functions to build the
new page logic. For example: gx_doSubmitKeyLogic("[enter]"), to
send the field with an enter and jump to the next page.
Note:
When inheriting from GXBasicWebForm, you should call the method
gx_attach() in the load event of your code class.
For example:
In <myPage>.ASPX:
... <input id="myBtn" type="button" runat="server"/>
In <myPage>.aspx.cs
Public void myBtn_click(){
}
ApplinX Frameworks support replacement of unprotected fields with a GUI element such as a combo box, radio button or checkbox. Replacing an unprotected field can be achieved by using a transformation (typically in Instant pages) or directly in generated pages, using the following code:
ApplinX .NET framework supports the following .NET controls:
<select id=<APP_FIELD_NAME>
     runat=server><option value="<HOST-VALUE>"> Display Value </option></select>
<gx:GXCheckBox id="<APP_FIELD_NAME>" runat=server
    checkedValue="<CHECKED-VALUE>" uncheckedValue="<UNCHECKED-VALUE>"
    />
<asp:RadioButtonList id="<APP_FIELD_NAME>" runat="server">
<asp:ListItem Value="<HOST-VALUE>">Display value</asp:ListItem>
<asp:ListItem Value="<HOST-VALUE2>">Display value2</asp:ListItem>
</asp:RadioButtonList>
The gx:Checkbox tag requires users to add a tag
registration statement at the top of the page as follows: <%@ Register
TagPrefix="gx" Namespace="com.sabratec.dotnet.framework.web.controls"
Assembly="GXDotnet" %>
Note:
When adding the attribute multiple="true" the combobox
will be mapped to the values of a multiple field.
Note:
Only checkbox GUI elements need to be configured in the ApplinX
Designer.
ApplinX Framework for JSP supports the following JSP tags:
<gx:select
     id=<APP_FIELD_NAME>><option value="<HOST-VALUE>"> Display Value </option></gx:select>
<gx:checkbox id="<APP_FIELD_NAME>" checkedValue="<CHECKED-VALUE>" uncheckedValue="<UNCHECKED-VALUE>"
    />
<gx:radioButtonList id="<APP_FIELD_NAME>" runat="server">
<gx:radioButton value="<HOST-VALUE>">Display value</gx:radioButton>
 <gx:radioButton value="<HOST-VALUE2>">Display value2</gx:radioButton>
 </gx:radioButtonList>
Note:
When adding the attribute multiple="true" the combobox
will be mapped to the values of a multiple field.
Partial Page Rendering (PPR) is a feature that allows a part of a page to be redrawn rather than having to reload the entire page. Partial Page Rendering offers significant benefits as it improves application performance as well as provides more direct feedback when users perform actions. You can add server side buttons/links and perform logic on the target server function, and as a result update only a part of the page. Do not use this feature if the action triggers navigation to a different web page.
Do not call getResponse.sendRedirect() (JSP) /Response.Redirect (.NET),
gx_handleHostResponse in the target function.
Typical use: Paging, sorting, collecting aggregated data from a few screens into the same web page, and more.
Note:
Call the gx_updatePagePart method with the ID of the panel to be updated.
Add a button/link which performs a server side action (refer to Creating a Button/Hyperlink for Submitting a Host Key).
Create a wrapping tag to the web page in the area you want to update:
<gx:div id="tableArea">
...
</gx:div>
<div id="tableArea" runat="server">
...
</div>
Add the following JavaScript code to the link/button:
... onclick="gx_updatePagePart('tableArea')"
... onserverclick="Btn_Clicked" ...
To create a button / link for submitting a host key (JSP):
Add a button or a hyperlink to a page, with the attribute
onserverclick="<name_of_server_side_function>":
 <gx:a id="mylink"
                                   onserverclick="mylink_ServerClick">Top</gx:a>
In the Code-behind of the page, add an "onServerClick" function of the following form:
 public void mylink_ServerClick(){
    gx_doSubmitKeyLogic("[pf3]"); }
To create a button / link for submitting a host key (.NET):
Add a button or a hyperlink to a page, with the attribute
runat="server": <a href="" runat="server" id="myLink"
                                   onserverclick="myLink_ServerClick">
In the code-behind of the page, add an "onServerClick" function of the following form:
private void myLink_ServerClick(object sender,
       System.EventArgs e) { gx_doSubmitKeyLogic("[pf3]");
}
To create a button / link for submitting a host key (JavaScript):
Add a button or a hyperlink to a page with the attribute:
onclick="gx_SubmitKey([keyValue])":
<a href="#" id="myButton" onclick="gx_SubmitKey([pf3])">Back</a>
Sample code can be found in the Composite demo: BrowseProposals.jsp/cs containing links that submit [pf4] and [pf3].
To create a button / link for executing a navigation path (JSP):
Add a button or a hyperlink to a page, with the attribute
onServerClick="<name_of_server_side_function>":
 <gx:a id="myLink"
                                   onserverclick="myLink_ServerClick">Top</gx:a>
In the code-behind of the page, add an "onServerClick" function of the following form:
public void myLink_ServerClick(){
try {
GXPathRequest req = new GXPathRequest("<path_name>");
      req.addVariable("<PathInputVariable1>","<value1>");
      req.addVariable("<PathInputVariable2>","<value2>");
// ... add additional input values
      getGXSession().executePath(req);
 gx_handleHostResponse();
 } catch(GXGeneralException err){
 //handle error
}
}
To create a button / link for executing a navigation path (.NET):
Add a button or a hyperlink to a page, with the attribute
runat="server": <a href="" runat="server" id="myLink">
In the code-behind of the page, add an "onServerClick" function of the following form:
private void myLink_ServerClick(object sender,
       System.EventArgs e) {
try {
GXPathRequest req = new GXPathRequest("<path_name>");
      req.addVariable("<PathInputVariable1>","<value1>");
      req.addVariable("<PathInputVariable2>","<value2>");
// ... add additional input values
      gx_session.executePath(req);
gx_handleHostResponse();
} catch(GXGeneralException err){
 //handle error
}
}
To create a button / link for executing a navigation path
(JavaScript):
Add a button or a hyperlink to a page with the attribute:
onclick="gx_ExecPath('<path name>')"
<a href= "#" id="myButton" onclick="gx_ExecPath('gotoMainMenu')">Top Men</a>
Sample code can be found in the Composite demo Web application: login.jsp/cs - containing a button that executes a login path.
The framework is able to perform automatic actions against the host, by using a simple API. One of the common tasks is to collect all the modified fields from the Web page into a GXSendKeyRequest / GXPathRequest object, add/remove fields from it, and send it to the host.
To collect all modified page fields into an ApplinX request (JSP)
import com.sabratec.applinx.baseobject.*;
 // collect all modified fields from the page, along with [enter] key
GXSendkeysRequest req = gx_prepareSendKeysRequest("[enter]");

// collect all modified fields from the page that
// matches the current screen, along with the specified path name
//GXPathRequest req = gx_preparePathRequest("<PATH NAME>");

// modify/add a field to the request
req.addInputField("<SOME FIELD>","<SOME VALUE>");

// send the request to the host
getGXSession().sendKeys(req);

// for path execution
// getGXSession().executePath(req);

if (getGXSession().getScreen().getName().equals("<SOME SCREEN NAME>")){
            // performs page actions
}
else{
            // jump to the relevant page
            gx_handleHostReponse();
}
To collect all modified page fields into an ApplinX request
(.NET)
Using com.sabratec.applinx.baseobject;
 // collect all modified fields from the page, along with [enter] key
GXSendkeysRequest req = gx_prepareSendKeysRequest("[enter]");

// collect all modified fields from the page that
// matches the current screen, along with the specified path name
//GXPathRequest req = gx_preparePathRequest("<PATH NAME>");

// Modify/add a field to the request
req.addInputField("<SOME FIELD>","<SOME VALUE>");

// send the request to the host
gx_session.sendKeys(req);

// for path execution
//gx_session.executePath(req);

if (gx_session.getScreen().getName() == "<SOME SCREEN NAME>"){
            // performs page actions
}
else{
            // jump to the relevant page
            gx_handleHostReponse();
}
ApplinX data can be easily exported to an MS Office application, such as
an Excel spreadsheet as detailed in this example. It is possible to modify the
styling and formatting that will be displayed in Excel. This modification can
be done in the HTML tags of the JSP file (For example, if you want to add a
border to a table, in the excel.jsp file, add to the table
tag: <table border=1>).
Note:
The solution provided below is an applicative solution. The following
solution can be implemented to export data in other formats (such as CSV or
Word documents). An additional example can be found in the Composite Demo, in
which the HTML table is exported to an Excel document.
To export an ApplinX Table to an Excel Spreadsheet (JSP):
Define a Web page and a java class bound to it. Add the desired gx
tags for the Excel data. For example: <gx:table
id="myTable"/><gx:span id="excelData"/>
In the java class, extend GXBasicContext. In the
function gx_onLoad define the page's content type as Excel:
getResponse().reset();
getResponse().setContentType("application/vnd.ms-excel");
getResponse().addHeader("Content-Disposition","attachment; filename=\"" +
gx_table.getName() + ".xls\"");
Attach to ApplinX: gx_attach();
Get the ApplinX host screen data:
GXITable gx_table = getSession().getScreen().getTables()[0];
Fill the gx tags with the retrieved data: getTagAccesor( ).setTagContent("excelData",xlStr); getTagsAccesor( ).setTagTable("excelTable,gx_Table);
This code is generic and the page can be invoked from any other page requiring export to Excel.
Sample code can be found in the Composite Demo Application:
WEB-INF\classes\contexts\excel.java - Changing the HTTP response content-type to Excel and filling the HTML table.
\excel.jsp - returning the spreadsheet by invoking excel.java.
\BrowseProposals.jsp - invoking excel.jsp upon clicking an image.
To export an ApplinX Table to an Excel Spreadsheet (.NET):
Define a page that extends GXBasicWebForm. Add a table
to the page (with an runat="server" attribute). In the function Page_Load
define the page's content type as Excel:
Response.ContentType = "application/vnd.ms-excel";
 Response.AddHeader("content-disposition","attachment; filename=\"" +
 gx_table.getName() + ".xls\"");
Attach to ApplinX: gx_attach();
Get the ApplinX host screen data:
GXITable gx_table = gx_session.getScreen().getTables()[0];
Bind the DataTable to the DataGrid: DataGrid1.DataSource = dt;
DataGrid1.DataBind();
This code is generic and the page can be invoked from any other page that it is required to export to Excel.
Sample code can be found in the Composite Demo Application: \excel.aspx - binding an ApplinX table to the Excel spreadsheet and returning it. \BrowseProposals.aspx - invoking excel.aspx upon clicking an image.
An external login means a login Web page that is not connected to the host when the page is loaded. It allows displaying the typed user name as the ApplinX session ID within the Designer.
To create such a page:
Create a login path using ApplinX. This path should login to the host application (by supplying the user ID and password) and navigate from the first screen of the host application to the main menu screen of the application (or any other screen that appears after logging in).
Set the code class for your login page to inherit from
GXBasicWebForm (.NET)/GXBasicContext(JSP).
Initialize the session configuration object with the typed user name and (optional) the typed password (for securing the ApplinX session from other users).
Use the framework building block gx_connect to create a
new session.
Execute the path method of the base object.
Add error handling as needed, for example: disconnect if login failed.
Navigate to the next matching page
(gx_handleHostResponse).
For code sample see Composite Demo Application: common/Login.aspx / Login.aspx.cs - .NET Login.jsp / WEB-INF/classes/contexts/common/Login.java - JSP
It is a common task to collect data from multiple host screens. ApplinX enables you to do this by using a path procedure that navigates through the host screens and collects different types of data to be retrieved as procedure's output. The retrieved data can then be used either in a Web Service/Procedure Client or be bound to web controls defined in an ApplinX Framework based web page.
To collect data from multiple host screens
Create a Path procedure which navigates through several host screens and map host data as procedure output.
Associate the procedure you created with a procedure group.
The procedure group can be used in one of the following ways:
Web service - wsdl file can be found at the following URL: http://<ApplinX Server machine>:2380/wsstack/services/<ApplinX Application Name>.<Procedure group name>?wsdl
Procedure Client - It is possible to generate a code client into your own .NET/Java project. The generated code will include:
Classes for ApplinX defined types (Data Structure entities) used by the procedure group methods (associated procedures).
Methods that execute the procedure group methods (associated procedures).
A service that handles ApplinX server connectivity.
It is possible to bind Procedure outputs to several controls on a web page so that the appropriate controls are displayed on the web page. In order to be able to do this with minimum code, follow these steps:
Make sure your procedure's outputs are well defined for web page binding:
Text and Text array outputs will easily bind to a text control (Input or Span for example) in a web page providing this control has the appropriate ID attribute (see examples below).
Data structure arrays can be used to bind data to a Table control on a web page providing that the table has the same ID as the array name and contains controls (Input, Span, TD, SELECT tags) with IDs similar to the data structure's attribute names (see example below).
Associate the procedure with a Procedure Group in order to be able to generate a Procedure Client into your project (if you haven't already done so).
If you have made changes to your procedure inputs/outputs, re-generate the Procedure Client into your project in order for the changes to take effect.
Create a Fill method that executes the procedure and fills the Form with the data provided by the procedure's response.
The following example displays the procedure output (example: myProcedure):
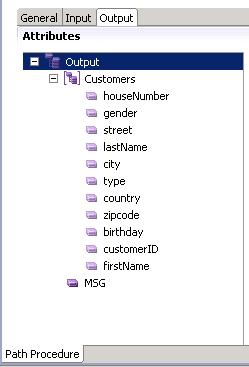
The procedure output contains an Array (named Customers) of CustomerDetails type which we defined earlier. This type has several attributes (first name, last name....). It also contains a single Text output (named MSG) used to retrieve messages from the host during execution. Assuming we wish to display the Customers Array in a table and the host message in a SPAN tag, this is what the controls look like in the JSP/ASPX page:
<gx:span id="MSG"></gx:span>

<gx:table id="Customers" clas="gx_tbl" cellspacing=...>
   <tr>
       <th>ID</th>
       <th>First Name</th>
       ......
       <th>Birth Date</th>
   </tr>
   <tr>
       <td><gx:span id="customerID"></gx:span>/td>
       <td><gx:span id="firstName"></gx:span></td>
       .......
       <td><gx:span id="birthday"></gx:span></td>
   </tr>
</gx:table>
All relevant controls must have a "runat='server'" attribute
<span id="MSG" runat="server"></gx:span>

<table id="Customers" runat="server" clas="gx_tbl" cellspacing=...>
   <tr>
       <th>ID</th>
       <th>First Name</th>
       ....
       <th>Birth Date</th>
   </tr>
   <tr>
       <td><span id="customerID" runat="server"></span>/td>
       <td><span id="firstName" runat="server"></span></td>
       .....
       <td><span id="birthday" runat="server"></span></td>
   </tr>
</table>
After associating the procedure (in the above example: <myProcedure>) with a procedure group (in the example: <myGRP>) and generating a Procedure Client, execute the procedure client and fills the web page with relevant data:
In the page's code behind (located at \WEB-INF\classes\contexts\), add a function (example: myFillMethod), executing the procedure client and filling the page with the path's output:
Fill a Form from an open ApplinX Web Session:
public void myFillMethod (){
	<myProcedure>Request req = new <myProcedure>Request();
	<myProcedure>Response res = (<myProcedure>Response)getGXSession().executeProcedure(req);
   gx_fillForm(res);
}
public void myFillMethod (){
	<myProcedure>Request req = new <myProcedure>Request();
	<myProcedure>Response res = (<myProcedure>Response)gx_session.executeProcedure(req);
   gx_fillForm(res);
}
Determining when to execute the Fill method depends on the Page behavior. This functionality can be added to a method, triggered by a button's onClick event to fill data on the screen. We could override the default gx_fillForm method to add some data to the screen when the page is initially loaded, by executing and retrieving data for other host screens. These are just two examples. This method can be executed by any server side page event.
Note:
Make sure your fill method doesn't collide with the page's gx_fillForm method. If you execute your method before the gx_fillForm method has been executed some of data may be lost. In this case, check screen fields and output field names. If you find matches, change one of them.
Output names are case sensitive. Make sure web controls are named appropriately , otherwise, they will not be filled.
It is a common task to update/enter data in multiple host screens using a single Web page. ApplinX enables you to do this by using a path procedure for updating the data on the screens (refer to Creating a Path Procedure), and calling your own server side functions to bind the path's input variables to the fields defined in each of the host screens. This data is often presented using Web tabs.
To update data in multiple host screens
Create/Record a Path Procedure which updates/enters data in multiple host screens.
In the JSP/ASPX file, add controls to allow users enter the input data required by the procedure. Consider the following:
gx:input controls, with an identical ID as the input attributes name, will make it easy for you to track which JSP/ASPX control should be assigned to which input variable.
Using Data structures will require you to generate a procedure client in order for the framework to properly recognize the structure defined in APX repository.
Create a server side execution method and a Link/Button on the JSP/ASPX page that will trigger the function(refer to Creating a Button / Hyperlink for Executing a Path Procedure). Refer to ModifyProposal1.java/aspx.cs.
To update data in multiple host screens (JSP):
Create a Web page (JSP) for the first screen of the path procedure, containing fields representing each input field in the procedure, for example:
<gx:input id="StockValueGroup" type="text" maxlength="1"
                                   size="1"/>
In the page's code behind (located in
\WEB-INF\classes\contexts\), create a doSave
method, executing the path procedure with the procedure's input:
public void doSave(){ GXPathRequest req = new GXPathRequest ();
        req.addVariable("Input1", getTagsAccesor().getTagContent("StockValueGroup"));
        req.addVariable("Input2","Input2Value");
        req.addVariable("Input3","Input3Value"); ... ... ... GXPathResponse res =
        getGXSession().executePath(req); gx_handleHostResponse(res); }
To update data in multiple host screens (.NET):
Create a Web page (JSP) for the first screen of the collection path, containing fields representing the fields appearing in all accumulated host screens, for example:
<input id="StockValueGroup" type="text" maxlength="1"
                                   size="1" runat="server">
In the page's code behind (.aspx.cs or .aspx.vb), create a
doSave method executing the path procedure with the procedure's
input:
public void doSave(object sender,EventArgs args)
{
   try
   {
       GXPathRequest req = new GXPathRequest ();
       req.addVariable("Input1",  StockValueGroup.Text));
       req.addVariable("Input2","Input2Value");
       req.addVariable("Input3","Input3Value");
       ... ... ...
       GXPathResponse res = gx_session.executePath(req);
       gx_handleHostResponse(res);
    }
    catch (GXGeneralException ge)
    {
            gx_handleSessionError();
    }
 }
Sample code can be found in the Composite demo Web application. ModifyProposal1.aspx / ModifyProposal1.aspx.csis a page which contains tabs displaying data collected from multiple host screens, with the ability to update the data (online only).
In some cases it is required to activate a server side function after performing a number of client side actions such as validation, hierarchical-menus, etc. In order to do so, perform the task detailed below.
To activate a server side function from JavaScript (JSP):
gx_postBack('<SERVER FUNCTION NAME>');
To activate a server side function from JavaScript (.NET):
Add a hidden button to the page:
<input type="button" runat="server" id="MyBtn"
                                   style="display:none" onserverclick="<SERVER FUNCTION NAME>">
The command to execute it from JavaScript:
GXBrowserUtil.getElement("MyBtn").click();
Page specific actions can be mapped to a keyboard key (or to a combination of two keyboard keys) using the following JavaScript in the page.
function pageOnLoad(){
gx_engine.addKeyBoardMapping(GXAdditionalKey.<the additional key>, GXKeyCodes.<the key to which the event is attached>,myJSFunction,<determines whether to override existing mapping>,[myJSBoolFunc]);
}

function myJSFunction(){
            // enter your code
}

// this function is optional and can be left out - See examples
function myJSBoolFunc(){
	if (...)
		return true;  // myJSFunction will not be executed
	else
		return false; // myJSFunction will be executed
}
// Map [+] to the JavaScript function addClient();
// addClient function will override any default functionality
// associated with the [+] key
gx_AddKeyBoardMapping(GXAdditionalKey.NONE,GXKeyCodes.PLUS,addClient,true);

//Map shift+ESC -> javaScript:logoffUser();
gx_AddKeyBoardMapping(GXAdditionalKey.SHIFT,GXKeyCodes.ESC,logoffUser,false);

//map ctrl+TAB -> javaScript:printPage();
gx_AddKeyBoardMapping(GXAdditionalKey.CTRL,GXKeyCodes.TAB,printPage,false);

// Map [ENTER] to the JavaScript function dropClient();
// dropClient will be performed if Javascript function confirmFunc
// returns false
gx_AddKeyBoardMapping(GXAdditionalKey.NONE,GXKeyCodes.ENTER,dropClient,true,confirmFunc);
Additional Keys
GXAdditionalKey.NONE
GXAdditionalKey.CTRL
GXAdditionalKey.ALT
GXAdditionalKey.SHIFT
| GXKeyCodes.BACKSPACE | GXKeyCodes.HOME | GXKeyCodes.F3 |
| GXKeyCodes.TAB | GXKeyCodes.LEFT | GXKeyCodes.F4 |
| GXKeyCodes.ENTER | GXKeyCodes.UP | GXKeyCodes.F5 |
| GXKeyCodes.SHIFT | GXKeyCodes.RIGHT | GXKeyCodes.F6 |
| GXKeyCodes.CTRL | GXKeyCodes.DOWN | GXKeyCodes.F7 |
| GXKeyCodes.ALT | GXKeyCodes.PLUS | GXKeyCodes.F8 |
| GXKeyCodes.CAPSLOCK | GXKeyCodes.INSERT | GXKeyCodes.F9 |
| GXKeyCodes.ESC | GXKeyCodes.DELETE | GXKeyCodes.F10 |
| GXKeyCodes.PAGEUP | GXKeyCodes.F1 | GXKeyCodes.F11 |
| GXKeyCodes.PAGEDOWN | GXKeyCodes.F2 | GXKeyCodes.F12 |
| GXKeyCodes.END |
The purpose of a screen locker is to indicate to the user by means of a message, that the application is processing his request, and blocks him from interfering with the current process by repressing a button/link or keyboard PF/ENTER. The Screen Locker feature is typically implemented for the whole application (Refer to Activating the Screen Locker). Sometimes it is necessary to initiate a screen-lock or disable the screen locker for a specific page.
For example, in the following code, the page contains a link to the
Software AG web site, and the Href attribute executes a JavaScript
function: openWin(). If we do not disable the Screen Locker, the
application will be locked and the user will not understand the reason that it
is locked. However, as the window opened (in this example, the Software AG web
site) is not related to the application, the screen will not become unlocked.
Therefore, in such a case, disabling the screen locker, allows the user to
carry on working. First, ensure that you have configured the relevant parameter
in the Framework Configuration Editor.
<script>
        function openWin(){
            gx_disableScreenLocker();
            window.open('http://www.softwareag.com,'newWin',
                           'width=300,height=300,top=10,left=0');
        }
</script>

<a href="javascript:openWin();">Software AG</a>
gx_lockScreen():
used to lock the web page so that no additional host keys/links/ buttons can be
pressed until the page is unlocked.
gx_unlockScreen():
used to unlock a web page.
gx_disableScreenLocker()/gx_enableScreenLocker():
used to disable/enable the screen locker. Designed to lock the screen while the
client is waiting for a new application screen.
By default the framework offers using the Up arrow key, Down arrow key and Tab key to navigate between inputs. It is possible to define additional navigation options such as moving to the first or last element in a page, moving to the next input field, moving to the first or last input field in the screen.
The following example moves the cursor to the next input element whenever the right arrow key is pressed on the keyboard. Add the following function to any generated page or even to the master page (template.jsp /template.master.cs) in your web application.
function pageOnKeyDown(gx_event){
	// activate page scope function if exits
	activateIfExists(gx_event,gx_event.window.pageOnKeyDown);

	if (gx_isValidInputElement(gx_event.element)){
	    if (gx_event.keyCode== GXKeyCodes.RIGHT){
	        gx_jumpToNextInput(gx_event.element);
	    }
	}

}
The web application is sometimes required to be cross browser compatible. While most JavaScript code runs well on all browsers, there are some subtle differences between how different browsers handle the same JavaScript code. Therefore it is important to determine the browser used. The ApplinX JavaScript engine provides several functions to retrieve the browser information.
function myFunction(){
	if (GXBrowserUtil.isIE()){		// is the client using Internet Explorer
if (GXBrowserUtil.isIE7()){      	// is it IE version 7 (or above)?
			doThis();
}
else{ 				// it is IE6 (or lower)
	doThat();
}
}
if (GXBrowserUtil.isMozilla ()){		// is the client using Firefox?
		doSomethingElse();
}
}
ApplinX Web enablement sends information to the host screen. Therefore, the host application validation continues to validate the data in the same way as when using a standard emulation. However, to enhance existing validations and to be more user friendly, it is possible to use Web page validations, which validate the data before sending the information to ApplinX and then to the host. A typical example for such a case is when merging several host screens into a single web page.
Additional usages include:
Required-fields validation.
String format validation (email, date etc.)
Numeric/alphanumeric field validation.
GXValidator represents an array of validators, used to validate the form's data before submitting it to the host.
The following example is automatically added to every JSP/ASPX page generated from ApplinX (as a commented example). This validator checks that "Field_A" has a value. Otherwise, it returns an error message.
var pageValidator = new function(){
	this.validateField = function(inputField){
		if (inputField.name == "FIELD_A"){
			if (inputField.value == ""){
				return "Field cannot be empty";
			}
		}
		// ...
	}
}

function pageOnLoad(){ 	// register validator function
	GXValidator.registerValidator(pageValidator);
}
The form is validated when submitted. The returned message is reflected in the "errormsg" div located in the master page (template.jsp /template.master.cs). Once a validator indicates invalid data, an error message will appear in the web page and the form will not be submitted.
When working with pop-up windows, the interaction between the pop-up
window and the parent window needs to be defined, in order to ensure continuous
and smooth workflow when working with windows. For example, ApplinX Framework
uses the gx_window object to automatically open pop-up windows, reflecting host
application window screens. In addition it is also possible to open windows to
perform other actions which are not related to the application, such as opening
a window or a different web page. The JavaScript gx_window object encapsulates
the web page window object with additional ApplinX functionality enabling
developers to perform JavaScript actions without disrupting the ApplinX
JavaScript workflow. When using ApplinX Frameworks, it is recommended to use
the gx_window object.
The following example demonstrates how to open a pop up window from the main window and fill in an input element on the main page from data taken from the pop up page. In addition, the child window JavaScript function handles the screen locker of the parent page.
<script>
     function getData(){
	   	  gx_window.open("myData.jsp",200,300,0,0) ;

		//  .NET
		// gx_window.open("myData.ASPX",200,300,0,0);
	     }
      </script>
<input id="myInput"  value=" "/>
<a href="#" onclick=" getData ();">open Win</a>
function setMainWindowInput(){
            // Set the value of an Input on the main window
                  gx_window.getOpener().
                       gx_window.setField("myInput","someValue");
                  // Unlock the main window before closing the pop up
	        	gx_window.getOpener().gx_unlockScreen();
                  // Close the pop up window
	        	gx_window.close();
   }

<a href="#" onclick=" setMainWindowInput ();">close Win</a>
You may want to store user information and adjust the ApplinX Web Application to each user's needs. This information can be stored in cookies. ApplinX JavaScript Engine provides developers with easy to use JavaScript functions to set and get Cookie values. You can create new cookies and use the values to further meet user requirements. The ApplinX HTML Emulation template Application makes use of cookies to store the user's last choice of font-size, style sheet preference and screen resolution.
The following example will demonstrate how you can check if the user has a preferred style sheet. If not, a default value will be set and the document style sheet reference changed. The following code can be added to the instant page in the Emulation template application:
function pageOnLoad(){
   //Check if cookie doesn't exist
   if (!gx_getCookie(GXLAFHandler.COLOR_CSS_COOKIE)){
	 // set the cookie value, so that the next page that loads
	 // automatically uses the styles_black css file
       gx_setCookie(GXLAFHandler.COLOR_CSS_COOKIE,
                               "css/styles_black.css");
	 // Set the current page to use that File as well
       document.styleSheets[0].href =
           gx_getCookie(GXLAFHandler.COLOR_CSS_COOKIE);
   }
}
The user exits file is located in the js directory of your web application. All the global events registered in the globalOnLoad function allow users to add JavaScript functionality to the default framework behavior. Any code placed in these global functions will effect the whole application and therefore must be handled with caution. Each global function contains a the following line: activateIfExists(gx_event,gx_event.window.functionName); This line of code will execute the user function, functionName, if indeed the function exists on the page.
For Example: Assuming you have a text area on your web page, whenever you press the enter key, the page will be submitted to the host rather than just add a new line to the text area. Adding the following function to a generated JSP/ASPX, that contains a text Area input control, in the ApplinX web application will cause this function to automatically execute whenever a keyboard key is pressed.
// When a keyboard key is pressed check if "enter" was pressed and if the event originated in
// "myTextArea". If so, Prevent the form submitting by canceling the event and manually add newline
// to the textArea value
function pageOnKeyDown(gx_event){
 if (gx_event.keyCode == GXKeyCodes.ENTER &&
                      gx_event.element.id == "myTextArea"){
     gx_event.element.value += "\r\n";
     gx_event.cancel();
 }
}
If you wish to implement this behavior to all text areas in your web application add the following code to the globalOnKeyDown function in the userExits.js file
// When a keyboard key is pressed check if "enter" was pressed and if the event originated in a
// TextArea. If so, Prevent the form submitting by canceling the event and manually add newline
// to the textArea value
function globalOnKeyDown (gx_event){
 // activate page scope function if exits
 activateIfExists(gx_event,gx_event.window.pageOnKeyDown);
 if (gx_event.keyCode == GXKeyCodes.ENTER &&
                      gx_event.element.tagName == "TEXTAREA"){
     gx_event.element.value += "\r\n";
     gx_event.cancel();
 }
}
As ApplinX works with HTML frames, you need to be sure that you work with the current HTML document object model (DOM). It is therefore recommended to use the gx_getElement function (instead of the window.getElement JavaScript function.
The following example demonstrates how to retrieve a message received from the host and launch it as an alert message when the page is loaded. Add the following to any generated page:
function pageOnLoad(){
// Get the message from the "Message" SPAN
var msg = gx_getElement("MessageSpan").innerHTML;
// If the message contains something other than spaces ( )
if (msg.replace(/ /g, "")!=""){
// launch an alert message and replace any   with space
alert(msg.replace(/ /g, " "));
}
}
ApplinX provides the functionality to add a calendar component. In Instant pages this is done using transformations and in generated pages this is done using JavaScript code as demonstrated in the following examples.
In this example, when choosing a date from the calendar, it will be populated in a 'MM-dd-yyyy' format. .e.g. 12-31-2008.
<input maxlength="10" id="birthDate" />
<a href="#" onclick="gx_showCalendar('Select a Date','birthDate','MM-dd-yyyy');">
<img src="images/calendar.gif"/>
</a>
In this example, when choosing a date from the calendar, it will populate three input fields, each having its own format:
Day:    <input maxlength="10" id="day" />
Month:  <input maxlength="10" id="Month" />
Year:   <input maxlength="10" id="Year" />
<a href="#" onclick="gx_showCalendar('Select a Date','Month','MM','year','yy','day','dd');">
<img src="images/calendar.gif"/>
</a>
Replacing static host confirmation messages (such as: "Are you sure? (Y/N)__") with JavaScript confirmation pop-up box provides a more Web oriented look and feel to the application functionality.
To replace the confirmation message with a JavaScript confirmation
pop-up box
Within the generated page's Java/C#/VB code create a method ("myConfirmMethod") that executes host logic that submits the data entered in the JSP page to the current host screen and performs the confirmation in the screen that follows.
Add the following function:
function confirmSubmit(){
   if (confirm('Are you sure?'){
      gx_postBack('MyConfirmMethod'); // Execute a server side method
   }
   else{
      // do nothing
   }
}
Add the following button:
<input runat="server" type="button" id="confirmButton" value="GO" onserverclick="MyConfirmMethod" style="display:none" />
Then add the following JavaScript:
function confirmSubmit(){
   if (confirm('Are you sure?')){
     gx_getElement("confirmButton").click();
   }
   else{
      // do nothing
   }
}
Execute this function in any JavaScript event on the page.
For example:
<input type="button" value="Save" onClick="confirmSubmit();" >
You can even override the PF-key used to submit the data to perform this confirmation. For further details about setting keyboard mappings using JavaScript refer to Mapping Keyboard Keys to User Actions in Individual Pages.
ApplinX web applications handle host application modal windows by opening the modal window's corresponding JSP/ASPX page in a pop-up window. The main window is automatically locked, and any attempt by the user to interact with it just results in the pop-up window receiving the focus. In order to create a pop-up window (JSP/ASPX) that behaves the same way but has no corresponding host screen, carry out the following steps:
JSP
Add a new Java class to the contexts package that extends the
GXBasicContext class (in this example we'll refer to it as
ExamplePopUp.java):
Create a new JSP file in your project. The initial JSP code looks like this:
<%@ page extends="com.sabratec.j2ee.framework.web.GXJspServlet"%>
<%@ taglib uri="com/sabratec/j2ee/framework/tags" prefix="gx"%>
<%@ page contentType="text/html; charset=utf-8"%>
<gx:page gx_context="contexts.ExamplePopUp">
<html>
	<head>
		<title>Insert title here</title>
	</head>
	<body >
		<gx:form>
		...
		</gx:form>
	</body >
</html>
</gx:page>
Note:
Set the gx_context attribute of the
gx:page tag to the newly created Java class.
Edit your code class: Override ExamplePopUp.java onLoad
event method:
public void gx_onLoad(){
	try {
		gx_attach();

	}catch (GXGeneralException e) {
		gx_handleSessionError(e);
	}
		super.gx_onLoad();
	}
Note:
The gx_attach call is required, even when no
interaction is made with the host application. It allows the framework to treat
this window like any other host modal window. This means that the window will
always stay in focus and the parent window will be "locked" until the window is
closed.
There are a number of options to close the window:
The Browser's Close button (the X button). The window closes and the main screen is refreshed.
Calling the JavaScript gx_window.close() function. The window closes and the main screen is refreshed.
To avoid the refresh effect you can handle the window closing with a server side method that will allow you to cancel the refresh in addition to enabling setting values in inputs or labels on the main screen and performing host related operations such as, sending host keys or executing path procedures. In order to do this add a server side method that handles the window closing functionality:
public void doClose(){
	// Cancel Parent page refresh upon closing the window
	getGXWindow().getOpenerWindow().cancelRefresh();

	// Set value of either an input or a label on the parent screen
	//getGXWindow().getOpenerWindow().setField("<input or label ID>", "<value>");
	// Close the window
	getGXWindow().close();
}
In the page from which you wish to invoke the pop-up, add the following HTML code:
<input type="button" value="openWin"
onclick="gx_window.open('<Path>ExamplePopUp.jsp','myPopUp','')"/>
Regarding the path, if ExamplePopUp.jsp is not within the root directory of the web application, an absolute path should be added (for example: "myDirectory/ExaplePopUp.jsp").
.NET
Add a new Web Form (including a code class) to the web application
(call it ExamplePopUp.aspx) . Open the code class .NET created and specify that
the new class should inherit from GXBasicWebFrom rather than from
System.Web.UI.Page..
Edit your code class: Override ExamplePopUp.java onLoad
event method:
protected void Page_Load(object sender, EventArgs e)
 {
        gx_attach();
}
Note:
The gx_attach call is required, even when no
interaction is made with the host application. It allows the framework to treat
this window like any other host modal window. This means that the window will
always stay in focus and the parent window will be "locked" until the window is
closed.
There are a number of options to close the window:
The Browser's Close button (the X button). The window closes and the main screen is refreshed.
Calling the JavaScript gx_window.close() function. The window closes and the main screen is refreshed.
To avoid the refresh effect you can handle the window closing with a server side method that will allow you to cancel the refresh in addition to enabling setting values in inputs or labels on the main screen and performing host related operations such as, sending host keys or executing path procedures. In order to do this add a server side method that handles the window closing functionality:
public void doClose(object sender, EventArgs e)
{
   // Cancel Parent page refresh upon closing the window
   gx_window.getOpenerWindow().cancelRefresh();
   // Set value of either an input or a label on the parent screen
   //getGXWindow().getOpenerWindow().setField("<input or label ID>", "<value>");

   // Close the window
   gx_window.close();
}
In the page from which you wish to invoke the pop-up, add the following HTML code:
<input type="button" value="Open Win" onclick=
"gx_window.open('<path>/ExamplePopUp.aspx','myPopUp','')" />
Regarding the path, if ExamplePopUp.aspx is not within the root directory of the web application, an absolute path should be added (for example: "myDirectory/ExaplePopUp.aspx").
You can determine the font size to be used in the web application for each screen resolution.
With class GXBasicContext.java (or GXBasicWebForm.cs in .NET application) you can add a method called
getColumnMappingPerResoultion where you can create a map for font size per resolution and number of columns of the screen. For example:
public Map<String, Map<Integer, Integer> getColumnMappingPerResoultion() {
       Map<Integer, Integer> mapping1 = new HashMap<Integer, Integer> ();
       mapping1.put(80, 25);
       mapping1.put(132, 18);

       Map<Integer, Integer> mapping2 = new HashMap<Integer, Integer> ();
       mapping2.put(80, 28);
       mapping2.put(132, 19);
       columnsMappingPerResoulation.put("1280X768", mapping1);
       columnsMappingPerResoulation.put("1920X1200", mapping2);
       return columnsMappingPerResoulation;
}
In the method above, you define that if the resolution in your machine (where the web browser is open) is "1280X768", for columns 80 characters wide the font size will be 25, and for column width 132 the font size will be 18.
You can also define just font size for high resolution and for low resolution (high resolution is defined for width greater than 1200). For example:
public Map<String, Map<Integer, Integer>> getColumnMappingPerResoultion() {

       Map<String, Map<Integer, Integer>> columnsMappingPerResoulation = new HashMap<>();
       Map<Integer, Integer> lowResMapping = new HashMap<Integer, Integer>();
       lowResMapping.put(80, 10);
       lowResMapping.put(132, 8);

       Map<Integer, Integer> highResMapping = new HashMap<Integer, Integer> ();
       highResMapping.put(80, 21);
       highResMapping.put(132, 17);
       columnsMappingPerResoulation.put("LowRes", lowResMapping);
       columnsMappingPerResoulation.put("HighRes", highResMapping);
}
See also this example for a .NET application (C#):
public override Map getColumnMappingPerResoultion() {
       Map columnsMappingPerResoulation = new HashMap();
       Map lowResMapping = new HashMap();
       lowResMapping.put(new Integer(80), new Integer(15));
       lowResMapping.put(new Integer(132), new Integer(13));

       Map highResMapping = new HashMap ();
       highResMapping.put(new Integer(80), new Integer(21));
       highResMapping.put(new Integer(132), new Integer(17));
       Map mapping1 = new HashMap ();
       mapping1.put(new Integer(80), new Integer(23));
       mapping1.put(new Integer(132), new Integer(19));
       Map mapping2 = new HashMap ();
       mapping2.put(new Integer(80), new Integer(25));
       mapping2.put(new Integer(132), new Integer(22));


       columnsMappingPerResoulation.put("LowRes", lowResMapping);
       columnsMappingPerResoulation.put("HighRes", highResMapping);
       columnsMappingPerResoulation.put("1280X768", mapping1);
       columnsMappingPerResoulation.put("1920X1200", mapping2);
       return columnsMappingPerResoulation;
}
Note:
This functionality requires that the font size defined in the web application configuration is set to "Dynamic by resolution".
See Font size under Web Application Configuration Parameters > Instant Parameters.